Page is loading ...

1
NW765
MOTORIZED LED FLOOD LIGHT WITH WIFI CAMERA
INSTRUCTION MANUAL V3.0
CAN WE HELP?
Questions, problems, missing parts? Before returning to the store please call NightWatcher Customer Service:
0345 900 6764 (Local rate call)
Or Email: support@nightwatcher.co.uk
OS Windows 2000 / XP / Vista / 7/8/10 / MAC
Micro SD Memory card 1GB SD ~ 32GB SDHC (max) Class 4 (min)

2

3
PACKAGE CONTENTS
D E F
A
Part
Description
Quantity
A
Screw nut
2
B
Backplate screw
2
C
EVA Gasket
1
D
Memory card and memory card
adaptor
1
E
User manual
1
F
Antenna
1
Pre-installation

1
Height - For optimum performance the recommended mounting height of the unit has to be between 2m (6.6ft)
and 3m (10ft) – the optimum height for operation is 2.5m (8ft) - Do not mount the unit higher than 3 meters
(10ft) as this will adversely affect the range and sensitivity of the PIR and introduce unit blind spots to both PIR
and camera. It may even prevent it from detecting any movement at all.
Triggering range and direction - Be aware that PIR sensors are triggered by targets warmer than their
surroundings moving relative to the sensor. PIRs are more sensitive to targets moving across the line of sight of
the sensor than targets bearing directly towards them as these present a smaller change in warm area. Thus, the
triggering range of the 3 sensors (up to 10m) is affected by the target’s direction. See diagrams below
False triggering – False triggering can be annoying, to your neighbours as well as to you. When selecting your
installation site, it’s important to consider what features within the line of sight of the PIR might cause false
triggering; such as boiler vents, pets, air condition units, or even bushes and trees close to the unit moving in the
wind.
Blinding the PIR – Be aware that the sensor can be set off or desensitized by very strong light directed into the
sensor. Consider factors such as sunlight reflecting off swimming pools, windows etc.
Extreme weather - To prolong the lifespan of the NightWatcher fixture it is advised to install the unit in a site that
is not directly exposed to extreme weather conditions. Your NightWatcher is very weather-resistant, but will not
put up with gales and monsoon rain forever! Help protect it if you can.
Blinding the camera - Narrow alleys etc. – It is not advised to site your NightWatcher in a narrow alley or
anywhere close to physical obstructions such as close to another wall. The light is powerful and the camera is
sensitive. If sited in an alley the light from the NightWatcher will reflect back into the camera and will often cause
the camera sensor to misbehave (displaying banding or similar effects in the record video).
Modifying the light output – Do not baffle or diffuse the light from the LED as this will cause the LED to
overheat, greatly reducing its life span and invalidating your warranty.
WiFi signal strength – This is critical to satisfactory operation. See the section on ‘Connecting your
NightWatcher to the WiFi network’ before finalizing your installation site.
The NightWatcher NW765 is designed to run on 230-250V AC and thus requires mains installation. Mains
installation is potentially very dangerous and it may contravene electrical and building regulations to do the
installation yourself if you are not legally competent. Like for like replacement may be allowed without
qualification - consult government websites for further information on the law. If you have any doubts about any
aspect of electrical installation, seek expert advice. This device must be earthed.
Installation
Higher
sensitivity
Lower
Sensitivity

2
Installing your Nightwatcher NW765 on a wall or
building surface
Route your mains cable directly to the back of the unit
through the siting wall.
Use the wall mounting plate to mark out the positions for
the drill holes in the wall.
For a masonry site, drill the holes with a masonry bit and
insert raw plugs provided. If mounting onto wood screw
directly with woodscrews
Feed the cable through the soft gasket and back
mounting plate into the mounting box, using caution to
avoid abrasion to the cable.
Place the gasket behind the mounting plate and using a
screwdriver, fasten the backplate and gasket to surface
using the self-tapping screws provided.
Wire the light unit as shown above;
Brown = L Live
Blue = N Neutral
Yellow/Green = E Earth
Ensure all wires are connected securely and that no loose strands are exposed.
Make sure the polarity is correct. Double check the connections after wiring. Errors may damage the motion
sensor or cause a fire hazard.
Finally, push the light unit onto the protruding bolts and fasten in place with the hex nuts. Do not overtighten.
Setting camera and lighting head - down angle
Your NightWatcher NW765 has independently posable camera and posable light.
You can tilt the camera down as much as 25° from horizontal to avoid having a blind spot under the camera arc.
You can tilt the lighting head down up to 45° to suit where you want the light to shine
Both of these are quite stiff to avoid accidental movement, so set the down angle of the camera and down lighting
head by physically posing them before you switch on the NightWatcher (to avoid damage to the motor).
IMPORTANT
Remove all plastic tape from the NW765 before switching on the power
Allow 1 minute warm up time after switching on
Do not touch the NW765 during warm up time to avoid interruption of start-up sequence

3
Selecting working mode
There is a “Mode” LED indicator inside
the motion detector window that will
display different coloured lights when
switching between modes. Once a
mode has been selected, the coloured
LED light will turn off after 30 seconds.
Mode 1: RED
Recommended for home or business (default setting)
- Camera will follow motion and record during the day and night
- Light will illuminate at night only
- Speaker will operate at night only
Mode 2: ORANGE
- Light illuminates during the day and night
- Camera records motion during the day and night
- Speaker operates during the day and night
Mode 3: GREEN
- Camera will follow motion and record during the day and night
- Light will illuminate at night only
- Speaker will operate during the day only
NOTE:
A short press of the mode button changes mode. A long press disables the cameras movement. A second, long
press re-enables camera movement.
Camera LED indicator
The LED light next to the memory card compartment indicates the function status of the camera by using different
coloured LED lights.
- Red: For short period - System is busy. For long period - The system is malfunctioning - reset.
- Blue: Continuous - Unit is working properly. Blue flashing – system is trying to connect to wifi.
- LED OFF: No micro SD card inserted or standby mode (Micro SD memory card is inserted into the slot but not
recording.) Also, the LED will turn off when OFF/REC button is pressed.
Audio
□ Audio mode: for selecting which audio message will play when motion
sensor detects movement.
- Pre-set default is “silent mode”
- Push once for “doorbell chime”
- Push again for “dog barking”
- Push once more for the message you recorded (Message 1)
- Push again for additional message you recorded (Message 2-
you can record up to 2 messages at a time)
□
Recording:
1. Press the SET/REC button for 3 seconds, and you will hear a single beep. After the beep, start recording your
message by talking into the microphone (see fig. 9). Push the button again to stop recording, and you will hear a
series of 2 beeps, meaning the recording is finished. If you do not push the button again after you have recorded the
message, the recording will stop automatically after 10 seconds.
2. The NightWatcher NW765 can hold 2 custom-recorded messages. If you have recorded one message, repeat
above step for message 2.
3. If you hear a series of 3 beeps when you want to record your message by pressing the SET/REC button for 3
seconds, this means the self-recorded messages are full, please erase previous messages.
□ Play/Erase: allows you to listen to and erase messages

4
1. If you have only recorded 1 message, push the button one time to listen to recorded Message 1. If you wish to
erase it, press the PLAY/ERASE button and hold it for 3 seconds. You will hear a series of 2 beeps, indicating the
message has been erased.
2. If you have recorded 2 messages, push the button one time to listen to the first message, and push it again to
listen to the second message. If you want to erase a message, select that message, and after listening to it, push the
PLAY/ERASE button and hold it for 3 seconds to erase it.
3. If message 1 is erased, message 2 will automatically become message 1. The next message you record will then
become the new message 2.
Removing the micro SD memory card
Do not remove the memory card while the camera is recording. This will corrupt the micro SD memory
card.
Ensure that the camera is not recording. Open the app. From the live view screen,
open settings>motion detection. Disable motion detection. This won’t actually stop
the camera moving but will stop it recording. Now wait for 30 seconds or so to make
sure the message got through the WiFI, then turn the light off at the mains. Now you
can safely remove the micro SD card from the slot, Alternatively, you can disable the
motion detect then disable movement by pressing the mode button on the bottom of
the NightWatcher NW765 for 3 seconds to stop the light from turning – the ‘Mode’
LED will flash red. (To resume working, press the mode button again.)
Open the card compartment using the provided Allen key and push the micro SD memory card in and then
release it. It will spring out so that you can then pull it out.
For viewing and/or formatting, please slide the micro memory card into the memory card adapter that has been
provided. Then, slide the memory card adapter into the memory card slot on your laptop.
Formatting the memory card
Please ensure that any required images are saved to a different drive prior to formatting.
- Place micro memory card into the memory card adaptor supplied
- Place the adaptor in a spare card slot on your PC or /Laptop
- Right click on the memory card location
- Select Format
- Ensure the correct file system is selected FAT16
(or FAT) for SD (cards up to 2GB) and FAT32 for cards from
4-32GB
- Select quick format
Do not format your card EXFAT. It will not be recognized by the NightWatcher
-Now put the card back into the NightWatcher
-Turn it back on
-Re-enable motion detection

5
The NightWatcher NW765 has a built-in Wi-Fi module which can be connected to the local Wi-Fi network,
enabling the broadcast of live video and message alerts to a dedicated app. 2 versions of the app are available,
iOS or Android. The performance of the NightWatcher is dependent on the quality of the Wi-Fi signal and we
therefore recommend the following prior to installation;
Ensure that the WiFi signal at the NightWatcher is sufficient to run all functions. You can do this by testing the
WiFi signal (see below), or by making a temporary installation (on an extension lead). If you do this take great
care that the NightWatcher is secure and will not fall down when it moves or in the wind!
If possible, install close to the Wi-Fi router.
Download and install a WiFi signal strength testing app on your phone (e.g. WiFi analyser classic).
Stand next to the proposed NightWatcher installation site and test the strength of the Wi-Fi signal using a
smartphone. Signal strength of -40 to -60 db is recommended for optimal performance, but you may find you can
manage with -75 to -60 db. If the signal at the proposed installation site is less (-100 to -75) you will need to move
the router closer to the NightWatcher or use a range extender.
Consider that thick, dense materials (like brick) limit the range of the Wi-Fi signal heavily. Thinner, and less dense
materials like wooden floors and stud walls do not limit range as much.
Installation Summary
The installation process involves the following steps;
After installation, power up the NightWatcher.
Press and hold the Mode button on the base of the NW765 to disable the light movement. (The light in the PIR will
flash).
Open the SD card flap using the Allen key provided and insert the Micro-SD card with the text facing up, then
close and secure the SD card flap.
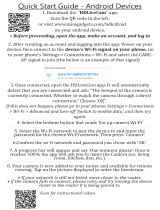
Scan the QR code below appropriate to your phone’s operating system to download the free “NightWatcherHD”
app to an iOS or Android device.
Using the instructions below, the app will register the Night Watcher’s unique ID permanently to your account and
local Wi-Fi.
Once the NightWatcher is successfully connected, the light next to the SD Card flap will turn blue. The light will
flash blue whilst connecting to the Wi-Fi and remain a steady blue when connected.
Long press the Mode button on the base of the NW765 to re-activate the robotic motion. (The light in the PIR will
change to a solid colour)
NB: If the connection is not successful, you can reset the NightWatcher;
Press and hold the Mode button on the base of the NW765 to disable the light movement. (The light in the PIR will
flash)
Press the reset button on the top of the NightWatcher for 3 seconds. The light next to the SD card flap will change
to flashing blue to indicate the reset has been successful and then repeat the Wi-Fi pairing process below.
Connecting the NW765 to the Wi-Fi Network

6
Firstly, ensure your phone or
tablet is connected to the Wi-Fi
network you intend to use for
the NightWatcher NW765.
Open the NightWatcherHD App
First time in, select “Sign Up” to create your
unique account, then select “Log In”
NB: If you forget the password for your
Nightwatcher account, you can use the ‘Reset
Password’ function to change it. This will send a
reset link to your email, which will give you a
temporary password (which expires if not used
within an hour)
Connect your NW765 to the Wi-Fi network by pressing “+”
Now while you can remember it, record your username and
password here!
Username
Password
Follow the on-screen instructions to connect the NW765 to the Wi-Fi network.
STEP 1: Connect the NightWatcher to the mains power supply and after it has
completed its startup process (approx. 45 secs) press “Next”.
Connecting the NW765 to your Phone or Tablet

7
STEP 2: Ensure your smartphone is connected to the same Wi-Fi network as you
plan to connect the NightWatcher, then press “Next”
STEP 3: Your Wi-Fi network should be displayed, then enter the Wi-Fi Password
and click “Next”.
STEP 4: Ensure the NightWatcher is in standby mode by pressing the Mode
button on the base. Then press the Reset button as shown in the diagram for 3
seconds and the blue status indicator light will flash rapidly, then press “Next”.

8
STEP 5/6: Next your phone will generate a QR code.
Checking that the blue status indicator light is still
blinking rapidly, point the QR code displayed on your
phone at the NightWatcher camera (approx. 15-30cm
distance) until the status indicator firstly turns red briefly
and then to a
slow flashing blue. Then press “Next”.
STEP 7: When the NightWatcher is successfully connected to the Wi-Fi network,
the status indicator light will remain a solid blue colour.
STEP 8: When the NightWatcher is successfully
connected to the Wi-Fi network,
the screen below will display.
Then click “Next” and you will receive a
confirmation message.

9
If the status indicator turns and stays red then the configuration has not been
successful and this message will display on your phone. Either repeat the process
from STEP 1 or go to ADD DEVICE MANUALLY below.
Add device manually
Alternatively connect the camera manually to your Wi-Fi network following the instructions below.
Get Camera ID; On the side panel of the
NightWatcher there is a label with a QR code and
the camera ID. From the screen below, select Scan
QR Code and point your phone’s camera at the
label to read the unique QR code. When the QR
code has been read successfully, the scan will stop
and you will see the Camera ID displayed.
Alternatively enter the
Camera ID number displayed on the label.
Wi-Fi Connection; In order to connect your NightWatcher to your Wi-Fi network,
press Generate QR code for Wi-Fi. In the next screen below,
confirm the selected Wi-Fi Network, enter the Wi-Fi password and then
click Next.

10
The screen will now display a QR code as shown below. Press and hold
the RESET button on the NightWatcher until the blue status indicator light
is blinking rapidly and point the QR code on your phone at the NightWatcher
camera (approx. 15-30cm distance) until the status indicator firstly turns red
briefly and then to a slow flashing blue. Then press “Next”.
When the NightWatcher is successfully connected
to the Wi-Fi network, the screen below will display.
Then click “Next” and you will receive a
confirmation message.
If the status indicator light remains red the configuration is not successful and
the screen below will display Camera status Offline. Press the back button to
Add Camera page and config again. If it displays Camera status Online.
Press Submit to finish configuration process.

11
Enabling video
Now check that your video
recording is enabled.
From your home screen
touch the cog
icon in the top right of the
screen to
select settings.
Then select motion
detection
The touch the slider
button to activate motion
detection.
That’s it, you are all set
up!

12
NightWatcher home screen
This displays the ID number or name of your camera or cameras if you have more
than one on the account. From here you can select a camera to go to the live
view screen or select the ‘hamburger menu icon’ to go to the menu screen
Menu screen
From here you can go back to NightWatcher home,
view motions, account details, support or about
NightWatcher HD app information
Live view screen
In this screen you can view live video from your camera via wifi of mobile data
from anywhere in the world with a connection! Viewing in portrait you can drag
your finger over the image to pan left or right within the image are or rotate the
phone
to view the full widescreen image.
Touch Lighting to manually turn the light on if it’s dark
Touch History to view video clips
Touch Shared Users to add e-mail addresses to the account to share access to
the camera.
Operation

13
History screen
Here you should see a list of picture icons. Each one represents a video clip.
These may display a default (stock) image or may fill in a still image of the video
clip depending on the version you have
A date and time is displayed above each.
Touch the picture to see a still image of the motion detection incident and touch
replay video to view the video clip.
Touch share to send the still image by email social media app etc.
Touch save to save the still image to your phone
Motion detected screen
Touch the ‘Replay video’ icon to play the clip
Customization
You can change the camera ID to a name; i.e. Garden, Front & etc. in Camera Settings.
To rename your camera, go to Home page>Settings>Device Information
Press and hold Name until the renaming dialog box appears. Type in the new name. Press Confirm.
Multiple devices
You can view the same camera on multiple devices by accessing the same account. This doesn’t interrupt other
logins.
HELP!
For further operating instructions, tips FAQ’s and phone support go to our website www.nightwatcher.co.uk.

14
Possible problems with camera installation and the solutions:
Troubleshoot by symptom
1. Live view works but no video clips can be seen in history
a. Motion detection is not activated in the app settings - See Enabling video (Page 12)
b. Micro SD card is corrupt. Reformat or replace if necessary – See formatting your memory card (Page 5)
c. No micro SD card is inserted in the NightWatcher
2. Live view works but only still images can be seen in history
a. Micro SD card is corrupt. Reformat or replace if necessary -See formatting your memory card (Page 5)
b. No micro SD card is inserted
3. NightWatcher will not complete set up.
a. Check wifi signal strength at NightWatcher with a signal checking app. See page 6
b. Check physical connection
c. Reset NightWatcher and try again
d. Delete NightWatcher app, reinstall app and try again
4. Error code 128
This means the user has reset their password and been given a temporary password. This temporary
password must be replaced with the time limit (30 mins) as directed onscreen. Remedy by resetting
the NightWatcher and repeating set-up but replacing default password within time limit as directed
onscreen.
5. Not getting push notifications
a. Push notifications disabled – go to Settings>Notifications
b. Check NightWatcher wifi connection
c. Check mobile signal
d. Check data is enabled on mobile phone (if outside wifi zone).
e. Check that push notification has not been disabled on the app preferences in Android on your phone
6. Cannot access account
a. Login details incorrect – if you used your e-mail check details, if you used a name check spelling and
case.
b. May indicate a temporary connection issue to the NightWatcher server – check connection to internet
or try again later.
c. If all else fails, contact NightWatcher at NightWatcher.co.uk/support
7. Authentification failure
a. Can be wifi or mobile data connection – check signal by other means
b. May indicate a temporary connection issue to the NightWatcher server – check connection to internet
or try again later.
8. Forgotten/incorrect password
On login screen, press the ‘Forget your password?’ button, then enter the email or username used to sign
up to the account. After hitting ‘confirm’, an email will be sent to the address used for the account. Follow
the instructions to reset your password. (Password resets are only valid for 30 minutes).
Troubleshooting

15
Trouble shoot by cause - common problems.
1. Insufficient WiFi signal
2. Incorrect login process
3. Corrupted micro SD card
4. Incorrect siting of the device
5. Out of date software
6. Very old, unsupported operating system
1. Download and install a wifi signal checker/analyser to your mobile phone. Check the signal strength at the
NightWatcher. If signal is poor move the router closer to the NightWatcher or put a range extended
between router and NightWatcher.
2. Always write down your login details and keep in a same place (perhaps the NightWatcher box). Do not
use special characters (@#~$”& etc.) as these may not be recognised.
3. Removing the micro SD card while the camera is recording is the most common cause of corruption.
Power failure during a recording can also have the same effect. In some cases the card can be
reformatted, have its bad sectors repaired or flagged as damage and the card reused. In other cases, it
needs to be replaced. Memory cards are cheap enough to keep spares.
4. Re-read the installation instructions and re-site the device if necessary.
5. Update the NightWatcher app to latest version
6. Change the app host device
WiFi/Router issues;
1. The router may be set to prevent unauthorised access: if the WI-FI network is set to prevent unauthorised
access (Black and White List, MAC address filtering " etc.) this may lead to network connection failure.
2. The router may be set 5GHz WIFI: 5GHz Wi-Fi is not currently supported.
3. Bridge-connected WiFi: bridge-connected Wi-Fi may lead to an unstable network which may cause the Wi-Fi
connection to fail.
4. DHCP may not be enabled in order to assign IP addresses automatically: if your router DHCP is disabled this
may not allow the camera to obtain a valid IP address and cause the WI-FI connection to fail.
5. Check permissions on your mobile phone app. Check that it is allowed to use data and connect to wifi.
6. The router has a hidden Wi-Fi setting: the NightWatcherHD camera does not support a hidden SSID, please
ensure the SSID is not hidden.
Account/ID issues
1.App displays message: "This device has been added to another account"
In order to protect the privacy of our users, NightWatcherHD devices can only be added to one account. It is
possible for more than one user to connect to the same account to view devices and receive push alerts.
Live video sharing; you can also click "SHARE" in the settings to enable your family and friends access your live
streams
2.How to remove a device from your account?
In the Home screen, select your device from the list, then press and slide to the left and press "Delete".
3.How to move a device from one account to another account?
Firstly, from the current account, in the Home screen, select your device from the list, then press and slide to the
left and press "Delete". Then login to the other account and add the device.
4. App displays message “Authentification failure”. Check login details and retry.
4. Forgotten password/ID not recognises: contact NightWatcher via website support.
Video play issues:
1. I can see live view but can’t see history. Check wifi signal at NightWatcher. Reboot app. Check app for
updates. Shut down NightWatcher and remove micro SD card to check it is not corrupted.
2. Why can I play it when I'm at home but not outside?
When the camera and the App client are in the same local area network (LAN), you can view the device via the
intranet search feature. However, the device cannot be viewed outside the local area network until the device has
been added successfully to the User Account.
2. Why does the video play smoothly when I'm at home but not outside? What are the broadband requirements of
the camera?

16
The NightWatcherHD camera real-time play has third modes: HD, SD and Automatic;
(1:) Real-time viewing while in HD mode, Asymmetric Digital Subscriber Loop
(2:) Real-time viewing while in SD mode.
(3:) Real-time viewing while in Automatic mode.
Power and physical issues
1. What if the camera stays off-line; Blue LED is not lit, camera does not move or transmit?
Check power to the device. Check circuit breakers, check fuse in fused spur. Remove NightWatcher from mount
and check power at device (Warning – 240V mains power! Expertise and safe operating procedures apply.
2. The camera is hot; is it safe?
The device will operate normally with the range of -10°C to + 55°C. Extended use may cause the device to appear
hot but this is totally safe and will not affect operation.
If the camera remains off-line, please power the device off and on and reconfigure the WI-FI connection. If
necessary, delete the app and reinstall from start.
Operating systems supported
1. Which mobile phone operating system does NightWatcherHD currently support?
The NightWatcherHD App currently supports iOS 8.0 and higher and Android 4.4.0 and higher.
Specification questions
1. How does the night vision feature work?
The camera has High power lightning LED, it will be triggered when someone's moving and the light is less than 3
lux within 10 meters.
2. How many trigger events can be stored on the SD card?
3. What happens when the SD card is full?
When the memory card is full, it will over-write the earliest recordings. Video can also be backed up by removing
the SD card from the camera and saving to a PC or MAC
Camera LED code
Blue steady LED – Light connected to WiFi in normal operation
Blue LED flashing 1/sec – Connecting to WiFi
Blue LED flashing rapidly 2/sec – WiFi resetting
Red LED – The red LED may light very briefly in normal operation but if it comes on and stays on, or flashes fro
more than a few seconds this indicates a fault. May indicate the micro SD card has been removed or needs to be
re-formatted, See pages 3 and 4. Or it may indicate that the NightWatcher needs to be reset.
PIR window LED codes
Red
Orange
Green
See page 3
For further information and updated FAQs and downloads etc. visit
www.nightwatcher.co.uk/support
/