Page is loading ...

AppCam Solo 2
Quick Start Guide

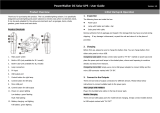
Red LED (Wi-Fi connection failed)
Blinking: Standby status
On: Working status
Blue LED (Wi-Fi connection succeeded)
Blinking: Standby status
On: Working status
What’s in the Box General Introduction
Micro SD Card Slot
Reset Button
Daylight Sensor
Lens
Status LED
Built-in Mic
Speaker
Magnetic Mount
Built-in PIR Motion Sensor
2 3
AppCam Solo 2
Camera
x1
Rechargeable
Battery
x1
Screw Mount
x1
Mounting
Strap
x1
Reset
Needle
x1
Screw
Kit
x2
Mounting
Template
x2
Power
Cable
x1
Weatherproof
Silicone Cover
x1
Magnetic Mount
x1

Install the Rechargeable Battery to
the Camera
Charge the Battery
Please press the button (on the top of the back casing), and slide the back casing downward
to close it. The button also needs to be closed firmly for good weatherproof performance.
For the weatherproof performance, always cover the USB charging port with the
rubber plug.
4 5
AppCam
Solo 2
Power Cable Rechargeable
Battery
AppCam Solo 2
Solar Panel
(Not included in
the package)
1. You can charge the battery when it’s installed to the camera.
2. You can charge the battery separately.
3. You can charge the battery with Uniden AppCam Solo 2 Solar Panel. Please note that
the solar panel is NOT included in the package.
There is a status LED under the micro USB port of the battery, indicating the battery charging status.
•
Green LED: Fully charged
•
Orange LED: Charging

1. Charge the battery when it’s installed
to the camera.
2. Charge the battery separately.
3. You can charge the battery with Uniden AppCam Solo 2 Solar Panel. Please note that
the solar panel is NOT included in the package.
6 7

1. Please charge your rechargeable battery with a standard and high-quality DC 5V
or 9V battery charger.
2. If you want to power the camera via the solar panel, please note that the camera
is ONLY compatible with Uniden Solar Panel. You cannot charge this camera with
other solar panel brands.
3. Please charge the battery in temperatures between 0°C and 45°C.
Please read the battery warnings and safety document provided in this
guide to use your Uniden Solo 2 rechargeable battery safely.
Uniden AppCam Solo 2 is not designed for 24/7 full capacity running or around-the-
clock live streaming. It’s designed to record motion events and remotely view live
streaming only when you need it.
Please learn some useful ways to maximize the battery life in this post:
“APPCAM SOLO 2 - INCREASING BATTERY LIFE” under Video Technology at
https://uniden.com/kb
Important Safeguards on Rechargeable
Battery Use
!
8 9
1. Please charge the rechargeable battery with a standard and high-quality DC 5V or 9V
battery charger.
2. If you want to power the battery via the solar panel, please note that the battery is ONLY
compatible with Uniden Solo 2 Solar Panel. You cannot charge the battery with other solar
panel brands.
3. Please charge the battery in temperatures between 32°F and 113°F (0°C and 45°C).
4. Always use the battery in temperatures between -4°F and 140°F (-20°C and 60°C).
5. Please make sure the battery compartment is clean.
6. Please keep the USB charging port dry, clean and free of any debris and make sure the battery
contacts are aligned.
7. Always make sure the USB charging port is clean. Please cover the USB charging port with the
rubber plug after the battery has been fully charged.
8. Never charge, use or store the battery near any ignition sources, such as fire or heaters.
9. Always store the battery in a cool, dry and ventilated environment.
10. Never store the battery with any hazardous or combustible objects.
11. Do keep the battery away from children.
12. Do not short-circuit the battery by connecting wires or other metal objects to the positive (+)
and negative (-) terminals. Do NOT transport or store the battery with necklaces, hairpins or
other metal objects.
13. Do NOT disassemble, cut, puncture, short-circuit the battery, or make it dispose of in water, fire,
microwave ovens and pressure vessels.
14. Do NOT use the battery if it gives o an odor, generates heat, becomes discolored or
deformed, or appears abnormal in any ways. If the battery is being used or charged, remove
the battery from the device or the charger immediately, and stop using it.
15. Always follow the local waste and recycle laws when throwing the used battery away.

Install AppCam Solo App
Set up the Camera
There are two ways to get the AppCam
Solo App:
• Search “AppCam Solo” in App Store (for iOS)
download and install the app.
• Search “AppCam Solo” in Google Play
(for Android), download and install the app.
Please follow the prompt tone to
configure the camera
Please run App. Click the “Add New
Device” button, and follow the instructions
to set up the camera.
1. Please click the “ ’’ button in the
top right corner to add the camera.
10 11
2. Scan QR code on the camera.
3. Click “Connect to Wi-Fi” to continue.
Note: When the setup for this camera
is completed, your family can access
the camera simply by clicking “Access
Cameras” without reconfiguring it.
iOS

4. Click the button “I have heard the
voice prompt” to enter the next page.
If you did not hear the voice prompt,
please press “I did not hear the voice
prompt” for help.
5. Enter the Wi-Fi password of the
selected Wi-Fi network and press “I have
entered the correct information” to enter
the next page.
12 13
Distance (8 inches)
1 2 3 4
Scan succeeds. Camera is connecting to the router.
6. A QR code will be generated on the phone. Please place the QR code on your phone towards
the AppCam Solo 2 camera lens at a distance of about 20cm to let the camera scan the QR
code. Please make sure that you’ve removed the protection film o the camera’s lens.
5 6 7 8

7. If you hear the above voice prompt,
please press “I heard ‘Wi-Fi connection
failed’ ” for help.
Wi-Fi connection failed! Please check
the Wi-Fi settings and try again.
8. If you hear the above voice prompt,
please press “I heard ‘Wi-Fi connection
succeeds’ ” to finish the quick setup.
Wi-Fi connection succeeds!
14 15
9. Name your camera and create a password (at least 6 characters), tap “Create Password”,
slide the page to read the tips and tap “finish” to start the Live View. Tap
V
to go to the
“Devices” menu.
Note:
“Name your camera” field refers
to the display name of the
camera rather than the login
username.
“Playback” only displays when
you’ve inserted a micro SD card
into the camera. Make sure that
the SD card is recognized by the
camera.

Device Menu
10. Please tap the camera and follow the steps to
sync the time, and then start live view or go to
“Device Settings” for more configurations.
Menu
Add New Device
Enable/Disable PIR Motion Sensor (in
default, the PIR sensor is enabled).
Device Settings
Access the Live View
Battery Status
16 17
Adjust the Detecting Distance of the PIR Sensor
The default sensitivity of the PIR sensor is at “Mid” and the detecting distance is 6 meters
(20ft). If you want to adjust the sensitivity, please launch your AppCam Solo App, and then
click “Device Settings” -> “PIR Settings” and click the “Save” button to save the settings.
Note:
Higher sensitivity oers longer detecting distance, but it
would lead to more false alarms.
You are advised to set up the sensitivity level to “Low” or
“Mid” when you install the camera outdoors.
Sensitivity
Detecting Distance
(For moving and
living things)
Detecting Distance
(For moving vehicles)
Low Up to 4 meters (13ft) Up to 10 meters (33ft)
Mid Up to 6 meters (20ft) Up to 12 meters (40ft)
High Up to 9 meters (30ft) Up to 15 meters (50ft)

To reduce false alarms, please note that:
• Do not install the camera facing any objects with bright lights, including
sunshine, bright lamp lights, etc.
• Do not place the camera too close to a place where there are frequently
moving vehicles. Based on our numerous tests, the recommended distance
between the camera and the vehicle is 55 ft.
• Stay away from the outlets, including the air conditioner vents, humidifier
outlets, the heat transfer vents of projectors, etc.
• Do not install the camera where there are strong winds.
• Do not install the camera facing the mirror.
• Keep the camera at least 3 ft away from any wireless devices, including Wi-Fi
routers and phones in order to avoid wireless interference.
Important Notes for Reducing False Alarms
!
18 19
Cover the Monitoring Area
When installing the camera, it’s not suggested to
make the PIR sensor vertically face the moving
object. Please note that if the moving object
approaches the PIR sensor vertically, the PIR
sensor may not detect the motion events. You are
advised to install the camera angularly (the angle
between the PIR sensor and the detected object is
larger than 10°) for eective motion detection.
FYI:
• The PIR sensor’s detecting distance: 6m
(in default)
• The PIR sensor’s detecting angle: 120° (H)
Entrance
10°
It’s not suggested to make
the PIR sensor vertically
face the moving object.
The path of the
moving object

20 21
Ideal Viewing Distance:
7- 33 ft
The Ideal Viewing Distance
The ideal viewing distance is 7-33 ft,
which enables you to recognize a human.
How to Install the Skin to the AppCam Solo 2.
Please dress the camera with the skin for better weatherproof performance when
you install the camera outdoors.
Step 1
Please dress the AppCam
Solo 2 camera with the skin
provided in the package.
Step 2
The skin has an anti-falling
safety rope. Please fasten
the other end of the rope
to the wall mount when
mounting it to the wall.
Step 3
Stick the camera on the wall
mount and twist the camera
in any directions you want.

How to Install (using screw mount)
Wall Mount
Step 1:
Press the button to release the
plate from the security mount.
Step 2:
Screw in the security mount
plate into the wall.
Step 4:
Press the security mount
button until its plate clicks into
the mount.
Step 5:
Screw in the camera, adjust
its direction and tighten the
knob to fix it.
Step 3:
Latch the security mount on its
plate.(Make sure the top edge
of the backing plate is inserted
into the mount.)
22 23
How to Remove
Step 1:
Thread the hook & loop strap
through the slots.
Step 2:
Unscrew the AppCam Solo 2
from the wall mount.
Step 1:
Thread the hook & loop strap
through the slots.
Step 2:
Thread the hook & loop strap
through the slots.
Step 3:
Fasten the warp strap to
the tree.
Step 5:
Press the security mount
button until its plate clicks into
the mount.
Step 4:
Latch the security mount on its
plate. (Make sure the top edge
of the backing plate is inserted
into the mount.)
Step 6:
Screw in the AppCam Solo 2,
adjust its direction and tighten
the knob to fix it.
Tree Mount

Uniden AppCam Solo 2
Uniden Corporation Limited 1 Year Warranty
Important: Keep your receipt. Proof of original
purchase is required for warranty service
WARRANTOR: Uniden America Corporation
(“Uniden”) ELEMENTS OF WARRANTY: Uniden
warrants, for one year, to the original retail owner,
this Uniden Product to be free from defects in
materials & craftsmanship with only the limitations
or exclusions set out below. Uniden only warrants
the Products contained in the original factory
packaging.
WARRANTY DURATION: This warranty to the
original user shall terminate & be of no further
effect 12 months after the date of original retail
sale. The warranty is invalid if the Product is (A)
damaged or not maintained as reasonable or
necessary, (B) modified, altered, or used as part
of any conversion kits, sub-assemblies, or any
configurations not sold by Uniden, (C) improperly
installed, (D) serviced or repaired by someone
other than an authorized Uniden service center for
a defect or malfunction covered by this warranty,
(E) used in any conjunction with equipment or
parts or as part of any system not manufactured
by Uniden, or (F) installed or programmed by
anyone other than as detailed by the owner’s
manual for this product.
STATEMENT OF REMEDY: In the event that the
product does not conform to this warranty at any
time while this warranty is in effect, warrantor
will either, at its option, repair or replace the
defective unit & return it to you without charge
for parts, service, or any other cost (except
shipping & handling) incurred by warrantor
or its representatives in connection with the
performance of this warranty. Warrantor, at
its option, may replace the unit with a new or
refurbished unit. Warrantor is not responsible for
any additional costs associated with reinstallation
of product.
WARRANTY WARRANTY
THE LIMITED WARRANTY SET FORTH
ABOVE IS THE SOLE & ENTIRE WARRANTY
PERTAINING TO THE PRODUCT AND THE
CONTENTS CONTAINED IN THE ORIGINAL
FACTORY PACKAGING & IS IN LIEU OF &
EXCLUDES ALL OTHER WARRANTIES OF ANY
NATURE WHATSOEVER, WHETHER EXPRESS,
IMPLIED OR ARISING BY OPERATION OF LAW,
INCLUDING, BUT NOT LIMITED TO ANY IMPLIED
WARRANTIES OF MERCHANTABILITY OR
FITNESS FOR A PARTICULAR PURPOSE. THIS
WARRANTY DOES NOT COVER OR PROVIDE
FOR THE REIMBURSEMENT OR PAYMENT OF
INCIDENTAL OR CONSEQUENTIAL DAMAGES
TO THE PRODUCT CAUSED BY IMPROPER
INSTALLATION OF THE PRODUCT. THIS
WARRANTY DOES NOT COVER ANY COSTS
RELATING TO THE REMOVAL, REPLACEMENT,
OR INSTALLATION OF ANY PRODUCT.
Some states do not allow this exclusion or
limitation of incidental or consequential damages
so the above limitation or exclusion may not
apply to you.
LEGAL REMEDIES: This warranty gives you
specific legal rights, & you may also have other
rights which vary from state to state. This
warranty is void outside the United States of
America & Canada.
PROCEDURE FOR OBTAINING PERFORMANCE
OF WARRANTY: If, after following the
instructions in the owner’s manual you are
certain that the Product is defective, pack the
Product carefully (preferably in its original
packaging). The Product should include all
parts & accessories originally packaged with the
Product. Include evidence of original purchase &
a note describing the defect that has caused you
to return it.
The Product should be shipped freight prepaid,
by traceable means, to warrantor at:
Uniden America Service
C/O Saddle Creek
743 Henrietta Creek Rd., Suite 100
Roanoke, Texas 76262
24 25

FCC Statement
1. This device complies with Part 15 of the FCC
Rules. Operation is subject to the following two
conditions:
(1) This device may not cause harmful interference.
(2) This device must accept any interference
received, including interference that may
cause undesired operation.
2. Changes or modifications not expressly
approved by the party responsible for compliance
could void the user’s authority to operate the
equipment.
NOTE: This equipment has been tested and found
to comply with the limits for a Class B digital
device, pursuant to Part 15 of the FCC Rules.
These limits are designed to provide reasonable
protection against harmful interference in a
residential installation. This equipment generates
uses and can radiate radio frequency energy
and, if not installed and used in accordance with
the instructions, may cause harmful interference
to radio communications. However, there is no
guarantee that interference will not occur in a
particular installation. If this equipment does
cause harmful interference to radio or television
reception, which can be determined by turning the
equipment off and on, the user is encouraged to
try to correct the interference by one or more of
the following measures:
• Reorient or relocate the receiving antenna.
• Increase the separation between the equipment
and receiver.
• Connect the equipment into an outlet on a
circuit different from that to which the receiver is
connected.
• Consult the dealer or an experienced radio/TV
technician for help.
FCC Radiation Exposure Statement This equipment
complies with FCC radiation exposure limits
set forth for an uncontrolled environment. This
equipment should be installed and operated with
minimum distance 20cm between the radiator &
your body.
IC Compliance / IC conformité
This device complies with Industry
Canada license-exempt RSS standard(s).
Operation is subject to the following
two conditions: (1) this device may not
cause interference, and (2) this device
must accept any interference, including
interference that may cause undesired
operation of the device.
Changes or modifications not expressly
approved by the party responsible for
compliance could void your authority to
operate the equipment.
Cet appareil est conforme aux normes
RSS exemptes de licences d’Industrie
Canada. Son fonctionnement est soumis
aux deux conditions suivantes : (1) cet
appareil ne doit pas causer d’interférences
nuisibles et (2), il doit pouvoir accepter les
interférences, incluant celles pouvant nuire
à son fonctionnement normal.
Tout changement ou modification non
approuvé expressément par la partie
responsable pourrait annuler le droit
à l’utilisateur de faire fonctionner cet
équipement.
26 27

uniden.com
/