Samsung NET-i ware User manual

Category
Video software
Type
User manual
ware V1.38
User Manual
SAMSUNG NETWORK RECORDING
SERVER SOFTWARE
Before installing or while using this program, visit the Samsung website www.samsungsecurity.com and download and
upgrade with the latest S/W version available.
SNS-SF064/SNS-SF032/SNS-SF016
CONTENTS
2_ English
BEFORE YOU START
3
3 Purpose
3 Audience
3 Organization
3 Terminology
4 What is NET-i ware?
6 Installing NET-i ware
SETUP
10
10 Name and Function of Each Control
11 Getting Started
12 Hardware
20 Record Setting
27 To set an Event
29 Event Alert Sound
29 Event Preset
30 Backup Setting
31 Network Setting
33 System Setting
BACKUP
39
39 To Backup Data
SERVICE MANAGER
41
41 Using Service Manager
NET-I WARE UPDATE
42
42 Installation
43 Auto Update Setting
44 Auto Update Scenario
NET-I WEB VIEWER
45
45 What is the Web Viewer?
45 Getting Started with the Web Viewer
46 Installing Silverlight
47 Checking the Connection Status of Web Viewer
49 Live Viewer
56 Video Screen At a Glance
58 Search Viewer
62 Setup Viewer
69 About
BEFORE YOU START
PURPOSE
Provides instructions for using NET-i ware.
Provides a description of work for configuring the NET-i ware settings and for using the NET-i ware Tool.
AUDIENCE
This user guide is designed for engineers who install, configure the settings of and maintain the NET-i ware system.
- The users who install NET-i ware are required to have good knowledge and experience of Windows applications and
services.
ORGANIZATION
Installation
Guides you through the steps to install the NET-i ware component programs.
Setting
Provides a description of configuring the NET-i ware service and related settings.
Backup
Provides a description of manual backup.
Service Manager
Provides a description of controlling the NET-i ware service.
NET-i ware Update
Guides you through the steps to update NET-i ware with the latest version.
TERMINOLOGY
•
Tree : Area where you can see information on and correlation between device, camera, alarm and user (group).
•
Device : This is a generic term for network cameras and encoders.
•
fps (frames per second) : Number of frames per second.
•
4CIF : Resolution [704x480(NTSC), 704x576(PAL)]
•
VGA : Resolution [640x480]
•
CIF : Resolution [320x240(NTSC), 352x288(PAL)]
•
QXGA : Resolution [2048x1536]
•
UXGA : Resolution [1600x1200]
•
1080P(Full HD) : Resolution [1920x1080]
•
720P (HD) : Resolution [1280x720]
•
SXGA : Resolution [1280x1024]
•
XGA(XVGA) : Resolution [1024x768]
•
SVGA : Resolution [800x600]
•
QVGA : Resolution [320x180]
Before you start
English _3
Before you start
WHAT IS NET-i ware?
NET-i ware is an open storage solution for security and automatic monitoring environment.
This program includes general functions for monitoring sites and storing device images.
This program is integrated with network cameras via the network environment.
You can set to record video at the set time.
@
You can search for and play recording data remotely using NET-i web viewer and NET-i viewer.
Key Features of NET-i ware
With NET-i ware, you can:
•
Record up to 64 channels simultaneously
Record up to 64 channels manually or on schedule
- SNS-SF064 : Max. 64 Channels / SNS-SF032 : Max. 32 Channels / SNS-SF016 : Max. 16 Channels
•
Save and search for system and event logs
•
Play various formats of video source
H.264 / MPEG4 / MJPEG
•
Play various formats of audio source
G.726, G.711, G.723
•
Backup
REC1/SEC format supported
•
Update automatically
•
Advanced search (using NET-i viewer & Web Viewer)
Date/Time & Event Search
•
Provides multiple playback control options (using NET-i viewer & Web Viewer)
Play up to 64x forward / backward
NET-i ware Program
Check if all applications of the NET-i ware system are included in the product package and check the system
requirements.
NET-i ware Tool
You can configure the settings of NET-i ware and the remote device.
Language Settings
Register/Change/Delete Device
Create/Edit/Delete Recording Schedule
Event Setting
Create/Edit/Delete Backup Schedule
Manual Backup
Network Setting
Create/Edit/Delete User
Log Setting & Search
Update Device Firmware
Reset NET-i ware and Import/Export
Others
4_ English
BEFORE YOU START
Service Manager
Start/Stop NET-i ware service
Add/Delete Product Key
Updater
Update automatically
Update manually
System Requirement
The below specification is for the minimum hardware and OS requirements to install and run the NET-i ware
system alone.
CPU Intel Core i3 (Recommended : Intel Core i7)
OS
Windows XP Professional SP2, Windows Server 2003 SP2,
Windows Vista Business / Ultimate, Windows Server 2008, Windows 7
DRAM 4 GB or more
HDD SATA2
2 or more (one for the OS and one for the data storage HDD)
- at least 1 GB of free disk space is required to install NET-i ware.
VGA
32MB, Direct X 8.1, 32 bit color, 1024 x 768 or higher resolution
(Recommended: 64MB or more, DirectX 8.1 or later, 32 bit color, 1280 x 1024 or higher resolution)
Network Gigabit Ethernet NIC
DVD Reader/ Writer For installing NET-i ware and backing up data
M
`
In case of a power failure or a problem with the power supply, NET-i ware may not work properly.
To cope with this, it is recommended to use the uninterruptible power supply (UPS).
- If you set the Restore on AC/Power Loss item in the CMOS settings of your PC, the system will reboot automatically after
the power failure. Check if your PC supports this function.
English _5
Before you start
INSTALLING NET-i ware
Installing the NET-i ware Program
1. Insert the provided dongle key into a corresponding port of your computer.
- Do not remove the dongle key while installing the program. If it's removed, the installation program may not
proceed.
2. Run the SETUP.EXE file in the NET-i ware installation DVD or in the installation folder of your PC.
3. If .NET Framework 4.0 is not installed on your PC, .NET Framework 4.0 will be installed first.
- If .NET Framework 4.0 is not installed on your PC, NET-i ware will not work properly.
- You can download and install .NET Framework from the MS download center.
Click [I have read and accept the license terms.] in the
.NET Framework Client Profile window.
The status bar will display the installation progress.
- When installation of .NET Framework 4.0 is done, you may need
to restart your system depending on the PC environment.
4. If your PC has not installed a driver for the dongle key, HASP SRM run-time will be installed first.
- If HASP SRM run-time is yet to install, NET-i ware will not work normally.
- You can download and install HASP SRM run-time from Aladdin.com.
Click [Next >] in the HASP SRM run-time setup window.
The installation status will be shown in the status bar during the installation.
6_ English
BEFORE YOU START
5. Click [Next >] to move to the license agreement step.
6. Read the license agreement carefully and select "I accept
the terms of the license agreement." And click [Next >] to
proceed with the next step.
7. To activate NET-i ware, enter the product key (26 characters)
and click [Check].
- You can find the product key on the surface of the DVD case.
M
`
If you replace a model featuring lots of available channels with
a different model that has less channels available, some of the
configuration and recording data can be lost.
`
If you want to connect to NET- i ware 16CH model without a dongle
key, select to install “Free Version (SNS-SF016) Installation”
8. Provide the Windows logon account information, and click
[Next >].
- The Windows logon account is information required to log
onto the Windows OS of your PC.
You can check your Windows logon account in Control Panel
– Administrative Tools – Computer Management – Local Users
and Groups.
- The Windows logon account information can be also edited
in NET-i ware tool after its installation. (Page 35)
English _7
Before you start
9. Click [Install] to install the program.
10. The Wizard is ready to install the NET-i ware program.
11. The Wizard starts installing the NET-i ware program.
12. When the installation is completed, click [Finish] to complete
the installation.
`
When done, your PC will reboot.
8_ English
BEFORE YOU START
Checking Installation
Check if NET-i ware is installed successfully on your system.
1. Move to the Start menu.
2. If NET-i ware is properly installed, you will see 3 sub
components in the NET-i ware program menu: NET-i ware Tool,
ServiceManager and Uninstall.
M
`
When you first run NET-i ware, the language of NET-i ware is
defaulted to that of the operating system.
English _9
Check the use instructions of the NET-i ware Tool that enables you to configure the tree and system related options.
You can configure the NET-i ware settings with the NET-i ware Tool.
You can configure the device settings in the Device Setting page.
NAME AND FUNCTION OF EACH CONTROL
Category Item Description
Main Menu Setup Displays the Setting page.
Backup Displays the Manual Backup page.
Exit Exits the NET-i ware Tool.
Login Displays the Login dialog.
Logout Displays the Logout dialog.
Setup Menu Hardware Register Displays the Register Device and Change Information of Server, Device or Camera pages.
Activation Displays a page where you can activate a camera to use.
Camera Displays a page where you can configure video and audio settings and set Covert to On/Off.
Video Opens the video properties page for the live and recording source.
Record NET-i ware You can check the HDD information, disk quota for each camera and basic record settings.
Schedule You can create / edit / delete a schedule with holidays and assign a camera to the schedule.
Event You can set the pre / post recording time for the camera and event.
Camera Display the recording FPS for each camera as well as the storage period of the recording file.
Event Camera You can set the event discard time and alarm in link for each camera.
E-mail You can create / edit / delete an e-mail and set the e-mail notice interval.
Alert Sound You can set the alert sound for each event.
Preset Displays the preset setup page for the applicable Alarm In.
Backup Schedule You can create / edit / delete a schedule backup instance.
Network
Drive
Displays a page where you can specify the network connection retry count and configure to
delete the backup file automatically.
Network Interface Display the network settings and transfer settings pages.
DDNS Displays the DDNS Setting page.
System User You can create / edit / delete a user account.
Setting You can set the language, date/time format, windows logon account, overwrite options and
IP filtering and restore the settings to the default, sync with the updater and import/export
settings.
Log You can set the log storage options and view the search result.
Setup
10_ English
SETUP
GETTING STARTED
Double-click the < > icon on your desktop.
The main page of the NET-i ware Tool will appear.
Login/Logout
Login
You must have logged in before using the Setup page.
1. Click [Login] in the Setup main page.
You will see the Login dialog.
2. Enter your ID and password.
- Default ID: admin
- Password: 4321
M
`
Login will fail in the following cases:
- If you enter an unregistered user ID
- If you enter a wrong password
- You can make settings for only one user at a time. If a different user
has already accessed the web viewer, you can disconnect the current
connection and make yourself access the web viewer by force.
- If you are forced to log in to the web viewer, the user logged in to
NET-i ware tool will be logged out automatically.
J
`
The default password can be exposed to a hacking thread so it is recommended to change the password after installing the
product.
Note that the security and other related issues caused by the unchanged password shall be responsible for the user.
Logout
You must log out when you have completed your settings.
1. Click [Logout] in the Setup main page.
You will see the Logout dialog.
2. Click [OK] in the dialog.
You will be logged out.
`
You will be automatically logged out if you exit the Setup program.
English _11
Setup
HARDWARE
Registering Hardware
Registering Device
You can add / change / delete a desired device to and from NET-i
ware.
Register a desired device in two ways:
You can register up to 64 devices.
- SNS-SF064 : Max. 64 Devices / SNS-SF032 : Max. 32 Devices /
SNS-SF016 : Max. 16 Devices
Only devices connected in the network can be registered.
Automatic Registration of Devices
Press the [Auto] button in the bottom left corner of the main window to register a device automatically.
1. Click [Auto] to register a device automatically.
All devices connected in the local network will be listed in
"Register Device(Auto)" window.
Registered devices will be marked grey.
M
`
The Auto Device Scan function may not work due to firewall of the
vaccine program. To use Auto Device Scan, you must turn off the
firewall first.
2. To register a specific device in the list, simply click the device in
the list.
3. Provide the device ID and password, and click [Register].
The device information includes the ID and password that are specified for the device.
- IP Install: You can change the network address of the device.
Enter an IP address, subnet mask, gateway, HTTP port, device
port and password, and click [OK].
M
`
You may not be enabled to configure IP settings of the device,
depending on the device model.
- Refresh: Reloads to list devices that are connected to the local network.
- Close: Closes the Register Device window.
4. If you experience a problem, you will see the appropriate error message.
Registered devices will be listed in the tree.
`
For more information about errors, refer to "Error Type". (Page 13)
12_ English
SETUP
Manual Registration of Devices
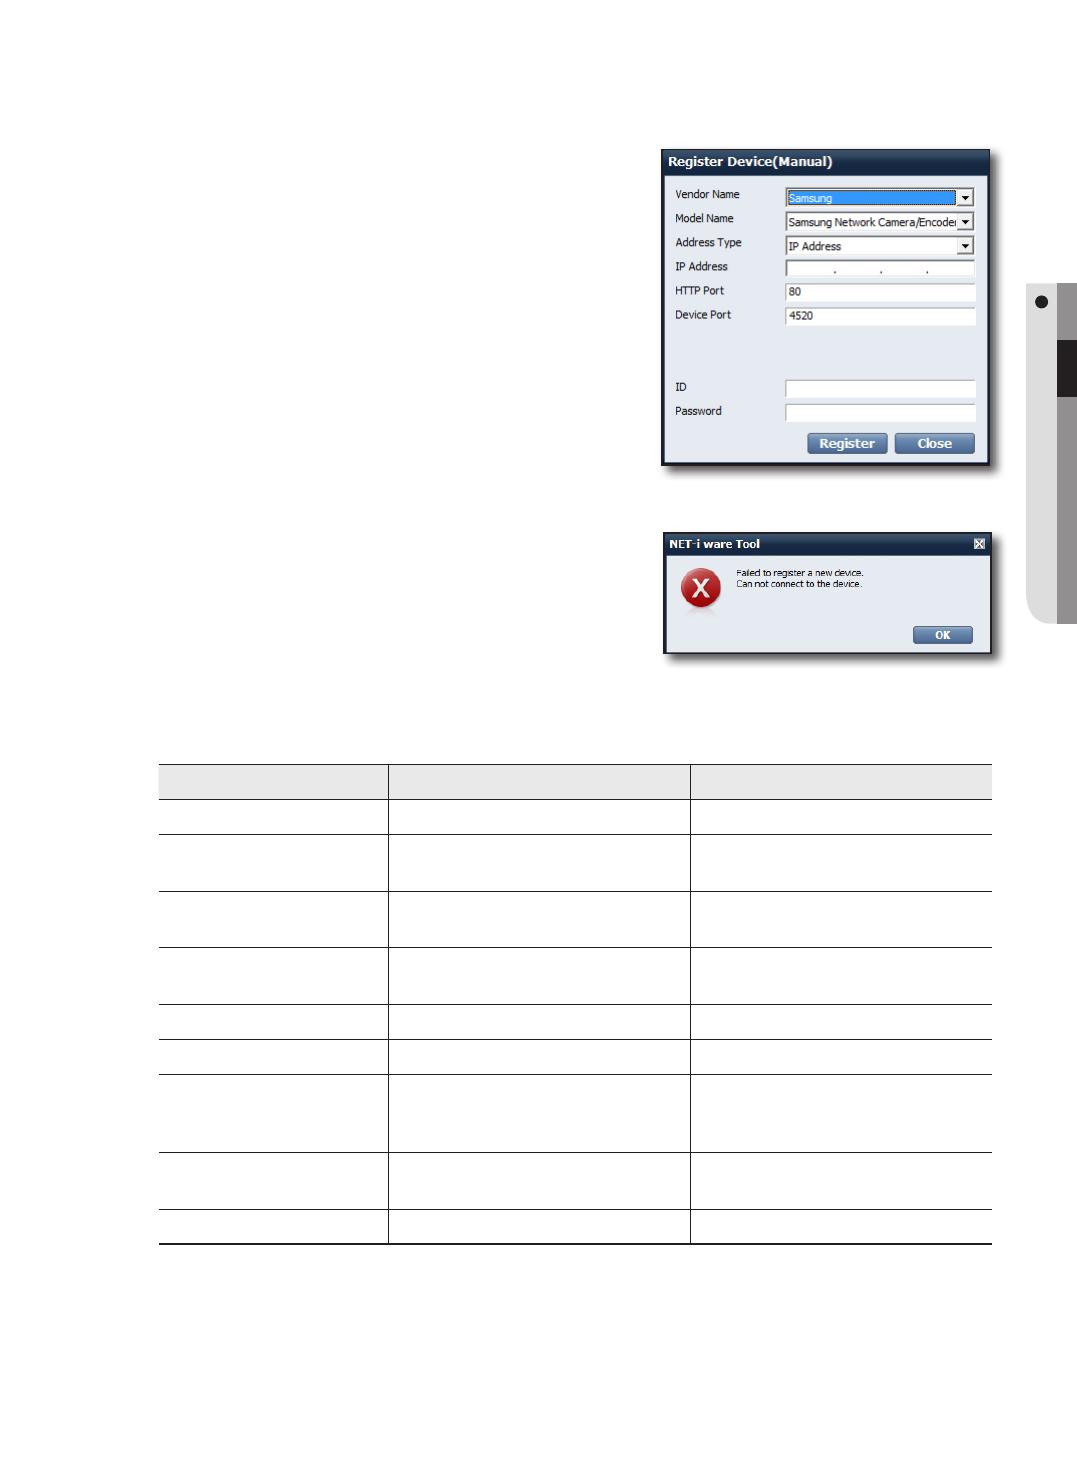
Press the [Manual] button in the bottom left corner of the main window to register a device manually.
1. Click [Manual] to open the "Register Device(Manual)"
window.
2. Select a vendor name and model name.
3. Select an address type.
- Available address types include: IP Address, URL,
websamsung.net, samsungipolis.com
4. Provide necessary information to connect to the device.
- You should provide different information, according to the
vendor name, model name and address type.
5. Provide the ID and password.
The device information includes the ID and password that are
specified for the device.
6. Click [Register].
When registration is completed, the device will be added to the tree.
If it fails, you will see an error message with the cause (see registration error messages).
`
Ex) If connection to the device fails, you will see the error message
shown.
Error Type
If you experience a registration problem, you will see one of the following error messages:
Error Message Description Action
Parameter Error Invalid registration parameter. Verify the information that you provided.
Device Connection Error Device is not connected. Check if the device is connected to the
network properly.
Network Error Network connection failed. Check if the device is connected to the
network properly.
Duplicate Address Error The address already exists. Please check the MAC address of the device
again.
Login ID Error The login ID is not valid. Verify the login ID that you provided.
Login Password Error The login password is not valid. Verify the login password that you provided.
Login Conflict Error The login ID is out of range.
Ex) If you try to log in as an ID that can not
be connected concurrently
Please check the allowable number of
simultaneously logged-in devices.
Exceed the maximum number Exceeded the maximum number of devices
to register.
Please check the number of devices that you
have registered.
Unknown Error Unknown error occurred. Please restart the NET-i ware service.
English _13
Setup
Tree View
The tree will cascade a list of servers, registered devices and
cameras.
The connection status of the server, device and camera will be
displayed in the form of an icon.
You can check the status of the server and device by the color of
the icon.
- : Connected
- : Not connected
Checking the camera status
There are 6 states for the camera connection:
- : Connected + Activated + Schedule Recording
- : Connected + Activated + Manual Recording
- : Connected + Activated + Schedule & Manual Recording
- : Connected + Activated
- : Not Connected + Activated
- : Not Connected + Not Activated
`
You can use the +/– buttons to show or hide the sub menus.
To delete a device
You can select a device to delete.
1) To delete a device
Select a device in the tree and click [Delete].
In the Delete Device dialog, decide to delete recording files and
click [Delete].
M
`
If you check the Delete Recording Data option, the recording data of
the device will be deleted accordingly.
2) Result of deletion
- The device or camera will be deleted in the tree.
- If the appropriate camera is in process of recording or playback, it will be stopped.
14_ English
SETUP
To view the server information
You can change the server name or description and check the address and port number.
1. In the tree, click the server icon <
>.
You can change the server name and description.
2. To save your work, click [Apply].
To view the device information
You can change the device information or request to connect.
`
For camera activation, refer to page 18.
1. In the tree, click the device icon < >.
2. Change the information or request to connect.
To change the device information
1. Change the name, description or properties.
`
The device information includes the ID and password that are specified for the device.
`
Out-of-order devices can be replaced with.
`
Connect the replacing device to the network, and edit its properties(address type and IP, etc.) with those of replaced device.
`
The model name and MAC address cannot be modified while the device is connected.
2. Click [Apply] to save the changes.
3. If connection to the device with the changed properties fails, you will see the Properties window where you
can restore the previous settings.
English _15
Setup
To update the firmware
You can update the device firmware remotely.
1. Click [Firmware Update].
2. Select a vendor name and model name to update.
The selected devices will be listed.
3. Check to select for devices to update.
4. Click [File Browser (
)] and select a firmware file.
5. Click [Update] to update the selected devices. If there is more
than one device to update the firmware, the update will perform
in the sequence from top.
6. When the update is done, the status bar will display a message
of completed. During the update process, no other function will
be enabled.
`
If the firmware update fails during the process, the system will just proceed with the next device.
To view the device settings
For device settings, you can move to the Setup page for each device.
`
For more information, refer to the user guide of the appropriate device.
1. Click [Device Setup Page].
You will see the Setup page of the selected device.
16_ English
SETUP
To view the camera information
You can change the camera information or view the live video.
`
You can change the information or view the live video only if the camera is activated.
`
You can check the resolution, video format, PTZ and audio permissions of the camera.
1. In the device list, click the camera icon < >.
2. Change the information of the connected camera or play the
live video.
To change the camera information
1. Change the name, description or video source.
`
If the camera supports more than one video source, you can select one for live playback 1, 2 and one for recording,
respectively.
2. Click [Apply] to save the changes.
M
`
It is recommended to set a different source (video profile) for each of live source 1 and 2.
To play the live video
You can play the live video, and start/stop manual recording.
1. To start manual recording, click <
> in the bottom of the
screen.
`
The minimum recording time is 30 minutes and you can not stop
recording within 30 minutes after the start of recording.
`
You must assign the camera to a disk before you can proceed with
manual recording.
For more information, refer to To assign a camera to each disk
(Page 21)
2. To stop manual recording, click < >.
`
Manual recording will be stopped if the connection terminates.
M
`
If the camera has an incoming video loss event, recording will not start even if you press the Start Manual Recording button.
English _17
Setup
Activation
To activate a camera
To use a camera, you must activate the camera after you registered it.
`
You can activate up to 64 cameras.
- SNS-SF064 : Max. 64 Cameras / SNS-SF032 : Max. 32 Cameras / SNS-SF016 : Max. 16 Cameras
M
`
If you want to register a multi-channel device for operational purposes, sometimes there happens where not all devices are
available.
Ex) If you register one 4-channel encoder and 31 network cameras with model SNS-SF032, a total of the channels to be
registered will be 35. If this is the case, the maximum number of active channels available is 32 so the remaining 3 will be
disabled.
1. Select a camera in the camera list of the left pane and click
<
>.
The selected camera will move to the right list.
2. To change the camera index, select a camera and use the
<
, > buttons to change the index.
`
The changed index will have the same list order of cameras as in
NET-i viewer.
3. To deactivate an already activated camera, select a camera
in the right list and click <
>.
The selected camera will move to the left list.
4. If you want to sort or find more about the camera list in the left
pane, right-click an empty area to select one of the followings:
- Find object
Enter the name of a device or camera to search for a desired configuration file.
- Sort by name / sort by active index
You can sort the device or camera configuration files by name (ascending) or by index.
5. To save your work, click [Apply].
`
If you activate a camera, the camera will automatically connect to the network.
`
If you deactivate a camera, the camera will be automatically disconnected from the network.
18_ English
SETUP
Camera
You can turn on/off functions of Video, Audio and Covert.
Video
1. Select the video item of a camera that you want to change the
settings of.
2. Select either On or Off.
M
`
If you set the Video function to Off, you can not play the live video,
nor record.
If the Video function is set to Off, the Audio function will be turned off
accordingly.
Audio
1. Select the Audio item of a camera that you want to change the
settings.
2. Select either On or Off.
M
`
If you set the Audio function to Off, you can not play the live audio,
nor voice record.
Audio Recording
1. Click on the Audio Recording of the desired camera.
2. Select either one of On and Off.
M
`
If you set the camera’s Audio Recording to Off, no audio will be
recorded.
Covert
1. Select the Covert item of a camera that you want to change the
settings of.
2. Check the item.
The Covert function will be set to On.
M
`
If you check the Covert item, you can not play the live video or audio,
but can make video or voice recording.
English _19
Setup
Video
You can configure the live 1, 2 and recording video properties for
each active camera.
- Configure the video properties for the live 1, 2 and recording video
source specified in Camera Properties.
(To change the camera information, refer to page 17)
- In Video Properties, there are Resolution, Quality, Frame Rate,
Compression, Bitrate Control, Bitrate and GOP size.
M
`
Cameras in link with a device that does not support this function will
be displayed inactive.
RECORD SETTING
NET-i ware
To change the disk status
The HDD information list will show the information of the HDD currently installed. You can change the status of the
local disk to Assigned or Released.
Allocation
If the local disk is assigned, you can record/scan/play a source.
1. Select a disk that is not assigned.
The [Allocation] button will be activated.
2. Click [Allocation].
The Assign dialog appears.
3. Click [Yes] to change the status of the disk to Assigned.
The icon of the local disk will be displayed green.
M
`
The system disk where the OS is installed can not be assigned.
`
If there is no other disk than the system disk for recording purposes,
you can not proceed with recording.
20_ English
  • Page 1 1
  • Page 2 2
  • Page 3 3
  • Page 4 4
  • Page 5 5
  • Page 6 6
  • Page 7 7
  • Page 8 8
  • Page 9 9
  • Page 10 10
  • Page 11 11
  • Page 12 12
  • Page 13 13
  • Page 14 14
  • Page 15 15
  • Page 16 16
  • Page 17 17
  • Page 18 18
  • Page 19 19
  • Page 20 20
  • Page 21 21
  • Page 22 22
  • Page 23 23
  • Page 24 24
  • Page 25 25
  • Page 26 26
  • Page 27 27
  • Page 28 28
  • Page 29 29
  • Page 30 30
  • Page 31 31
  • Page 32 32
  • Page 33 33
  • Page 34 34
  • Page 35 35
  • Page 36 36
  • Page 37 37
  • Page 38 38
  • Page 39 39
  • Page 40 40
  • Page 41 41
  • Page 42 42
  • Page 43 43
  • Page 44 44
  • Page 45 45
  • Page 46 46
  • Page 47 47
  • Page 48 48
  • Page 49 49
  • Page 50 50
  • Page 51 51
  • Page 52 52
  • Page 53 53
  • Page 54 54
  • Page 55 55
  • Page 56 56
  • Page 57 57
  • Page 58 58
  • Page 59 59
  • Page 60 60
  • Page 61 61
  • Page 62 62
  • Page 63 63
  • Page 64 64
  • Page 65 65
  • Page 66 66
  • Page 67 67
  • Page 68 68
  • Page 69 69
  • Page 70 70

Samsung NET-i ware User manual

Category
Video software
Type
User manual

Ask a question and I''ll find the answer in the document

Finding information in a document is now easier with AI