Xvision Elite 9004P User manual
- Category
- Digital Video Recorders (DVR)
- Type
- User manual
This manual is also suitable for

Professional HD IP NVR
User Guide
Version 1
Thank you purchasing the ELITE NVR from Xvision.
Please ensure that you read and understand this User Guide before operating the NVR.
Please store this User Guide in an easily accessible location.
IP
HD
1080p
Compatible
POWER OVER ETHERNET
PoE

Contents
1. Safety Precautions ........................................................................................................................... 4
2. Descriptions of Front and Rear Panels ............................................................................................ 5
2.1 Description of Front Panel ................................................................................................. 5
2.2 Description of rear panel .................................................................................................... 6
2.3 Description of pin assignment ............................................................................................ 7
3. Getting started ................................................................................................................................. 9
3.1 Connect and switch on ...................................................................................................... 9
3.2 Initial Start setup menu .................................................................................................... 10
4. Live View ........................................................................................................................................ 11
4.1 Tool bar ........................................................................................................................... 12
4.1.1 Status display ......................................................................................................... 12
4.1.2 Log off ..................................................................................................................... 13
4.1.3 Setup ....................................................................................................................... 13
4.1.4 VA (video analytics) ................................................................................................ 13
4.1.5 Quick copy .............................................................................................................. 14
4.1.6 Search ..................................................................................................................... 15
4.1.7 Display .................................................................................................................... 15
4.1.8 PTZ ......................................................................................................................... 16
4.1.9 Digital zoom ............................................................................................................ 17
4.1.10 Log list ..................................................................................................................... 19
5. Search and playback ..................................................................................................................... 20
5.1 Time / Calendar search ................................................................................................... 20
5.2 Panorama search ............................................................................................................ 22
5.2.1 Basic operation ....................................................................................................... 22
5.3 Event search .................................................................................................................... 23
5.4 Copy ................................................................................................................................. 25
6. Quick menu .................................................................................................................................... 26
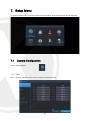
7. Setup Menu .................................................................................................................................... 29
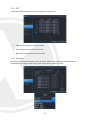
7.1 Camera Configuration ...................................................................................................... 29
7.1.1 Title ......................................................................................................................... 29
7.1.2 Adjust ...................................................................................................................... 30
7.1.3 PTZ ......................................................................................................................... 31
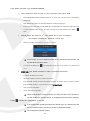
7.1.4 Cam port ................................................................................................................. 31
7.1.5 Virtual port ............................................................................................................... 34
7.2 Configuring display .......................................................................................................... 35
7.2.1 OSD ........................................................................................................................ 35
7.2.2 Monitor .................................................................................................................... 36
7.2.3 Sequence ................................................................................................................ 37
7.3 Configuring disk ............................................................................................................... 38
7.3.1 Setup ....................................................................................................................... 38
7.3.2 Format ..................................................................................................................... 40
7.4 Configuring system .......................................................................................................... 41
7.4.1 Date and time ......................................................................................................... 41
7.4.2 Management ........................................................................................................... 42
7.4.3 Sound ...................................................................................................................... 44
1

7.4.4 RS-485 .................................................................................................................... 44
7.5 Configuring event / sensor ............................................................................................... 45
7.5.1 Sensor input ............................................................................................................ 45
7.5.2 Alarm output setup .................................................................................................. 46
7.5.3 Buzzer output setup ................................................................................................ 47
7.5.4 E-mail setup ............................................................................................................ 48
7.5.5 Push alarm .............................................................................................................. 48
7.6 Configuring user............................................................................................................... 49
7.6.1 User register ........................................................................................................... 49
7.6.2 User authority ......................................................................................................... 51
7.6.3 Log-out .................................................................................................................... 51
7.7 Configuring record ........................................................................................................... 52
7.7.1 Main stream ............................................................................................................ 52
7.7.2 Sub stream.............................................................................................................. 53
7.7.3 Schedule ................................................................................................................. 54
7.7.4 Option ..................................................................................................................... 55
7.8 Configuring network ......................................................................................................... 57
7.8.1 Ethernet port ........................................................................................................... 57
7.8.2 Local port ................................................................................................................ 58
7.8.3 DDNS ...................................................................................................................... 59
7.8.4 E-mail ...................................................................................................................... 60
8. Remote .......................................................................................................................................... 61
8.1 Web server ....................................................................................................................... 61
8.1.1 Connect to web server ............................................................................................ 61
8.2 Initial Page of Web Configuration .................................................................................... 63
8.2.1 Web viewer (Active x) ............................................................................................. 63
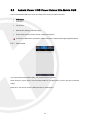
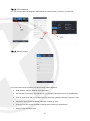
8.3 Android Viewer / iOS Viewer Xvision Elite Mobile CMS .................................................. 74
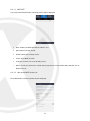
8.3.1 How to use .............................................................................................................. 74
8.4 DDNS server .................................................................................................................... 78
8.4.1 How to register ........................................................................................................ 78
8.4.2 Register ................................................................................................................... 79
8.4.3 Input NVR information. ........................................................................................... 79
8.5 Xvision Elite CMS ............................................................................................................ 80
8.5.1 Installation ............................................................................................................... 81
8.5.2 Execution ................................................................................................................ 82
8.5.3 Live video monitoring .............................................................................................. 82
8.5.4 Connection manager .............................................................................................. 83
8.5.5 Live video window ................................................................................................... 85
8.5.6 Player ...................................................................................................................... 89
8.6 File player ........................................................................................................................ 97
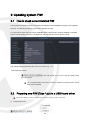
9. Updating system F/W .................................................................................................................... 99
9.1 How to check current installed F/W ................................................................................. 99
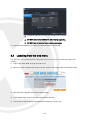
9.2 Preparing new F/W (Type *.zip) in a USB thumb driver .................................................. 99
9.3 Upgrading System from the System Menu .................................................................... 100
9.4 Updating from the web menu ......................................................................................... 101
10. Appendices .......................................................................................................................... 104
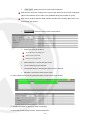
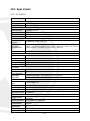
10.1 Items showing in Log List. .......................................................................................... 104
10.2 Spec sheets ................................................................................................................... 107
2

10.2.1 ELITENVR4 .......................................................................................................... 107
10.2.2 ELITENVR16 ........................................................................................................ 109
10.2.3 ELITENVR32 ......................................................................................................... 111
3

1.
Safety Precautions
Check the input voltage (AC100V–AC240V) to the power supply module before connecting
it.
Do not install the equipment in an environment with too much moisture, dust or smoke
dust as this may result in fire or electric shock.
In the unlikely event that the equipment should malfunction and emit an abnormal smell or
smoke, please immediately stop it, shut off the power and contact your supplier.
Please do not place this equipment near a heat source to avoid risk of fire.
Please do not store, install and use this product in danger areas with inflammable or
explosive substances.
Please make sure the power is turned off when installing the product.
Please ensure that you install the NVR in an area with good ventilation.
Please do not use the NVR in an environment where temperatures that exceed either -20°C
to +55°C.
4

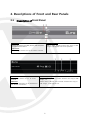
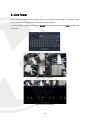
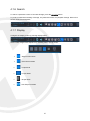
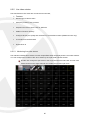
2. Descriptions of Front and Rear Panels
2.1
Description of
Front Panel
1.Status led
Displays the statues of the NVR, Record / HDD read/write
and Network transmission.
2.IR receiver
Infrared signal receiver for the IR remote controller.
3. Front USB 2.0 port
USB 2.0 ports. Provides functions like ‘
Copy to USB
storage’, ‘F/W Upgrade’ and ‘mouse’ operation.
1.IR receiver
Infrared signal receiver for the IR remote
controller.
2.Status led
Displays the information of the NVR Record
and Network transmission.
3.Front USB 1/2 2.0 port
Top Device: USB 2.0 ports. Provides functions like ‘Copy to USB
storage’, etc.
Bottom Device: USB 2.0 ports. Provides functions like ‘Copy to
USB storage’, ‘F/W Upgrade’ etc.
5

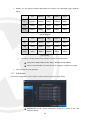
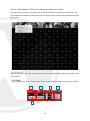
2.2
Description of rear panel
8
9
10
13
4
567
2
1112
13
[Rear panel of 4CH NVR]
1
23
4
5
6 78
9
10
11
12
13
[Rear panel of 8 & 16CH NVR]
4
3
5
212
7
8910
11 513
14
[Rear panel of premium 8/16/32CH NVR]
1.Power Switch(Only the 4CH NVR)
Switch to turn the NVR ON & OFF.
2.VGA Output (Video Graphic Array)
15-pin D-sub connector for the analogue VGA output.
3.Audio Inputs
RCA connectors for the audio signal inputs. (Line In)
4.Power In
12V DC Power socket.
5.Alarm(Sensor) Inputs, RS-485, and Relay Output
• Alarm inputs x 4
• RS-485 Signals. (G: Ground, D+: RX/TX +
signal, D-: RX/TX- signal)
• 4CH NVR: Relay output for the relay 1 (NO:
Normal Open, NC: Normal Closed, CM:
Common)
• 8&16CH NVR: Relay output for the relay 2 (NO: Normal
Open, NC: Normal Closed, CM: Common)
6.Rear USB 2.0(Only the 4CH NVR)
USB 2.0 ports. Provides functions like ‘Copy to USB
storage’, ‘Mouse’ etc.
7.DIGITAL VIDEO OUT
Digital video output for the main monitor.
8. CVBS Monitor Output
Composite video output for the main live screen or the spot screen.
(BNC)
9.RJ-45 Network Port( 1G Base-T)
Network port is used for 1G base-T, PC application software or
Mobile application.
6

10.RJ-45 Local Port( 1G Base-T)
connection between IP camera and NVR through this
port if using local network already installed.
IP address will be automatically assigned as 192.168.1
72.100.
11.RJ-45 Cam(PoE) Port (100M Base-T)
Connection between IP camera and NVR as peer to peer
mode (direct connection). IP address will be assigned in th
e range of 192.168.172.101 ~ 8, automatically. (4CH NVR:
4port / 8&16 NVR: 8port)
12.Audio Outputs
RCA connectors for the audio signal outputs. (Line out)
13.POE Power In (48V)
DC Power socket for POE Power.
14.eSATA Connection Port(Optional)
connect e-SATA storage to expand HDD
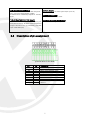
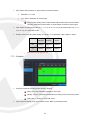
2.3
Description of pin assignment
[Terminal block of 4CH NVR]
Pin
I/O
Description
D-
I
485 – data signal
D+
I
485 + data signal
NO
O
Relay output (Normal Open)
CM
-
Relay Ground
NC
O
Relay output (Normal Close)
GND
-
Sensor Ground
S4
I
Sensor 4
S3
I
Sensor 3
S2
I
Sensor 2
S1
I
Sensor 1
7

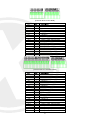
[Terminal block of 8CH NVR]
Pin
I/O
Description
S1
I
Sensor 1
S2
I
Sensor 2
S3
I
Sensor 3
S4
I
Sensor 4
S5
I
Sensor 5
S6
I
Sensor 6
S7
I
Sensor 7
S8
I
Sensor 8
GND
-
Sensor Ground
NC1
O
Relay 1 output (Normal Close)
CM1
-
Relay 1 Ground
NO1
O
Relay 1 output (Normal Open)
NC2
O
Relay 2 output (Normal Close)
CM2
-
Relay 2 Ground
NO2
O
Relay 2 output (Normal Open)
ENG
-
Reserved
GND
-
485 Ground
D+
I
485 + data signal
D-
I
485 – data signal
[Terminal block of 16&32CH NVR]
Pin
I/O
Description
S1
I
Sensor 1
S2
I
Sensor 2
S3
I
Sensor 3
S4
I
Sensor 4
S5
I
Sensor 5
S6
I
Sensor 6
S7
I
Sensor 7
S8
I
Sensor 8
GND
-
Sensor Ground
S9
I
Sensor 9
S10
I
Sensor 10
S11
I
Sensor 11
S12
I
Sensor 12
S13
I
Sensor 13
S14
I
Sensor 14
S15
I
Sensor 15
S16
I
Sensor 16
GND
I
Sensor Ground
NC1
O
Relay 1 output (Normal Close)
CM1
-
Relay 1 Ground
NO1
O
Relay 1 output (Normal Open)
NC2
O
Relay 2 output (Normal Close)
CM2
-
Relay 2 Ground
8

NO2
O
Relay 2 output (Normal Open)
ENG
-
Reserved
GND
-
485 Ground
D+
I
485 + data signal
D-
I
485 – data signal
3. Getting started
It is recommend that you use the mouse to operate the Xvision ELITE NVR so you can use all the
functions, the remote control is limited in the functions supported.
3.1
Connect and switch on
Connect one or more monitors to the Xvision ELITE NVR using HDMI, VGA or CVBS outputs.
Connect the supplied power to the Xvision ELITE NVR. Press the power button on the back panel to begin
operation.
The 8/16ch Xvision ELITE NVR will boot automatically when power is applied to them.
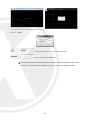
When the system boots up, you will see following system loading screen as shown below.
Depending on the monitor which you connected to the Xvision ELITE NVR, you may
not see an image this is because your monitor doesn’t support the resolution.
The default set resolution is 1024 x 768, so please use a monitor that supports
1024x768.
After the loading screen is displayed, the system will start recording if the installed
HDD (s) are setup/formatted, the NVR will record according to pre-set recording
conditions.
If the loading screen is flashing an odd color while the unit is booting, please check
your monitor cable connection.
Once booted you will see the below screen.
9

3.2
Initial Start setup menu
System language: Select the system language.
System time zone: Select the system time-zone.
Date format: Select the date format.
Video signal format: Select the video signal type.
Video output resolution: Select the video output resolution.
Preview: Check the preview of the video resolution.
The items which are defined in the 'START SETUP' menu will not be initialized
after a factory default.
The settings in the 'START SETUP will replace the factory default value of each
setting. After the factory default in the setup menu, the items defined in 'START
SETUP' will have the values selected here.
10

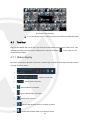
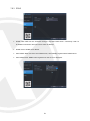
4.
Live View
Once you have completed the Start Setup menu you can login to the Elite NVR, you will need to login
as the Administrator to gain access to the Elite NVR menu options.
You need to type the default user name as
“ADMIN”
and the default password as
“1234”
and press the
enter button.
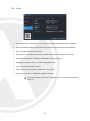
[live mode of 4 channels]
[live mode of 16 channels]
11

[live mode of 32 channels]
It is recommend that you to connect your IPC’s first before the Elite NVR starts.
4.1
Tool bar
The Tool-box display will pop up when you move the mouse pointer to the bottom of the screen, This
will disappear after pre-defined menu setting time or exit with exit button ( ). In the menu you can
set with all-time display.
4.1.1 Status display
Check the current time / Network connection / USB storage connection/ Auto sequence/ HDD location
currently recorded / Audio.
: Display current time.
: Shows User connection
: Shows Network connection.
: Shows USB Storage connection
: Shows Auto sequence
: Shows HDD location which is currently recorded.
: Shows HDD location which is currently recorded.
12

4.1.2 Log off
There are two ways to log off.
One is manual log off and the second is automatic log off after configured time passed with no user
interaction.
Once Log off selected as above, current account will be logged off.
Set up auto log off in SETUP/USER/LOGOUT menu.
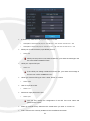
4.1.3 Setup
If you press main menu button, main menu will POP-UP, full details in Section Setup Menu.
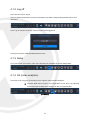
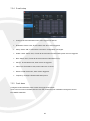
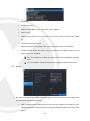
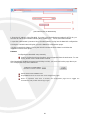
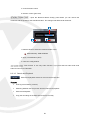
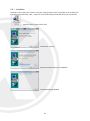
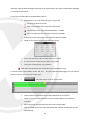
4.1.4 VA (video analytics)
This menu is for using IPC (IP Camera) which supports Video Content Analytics.
The Elite NVR doesn't support VA configuration of your IPC’s, the following
menu shows the VA Meta data coming from the VA supported IPC.
[VA MENU]
13

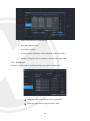
VCA event record: Configure the record schedule once the VA event is activated from the IPC.
VCA only: Elite NVR records only VA event.
VCA off: Elite NVR doesn't recognize VA event as real event.
VCA+MD: Elite NVR recognize VA event and motion event both as an event.
Send E-mail: Elite NVR sends email once VA event recognised.
Attach snapshot: Select either attaching snapshot onto notification email or not.
VCA popup: When the VCA event happens, event channel will be changed to full screen.
VCA popup dwell: Configure the duration for VCA POPUP.
VCA icon display: Elite NVR will display the VA icon on live screen.
VCA box display: Elite NVR will display the VA box on live screen.
VCA zone display: Elite NVR will display the VCA zone on live screen.
Buzzer: Configure the buzzer on /off when the VA event is triggered.
Relay: Configure the relay on/off when the VA event is triggered.
VCA push alarm: Configure the push alarm on/off when the VA event is triggered.
4.1.5 Instant Backup
Click following icon, the instant Backup menu will be pop up. You can save the data 10 minutes from
the current time.
14

4.1.6 Search
To search a particular section of recorded footage, press the
SEARCH
button.
To protect unauthorized viewing of footage, only authorized users can playback footage. More info in
Section Search and Playback.
4.1.7 Display
Configure the display mode by pressing display button.
Select Quad / Single/ Auto sequence by selecting item in pop-up menu.
: Single Screen Mode
: Quad Screen Mode
: 9-split Mode
: 16-split Mode
: 32-split Mode
: Auto Sequence Mode
15

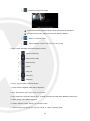
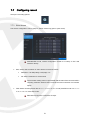
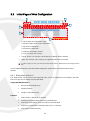
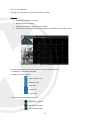
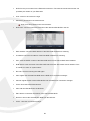
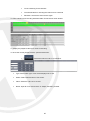
4.1.8 PTZ
When the display mode is set to split screen, the PTZ control panel will be used for the selected
camera which is highlighted by the mouse click. If there is no highlighted camera, the PTZ control
panel will control camera 1 by default. In single display mode, the PTZ control panel is used for the
currently displayed camera.
[PTZ Controller Screen]
①
⑥
② ③
④
⑤
⑦
⑧
1: Select channel for PTZ control.
2: Number to configure Preset.
3: Select the tour function start or end.
4: Control the PTZ.
5: Change the size of control box.
6: Display PTZ control parameters which are set under the ‘DETAIL’ of PTZ menu settings
7: Execute the automatic focus.
8: Execute the auto scan.
16

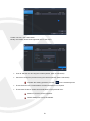
4.1.9 Digital zoom
In Full screen mode, you can enter the Digital Zoom mode with this button.
When using digital zoom in Split screen mode, this feature will default to channel 1, unless you select
a different camera image.
[Zoom mode of 4 / 8 / 16channels]
[Zoom mode of 32channels]
: Move Zoom area with arrow buttons.
: Zoom ratio will be changed from 1x to x5
17

[Zoom by using Mouse]
In full screen mode, you can select the area to zoom in by clicking the left button on the Mouse.
(Drag), Clicking on the zoomed screen, the display returns to the original full screen mode.
Digital Zoom supported in Live / Play mode
Digital Zoom supported only in Full screen mode.
18

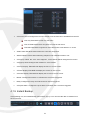
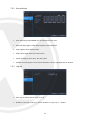
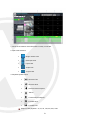
4.1.10 Log list
View the log list by selecting the log list button in Tool bar.
There is a full break down of all log meanings at the end of the manual.
1
2 3
1: Display number from currently triggered (Max 10,000 list can be recorded)
2: Date / Time
3: Log list
19
Page is loading ...
Page is loading ...
Page is loading ...
Page is loading ...
Page is loading ...
Page is loading ...
Page is loading ...
Page is loading ...
Page is loading ...
Page is loading ...
Page is loading ...
Page is loading ...
Page is loading ...
Page is loading ...
Page is loading ...
Page is loading ...
Page is loading ...
Page is loading ...
Page is loading ...
Page is loading ...
Page is loading ...
Page is loading ...
Page is loading ...
Page is loading ...
Page is loading ...
Page is loading ...
Page is loading ...
Page is loading ...
Page is loading ...
Page is loading ...
Page is loading ...
Page is loading ...
Page is loading ...
Page is loading ...
Page is loading ...
Page is loading ...
Page is loading ...
Page is loading ...
Page is loading ...
Page is loading ...
Page is loading ...
Page is loading ...
Page is loading ...
Page is loading ...
Page is loading ...
Page is loading ...
Page is loading ...
Page is loading ...
Page is loading ...
Page is loading ...
Page is loading ...
Page is loading ...
Page is loading ...
Page is loading ...
Page is loading ...
Page is loading ...
Page is loading ...
Page is loading ...
Page is loading ...
Page is loading ...
Page is loading ...
Page is loading ...
Page is loading ...
Page is loading ...
Page is loading ...
Page is loading ...
Page is loading ...
Page is loading ...
Page is loading ...
Page is loading ...
Page is loading ...
Page is loading ...
Page is loading ...
Page is loading ...
Page is loading ...
Page is loading ...
Page is loading ...
Page is loading ...
Page is loading ...
Page is loading ...
Page is loading ...
Page is loading ...
Page is loading ...
Page is loading ...
Page is loading ...
Page is loading ...
Page is loading ...
Page is loading ...
Page is loading ...
Page is loading ...
Page is loading ...
Page is loading ...
Page is loading ...
Page is loading ...
-
 1
1
-
 2
2
-
 3
3
-
 4
4
-
 5
5
-
 6
6
-
 7
7
-
 8
8
-
 9
9
-
 10
10
-
 11
11
-
 12
12
-
 13
13
-
 14
14
-
 15
15
-
 16
16
-
 17
17
-
 18
18
-
 19
19
-
 20
20
-
 21
21
-
 22
22
-
 23
23
-
 24
24
-
 25
25
-
 26
26
-
 27
27
-
 28
28
-
 29
29
-
 30
30
-
 31
31
-
 32
32
-
 33
33
-
 34
34
-
 35
35
-
 36
36
-
 37
37
-
 38
38
-
 39
39
-
 40
40
-
 41
41
-
 42
42
-
 43
43
-
 44
44
-
 45
45
-
 46
46
-
 47
47
-
 48
48
-
 49
49
-
 50
50
-
 51
51
-
 52
52
-
 53
53
-
 54
54
-
 55
55
-
 56
56
-
 57
57
-
 58
58
-
 59
59
-
 60
60
-
 61
61
-
 62
62
-
 63
63
-
 64
64
-
 65
65
-
 66
66
-
 67
67
-
 68
68
-
 69
69
-
 70
70
-
 71
71
-
 72
72
-
 73
73
-
 74
74
-
 75
75
-
 76
76
-
 77
77
-
 78
78
-
 79
79
-
 80
80
-
 81
81
-
 82
82
-
 83
83
-
 84
84
-
 85
85
-
 86
86
-
 87
87
-
 88
88
-
 89
89
-
 90
90
-
 91
91
-
 92
92
-
 93
93
-
 94
94
-
 95
95
-
 96
96
-
 97
97
-
 98
98
-
 99
99
-
 100
100
-
 101
101
-
 102
102
-
 103
103
-
 104
104
-
 105
105
-
 106
106
-
 107
107
-
 108
108
-
 109
109
-
 110
110
-
 111
111
-
 112
112
-
 113
113
-
 114
114


Xvision Elite 9004P User manual
- Category
- Digital Video Recorders (DVR)
- Type
- User manual
- This manual is also suitable for
Ask a question and I''ll find the answer in the document
Finding information in a document is now easier with AI
Related papers
Other documents
-
Micro Innovations KB565BL User manual
-
 Ultracker UN6584 User manual
-
 Meiji Techno HD1500MET & HD1500MET-M Operating instructions
-
Avtech 67xb-a Quick start guide
-
Foscam FN7108HE User manual
-
Swann Pro-Series User manual
-
CNB KNU series User manual
-
 Visualint VI-M-16-4000 Owner's manual
-
 Eyemax HD4K-1.0(A01) User manual
-
Q-See QC Series NVR User manual


