Page is loading ...

- 1 -
INSTALLATION INSTRUCTIONS
Product names listed herein are trademarks of AS America, Inc.
© AS America, Inc. 2017
SAVE FOR FUTURE USE
RECOMMENDED TOOLS AND MATERIALS
Most of the procedures require the use of common tools and materials, which are available from hardware and plumbing
supply stores. It is essential that the tools and materials be on hand before work has begun.
M965816 Rev. 1.0 (7/17)
Model D35120802
Model D35120822
DXV Modulus
™
Widespread Lavatory Faucets
Plumbers' Putty or Caulking
Phillips Screwdriver
Channel LocksTubing Cutter Flat Blade Screwdriver Adjustable Wrench
Basin Wrench
ROUGHING-IN DIMENSIONS:
• For reference
1-1/4" MAX.
(32 mm)
1-1/16" DIA.
(27 mm)
2-3/4" DIA.
(70 mm)
1-3/4"
(45 mm)
1-1/2" MAX.
(38 mm)
3-1/8"
(80 mm)
5-1/8"
(130 mm)
14-1/2"
(368 mm)
8"
(203 mm)
7/8" DIA.
(22 mm)
4-3/8"
(110 mm)
NOTE: MOUNTING HOLES
ARE 1-3/8" DIA. (35 mm)
CONNECTIONS:
• 1/2" IPS FLEXIBLE SUPPLIES
• 3/8" O.D. BULL-NOSE RISERS
2-3/8"
(60 mm)
5-3/16"~7-11/16"
(131~195 mm)
1-1/4" O.D.
(32 mm)
8-1/4"
(210 mm)
5-5/8"
(144 mm)
D35120822
D35120802
In the United States:
DXV
One Centennial Avenue
Piscataway, New Jersey 08855
Attention: Director of Customer Care
For residents of the United States, warranty
information may also be obtained by calling
the following toll free number: (800) 227-2734
www.DXV.com
In Canada:
DXV
5900 Avebury Road
Mississauga, Ontario
L5R 3M3
Canada
Toll Free: 1-800-387-0369
Local: 905-306-1093
Fax: 1-800-395-1498
www.DXV.ca
In Mexico:
DXV
Via Morelos 330
Col. Santa Clara Coatitla
Ecatepec, Estado de México 55540
Toll Free: 01-800-8391200
www.DXV.mx
Thank you for selecting DXV. To ensure that your
installation proceeds smoothly, please read these
instructions carefully before you begin.
D35120802
D35120822

- 2 -
M965816 Rev. 1.0 (7/17)
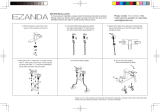
2
3
1
TEE ASSEMBLY
INSTALL VALVE BODIES
• Insert SPOUT (1) through center hole, making sure SEAL
WASHER (2) is properly seated in SPOUT BASE (3) groove.
• Assemble RUBBER WASHER (4), BRASS WASHER (5) and
LOCKNUT (6) onto SPOUT SHANK (7) from under side
of sink. Make sure SPOUT (1) is centered in the mounting
hole and the slot in the BRASS WASHER (5) faces toward
the front of the sink.
• Tighten LOCKNUT (6) rmly.
SPOUT ASSEMBLY
CAUTION
Turn off hot and cold water
supplies before beginning.
• Thread TEE BODY (1) COUPLING NUT (2) to
SPOUT SHANK (3). Tighten with wrenches.
• Unpack valve assembly and Modulusove HANDLE (9).
Unthread FLANGE (8) removing from VALVE BODY (2).
• Thread LOCKNUT (1) to bottom of VALVE BODY (2). Make sure
SPACER (3), BRASS WASHER (4) and RUBBER WASHER (5)
are installed.
• Insert VALVE BODY (2) through mounting hole from underside
of lavatory or mounting surface.
Note: VALVE BODY marked Hot is installed in the left Mtg. hole,
VALVE BODY marked Cold in the right when facing front of
fitting. Maximum mounting surface thickness is 1-3/4".
• Install STOP RING (6) onto VALVE BODY (2) if not in place. Install
WASHER (7) beneath FLANGE (8).
• Thread FLANGE (8) ush against STOP RING (6).
• Align VALVE BODY (2) and from below tighten LOCKNUT (1)
to secure VALVE BODY (2).
INSTALL HANDELS
• Turn VALVES to off position. Align HANDLES (9) as shown or as
desired and install onto CARTRIDGE STEM (10). Make sure the
O-ring (14) is properly seated in the handle base groove.
HOSE CONNECTIONS
• Tighten COUPLING NUT (11) on SUPPLY HOSE (13) to OUTLET (12) making water tight connection.
Important: Loop SUPPLY HOSES (13) as shown so they do not kink.
4
6
5
SLOT
2
7
3
1
1-3/8'' (35mm) MAX.
STOP RING
14
1
2
HOT
12
5
11
COLD
13
11
3
4
8
6
10
7
9
1
3
2

- 3 -
WASTE
OUTLET
1-1/4" O.D.
TAILPIECE
M965816 Rev. 1.0 (7/17)
TEE ASSEMBLY
4
MAKE WATER SUPPLY AND WASTE CONNECTIONS
NOTE: FLEXIBLE SUPPLIES OR BULL-NOSE RISERS NOT INCLUDED
AND MUST BE PURCHASED SEPARATELY.
• Connect water supply to VALVE BODIES (1,1A) with
1/2" IPS FLEXIBLE SUPPLIES (2) or 3/8" O.D.
BULL-NOSE RISERS (3). Use adjustable wrench to
tighten connections. Do not over tighten. Be careful
not to kink copper supply when bending. Use tubing
cutter to cut to proper length.
• Connect HOT water supply to inlet of left SHANK
and COLD water supply to right SHANK using sealant,
appropriate connectors, and COUPLING NUTS.
HOT
COLD
FERRULE
COMPRESSION
NUT
COUPLING
NUT
FLEXIBLE
SUPPLIES
3/8 O.D.
BULL-NOSE
RISERS
1/2" PIPE
THREAD
3/8 COMPRESSION
CONNECTION
2
3
1A
1
5
6
• Apply a bead of PUTTY to underside of
DRAIN BODY FLANGE (1).
• Feed DRAIN BODY (1)) down through lavatory.
• Assembly GASKET (2) WASHER (3) and LOCKNUT (4)
onto DRAIN BODY (1). Tighten LOCKNUT (4) rmly.
• Assembly TAILPIECE (5) to DRAIN BODY (1).
• Connect 1-1/4" O.D. tailpiece on POP-UP DRAIN to waste outlet.
DRAIN INSTALLATION
CONNECT DRAIN
PUTTY
2
1
3
4
5

- 4 -
M965816 Rev. 1.0 (7/17)
7
8
• With HANDLE (1) in OFF position, turn on WATER
SUPPLIES (2) and check all connections for leaks.
• Operate HANDLE (1) to ush water lines thoroughly.
• Clean the Nozzles on the Aerator by massaging each
nozzle using your nger.
• Clean lter screen at inlet hoses.
• Fill lavatory with water. Check that DRAIN STOPPER (3)
makes a good seal and retains water in Sink.
• Check all drain connections and “P” trap for leaks.
Tighten if necessary.
TEST INSTALLED FITTING
CHECK DRAIN CONNECTIONS
HOT
2
2
COLD
“P” TRAP
WASTE
OUTLET
1
3
1

- 5 -
M965816 Rev. 1.0 (7/17)
M953006-0070A
TEE AND HOSE
ASSEMBLY
H960295.191
SPOUT MTG. KIT
H960136.191
1/2" CARTRIDGE
(CLOCKWISE ON)
H960742.191
1/2" SIDE VALVE
(CLOCKWISE ON)
H960741.191
1/2" SIDE VALVE
(COUNTER-CLOCKWISE ON)
H960104.191
1/2" CARTRIDGE
(COUNTER-CLOCKWISE ON)
M970291-YYY0A
MOUNTING KIT
M970290-YYY0A
HANDLE
D35120460.XXX
DRAIN ASSEMBLY
D35120822
D35120802
H960279.191
MOUNTING KIT
M970311-YYY0A
SPOUT &
ESCUTCHEON KIT
MODEL NUMBERS
DXV Modulus
™
Widespread
Lavatory Faucets
D35120802
D35120822
Replace the “YYY” with
appropriate finish code
POLISHED CHROME 100
BRUSHED NICKEL 144
PLATINUM NICKEL 150
/