Page is loading ...

CHARGE MANAGER 2005
BEDIENUNGSANLEITUNG SEITE 3 - 12
CHARGE MANAGER 2005
OPERATING INSTRUCTIONS PAGE 13 - 22
CHARGE MANAGER 2005
NOTICE D’EMPLOI PAGE 23 - 32
CHARGE MANAGER 2005
GEBRUIKSAANWIJZING PAGINA 33 - 42
Best.-Nr. / Item No. /
N° de commande / Bestnr.:
20 20 05
VERSION 10/08

2
Diese Bedienungsanleitung gehört zu diesem Produkt. Sie enthält wich-
tige Hinweise zur Inbetriebnahme und Handhabung. Achten Sie hierauf,
auch wenn Sie dieses Produkt an Dritte weitergeben.
Heben Sie deshalb diese Bedienungsanleitung zum Nachlesen auf!
Eine Auflistung der Inhalte finden Sie in dem Inhaltsverzeichnis mit Angabe
der entsprechenden Seitenzahlen auf Seite 3.
These operating instructions belong with this product. They contain
important information for putting it into service and operating it. This
should be noted also when this product is passed on to a third party.
Therefore look after these operating instructions for future reference!
A list of contents with the corresponding page numbers can be found in the
index on page 13.
Ce mode d'emploi appartient à ce produit. Il contient des recommanda-
tions en ce qui concerne sa mise en service et sa manutention. Veuillez
en tenir compte et ceci également lorsque vous remettez le produit à
des tiers.
Conservez ce mode d'emploi afin de pouvoir vous documenter en temps utile.!
Vous trouverez le récapitulatif des indications du contenu à la table des
matières avec mention de la page correspondante à la page XX.
Deze gebruiksaanwijzing hoort bij dit product. Er staan belangrijke aan-
wijzingen in betreffende de ingebruikname en gebruik, ook als u dit pro-
duct doorgeeft aan derden.
Bewaar deze handleiding zorgvuldig, zodat u deze later nog eens kunt nalezen!
U vindt een opsomming van de inhoud in de inhoudsopgave met aanduiding
van de paginanummers op pagina 33.
NL
F
GB
D

13
Introduction
Dear Customer,
In purchasing this Voltcraft® product, you have made a very good decision for
which we should like to thank you.
You have acquired an above-average quality product from a brand family which has
distinguished itself in the field of measuring, charging and network technology by
particular competence and permanent innovation.
With Voltcraft®, you will be able to cope even with difficult tasks as an ambitious
hobbyist just as much as a professional user. Voltcraft® offers you reliable technolo-
gy at an extraordinarily favourable cost-performance ratio.
We are certain: Your start with Voltcraft will at the same time be the commencement
of a long and profitable co-operation.
We wish you much enjoyment with your new Voltcraft® product!
Table of Contents
1. Intended Use .......................................................................................................14
2. Explanation of Symbols.......................................................................................15
3. Safety Instructions...............................................................................................15
4. General ................................................................................................................17
5. Properties ............................................................................................................18
6. Initial Operation ...................................................................................................19
7. Maintenance and Cleaning..................................................................................20
8. Disposal of Flat Accumulators ............................................................................20
9. Troubleshooting...................................................................................................21
10. Technical Data .....................................................................................................22

14
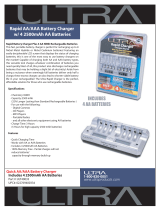
Intended Use
The Charge Manager CM2005 is to be used exclusively for charging simultaneously
up to eight nickel-cadmium or nickel-metal-hydride round cell accumulators, types
Mignon (R6) and Micro (R03), or four round cells of types Mono (R20) and Baby (R14).
Moreover, two 9V compound nickel-cadmium or nickel-metal-hydride accumulators
can be charged additionally in the compartments provided for this purpose. These
compound accumulators may consist of 6, 7 or 8 cells.
The maximum nominal capacity (given in mAh or Ah) of the accumulator to be char-
ged is not restricted.
This charge manager is to be used exclusively for recharging the accumulators
described above. Other types of accumulators must not be recharged!
Lithium ion accumulators, rechargeable alkaline and dry batteries (primary cells)
must not be recharged by using this charging set! Do not recharge non-rechargeable
batteries!
This charge manager is constructed according to protection class II. The charging
station has only been approved for the connection to a common 230V/50Hz alterna-
ting current source.
Use is only permitted in closed rooms, not in the open-air. Use in humid conditions
(e.g. in bathrooms) must be avoided at all times.
Use other than that described above can lead to damage to the product and may
involve additional risks such as short circuits, fire, electrical shocks, etc.
The product must not be changed or modified in any way. Do not open the housing!
Do not operate the charging station if it is open or if some housing parts are missing.
The operation in moist rooms or outdoor or under adverse ambient conditions is not
permitted.
Adverse ambient conditions are the following ones:
- excessive dampness or humidity
- dust or combustible gases, vapours or solvents
- electrical storms or stormy conditions and strong electrostatic fields, etc.
A direct voltage of max. 16V is applied to the connection contacts of the charge
manager.
The charging station is provided with a reverse battery protection and a short circuit
protection.

15
The use of this device is only permitted at a minimum environmental temperature of
0°C and a maximum temperature of +40°C.
The safety instructions should be observed without fail!
Explanation of Symbols
A triangle containing a lightning symbol indicates risks which can lead
to injury. These instructions must be followed strictly!
A triangle containing an exclamation mark indicates important infor-
mation in these operating instructions which is to be strictly followed.
☞
The hand symbol indicates useful tips which can help you when using
the product.
Safety Instructions
Please read through the operating instructions completely before set-
ting up the system; they include important information necessary for
correct operation.
The guarantee will lapse if damage is incurred as a result of non-com-
pliance with the operating instructions! We shall not be held liable for
any consequential damage!
We do not accept any liability for personal injury or damage to property caused by
incorrect handling or non-observance of the safety instructions! In such cases the
guarantee will lapse.
This device left the factory in perfect condition in terms of safety engineering.
To maintain this status and ensure safe operation, the user must comply with the
safety instructions and warnings contained in these operating instructions. The follo-
wing symbols must be observed:
This equipment is CE-tested and thus meets the EMC directive
89/336/EEC and the low-voltage directive 73/23/EEC.

16
Insulation class 2 (double insulated)
Only for use in dry interior environments
For safety and licensing reasons (CE), unauthorised conversion and/or modification
of the device is not permitted.
Consult suitably qualified staff, if you have doubts about how the equipment opera-
tes or about how to connect it safely.
Measuring instruments and accessories are not toys and have no place in the hands
of children!
In commercial institutions, the accident prevention regulations of the Employer’s Lia-
bility Insurance Association for Electrical Systems and Operating Materials are to be
observed.
In schools, training centres, computer and self-help workshops, handling of measu-
ring devices must be supervised by trained personnel in a responsible manner.
Prior to each setup, check your charging device and its cables for damage(s). Never
use the device if the protective insulation is damaged (ripped, torn off etc.).
Do not operate the charging station in areas or unfavourable conditions where com-
bustible gases, vapours or dust are or may be present.
If you have reasons to assume that the safe operation is not possible any longer, take
the device out of operation immediately and protect it against inadvertent operation.
Reasons to assume that the safe operation is not possible any longer include the fol-
lowing ones:
- the appliance is visibly damaged,
- it does not function any longer and
- the appliance has been stored for long periods of time under unfavourable condi-
tions or
- the appliance has been subject to considerable stress in transit.
Do not switch on the charging device immediately after it has been taken from a cold
to a warm environment. The condensation water generated could destroy the device.
Allow the device to reach room temperature before switching it on.

17
Do not leave the packaging material lying around. Plastic foils and bags, polystyrene
parts etc. are dangerous toys in the hands of children.
Before opening the device, disconnect it from all voltage sources.
Capacitors inside the device may still be charged, even if the device has been dis-
connected from all voltage sources.
A defect mains line and/or mains plug as well as the integrated fuse may only be
replaced by a specialist who is familiar with the relevant safety specifications and
regulations.
ATTENTION
Charging devices and batteries/accumulators must be kept out of
the reach of children.
Make sure that the polarity is correct when inserting the accumu-
lators.
Do not leave the batteries/accumulators lying around in the open;
there is a risk of them being swallowed by children or pets. If
swallowed, consult a doctor immediately.
Leaking or damaged batteries/accumulators may cause burning if
they come into contact with the skin. Therefore, you should use
suitable protective gloves when handling batteries/accumulators.
Do not short-circuit batteries/accumulators and do not throw bat-
teries/accumulators into a fire. Batteries may never be re-char-
ged. Danger of explosion!
You should also heed the safety instructions in each chapter of these instructions.
General
Accumulators consist of two electrodes put into an electrolyte; thus, an accumulator
is a chemical element. Chemical processes are running inside this element. Since
these processes are reversible it is possible to recharge accumulators.
The so called charge voltage is required for recharging accumulators. This voltage
must be higher than the cell voltage. Moreover, the energy (mAh) supplied for the
charging process must be higher than the one that can be drawn afterwards. This
ratio of the energy supplied to the energy drawn is called efficiency.
The capacity that can be taken mainly depends on the discharge current; it is decisi-
ve for the condition of the accumulator. The supplied charge cannot be used as a
measure, because a proportion of it will be lost (for example converted into heat).

18
The capacity data given by the manufacturer is the maximum theoretic quantity of cur-
rent which can be delivered by the accumulator. That means that for example an accu-
mulator of 2000mAh can theoretically deliver a current of 1000mA (= 1 ampere) for two
hours. This value considerably depends on many factors (condition of the accumulator,
discharge current, temperature, etc.).
The term C-rate is very common for charging devices. The C-rate is the amount of
current usually indicated for the charging and discharging processes. This current
value given in ampere corresponds to the nominal capacity given in ampere-hours;
that means that 1C = 2.0A for an accumulator of 2000mAh.
Please note that the accumulator capacity which can be drawn mainly depends on the
discharge current: The lower the discharge current the higher the capacity that can be
drawn.
Nowadays, noted manufacturers indicate C/3 for the capacity of an accumulator. That
means that for example an accumulator of 2500mAh achieves these 2500mAh for a
discharge current of 850mA (= ca. C/3). But if a manufacturer indicates a discharge
current of C/10 (= 250mA) for an accumulator of 2500mAh you can take it for granted
that this accumulator cannot deliver 2500mAh for a discharge current of 850mA! The-
refore, the accumulator provided with the indication C/10 is the worse accumulator.
Accumulators discharge themselves in the course of time. This property is known as
self-discharge.
Properties
This is a charge set for nickel-cadmium and nickel-metal-hydride accumulators; it
charges in a rapid or accelerated manner.
The microcomputer-controlled charging process charges the accumulators to 100%.
100% means up to 115% of the capacity indicated for new accumulators and less
than 100% of the capacity indicated for older ones.
This charging set does not require a discharge before starting the recharge process.
Based on its current charge status the accumulator is recharged to its currently pos-
sible 100%.
The recharging cycle is controlled independently of the charge status of the accumu-
lator.
The charging set is provided with an automatic charge conservation.
The charging device has an automatic accumulator monitoring system. The automa-
tic accumulator detection registers if an accumulator is inserted or removed.

19
A memory effect is not caused (the charging current is pulsed). Thus, a high internal
resistance of the accumulator decreases and its current carrying capacity increases.
The efficiency of the accumulator is improved (ratio of the required quantity of cur-
rent to the capacity that can be delivered).
The charging set does not have a memory backup. In case of power failure the char-
ging process starts anew.
If an accumulator exceeds ca. 80% of the capacity it can take up during the rechar-
ging process, a portion of the charging current will be converted into heat. This can
heat up the accumulator.
Initial Operation
Since the device generates heat when operating, ensure that it is
adequately ventilated. The housing must not be covered!
Installing the device
Look for a suitable place close to a mains socket.
The charging station can be set up on a stable and horizontal surface.
Use an appropriate base support to protect the surface of your furnitu-
re. Softener-solvent substances contained in furniture preservatives
could etch the rubber feet of the charger which then in their turn could
damage your furniture.
Connection
If required, remove all accumulators inserted, connect the charging manager and
activate the POWER switch at the back of the device to switch it on. All the ten light
emitting diodes are turned on one after the other and then go out simultaneously.
In this period of time the charge managers performs a self-test.
Now, insert one MONO (R20) or BABY (R16) accumulator centrally in one of the four
twin compartments for round cells or insert one MIGNON (R6) or MICRO (R03) accu-
mulator at the edge of the twin compartments. You can also insert a 9V compound
accumulator in one of the two provided charge compartments.
Always observe the correct polarity.

20
The charge manager identifies this accumulator and starts the CHARGE programme:
the LED flashes in a cycle rate of one second.
A running programme can only be interrupted by removing the accumulator.
If a programme has been successfully completed,the LED does not flash any longer
and gives a permanent light. Now, the accumulator can be removed.
If you do not remove the accumulator and the accumulator needs to be recharged,
the charge conservation programme TRICKLE will be started automatically; this
means that the accumulator will be recharged.
If the recharging process has not been successful, an error message will be display-
ed at the appropriate LED (double flash) and the charging station does not charge
this accumulator any longer.
Maintenance and Cleaning
Apart from an occasional cleaning this charge manager is maintenance-free.
Use a clean, lint-free, antistatic and dry cloth to clean the device. Do not use any
abrasive or chemical agents or detergents containing solvents.
Disposal of Flat Accumulators
You, as the ultimate consumer, are legally obliged (Regulation on Flat Batteries) to
return all flat batteries and accumulators. Disposal in the household waste is pro-
hibited!
Batteries/accumulators containing hazardous substances are marked
by the symbols alongside. These symbols also indicate that it is pro-
hibited to dispose of these batteries in the household waste.
The symbols for dangerous heavy metals are Cd= cadmium,Hg =
mercury Pb = lead and can be seen under the dustbin symbol.
You can return flat batteries/accumulators free of charge to the collec-
tion points in your community, our branches or anywhere else where
batteries or accumulators are sold.
You thus fulfil the legal requirements and make your contribution to the protec-
tion of the environment!

21
Troubleshooting
By purchasing this Charge Manager CM2005, you have acquired a product that is
reliable and operationally safe.
Problems and disturbances may, however, arise.
For this reason we want to describe how to troubleshoot potential malfunctions:
Always adhere to the safety instructions!
Fault Possible cause
No function or - Is the device switched on?
no LED display - Is the mains plug connected to the mains socket?
- Check the mains socket by using another electric
device.
No accumulator - - Have you paid attention to the polarity of the
identified accumulator?
- Are the contacts (of the charging set and/or accumu-
lator) contaminated?
ERROR indication with - The accumulator voltage is too high (battery possibly
an inserted accumulator inserted)
- Accumulator voltage too low (defect accumulator)
- Hardware error detection of the device: charge an
operational accumulator in the same compartment If
the error is detected again, the device is to be repaired.
EMC impulse, - No LED indication or no response:
electrostatic Turn off the device via the mains power switch and
discharge = ESD, then turn it on again
surge pulse or - Error message: here the hardware error detection
line guided has responded to protect the accumulator: Take out
interference immunity the accumulator and insert it anew.
Considerable - Due to the high efficiency of the device the upper and
temperature rise lower sides of the housing can be heated up; there is
at the housing not any defect; ensure a sufficient ventilation
The device does not - Turn off the device and then turn it on again
respond
Repairs other than those just described should only be performed by
an authorised expert.
If you have queries about handling the charging station, our technical
support is available under the following telephone number:
Voltcraft, 92242 Hirschau, Tel. no. 0180 / 586 582 7

22
Technical Data
Operating voltage: 230V~/50Hz
Power consumption: max. 36W
Output
compartments 1 through 8: 5V DC max.,8 * 1A (4 * 2A) max.
compartments A and B: 16V DC max., 2 * 20mA
Charging current:
Total charging current: max. 8A
Protection class: 2 (double insulation)
Type of protection: IP20
Temperature range: T40/E 0°C up to +40°C

Impressum
Diese Bedienungsanleitung ist eine Publikation von Voltcraft®, Lindenweg 15, D-92242 Hirschau,
Tel.-Nr. 0180/586 582 7 (www.voltcraft.de).
Alle Rechte einschließlich Übersetzung vorbehalten. Reproduktionen jeder Art, z. B. Fotokopie, Mikroverfilmung, oder die
Erfassung in elektronischen Datenverarbeitungsanlagen, bedürfen der schriftlichen Genehmigung des Herausgebers.
Nachdruck, auch auszugsweise, verboten.
Diese Bedienungsanleitung entspricht dem technischen Stand bei Drucklegung. Änderung in Technik und Ausstattung
vorbehalten.
© Copyright 2008 by Voltcraft®.
Legal Notice
These operating instructions are a publication by Voltcraft®, Lindenweg 15, D-92242 Hirschau/Germany,
Phone +49 180/586 582 7 (www.voltcraft.de).
All rights including translation reserved. Reproduction by any method, e.g. photocopy, microfilming, or the capture in electronic
data processing systems require the prior written approval by the editor. Reprinting, also in part, is prohibited.
These operating instructions represent the technical status at the time of printing. Changes in technology and equipment
reserved.
© Copyright 2008 by Voltcraft®.
Information légales
Ce mode d'emploi est une publication de la société Voltcraft®, Lindenweg 15, D-92242 Hirschau/Allemagne,
Tél. +49 180/586 582 7 (www.voltcraft.de).
Tous droits réservés, y compris de traduction. Toute reproduction, quelle qu'elle soit (p. ex. photocopie, microfilm, saisie dans
des installations de traitement de données) nécessite une autorisation écrite de l'éditeur. Il est interdit de le réimprimer, même
par extraits.
Ce mode d'emploi correspond au niveau technique du moment de la mise sous presse. Sous réserve de modifications
techniques et de l'équipement.
© Copyright 2008 par Voltcraft®.
Colofon
Deze gebruiksaanwijzing is een publicatie van de firma Voltcraft®, Lindenweg 15, D-92242 Hirschau/Duitsland,
Tel. +49 180/586 582 7 (www.voltcraft.de).
Alle rechten, vertaling inbegrepen, voorbehouden. Reproducties van welke aard dan ook, bijvoorbeeld fotokopie,
microverfilming of de registratie in elektronische gegevensverwerkingsapparatuur, vereisen de schriftelijke toestemming van
de uitgever. Nadruk, ook van uittreksels, verboden.
Deze gebruiksaanwijzing voldoet aan de technische stand bij het in druk bezorgen. Wijziging van techniek en uitrusting
voorbehouden.
© Copyright 2008 by Voltcraft®.
01_1008_01
/