Page is loading ...

w
TABLE A: MODEL DESIGNATIONS
CONSISTS OF
Valu-Vault L
Catalog
VAULT COVER
+’
VAULT HOUSING
No.
COVER
*LOCKS HOUSING
INSIDE
CAT. No.
TYPE REQUIRED
CAT, No.
DEPTH
1481-1
1498-l
1
1496-7
7"
1481-2
1498-2
CLOSED
2
1482-1
1498-1
1
1496-11
1 1"
1482-2
1498-2
2’
1483-1
1499-1
1
1496-7
7"
1483-2
1499-2
SLOTTED
2
1484-1
1499-1
1
1496-11
11"
1484-2
1499-2
2
*USE No. 4008 ADEMCO SECURITY CAM LOCK(S) (NOT FURNISHED)
a
GENERAL INFORMATION:
- The No. 1480 Series of Valu-Vaults provide easily installed, small, secure, key-locked enclosures for the temporary
or permanent storage of valuables.
Table A lists the models that are available, embodying various combinations of the following:
Two Capacities: Vaults with nominal interior dimensions of 5%” x 5%” x 7” or !%” x 5%” x 11” are available.
Two Cover Types: A cover with an “anti-fish” deposit slot or one with no slot may be used,
Two Locking Provisions: A cover accommodating one or (for higher security) two locks may be used.
Optional Mounting Methods: The vault, as received, may be bolted permanently in place to floor, wall, etc.
Alternatively, by using an accessory locking No. 1489 Valu-Vault Bracket (itself mounted permanently in place), the
vault may be unlocked from the bracket whenever necessary. Thus, it may be carried to another location for
emptying and/or replaced with an empty vault.
Optional Electrical Protection: Each vault housing contains mounting holes for the optional installation of a cover
tamper switch (No. 19 for closed circuits, No. 16 for open circuits) and/or a vibration (No. 11) or shock (Type 980 or
982) sensor.
INSTALLATION:
see Diagram I
1. Select a location for the vault, noting the following guidelines:
a. For increased security, an inconspicuous location should be selected. For example, in a home, suggested &a-
tions are: closet, laundry room, attic or basement (statistics show that the master bedroom and dining room are
prime target areas for thieves).
b. The vault may be installed horizontally or vertically on any sturdy surface, such as concrete, wood floor, metal
decking or shelving.
2. If optional electrical protection is to be connected to the vault (see GENERAL INFORMATION), the method
of wiring entry that will be used should be determined (and where appropriate, the wire should be run) before the
vauft is mounted permanently in place. Wire may be brought into the vault via one of the holes at its rear, via the
space at each comer of the vault’s bottom plate or via a hole drilled in the vault’s housing as required. Wiring
should be as inconspicuous as possible. Switches and/or ;$Isors should not be installed until Step 5.
552
www.PDF-Zoo.com

3. Mount the vault housing (or optional No. 1489 Valu-Vault Bracket) in the selected location.
MTPORTANT: Before drilling holes, check for existing electrical wiring and water pipes possibly concealed in
walls or floors.
For Installation on Concrete:
a. Using existing holes in housing (or bracket) as a template, mark hole locations on concrete to insure proper
placement.
b. Using a Ye” masonry drill bit, drill holes approximately 1 3/e” deep.
c. Insert Lok-Bolt (supplied) into each hole, tapping lightly until all but l/2’ of Lok-Bolt is in hole.
d. Remove nuts and washers from Lok-Bolts, place vault housing (or bracket) over bolts, replace nuts and wash-
ers and tighten until vault housing (or bracket) is secure.
For Installation on Metal Decking or Shelving:
Use 3/g” carnage bolts (not supplied). Insert from the bottom of the decking or shelving and install nuts’(not supplied)
from inside of vault (or bracket).
F?r Installation on Wood Floors:
Use,3/e” x 1 W’ lag bolts (not supplied) installed from inside of vault (or bracket).
4. lf a No. 1489 Valu-Vautt Bracket was installed in Step 3, place the housing in it, add a No. 4008 Cam Lock to
the brackets front plate and lock the housing in the bracket (see Diagram 2).
5. lf optional electrical protection is being installed, mount the tamper switch and/or vibration or shock sensor
via the holes provided inside the left wall of the vault housing (see Diagram 1) and complete the wiring and con-
nections that may have begun in Step 2.
Note: If the devices are connected in a supervised protective circuit with end-of-line resistor, the vault should be
at the end of the circuit, and the end-of-line resistor should be installed inside of the vault, for greater
security.
6. Install No. 4998 Cam Lock(s) (not supplied) on the vault cover. If a slotted cover is being used, the anti-fish
guard included with the cover should be held in place by the lock(s) as indicated in Diagram 1.
7. Slide the vault cover under the flange at the top of the vault housing and lock it in place to complete the
installation.
GENERAL SPECIFICATIONS:
Physical :
Front Side
Height
Nos. 1481-l Interior
I
: 51/21
(14.oCm) X
5%”
(14.oCm) X
7”(17.8cm)
1481-2 Exterior : 6” (15.2cm) x
6”(15.2cm)x7’/2”(19.lcm)
1483-1 Exterior, with
1483-2 No. 1489’:
6(/2’@ (16.5cm) x 7%” (18.4cm) x 8” (20.3cm)
‘Nos. 1482-1 Interior
I
: 5’hn
(14.oCm) X
5%”
(14.oCm) X
11” (27.9cm)
1482-2 Exterior : 6” (15.2cm) x
6” (15.2cm) x 11 l/2* (29.2cm)
1484-l Exterior, with
1484-2 No. 1489’:
6%” (16.5cm) x 7%” (18.4cm) x 12” (30.5cm)
l
Valu-Vault Bracket
Electrical :
Provision in vault housing for mounting:
Cover Tamper Switch: No. 16 (for open circuit)
No. 19 (for closed circuit)
Vibration Sensor:
No. 11
Shock Sensor:
Type 980 (for Type 970,971 Analyzers)
Type 982 (for Type 972,973 Monitors)
TO THE INSTALLER
Regular maintenance and inspection (at least annually) by the installer and frequent testing by the
user is vita\ to continuous satisfactory operation of any alarm system.
The installer should assume the responsibility of developing and offering a regular maintenance
program to the user as well as acquainting the user with the proper operation and limitations of the
alarm system and its component parts. Recommendations must be included for a specific program
of frequent testing (at least annually) to insure the system’s proper operation at all times.
562
553
www.PDF-Zoo.com

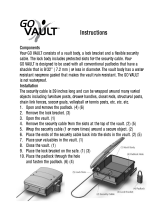
t-ISLES ARE
PROVIDED FOR
OPTIONAL
Nd. 19 (CLOSED
CIRCUIT) OR
No. 16 (OPEN
CIRCUIT)
TAMPER SWITCI
USE “/‘se
SCREWS
(e.g.: No. 572).
AND
CAM RETAINING NUT
-LOCKING CAM
ON CONCRETE
LOCK MOUNTING NUT
(SEE TEXT)
I I
w
WIRING MAY ‘!
ENTER VIA
t-e:
To INSTALL LOCK (See A-A)
1. Place lock in hole.
2. Position Anti-Fish Guard over lock.
3. Install and tighten Lock Mounting Nut.
4. Place Locking Cam over threaded tenon.
5. Install and tighten Cam Retaining Nut.
ANTI-FISH
------
GUARD
(FURNISHED
VIEW A-A
WITH EACH
SLOTTED COVER)
AS REQUIRED.
FOR MOUNTING
WITH OPTIONAL
No. 1489Valu-Vault .
BRACKET, SEE
DIAGRAM 2
Diagram 1: TYPICAL INSTALLATION
DETAILS (No. 1484-2 SHOWN)
(NOT SUPPLIED)
www.PDF-Zoo.com

No. 1489
VIEWED
FROM
ABOVE-
-JO
No. 1480
SERIES
Valu-)/ad
\
01‘.
G&,
/
,
/
,,T+
/
/
/
,
I +.
- POSTS (2): Fit into
holes at rear of
..n
vault housing
\
TABS (5): Support
base of vault
housing
, MOUNTING HOLES (4)
USE LOK-BOLTS
(SUPPLIED) FOR
MOUNTING ON
CONCRRE (SEE
TEXT).
ENGAGE
SLOT
FOR LOCKING
MOUNTING
INFORMATION.
No. 4008
SEE DIAGRAM 1’
CAM LOCK
(NOT SUPPLIED)
P
k/
VIEW
A-A
l’io.
1489
Diagram 2: OPTIONAL
No. 1489
Valu-Vault
BRACKET
ALARM DEVICE MANUFACTURING CC.
A DIVISION OF PITTWAY CORPORATION
165 &&en Way, Syosset. New York 11791
555
Copyright 8 198 2 PIllWAY Corking
www.PDF-Zoo.com
/