Page is loading ...

PROSTEEL VAULTS
BROWNING.COM
US: Morgan, Utah 84050-9326
CANADA: Browning Canada Sports Ltd/Ltée,
St-Laurent, Quebec, H4S 1W6
INTL: Parc Industriel des Hauts-Sarts,
B-4040 Herstal, Belgium
AO1505/15157
PISTOL
VAULT
OWNER’S MANUAL

1
CONTENTS PAGE
Thank You for Purchasing a
Browning Pistol Vault ............................................... 2
Serial Number ........................................................... 2
Opening the Pistol Vault........................................... 2
Installing the Batteries .............................................. 4
Interior Lighting ....................................................... 6
Opening the Pistol Vault
Using the Keypad ...................................................... 6
Locking the Pistol Vault ............................................ 7
Programming an Access Code.................................. 7
Lost Access Code ....................................................... 8
Programming and Using the
Biometric Scanner..................................................... 8
Silent Mode ............................................................... 9
Anchoring the Pistol Vault ....................................... 9
Care .......................................................................... 10
Limited Materials and
Workmanship Warranty ......................................... 11
Important Operating Instructions for:
BROWNING PROSTEEL
PISTOL VAULT
If you have any questions about your new pistol
vault, this owner’s manual or other Browning
products, contact:
Browning Consumer Information
One Browning Place
Morgan, UT 84050-9326
Phone: (801) 876-2711
www.browning.com
Please use the space below to record information
about your new pistol vault.
Model ___________________________________
Serial Number _____________________________
Combination ______________________________
Purchased From ___________________________
Date of Purchase ___________________________

2 3
THANK YOU FOR PURCHASING
A BROWNING PROSTEEL
PISTOL VAULT
Browning offers the finest home security products
available. With proper care and installation, your
Browning ProSteel Pistol Vault will provide you with
many years of peace of mind and security.
SERIAL NUMBER
Your pistol vault’s serial number is located on a
label on the back of the vault. Do not remove this
label. You will need the serial number should
warranty concerns arise. Since this portion of the
pistol vault might not be easy to access once it is
mounted, record the serial number on the first page
of this owner’s manual, or in another secure
location, prior to installation. Do not lock the
recorded serial number inside the pistol vault.
OPENING THE PISTOL VAULT
The pistol vault can be opened using the included
keys, keypad or biometric lock (if equipped). For
initial opening, use the keys, or the keypad and
external power supply access (page 3). With the
pistol vault open, install the eight (8) AA batteries
(not included) as instructed on page 4.
The keypad and biometric scanner are powered by
eight AA batteries (not included) that are located
inside the pistol vault. Should the batteries lose
power, the pistol vault can still be opened using the
keypad or biometric scanner and the external power
supply access or the included keys.
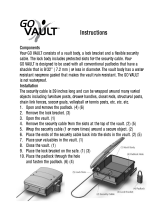
USING THE KEYPAD
The keypad is made up of four buttons and an
LED light (Figure 1, page 3). The buttons on
the keypad are labeled as indicated below. To
simplify this explanation, a corresponding number
is also shown.
See page 7 for instructions on programming
the keypad.
THE USING THE BIOMETRIC SCANNER
Some pistol vaults feature a biometric scanner that
requires only your fingerprint for you to gain access.
See page 8 for instructions on programming the
biometric scanner.
EXTERNAL POWER SUPPLY ACCESS
Should the batteries lose power, the pistol vault can
still be opened with the keypad using the external
power supply access.
1 Locate the external power supply access contacts
near the keypad.
The keypad is made up of four buttons and an LED light (indicated). The
biometric model shown includes a fingerprint scanner that makes accessing
the pistol vault fast and easy.
FIGURE 1
I = 1
II = 2
III = 3
IIII = 4
The external power supply access is located near the keypad. (Top opening
model shown.)
FIGURE 2

4 5
2 Place and hold a new 9V battery (not included)
on the external power supply access contacts
(Figure 2, page 3).
On top open models the + (positive) contact is
the left and the – (negative) is the right.
On front open models the + (positive) contact is
the top and the – (negative) is the bottom.
3 Enter the access code using the keypad.
USING THE KEY
The pistol vault can also be opened using the
included key. The key is unique, and must
be oriented correctly to ensure it slips into
the keyhole.
1 Locate and remove the rubber keyhole cover.
2 To correctly insert the key into the keyhole, first
locate the round dimple on the key.
3 Insert the key so that the dimple is closest to
the external power supply contacts (Figure 3).
4 Insert the key fully and rotate it clockwise
1
⁄4 turn.
IMPORTANT: The key is retained in the lock until
the safe is locked.
INSTALLING THE BATTERIES
The pistol vault requires eight AA batteries (not
included). The battery tray is located inside the
locking bolt housing and is secured in place
with two screws (Figure 4).
To install or replace the batteries, perform the
following operation.
1 Open the pistol vault. If you are installing
batteries for the first time, use the included key.
If you are replacing batteries, open the pistol
vault using either the external power supply
access and the factory access code or your
custom access code.
2 Carefully remove the two screws that secure the
battery tray cover (Figure 4).
3 Remove the cover and attached battery tray.
4 Unplug the power wire from the battery tray.
Detach the battery tray from the cover. Install
fresh batteries in the battery tray, oriented as
shown on the battery tray.
5 Replace the battery tray onto the cover with the
power wires up. Plug the connector into the
battery tray. .
6 Insert the tabs on top of the cover into the
locking bolt housing and replace the battery
tray in the housing. Take care not to pinch the
power wires.
7 Replace the two screws that retain the battery
tray cover. Do not overtighten the screws.
Orient the key so that the dimple on the head (circled) of the key is close to
the power supply contacts. Turn the key clockwise
1
⁄4 turn to unlock.
FIGURE 3
Remove the indicated screws to access the battery tray.
FIGURE 4

6 7
INTERIOR LIGHTING
Interior lighting is provided by long lasting LEDs.
They are automatically activated when the vault is
opened and shut off when the lid is closed.
OPENING THE PISTOL VAULT
USING THE KEYPAD
ACTIVATING THE KEYPAD
When not in use, the keypad goes into sleep mode
to conserve battery life. Prior to entering an access
code, the keypad must be activated. Press the IIII (4)
button to activate, then enter the access code.
USING THE KEYPAD
With batteries installed in the pistol vault, it is a
good idea to practice opening it using the factory
access code.
The access code is the series of button entries
used to access the pistol vault. For example, the
pistol vault is shipped from the factory with the
access code: 1 • 2 • 3 • 4 • 1 • 2. To open the pistol
vault using the factory access code, perform the
following operation.
1 Activate the keypad by pressing button 4. A chirp
will indicate that the keypad is activated.
2 Enter the factory access code: 1 • 2 • 3 • 4 • 1 • 2.
A chirp will sound and the green LED will flash
with each entry.
3 If the access code is entered correctly, the lid will
spring open. If the access code is entered
incorrectly a long chirp will sound and the LED
will flash red.
If the code is entered incorrectly, it is not
necessary to reactivate the keypad by pressing
button 4. If the LED flashes red due to an
incorrect code entry, re-enter the correct code.
IMPORTANT: If the access code is entered
incorrectly three times in succession, the lock will
shut down for ten minutes and then enter sleep
mode. The key can still be used to access the
pistol vault.
LOCKING THE PISTOL VAULT
The pistol vault automatically locks when the lid is
fully closed. Simply close the lid, hold it in place
briefly and the bolts secure the lid. The lid can also
be secured using the key.
IMPORTANT: The key can only be used to secure
the lid if it was used to open the pistol vault. If the
pistol vault was opened using the external power
supply access feature, the key will not secure the lid.
PROGRAMMING AN ACCESS CODE
SELECTING AN ACCESS CODE
Your access code is the series of button entries you
choose to open the pistol vault. When programming
an access code, it is important to select a
combination that is both difficult for others to
guess, but is easy for you to operate and quickly
gain entry.
Your access code must be made up of six individual
button entries. For example, the factory access code
is: 1 • 2 • 3 • 4 • 1 • 2.
PROGRAMMING A NEW ACCESS CODE
1 Activate the keypad by pressing the 4 button. A
chirp will indicate that the keypad is activated.
2 Press and hold the 1 button for three seconds
and release it. Three chirps will sound.
3 Enter the current access code: 1 • 2 • 3 • 4 • 1 • 2.
Three chirps will sound, indicating a new access
code can be entered.
4 Enter a new six-button access code such as:
1 • 2 • 3 • 4 • 3 • 4. Three chirps will sound.
5 Reenter the new six-button access code to
confirm it. Three chirps will sound if the new
access code is accepted.
If a long chirp sounds and the LED flashes red,
then the access codes do not match and you
must start over at step 2. After three unsuccessful
attempts at changing the access code, the lock
will shut down for ten minutes and then enter
sleep mode.
6 The access code is now changed and the lock will
enter sleep mode.

8 9
LOST ACCESS CODE
We strongly encourage you to write down your
access code and keep a backup copy in a hidden and
secure location outside the pistol vault. To protect
the safety of your access code, we will not release an
access code without a security check. We do not
maintain any ownership information on gun vaults
and access codes are tracked only by serial number.
If you lose your access code, we will only release it
upon completion of a security check process that
requires your pistol vault’s serial number and several
other steps. Your pistol vault’s serial number is
located on the back of the safe. There is a place to
record this serial number and the access code on the
first page of this owner’s manual.
PROGRAMMING AND USING
THE BIOMETRIC SCANNER
Some pistol vault models feature a biometric
scanner that uses your unique fingerprint to open
the door. Always use the same finger to open the
Pistol Vault. To program your fingerprint into the
finger pad, perform the following operation.
PROGRAMMING THE FINGER PAD
1 Activate the keypad by pressing the 4 button. A
chirp will indicate that the keypad is activated.
2 Press and hold the 3 button for three seconds
and release it. Three chirps will sound.
3 Enter your current access code or, if you have
not entered an access code, enter the factory
access code: 1 • 2 • 3 • 4 • 1 • 2. The finger pad
will illuminate when ready.
4 Place your finger on the finger pad.
5 A chirp will sound when the fingerprint has
been accepted. Remember, you must use the
same finger to open the Pistol Vault.
OPENING THE PISTOL VAULT USING THE FINGER PAD
1 Activate the keypad by pressing the 4 button. A
chirp will indicate that the keypad is activated.
2 The finger pad will illuminate when ready.
3 Place your finger on the finger pad.
4 The door will open.
CHANGING THE ACCESS FINGERPRINT
1 Activate the keypad by pressing the 4 button. A
chirp will indicate that the keypad is activated.
2 Press and hold the 4 button for three seconds.
3 Enter your current access code or, if you have
not entered an access code, enter the factory
access code: 1 • 2 • 3 • 4 • 1 • 2.
4 A chirp will sound when all fingerprints have
been deleted from the system. You can now
program a new fingerprint.
SILENT MODE
Silent mode disables the chirping sounds made
when buttons are pushed, allowing you to access the
pistol vault quietly.
ACTIVATING SILENT MODE
1 Activate the keypad by pressing the 4 button. A
chirp will indicate that the keypad is activated.
2 Press the 1 and 2 buttons simultaneously. The
LED will flash three times to indicate that the
pistol vault is in silent mode. There will no
longer be a confirmation chirp when a button
is pressed.
DEACTIVATING SILENT MODE
1 Activate the keypad by pressing the 4 button.
2 Press the 1 and 2 buttons simultaneously. The
LED will flash three times and you will hear
three chirps to indicate that silent mode has
been deactivated. There will now be a
confirmation chirp when a button is pressed.
ANCHORING THE PISTOL VAULT
Anchoring your pistol vault to a floor, sturdy shelf
or wall provides excellent protection for your
valuables. This prevents the pistol vault from simply
being picked up and carried away. The pistol vault
has two pre-drilled holes in the bottom that can be
used to secure the vault to a shelf, the floor or a wall.

10 11
ANCHORING YOUR PISTOL VAULT
ALWAYS WEAR EYE AND EAR PROTECTION WHEN
USING A DRILL OR OTHER POWER TOOLS TO PREVENT
THE POSSIBILITY OF DUST OR DEBRIS FROM
CONTACTING YOUR EYES, RESULTING IN INJURY.
ALWAYS USE A DUST MASK TO PREVENT INHALATION
OF POTENTIALLY HARMFUL DUST.
1 Locate the two holes on the bottom of the
pistol vault.
2 Using a sharp object, carefully trim the interior
padding from the holes.
3 Determine the location of the pistol vault. Open
the pistol vault and, using a pencil, mark the
locations of the mounting holes on the
mounting surface. The mounting holes will
accept up to
3
/8" diameter bolts. For additional
security, use fender washers inside the pistol
vault, underneath the bolt heads.
4 Drill holes in the mounting surface with a drill
bit suitable for the anchor bolts you selected.
5 Secure the pistol vault to the mounting surface.
CARE
Use a damp cloth to wipe the surface of the pistol
vault. A mild soap solution may also be used.
Use of harsh cleaners or adhesives could cause
permanent damage. The Pistol Vault is designed
for indoor use only.
LIMITED MATERIALS AND
WORKMANSHIP WARRANTY
ProSteel warrants your pistol vault to be free from
defective materials and workmanship for 90 days
from the date of purchase
. This warranty does not
apply to damage or loss resulting from accident,
alteration, misuse, unauthorized entry or improper
installation, damage resulting from exposure to
moisture and/or condensation, nor does it cover
wear or scratching of paint or plating.
If the product should become defective within the
warranty period, ProSteel will repair or replace it (at
ProSteel’s discretion) free of charge. A replacement
pistol vault or part will be shipped curbside delivery.
(For destinations in the continental United States.)
Should any defect be noted, the purchaser agrees to
inform ProSteel in writing before any work is
performed. For consumers in Canada, please contact
Browning Canada. For consumers in Europe or the
United Kingdom, please contact Browning
International S.A. (page 11).
IMPORTANT: All repair work claimed under this
warranty must be approved by the manufacturer
prior to repair. Any unauthorized repair,
dismantling, or tampering with the locking
mechanism shall nullify this warranty.
Neither ProSteel Security Products nor Browning
will be liable for consequential or incidental
damages or expenses. This warranty is in lieu of any
other warranty from ProSteel Security Products or
Browning, whether expressed or implied, including
but not limited to, any warranty of merchantability
or fitness for any particular purpose.
This warranty gives you specific legal rights. You
may also have other rights, which vary from state
to state.

12
For more information regarding your warranty,
please contact:
ProSteel Security Products
Customer Service Dept.
1400 South State
PO Box 977
Provo, UT 84603
(877) 501-7233, ext.14
For customers in Canada, please contact:
Browning Canada Sports Ltd./Ltée
5583 Chemin St Francois
St Laurent, Quebec
Canada H4S1W6
(514) 333-7261
For customers in Europe or the United Kingdom,
please contact:
Browning International S.A.
Parc Industriel des Hauts-Sarts
3eme Avenue #25
4040 Herstal, Belgium
00 32 4 240 52 11
For non-warranty questions, contact Browning at:
Browning Consumer Department
One Browning Place
Morgan, UT 84050
(800) 333-3288
/