Trendnet TEW-806UBH User manual

Category
Routers
Type
User manual

This manual is also suitable for

© Copyright 2014 TRENDnet. All Rights Reserved.
TRENDnet User’s Guide
Table of Contents
i
Contents
Product Overview ........................................................................... 1
Package Contents .......................................................................................................... 1
Features ......................................................................................................................... 1
Product Hardware Features........................................................................................... 2
System Requirements .................................................................................................... 2
Application Diagram ...................................................................................................... 2
Installing your Wireless Adapter ...................................................... 3
Windows® OS Installation .............................................................................................. 3
MAC® OS Installation ..................................................................................................... 6
Using the Wireless Utility .............................................................. 10
Windows® OS............................................................................................................... 10
Wireless Utility Overview ........................................................................................ 11
Connect to your wireless network .......................................................................... 14
Connect to your wireless network using WPS......................................................... 15
Create or modify wireless network profiles ............................................................ 18
MAC® OS ...................................................................................................................... 20
Wireless Utility Overview ........................................................................................ 21
Connect to your wireless network .......................................................................... 27
Connect to your wireless network using WPS......................................................... 28
Create or modify wireless network profiles ............................................................ 31
Technical Specifications................................................................. 33
Troubleshooting ............................................................................ 34
Appendix ...................................................................................... 35
© Copyright 2014 TRENDnet. All Rights Reserved.
TRENDnet User’s Guide
TEW-806UBH
1
Product Overview
TEW-806UBH
Package Contents
In addition to your wireless adapter, the package includes:
CD-ROM (Utility & Drivers)
Multi-Language Quick Installation Guide
If any package contents are missing or damaged, please contact the retail store, online
retailer, or reseller/distributor from which the product was purchased.
Features
TRENDnet's AC600 High Gain Dual Band Wireless USB Adapter, model TEW-806UBH,
connects a Windows® or Mac® computer to a revolutionary Wireless AC network.
Connect to a Wireless AC network at 433 Mbps or to a Wireless N network at up to 150
Mbps. This adapter features an adjustable high gain antenna which significantly
increases wireless coverage.
Ease of Use
Easy Setup
Get up and running in minutes with the intuitive guided setup
Operating Systems
Compatible with Windows® and Mac® operating systems
One Touch Connection
Securely connect to the router at the touch of the Wi-Fi Protected Setup (WPS) button
Performance
High Gain Antenna
An adjustable high gain antenna significantly increases wireless coverage
Next Generation Wireless AC
802.11ac provides uninterrupted HD video streaming in a busy connected home
Dual Band
High speed 433 Mbps Wireless AC + 150 Mbps Wireless N bands
Encrypted Wireless
Supports the latest encryptions standards (up to WPA2)
Backward Compatible
Compatible with legacy wireless devices
*For maximum performance connect to an 802.11ac wireless router or access point
**Maximum wireless signal rates are referenced from IEEE 802.11 theoretical
specifications. Actual data throughput and coverage will vary depending on
interference, network traffic, building materials and other conditions.
© Copyright 2014 TRENDnet. All Rights Reserved.
TRENDnet User’s Guide
TEW-806UBH
2
Product Hardware Features
USB Connector – The USB 2.0 Type A connector connects your adapter to one of
the available USB 2.0 Type A ports on your computer.
WPS (Wi-Fi Protected Setup) Button / Activity LED Indicator Push and hold the
WPS button for 3 seconds to activate WPS. The LED will blink rapidly to indicate
WPS has been activated. The LED will blink every 5 sec. when disconnected. When
connected, the LED will blink rapidly during wireless data transmission.
High Gain Antenna – The high gain antenna can be rotated 180° at the base, 90° at
the antenna, and 90° antenna tilt in order to optimize performance and
connectivity.
System Requirements
Windows® 8.1 (32/64), 8 (32/64), 7 (32/64), Vista (32-bit), or XP (32/64)
Mac OS® 10.6 - 10.9
Available USB 2.0/3.0 Type A port on your computer.
Note: Connecting the wireless adapter USB 1.1 Type A port will limit the speed
capabilities of the wireless adapter. Please ensure to connect the adapter to at
least USB 2.0 Type A port.
CD-ROM Drive (Utility and Driver Installation with included CD)
Application Diagram
The AC600 High Gain Dual Wireless USB Adapter can provide wireless AC or wireless N
connectivity through the use of an available USB 2.0/3.0 port on your computer to a
wireless AC/N network (router/access point). The adjustable high gain antenna can
allow for wireless connectivity at longer distances.
WPS Button
Activity LED
Indicator
USB 2.0
Connector
Adjustable High
Gain Antenna
© Copyright 2014 TRENDnet. All Rights Reserved.
TRENDnet User’s Guide
TEW-806UBH
3
Installing your Wireless Adapter
This section describes how to install the software driver and utility for the wireless
adapter.
Windows® OS Installation
1. Insert the included CD-ROM into your computer’s CD-ROM drive.
Note: If you do not have the included CD-ROM, you can download the utility and drivers
from http://www.trendnet.com/downloads/
.
2. At the CD Autorun Prompt window, click Run Autorun.exe.
Note: If the Autorun prompt does not appear automatically, open the CD contents and
double-click Autorun.exe.
3. At the CD-ROM main menu, click Install Drivers & Utility.
4. You will be prompted to accept the end user license agreement. Select I accept the
terms of the license agreement and click Next.
© Copyright 2014 TRENDnet. All Rights Reserved.
TRENDnet User’s Guide
TEW-806UBH
4
5. Select your preferred installation option and click Next.
Driver and TRENDnet WLAN Utility (Recommended) Installs both the driver
and TRENDnet software utility to manage your wireless connections.
Driver Only (Use the built-in Windows Utility) Installs the driver only and use
the built-in Windows wireless utility to manage your wireless connections.
6. Wait for the utility and drivers installation to complete. This may take a few minutes.
Note: If you do not receive a security prompt, continue to the next step. If prompted,
click Install this driver software anyway.
7. After the process is completed, click Finish.
© Copyright 2014 TRENDnet. All Rights Reserved.
TRENDnet User’s Guide
TEW-806UBH
5
8. Plug in the wireless USB adapter into an available USB 2.0/3.0 port on your computer.
9. After the driver is successfully installed, double-click the icon in the system tray and
click the Site Survey tab scan for available wireless networks.
10. If your wireless network requires a Wi-Fi security key, you will be prompted to enter
it. Enter the Wi-Fi security key required to connect to your wireless network and click
OK. Note: If your wireless network does not require a security key, skip to the next step.
11. Check the status information at the bottom of the utility to verify that you were
successfully connected to your wireless network.
Note: If no status information appears, please verify that your security key is correct.
© Copyright 2014 TRENDnet. All Rights Reserved.
TRENDnet User’s Guide
TEW-806UBH
6
MAC® OS Installation
1. Insert the included CD-ROM into your computer’s CD-ROM drive.
Note: If you do not have the included CD-ROM, you can download the utility and drivers
from http://www.trendnet.com/downloads/
.
2. Open the folder named “Mac” on the included Utility and Driver CD ROM.
3. Double-click the .dmg file.
4. Double-click on the USBWireless-Install.pkg file.
Note: If you decide to uninstall the utility and drivers later, use the USBWireless-Uninstall
file.
5. At the introduction window, click Continue.
© Copyright 2014 TRENDnet. All Rights Reserved.
TRENDnet User’s Guide
TEW-806UBH
7
6. At the Destination Select window, click Continue.
7. At the Installation Type window, click Install.
8. When prompted, enter your Name and Password to authorize the installation and
click Install Software.
9. When prompted, click Continue Installation.
10. Wait for the installation to complete. Click Restart to restart your computer and
complete the installation.
© Copyright 2014 TRENDnet. All Rights Reserved.
TRENDnet User’s Guide
TEW-806UBH
8
11. After your computer restarts, log into your computer and plug in the wireless USB
adapter into an available USB 2.0/3.0 port on your computer.
12. After the driver is successfully installed, an icon will appear in the top menu bar.
Click on the icon in the top menu bar and click Open Wireless Utility.
13. The wireless utility will appear. Click on the Site Survey button to search for
available wireless networks.
14. Double-click the wireless network you would like to connect.
© Copyright 2014 TRENDnet. All Rights Reserved.
TRENDnet User’s Guide
TEW-806UBH
9
15. If your wireless network requires a Wi-Fi security key, you will be prompted to enter
it. Enter the Wi-Fi security key required to connect to your wireless network and click
OK. Note: If your wireless network does not required a security key, skip to the next step.
16. If connection was successful, you will see a green handshake icon next to the
wireless network in the list.
Note: If no status information appears, please verify that your security key is correct.
© Copyright 2014 TRENDnet. All Rights Reserved.
TRENDnet User’s Guide
TEW-806UBH
10
Using the Wireless Utility
Windows® OS
Upon completing the software installation, a desktop shortcut is automatically created.
After installation, the wireless software utility will start and open up automatically. If the utility does not start and open up automatically, double-click the desktop icon to start the utility.
You can also start the wireless utility from the Start Menu folder.
Note: If you decide to uninstall the utility and drivers later on, click on the Uninstall item under the Start Menu.
Desktop Icon Start Menu
When the utility is started, you will the following icon in your system tray in the bottom right corner of the screen.
Wireless Adapter is Disconnected Wireless Adapter is Connected. When connected, icon displays green bars according to signal strength.
You can right-click the system tray icon for additional options.
Launch Config UtilityThis option opens up the wireless utility.
Exit This option will close the utility and terminate the application. The application will no longer be running and accessible from your system tray. You will have to restart the
application manually by double-clicking the Desktop icon.
© Copyright 2014 TRENDnet. All Rights Reserved.
TRENDnet User’s Guide
TEW-806UBH
11
Wireless Utility Overview
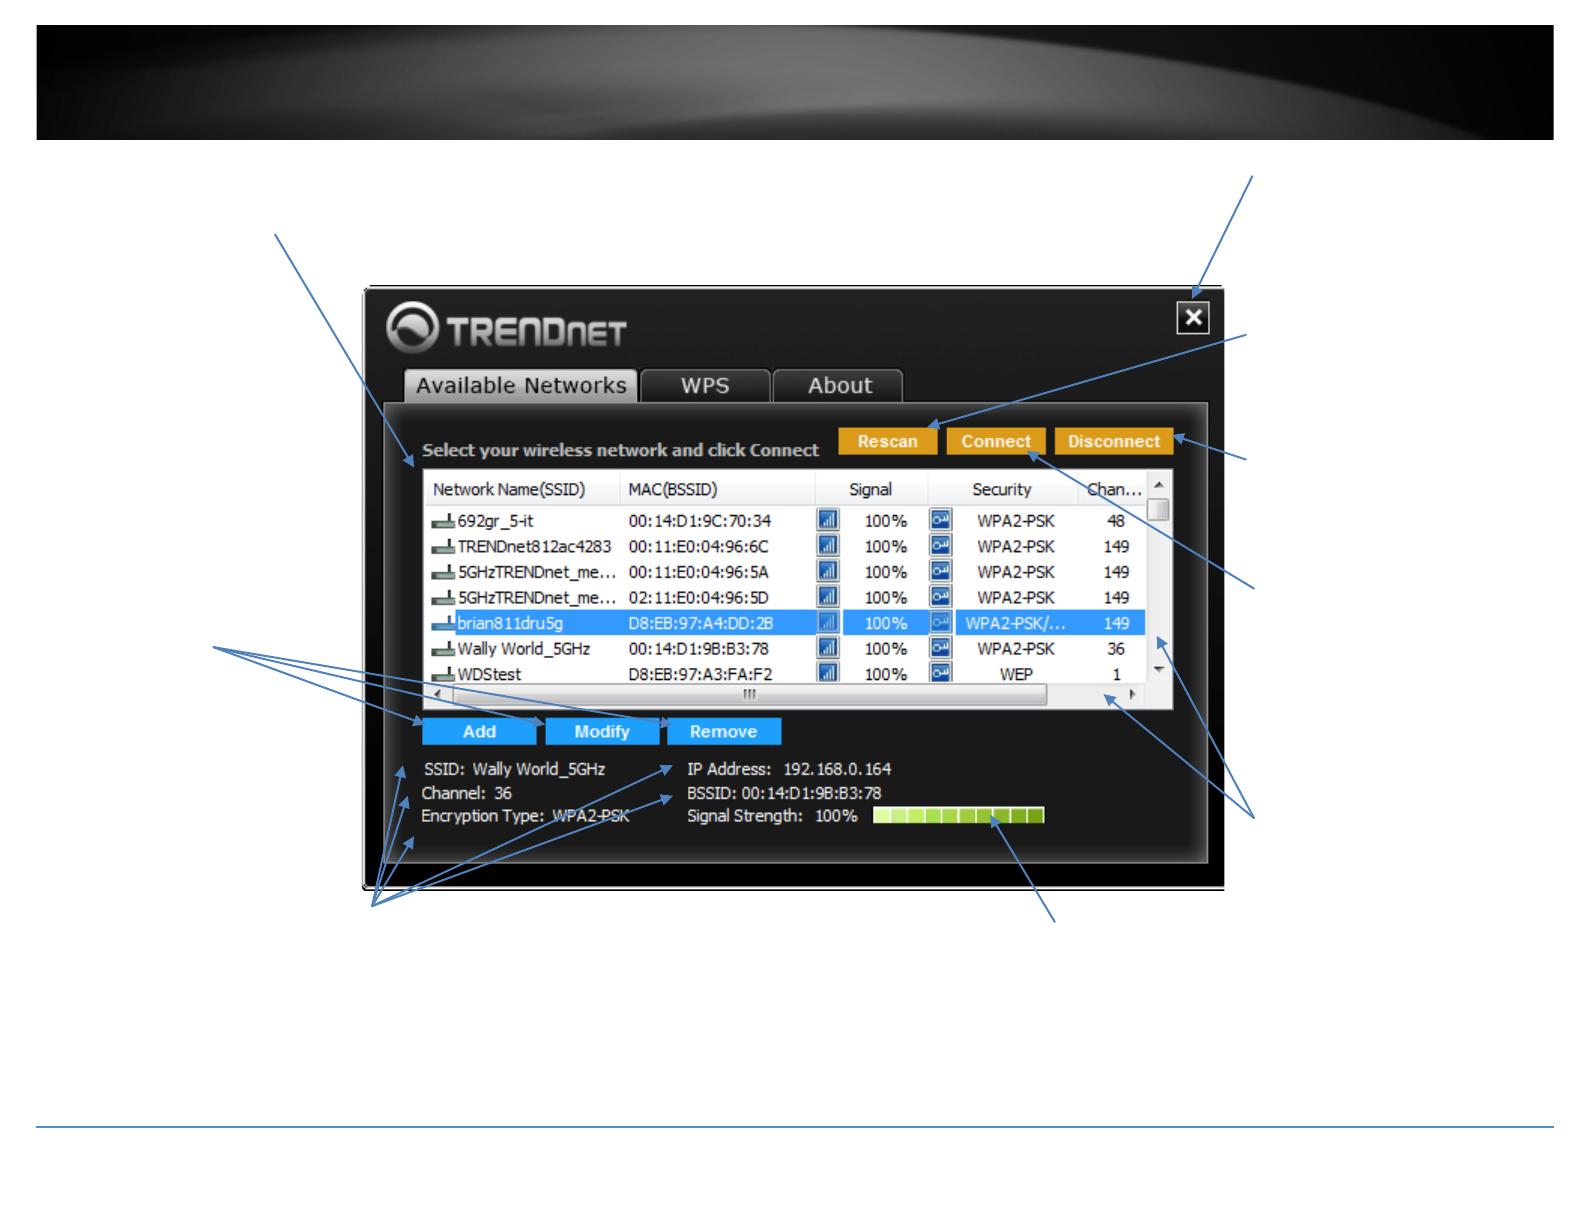
Available Networks Window
This window allows you to discover and connect to available wireless networks.
Rescan
If you do not find your wireless
network in the available networks
list, click Rescan to scan for
available wireless networks.
Connect
After selecting the wireless network
in the available networks list, you
can click Connect to connect to the
network or simply double-click the
network in the list. If the wireless
network has security enabled, you
may be prompted to enter a
network key.
Close
To close the utility, click Close. This
does not terminate the wireless
utility application and can still be
accessed through the system tray,
desktop icon, or start menu.
Available Networks List
This window displays a list of the
available wireless networks found
by your wireless adapter. In
addition to displaying the wireless
network name (SSID, the list will
display additional information about
the network such as MAC address
(BSSID), signal strength percentage,
security type, and channel
Note: Since this adapter has dual-
band capability, available wireless
network found on both the 2.4GHz
band and 5GHz band will be
displayed in the list.
SSID, Channel, IP Address, Encryption Type, BSSID, Signal Strength
This will display the wireless network name (SSID), channel, and
security/encryption type, MAC address (BSSID), and Signal Strength of
the wireless network you are currently connected. This will also display
the IP address obtained from the wireless network your are currently
connected.
Add, Modify, Remove
These controls allow you to
manage your wireless profiles. The
utility uses the built-in operating
system wireless profile manager for
your wireless profiles.
Add Click Add to manually add a
new wireless network profile.
Modify Select a network in the
list to modify, and click Modify. The
network should already be in your
network profile list in order to
modify.
Remove Select a network in the
list to remove from the profiles list.
The network should already be in
your profile list in order to remove.
Signal Strength/Link Quality
The bars provide a graphical
representation of the general signal
strength and link connectivity to the
wireless network you are currently
connected.
Vertical/Horizontal Scroll
You can click the arrows or click and
drag the slider, to display more
available networks or information.
Disconnect
Select the wireless network to
disconnect from, and click
Disconnect. This does not delete the
wireless profile from Windows®.
© Copyright 2014 TRENDnet. All Rights Reserved.
TRENDnet User’s Guide
TEW-806UBH
12
Wireless Utility Overview
WPS (Wi-Fi Protected Setup) Window
This window allows you to establish wireless connectivity using WPS to WPS supported device such as a wireless router/access point.
For information on how to connect using WPS, please refer to the section “Connect to your wireless network using WPS” on page 12.
WPS Push Button Method (Default)
Allows you to establish wireless
connectivity to a WPS supported device
such as a wireless router/access point
using the WPS Push Button method.
WPS PIN Method
Allows you to establish wireless
connectivity to a WPS supported device
such as a wireless router/access point
using the WPS PIN method.
Next
After selecting the WPS method to
use, click Next to continue to
remaining steps of the WPS
connection process.
© Copyright 2014 TRENDnet. All Rights Reserved.
TRENDnet User’s Guide
TEW-806UBH
13
Wireless Utility Overview
About Window
This window displays the wireless adapter MAC address, driver, and utility version reference information.
MAC Address, Utility & Driver Version
Displays the wireless adapter MAC
address, utility, and driver version
reference information.
© Copyright 2014 TRENDnet. All Rights Reserved.
TRENDnet User’s Guide
TEW-806UBH
14
Connect to your wireless network
1. Open up the wireless utility.
2. Click on the Available Networks tab.
3. In the list, double click on your wireless network or select your wireless network and
click the Connect button.
4. If your network has security enabled, you will be prompted to enter the Network Key
and the encryption type will be detected automatically. Enter the Network Key and click
OK.
Note: After entering the network key, you can click Display Key to show the characters
you typed in for the network key to verify it is correct.
5. The wireless network information will appear at the bottom of the utility of the
wireless network you are connected and the Signal Strength/Link Quality bars will turn
green to indicate a successful connection.
Connection Successful
Connection Unsuccessful
Note: If there is no information displayed and the bars do not turn green, you were not
connected to the wireless network successfully. Please select your network in the list
again, and click Modify and re-enter your Wi-Fi/Network Security Key to verify if your
key may have been entered incorrectly, then click OK. If you are still experiencing issues
connecting to your wireless network, you may need to verify the security settings of your
wireless network to make sure they correct key is entered.
© Copyright 2014 TRENDnet. All Rights Reserved.
TRENDnet User’s Guide
TEW-806UBH
15
Connect to your wireless network using WPS
WPS (Wi-Fi Protected Setup) is a feature that makes it easy to connect devices to your
wireless network. If your wireless router/access point supports WPS, you can use this
feature to easily connect wireless devices to your network.
Note: You can typically find out if you if your wireless router/access point supports WPS
just by looking at the physical device. There should be a WPS push button located on the
exterior casing of the device, if not, your device may not support WPS or you may need
to reference your device documentation as to how WPS can be initiated on the deivce. If
your device does not have an identifiable WPS push button on the exterior location, we
would recommend using the standard connection method on the previous page.
There are two methods the WPS feature can easily connect your wireless devices to
your network.
Push Button Configuration (PBC) method (Recommended)
PIN (Personal Identification Number) Method
Hardware Push Button (PBC) Method
On your wireless router/access point, push the WPS button. Then push and hold the
WPS button on the wireless for 3 seconds and release.
Note: Typically, the WPS button hold time is 3-5 sec., then release. For TRENDnet
routers/access points, the WPS hardware push button hold time is 3 seconds. If you are
using another brand device, you may need to refer to your device documentation for
WPS operation.
Virtual Push Button (PBC) Method
1. Open up the wireless utility.
2. Click on the WPS tab.
3. In the WPS window, the Push Button Configuration (PBC) option will be selected by
default. If not, check the Push Button option.
4. Click Next.
WPS
Button
(3 seconds)
© Copyright 2014 TRENDnet. All Rights Reserved.
TRENDnet User’s Guide
TEW-806UBH
16
5. On your wireless router/access point, push the WPS button.
Note: Typically, the WPS button hold time is 3-5 sec., then release. For TRENDnet
routers/access points, the WPS hardware push button hold time is 3 seconds. If you are
using another brand device, you may need to refer to your device documentation for
WPS operation.
6. On the wireless utility, click Start.
7. Messages will appear utility indicating that the WPS process has been activated and
the status. Wait for the process to complete.
8. If successful, you will see the following message at the top and the connection
information at the bottom of the utility will appear. Click Finish.
Note: If the WPS process fails, you will see the message below and connection
information at the bottom of the utility will not be displayed. You may need to click
Cancel and attempt the WPS process again. You may need to refer to your wireless
router/access point documentation regarding the operation of WPS.
© Copyright 2014 TRENDnet. All Rights Reserved.
TRENDnet User’s Guide
TEW-806UBH
17
PIN (Personal Identification Number) Method
1. Open up the wireless utility.
2. Click on the WPS tab.
3. Check the PIN Code option.
4. Click the WPS AP List drop-down list and select your wireless network.
5. Click Next.
6. The client PIN Code will be generated automatically.
7. On your wireless router/access point, enter the client PIN Code into your wireless
router/access point configuration page and start the WPS process.
Note: You will need to access the device configuration page (typically through a web
browser) to access the WPS section to enter the client PIN code and use the WPS PIN
method. You may need to refer to your device documentation on how to access your
device’s configuration page and locate the WPS section. The example below (from our
TRENDnet TEW-810DR router) shows where the WPS client PIN information is entered.
8. On the wireless utility, click Start.
9. If successful, you will see the following message at the top and the connection
information at the bottom of the utility will appear.
Note: If the WPS process fails, you will see the message below and connection
information at the bottom of the utility will not be displayed. You may need to click Back
and attempt the WPS process again. You may need to refer to your wireless
router/access point documentation regarding the operation of WPS.
© Copyright 2014 TRENDnet. All Rights Reserved.
TRENDnet User’s Guide
TEW-806UBH
18
Create or modify wireless network profiles
Wireless network profiles are profiles that define the parameters of an existing network
such as the wireless network name (SSID) and security settings in order to allow for
easier management especially if you connect to multiple wireless networks. When you
connect to a wireless network using the Available Networks window, a profile for that
network is automatically saved to your profile list so that the next time you are in range
of that network, your computer will automatically connect to that predefined wireless
network without having to manually scan and reconnect to the network.
Note: The wireless utility uses built-in Windows® profile management for wireless
networks.
When a parameter (wireless network name or security key) changes in a wireless
network that you had connected to before and saved to the profile list, you may need to
modify the profile of that network and change to the correct parameters in order to
reconnect.
If you are connecting to a wireless network where the wireless network name (SSID) is
not discoverable for security purposes, you may need to manually add a new profile to
the list for this network in order to connect.
Please note that these parameters are set based on the configuration parameters
required by the wireless router/access point.
For additional information on security parameters, you can refer to the Appendix.
1. Open up the wireless utility.
2. Click on the Available Networks tab.
3. Review the options.
When connecting to a wireless network, it is automatically saved to your Windows®
profile list.
Add Allows you to manually add a wireless network profile (ex. If the
wireless network is set to hide it’s wireless network name (SSID)). This will add
the profile to Windows® profile list.
Modify Allows you to modify an existing wireless network profile in the
Windows® profile list. Select the wireless network to modify in the Available
Networks list, and click this option to modify it. You will only be able to modify
the settings of a wireless network that had been saved in the Windows® profile
list.
Remove Allows you to remove an existing wireless network profile in the
Windows® profile list. Select the wireless network to remove in the Available
Networks list, and click this option to remove it. You will only be able to remove
a profile that had been saved in the Windows® profile list.
© Copyright 2014 TRENDnet. All Rights Reserved.
TRENDnet User’s Guide
TEW-806UBH
19
Enter or modify the parameters for the wireless network profile.
Profile NameEnter a name you easily identify in your profile list, for example
“Home” or “Office”. Please note that this is not the same as your wireless
network name and does not need to be the same as your wireless network
name.
Network Name (SSID) Enter the wireless network name of the network you
are connecting.
Network TypeThe most typical configuration type is Infrastructure which is
used when connecting to a wireless router/access point. Ad-Hoc is only used
when establishing a wireless one-to-one only connection with another wireless
device or computer operating in ad-hoc mode.
There are 2 security categories to choose.
Basic security for personal Includes the most common security options under the
Security Type drop-down menu.
Open \ DisableWireless network has no security configured. No key is
required.
Open or Shared \ WEPEnter the WEP key for your wireless network. Wireless
network has WEP security enabled, open or shared. Please note that the Key
Index 1-4 must also match the same index configured on the wireless
router/access point.
WEP Key Format
WPA-PSK \ TKIP or AESWireless network has WPA-PSK security enabled,
TKIP or AES.
Note: 8-63 alphanumeric characters (a,b,C,?,*, /,1,2, etc.)
WPA2-PSK \ TKIP or AESWireless network has WPA2-PSK security enabled.
TKIP or AES.
Note: 8-63 alphanumeric characters (a,b,C,?,*, /,1,2, etc.)
Advance security for enterprise Includes all security options including advanced
options under the Security Type drop-down that require additional authentication
parameters to connect to the wireless network typically used offices and businesses that
require a higher level of security.
Additional security options:
WPA EAP-TLS or WPA2 EAP-TLS \ TKIP or AES Wireless network has WPA-
EAP security enabled, TKIP or AES. Select the EAP (Extensible Authentication
Protocol) Type.
o Select a Certificate EAP-TLS requires additional certificate to be
installed on computer for authentication purposes. Click the drop-
down and select the certificate type used to authenticate and required
by the authentication (RADIUS) server.
WEP Key Format
HEX ASCII
Character set 0-9 & A-F, a-f only Alphanumeric (a,b,C,?,*, /,1,2, etc.)
64-bit key length 10 characters 5 characters
128-bit key length 26 characters 13 characters
1 / 1

Trendnet TEW-806UBH User manual

Category
Routers
Type
User manual
This manual is also suitable for

Ask a question and I''ll find the answer in the document

Finding information in a document is now easier with AI

Ask the document