Page is loading ...

Metra. The World’s Best Kits.® MetraOnline.com © COPYRIGHT 2022 METRA ELECTRONICS CORPORATION REV. 5/10/22 INST99-7620B
INSTALLATION INSTRUCTIONS
99-7620B
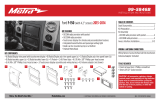
KIT FEATURES
• ISO DIN radio provision with pocket
• ISO DDIN radio provision
• Painted scratch-resistant matte black
• Axxess interface to keep the factory screen active
• Buttons and circuitry to control the factory climate system
KIT COMPONENTS
• A) Radio brackets for Armada • B) Radio brackets for Pathfinder • C) Screen brackets for Armada • D) Screen brackets for Pathfinder
• E) HVAC control panel • F) Outboard control panel (2) • G) Pocket • H) #8 x 3/8" Phillips screws (8) • Axxess interface and harness (not shown)
TOOLS REQUIRED • Panel removal tool
• Phillips screwdriver • Torx T-20 screwdriver
• 8mm socket wrench • Needle-nose pliers
TABLE OF CONTENTS
Dash Disassembly
– Armada (without NAV) 2013-2015 /
Armada 2008-2012...........................................2
– Pathfinder (LE, SE, SV, Silver Edition)
2008-2012 .........................................................3
Kit Preparation .......................................................4
Kit Assembly
– ISO DIN radio provision with pocket .................5
– ISO DDIN radio provision ....................................5
Axxess interface installation ............................6-14
WIRING & ANTENNA CONNECTIONS
(sold separately)
Wiring Harness: Axxess interface and harness included
Antenna Adapter: 40-NI12
A
F G H
B C D E
Nissan Armada (without NAV) 2013-2015,
Nissan Armada 2008-2012,
Nissan Pathfinder
(LE, SE, SV, Silver Edition)
2008-2012
Visit MetraOnline.com for more detailed information about the product and up-to-date vehicle
specific applications
Attention! With the key out of the ignition,
disconnect the negative battery terminal
before installing this product. Ensure that all
installation connections, especially the air
bag indicator lights, are plugged in before
reconnecting the battery or cycling the ignition
to test this product.
NOTE: Refer also to the instructions included
with the aftermarket radio.

386-257-1187
|
MetraOnline.com
2
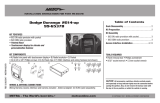
DASH DISASSEMBLY
Nissan Armada (w/o NAV) 2013-2015
Nissan Armada 2008-2012
1. Unsnap and remove the power
outlet/pocket assembly from the lower
center dash. (Figure A)
2. Remove (4) 8mm screws now exposed
in the cavity. (Figure B)
3. Using the panel removal tool, carefully
unclip and remove the radio/climate
control panel, including the A/C vents.
(Figure C)
4. Remove (4) 8mm screws securing
the display screen/climate module
assembly, disconnect the wiring, and
then remove the assembly. (Figure D)
Continue to Kit Preparation
(Figure A)
(Figure B)
(Figure C) (Figure D)

REV. 5/10/22 INST99-7620B 3
DASH DISASSEMBLY
Nissan Pathfinder (LE, SE, SV, Silver Edition)
2008-2012
1. Push down on the collar of the shifter
handle to expose the clip, and then
using a pair of needle nose pliers
remove the clip and then the shifter
knob. (Figure A)
2. Unsnap and remove the shifter trim
panel including the pocket/switch panel
below the radio. (Figure B)
3. Remove (2) 8mm screws now exposed
in the cavity. (Figure C)
4. Using the panel removal tool, carefully
unclip and remove the radio/climate
control panel. (Figure D)
5. Remove (4) 8mm screws securing
the display screen/climate module
assembly, disconnect the wiring, and
then remove the assembly. (Figure E)
Continue to Kit Preparation
(Figure A)
(Figure D)
(Figure B)
(Figure C)
(Figure E)

386-257-1187
|
MetraOnline.com
4
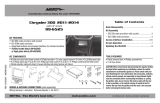
KIT PREPARATION
Attention! Hand tools are highly recommended
as the factory dash may break with the use
of power tools.
1. Remove (4) screws securing the climate
module brackets to the climate module
and remove the brackets. (Figure A,
shaded portion)
2. Secure the climate module to the model
specific set of screen brackets with the
(4) #8 x 3/8" Phillips screws provided
with this kit. (Figure B, shaded portion)
3. Remove (4) screws securing the display
screen brackets to the display screen
and remove the brackets. (Figure A)
4. Secure the display screen to the model
specific set of screen brackets using the
(4) screws previously removed. (Figure B)
5. Reconnect and secure the completed
assembly to the dash using the (4) 8mm
screws previously removed.
Note: It may be necessary to file the
inside edges of the top (2) screen mounts
to accommodate the display screen. The
factory brackets will not be reused.
6. Remove the (4) Torx T-20 screws
securing the radio chassis to the radio/
climate control panel, and then remove.
(Figure C)
7. Remove the Torx screws securing the
radio and climate controls buttons to the
radio/climate control panel, and then
remove. (Figure C)
8. Secure the HVAC control panel, and
the (2) outboard control panels, to the
factory radio/climate control panel using
the factory hardware. Leave the top (2)
mounting screws out for kit assembly.
(Figure D)
Continue to Kit Assembly
(Figure C)
(Figure D)
(Figure A)
(Figure B)
Armada brackets
shown for illustration
purposes

REV. 5/10/22 INST99-7620B 5
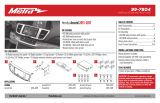
KIT ASSEMBLY
ISO DIN radio provision with pocket
1. Using the factory hardware, secure the
model specific radio brackets onto the
radio/climate control panel. (Figure A)
2. Attach the pocket to the radio brackets
using the (4) #8 x 3/8" Phillips screws
provided with this kit. (Figure B)
3. Remove the metal DIN sleeve and trim
ring from the aftermarket radio.
4. Slide the radio into the bracket/pocket
assembly, and then secure with the
screws supplied with the aftermarket
radio. (Figure B)
Continue to Axxess Interface Installation
ISO DDIN radio provision
1. Using the factory hardware, secure the
model specific radio brackets onto the
radio/climate control panel. (Figure A)
2. Slide the radio into the bracket/pocket
assembly, and then secure with the
screws supplied with the aftermarket
radio. (Figure B)
Continue to Axxess Interface Installation
(Figure B) (Figure B)
(Figure A) (Figure A)

386-257-1187
|
MetraOnline.com
6
AXXESS INTERFACE INSTALLATION
• Retains the factory display screen
• Retains the factory backup camera
• Retains the factory AUX-IN jack
• Retains personalization features
• Ability to add an aftermarket backup camera or additional video input
• Works in amplified or non-amplified models
• Pre-wired Axxess steering wheel control harness (sold separately)
INTERFACE FEATURES
• Crimping tool and connectors, or solder gun, solder, and heat shrink
• Tape • Wire cutter • Zip ties
TOOLS REQUIRED
• Axxess interface
• LD-7620-MAIN components:
• 7620-MAIN harness
• 12-pin harness with RCA jacks
• 20-pin to 24-pin interface to display harness
• LD-7620-NAV components:
• 7620-NAV harness
• 32-pin harness with RCA jacks
• 20-pin to 12-pin interface to display harness
• 14-pin to 14-pin HVAC control panel to interface harness
• 10-pin to 10-pin HVAC control panel to outboard control panel harness (2)
INTERFACE COMPONENTS
Connections
For models without factory NAV
Without Bose amplifier ......................................................................................................................7
With Bose amplifier ............................................................................................................................8
For models with factory NAV ................................................................................................................9
Installation ..............................................................................................................................................10
Final Assembly .........................................................................................................................................11
Screen Operation ................................................................................................................................11-14
Updating the Interface ........................................................................................................................... 14
TABLE OF CONTENTS

REV. 5/10/22 INST99-7620B 7
CONNECTIONS
For models
without
a BOSE amplifier:
From the 20-pin harness to the aftermarket radio connect as indicated:
• Black wire to the ground wire.
• Yellow wire to the battery/memory wire.
• Red wire to the accessory wire.
• Orange wire to the illumination wire. (if applicable)
• Gray wire to the front right (+) speaker output.
• Gray/Black wire to the front right (-) speaker output.
• White wire to the front left (+) speaker output.
• White/Black wire to the front left (-) speaker output.
• Green wire to the rear left (+) speaker output.
• Green/Black wire to the rear left (-) speaker output.
• Purple wire to the rear right (+) speaker output.
• Purple/Black wire to the rear right (-) speaker output.
The following wire is only for multimedia/navigation radios that require this wire.
Blue/Pink wire to the VSS/speed sense wire. (if applicable)
Red & White RCA jacks labeled “AUX Left” and “AUX Right” to the audio AUX-IN jacks, if retaining
the factory AUX-IN jack.
Disregard the 12-pin Harness with RCA jacks, it will not be used in this application.
• Disregard the Red and White RCA jacks labeled “From DVD”, they will not be used in this
application.
• Disregard the Yellow RCA jack labeled “From DVD”, it will not be used in this application.
Note: This 16-pin harness must be connected for the factory backup camera to function.
There are (2) 16-pin harnesses in the vehicle. Use the 16-pin harness that was connected into
the factory radio chassis.
• If an aftermarket backup camera or external video source is desired to be displayed to the
factory display screen, connect the Yellow RCA jack labeled “Backcam” to the desired source.
From the 12-pin pre-wired Axxess steering wheel control (SWC) harness & 3.5mm jack:
• If the vehicle is not equipped with steering wheel controls, disregard this harness entirely.
• If the vehicle has steering wheel controls, the 12-pin SWC harness provided in this kit is to
be used with an Axxess SWC interface (sold separately) to retain steering wheel controls.
Disregard the harness that comes with the interface.
Note: Please verify the Axxess steering wheel control connections for your vehicle by
visiting www.axxessinterfaces.com, and using the vehicle fit guide to find a vehicle
specific instruction.If the vehicle is not equipped with steering wheel controls, disregard
this harness entirely.
Continue to Installation
7620-MAIN harness (for models
without
factory navigation)

386-257-1187
|
MetraOnline.com
8
From the 12-pin pre-wired Axxess steering wheel control (SWC) harness & 3.5mm jack:
• If the vehicle is not equipped with steering wheel controls, disregard this harness entirely.
• If the vehicle has steering wheel controls, the 12-pin SWC harness provided in this kit is to
be used with an Axxess SWC interface (sold separately) to retain steering wheel controls.
Disregard the harness that comes with the interface.
Note: Please verify the Axxess steering wheel control connections for your vehicle by
visiting www.axxessinterfaces.com, and using the vehicle fit guide to find a vehicle specific
instruction.
From the 12-pin harness with RCA jacks to the aftermarket radio, connect as indicated:
• Blue/White wire to the amp turn on wire. This wire must be connected to hear sound from
the factory amplifier.
• White RCA to the left front RCA output.
• Gray RCA to the right front RCA output
• Green RCA to the left rear RCA output.
• Purple RCA to the right rear RCA output.
Continue to Installation
For models
with
a BOSE amplifier:
From the 20-pin Harness to the aftermarket radio, connect as indicated:
• Black wire with a ring terminal chassis ground.
• Yellow wire to the battery/memory wire.
• Red wire to the accessory wire.
• Orange wire to the illumination wire. (if applicable)
The following wire is only for multimedia/navigation radios that require the wire.
Blue/Pink wire
to the VSS/speed sense wire.
•
Tape off and disregard the following (9) wires, they will not be used in this application:
Gray, Gray/Black, Green, Green/Black, Purple, Purple/Black, White, White/Black, White/Blue.
• If retaining the factory AUX-IN jack, connect the Red and White RCA jacks labeled “AUX Input”
to the AUX input.
•
Disregard the Red and White RCA jacks labeled “From DVD”, they will not be used in
this
application.
• Disregard the Yellow RCA jack labeled “From DVD”, it will not be used in this application.
Note: This 16-pin harness must be connected for the factory backup camera to function. There
are (2) 16-pin harnesses in the vehicle. Use the 16-pin harness that was connected into the
factory radio chassis.
• If an aftermarket backup camera or external video source is desired to be displayed to the
factory display screen, connect the Yellow RCA jack labeled “Backcam” to the desired source.
CONNECTIONS
7620-MAIN harness (for models
without
factory navigation)

REV. 5/10/22 INST99-7620B 9
CONNECTIONS
From the 20-pin harness to the aftermarket radio connect as indicated:
• Black wire with a ring terminal to chassis ground.
• Yellow wire to the battery wire.
• Red wire to the accessory wire.
• Orange wire to the illumination wire (if applicable)
• Blue/Pink wire to the speed sense wire (if applicable).
From the 20-pin Harness to the aftermarket radio, connect as indicated:
• White wire to the left front (+) speaker output.
• White/Black wire to the left front (-) speaker output.
• Gray wire to the right front (+) speaker output.
• Gray/Black wire to the right front (-) speaker output.
• Green wire to the left rear (+) speaker output.
• Green/Black wire to the left rear (-) speaker output.
• Purple wire to the right rear (+) speaker output.
• Purple/Black wire to the right rear (-) speaker output.
From the 12-pin pre-wired Axxess steering wheel control (SWC) harness & 3.5mm jack:
• If the vehicle is not equipped with steering wheel controls, disregard this harness entirely.
• If the vehicle has steering wheel controls, the 12-pin SWC harness provided in this kit is to
be used with an Axxess SWC interface (sold separately) to retain steering wheel controls.
Disregard the harness that comes with the interface.
Note: Please verify the Axxess steering wheel control connections for your vehicle by
visiting www.axxessinterfaces.com, and using the vehicle fit guide to find a vehicle
specific instruction.
From the 32-pin harness with RCA jacks to the aftermarket radio:
• If retaining the factory AUX-IN jack, connect the Red and White RCA jacks labeled “AUX
Input” to the AUX input.
•
Disregard the Red and White RCA jacks labeled “From DVD”, they will not be used in
this application.
Continue to Installation
7620-NAV harness (for models
with
factory navigation)

386-257-1187
|
MetraOnline.com
10
INSTALL ATION
For models
without
factory navigation:
With the key in the off position:
Attention! Extreme care must be taken when inserting the following harnesses. They can be
forced in backwards and can permanently damage the kit if so.
1. Connect the 7620-MAIN harness into the interface, and then to the wiring harness in the
vehicle.
2. Connect the 20-pin to 24-pin interface to display harness into the interface, and then to
the 24-pin display harness in the vehicle.
3. Connect the 12-pin harness with RCA jacks to the wiring harness in the vehicle.
4. Connect the 14-pin to 14-pin HVAC control panel to interface harness into the interface,
and then to the HVAC control panel.
5. Connect the 10-pin to 10-pin HVAC control panel to outboard control panel harness into
the HVAC control panel, and then to the outboard control panel. The right side connector
on the HVAC control panel will go to the right side outboard control panel, and likewise
for the left side.
For models
with
factory navigation:
With the key in the off position:
Attention! Extreme care must be taken when inserting the following harnesses. They can be
forced in backwards and can permanently damage the kit if so.
1. Connect the 7620-NAV harness into the interface, and then to the wiring harness in the
vehicle.
2. Connect the 20-pin to 12-pin interface to display harness into the interface, and then to
the 12-pin display harness in the vehicle.
3. Connect the 32-pin harness with RCA jacks to the wiring harness in the vehicle.
4. Connect the 14-pin to 14-pin HVAC control panel to interface harness into the interface,
and then to the HVAC control panel.
5. Connect the 10-pin to 10-pin HVAC control panel to outboard control panel harness into
the HVAC control panel, and then to the outboard control panel. The right side connector
on the HVAC control panel will go to the right side outboard control panel, and likewise
for the left side.

REV. 5/10/22 INST99-7620B 11
FINAL ASSEMBLY SCREEN OPERATION
1. Locate the factory antenna connector in the dash and complete all necessary connections to
the radio. Metra recommends using the proper mating adapter from Metra.
2. Before using the kit it must be initialized.
Attention! If the interface loses power for any reason, the following steps will need to be
performed again.
a. Turn the key (or push-to-start button) to the ignition position and wait until the factory
display screen comes on. The screen should come on within 30 seconds.
Note: If the screen does not come on, turn the key to the off position, disconnect the
interface, check all connections, reconnect the interface, and then try again. Ensure that
the display harness is connected.
b. Start the vehicle and test all functions of the installation for proper operation, before
reassembling the dash.
Note: The rear seat climate controls (if applicable) will no longer function with this kit.
3. Secure the completed assembly into the dash using the factory screws, and then reassemble
the dash in reverse order of disassembly to complete the installation.
Note: If installing the Axxess Steering Wheel Control interface, test the aftermarket
radio first; then, with the key on the off position, connect the Axxess SWC and follow the
instructions on www.axxessinterfaces.com.
Continued on the next page
All button functions are retained and controlled in the same manner as the factory buttons
were controlled.
(Example: Tire Pressure, Fuel Economy, Brightness, Clock Setting, etc).
Note: The (2) blank buttons on the HVAC control panel will not be used in this application.
Settings:

386-257-1187
|
MetraOnline.com
12
• Go to - SETTINGS>MISCELLANEOUS>SELECT CAR
• The Axxess interface will auto-detect the auto manufacturer. In the settings menu there
is an option for manually designating the vehicle type to the interface. Also note, if
the current selection does not appear to be functioning as intended, select a different
vehicle to try.
• Go to - SETTINGS>MISCELLANEOUS
•
This menu allows access to the following options: Camera Input / Reverse Camera Lines
/
Select Car / System Information
Select Car:Miscellaneous:
SCREEN OPERATION (CONT)
Continued on the next page

REV. 5/10/22 INST99-7620B 13
SCREEN OPERATION (CONT)
Continued on the next page
Reverse Cam Lines:Camera input:
• Go to – SETTINGS> MISCELLANEOUS>CAMERA INPUT
• The factory back-up camera will continue to function by default. No extra steps are required.
•
If an aftermarket backup camera has been purchased, select “Aftermarket Backup Cam”.
• For non-nav models only: To use an external video source (AUX-VIDEO) on the factory
display screen, select “Backup Cam Disabled”.
• To activate AUX-VIDEO, press the blank button on the right outboard controller. AUXVIDEO
will only function while the vehicle is in park.
• Go to – SETTINGS>MISCELLANEOUS> REVERSE CAM LINES
• The reverse camera lines are off by default.
• Turn on to activate the reverse camera lines; off to deactivate them.

386-257-1187
|
MetraOnline.com
14
SCREEN OPERATION (CONT) UPDATING THE INTERFACE
Attention: In order to update the Axxess interface, the kit must have power from the vehicle.
1. Download and install the WebXXpress software update from axxessinterfaces.com.
2. Connect the USB-MINI-CAB update cable (sold separately) between the Axxess interface and
the computer. The cable will connect into the port on the Axxess interface labeled “A”.
3. Remove the main connector from the vehicle. This will remove power from the kit.
4. Reconnect the main harness back to the vehicle, putting power back to the kit.
5. From the Start Menu of the computer, click on “USB Bootloader”, and then click “Update
Board”.
6. Within a few seconds, the software will begin to download.
Note: If 30 seconds elapses before you finish this step, you will need to remove power from
the Axxess interface, reapply power, and then start the update process again.
Note: Please note which firmware downloaded to the interface. This will help in
troubleshooting, if need be.
• Go to - SETTINGS>MISCELLANEOUS>SYSTEM INFORMATION
• To access the current software of the product.
• Please have this information available when calling Tech Support for assistance.
System Information:

Metra recommends MECP
certified technicians
Metra. The World’s Best Kits.® MetraOnline.com © COPYRIGHT 2022 METRA ELECTRONICS CORPORATION REV. 5/10/22 INST99-7620B
INSTALLATION INSTRUCTIONS
99-7620B
Having difficulties? We’re here to help.
Contact our Tech Support line at:
386-257-1187
Or via email at:
techsupport@metra-autosound.com
Tech Support Hours (Eastern Standard Time)
Monday - Friday: 9:00 AM - 7:00 PM
Saturday: 10:00 AM - 7:00 PM
Sunday: 10:00 AM - 4:00 PM
KNOWLEDGE IS POWER
Enhance your installation and fabrication skills by
enrolling in the most recognized and respected
mobile electronics school in our industry.
Log onto www.installerinstitute.edu or call
386-672-5771 for more information and take steps
toward a better tomorrow.
®

Ensure the connectors (10 pin) are set in the correct orientation.
See photo below for correct locking position.
IncorrectCorrect
HVAC | Controls not responding
AxxessInterfaces.com
© COPYRIGHT 2021 METRA ELECTRONICS CORPORATION
99-7620B | TECH TIP

99-7620B Tech Tip
The vehicle side harness1 you use with this kit has a long black wire with a
ring terminal on it.
This wire needs to be connected to chassis ground before you connect the
interface to power. Failure to do so may cause damage to the interface.
If your vehicle side harness1 does not have this wire, please add one before
connecting the interface.
Note: Do not connect this wire to the radio ground, vehicles that use this kit may not have a
ground in the factory wiring harness. It is recommended that you use a self-tapping screw to
bare clean metal in the vehicle. Always check for clearance before drilling holes or screws.
1The vehicle side harness used in this kit will be either “LD-7620-MAIN” or “LD-7620-NAV”
9/17/20
/