Page is loading ...

Euro Fence Installaon Instrucons
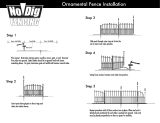
STEP 1: PLAN YOUR DESIGN
Decide on your layout and remember to consider where the gate will be installed. Regular posts should be
set 72” apart, measuring from center to center of each post, while gate posts should be set 48” apart,
center to center.
Layout the perimeter of determined fencing area with stakes and masons string to keep posts in line when
installing. Place the wood stakes where you intend on installing the posts.
Post Post
72”
Center of Post
POSTS FOR PANELS
Post Post
48”
Center of Post
POSTS FOR GATES
REQUIRED TOOLS:
PLEASE NOTE: Addional accessories are required if installing on hard surface, such as a deck, or
if mounng the end panel to a wall. Please consult with your local store for informaon regard-
ing the necessary materials.
HAMMER
TAPE
MEASURER
MASONS
STRING
2” x 2”
WOOD
STAKES
SHOVEL
WHEEL
BARROW
DRILL
PHILLIPS
SCREWDRIVER
WOOD
BLOCKS
ADJUSTABLE
WRENCH
HANDHELD
SAW
POST HOLE
DIGGER
CONCRETE
HEX
WRENCH
RECIPROCATING
SAW
IronCra Customer Service
1-888-662-1788
Monday - Friday
8am - 5pm EST

STEP 2: POST INSTALLATION
Starng with the first post, remove the stake from the ground and dig a hole measuring approximately 8” in
diameter and around 22“ deep in the stakes place. Once the hole is dug, posion the post in the hole and
check to make sure the pre-cut holes are facing the direcon the panels will be installed. Using a hammer
and a block of wood (to protect the post) hammer the post into the ground approximately 2-1/2” so the post
is 24-1/2“ below ground level. This will provide stability when pouring concrete and aaching the panel to
the post.
TIP: Measure 49.5” from the boom of the post and mark with chalk or a temporary marker to ensure
proper height placement. The 49.5” mark on the post should align with ground level.
Once the first post is in the ground, pour concrete to fill the hole, filling just enough to provide a slight slant
for water runoff.
Connue with remaining posts.
If installing on a hard surface such as a deck or pao, a flange post must be used and can be installed by
simply mounng the hardware to the surface (screws/bolts not included with flange post). Posts should be
installed at the same width as menoned above.
STEP 3: PANEL INSTALLATION
Each Euro fence post has pre-drilled dimples to mark the drilling locaon for a standard install. Using the
clamps, nuts and bolts included, mount the panel to the post, aligning the edge of the panel in the center of the
two pre-drilled dimples.

CORNER PANELS
If installing on a corner, holes must be drilled on the appropriate side to make a 90° angle. When drilling, make
sure they are aligned with the pre-drilled dimples. Once holes are drilled, install panels in the same manner as
GATE INSTALLATION
8.75” - Top Post Hinge (40.25” for the bottom post hinge)

LATCH INSTALL
Aach latch and striker to post and gate at preferred height using self tapping screws.
CUTTING PANELS
When you reach an area that is shorter than 72” wide, you can cut the panels using a hand saw or reciprocang
saw to the desired width. Measure the distance between the two posts to get the size for the short panel. The
panel must be cut in 1-7/8” increments ending with a vercal wire.
Once panel has been cut, touch up ends with exterior quality black paint to help prevent rusng. Once the paint
has dried, connue with installaon.
INSTALLING AT ACUTE OR OBTUSE ANGLES
If you want to install a corner that is less or greater than 90°, you will mount the panel in the same fashion, however
the holes will have to be drilled depending on the angle desired.
INSTALLING ON AN INCLINE
While this fence is designed to be installed on flat ground, it can be installed on a slight incline by using a
stepped post installaon method. This is achieved by seng the posts at a taller height as needed. It is not
recommended to exceed 5”.
No more than 5”
WARNING: VERIFY LEGAL REQUIREMENTS FOR USE WITH POOLS, HOT TUBS, AND SPAS.
Note: See Warning on ironcraftfences.com
/