Once the first post is in the ground, pour concrete to fill the hole, filling just enough to provide a slight slant for
water runoff.
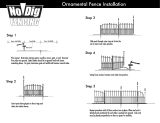
Assemble panels and posts by inserng the horizontal rails on the panels into the pre-cut holes on post.
Secure the posts with screws included. Place 2” wood blocks underneath the panel when aaching the panel
to the post for addional support.
Connue to the next in-ground stake, following the same acons as listed above.
Connue this unl fencing system is complete.
When you reach the area for the gate, remember to set the posts 1” wider than the width of the gate itself to
allow room for the hinges.
Installing the Gate:
Start by planning the swing of the gate. Align the opened hinge so that the L-bracket will fit on the gate and
the flat half of the bracket will aach to the end/gate post. Posion hinges so that they are approximately 8”
from the top and boom of the gate panel.
Start by installing the hinges to the end/gate post, opening the hinge and pushing fully against the top, keeping
flush and aach to the post using 3 self-tapping screws (included with the gate).
Next, hold the gate in posion so the top of the gate aligns evenly with the top rail of the
fence panel, then posion the gate into the L-bracket of the hinge and aach with 4 self-tapping screws.
WARNING: VERIFY LEGAL REQUIREMENTS FOR USE WITH POOLS, HOT TUBS, AND SPAS.
Note: See Warning on ironcraftfences.com
TIP: If installing the fence at an angle
greater or less than 90°, use one angle
connector (sold separately) per each
horizontal rail end.
Note: Gates do not rack