Atdec TH-1040-VFM Installation guide
- Category
- Flat panel wall mounts
- Type
- Installation guide
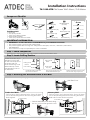
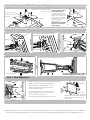
Atdec TH-1040-VFM is a versatile flat screen wall mount designed for secure and flexible display mounting. It boasts a maximum load capacity of 25kg (55lbs), supporting VESA mounting configurations of 75x75mm, 100x100mm, 200x100mm, and 200x200mm. The full-motion capability allows for 40° angular movement and 360° infinite horizontal rotation, providing optimal viewing angles. Cable management features ensure a clean and organized setup. Installation is straightforward with the included hardware and detailed instructions.
Atdec TH-1040-VFM is a versatile flat screen wall mount designed for secure and flexible display mounting. It boasts a maximum load capacity of 25kg (55lbs), supporting VESA mounting configurations of 75x75mm, 100x100mm, 200x100mm, and 200x200mm. The full-motion capability allows for 40° angular movement and 360° infinite horizontal rotation, providing optimal viewing angles. Cable management features ensure a clean and organized setup. Installation is straightforward with the included hardware and detailed instructions.


-
 1
1
-
 2
2


Atdec TH-1040-VFM Installation guide
- Category
- Flat panel wall mounts
- Type
- Installation guide
Atdec TH-1040-VFM is a versatile flat screen wall mount designed for secure and flexible display mounting. It boasts a maximum load capacity of 25kg (55lbs), supporting VESA mounting configurations of 75x75mm, 100x100mm, 200x100mm, and 200x200mm. The full-motion capability allows for 40° angular movement and 360° infinite horizontal rotation, providing optimal viewing angles. Cable management features ensure a clean and organized setup. Installation is straightforward with the included hardware and detailed instructions.
Ask a question and I''ll find the answer in the document
Finding information in a document is now easier with AI
Related papers
-
Atdec TH-1032-VFM Installation guide
-
Atdec TH-1040-VFM User manual
-
Atdec TH-2050-VFM Specification
-
Atdec TH-2250-VF Installation guide
-
Atdec TH-PFK User manual
-
-
-
-
Atdec TH-3060-UFH User manual
-
Atdec TH-2250-VTP User manual
Other documents
-
Clinton Electronics CE-LA19 User guide
-
König KNM-SFM10 Datasheet
-
-
Design Toscano KY72028 User manual
-
WALI WL-1330LM User manual
-
 Reka 20710 User manual
-
B-Tech BT7523 Installation guide
-
B-Tech BT7517 Installation guide
-
SunBriteTV SB-WM-ART1-M-BL User manual
-
Bell'O 8260DB User manual
