Page is loading ...
Page is loading ...
Page is loading ...
Page is loading ...
Page is loading ...
Page is loading ...
Page is loading ...
Page is loading ...
Page is loading ...
Page is loading ...
Page is loading ...
Page is loading ...
Page is loading ...
Page is loading ...
Page is loading ...
Page is loading ...
Page is loading ...
Page is loading ...
Page is loading ...
Page is loading ...
Page is loading ...

19. Service-Adressen
19.1. Deutschland
Multimedia
01805 - 633 466 01805 - 654 654
CE-Produkte
01805 - 633 633 01805 - 665 566
(0,14 €/Min. aus dem dt. Festnetz, Mobilfunk max. 0,42 €/Min.)
Mo. - Fr.: 07:00 - 23:00
Sa. - So.: 10:00 - 18:00
www.medion.de
@ Bitte benutzen Sie das Kontaktformular unter www.medion.com/contact
19.2. Österreich
0810 - 001 048
(0,10 €/Min. aus dem Festnetz)
07242 - 939 675 92
Mo. - Fr.: 08:00 - 21:00
Sa. - So.: 10:00 - 18:00
www.medion.at
@ Bitte benutzen Sie das Kontaktformular unter www.medion.com/contact
19.3. Belgien
022006198 022006199
(Lokaltarif)
Premium Hotline
0900-51111
(0,45 €/min)
Mo - Fr: 09:00 - 19:00
www.medion.com/be
@ Bitte benutzen Sie das Kontaktformular unter www.medion.com/contact
23 von 86
DE
FR
EN
NL
16480 DE-FR-EN- NL eCommerce Content Final REV1.indb 2316480 DE-FR-EN- NL eCommerce Content Final REV1.indb 23 01.09.2015 09:59:3001.09.2015 09:59:30

24 von 86
16480 DE-FR-EN- NL eCommerce Content Final REV1.indb 2416480 DE-FR-EN- NL eCommerce Content Final REV1.indb 24 01.09.2015 09:59:3001.09.2015 09:59:30
Page is loading ...
Page is loading ...
Page is loading ...
Page is loading ...
Page is loading ...
Page is loading ...
Page is loading ...
Page is loading ...
Page is loading ...
Page is loading ...
Page is loading ...
Page is loading ...
Page is loading ...
Page is loading ...
Page is loading ...
Page is loading ...
Page is loading ...
Page is loading ...
Page is loading ...
Page is loading ...
Page is loading ...
Page is loading ...

DE
FR
EN
NL
47 of 86
Table of content
1. General information ......................................................................................................................48
1.1. Reading and safekeeping of operating instructions ....................................................................... 48
2. Package contents ..........................................................................................................................49
3. Proper use .....................................................................................................................................49
4. Safety information ........................................................................................................................49
4.1. Unpacking the appliance ...................................................................................................................... 49
4.2. Electrical Safety ......................................................................................................................................50
4.3. Operating Times ...................................................................................................................................... 51
5. Controls .......................................................................................................................................... 52
5.1. Overview of accessories .........................................................................................................................53
5.2. Exploded view showing all mincer parts ........................................................................................... 54
6. Using the appliance for the fi rst time ...........................................................................................55
7. Operation as a kneading machine ...............................................................................................56
7.1. Getting started ....................................................................................................................................... 56
7.2. Mixing and kneading dough ................................................................................................................ 56
7.3. Beating egg white ................................................................................................................................. 56
7.4. Whipping cream ..................................................................................................................................... 56
7.5. Mixing shakes, cocktails or other liquids ............................................................................................57
8. End of operation ............................................................................................................................ 57
9. Working with the mincer .............................................................................................................. 57
9.1. Setting up the mincer to mince meat ...................................................................................................57
9.2. Fitting the mixer with the sausage attachment ................................................................................ 58
9.3. Setting up the mincer to produce spritz biscuits .............................................................................. 59
9.4. Setting up the mincer to produce pasta ............................................................................................. 60
9.5. Setting up the mincer to produce kebab meat .................................................................................60
10. End of operation .............................................................................................................................61
11. Instructions for use of the mincer .................................................................................................61
11.1. Chopping meat ....................................................................................................................................... 61
11.2. Making sausages ..................................................................................................................................... 61
11.3. Piping biscuits ......................................................................................................................................... 61
12. End of operation .......................................................................................................... ...................61
13. Cleaning ......................................................................................................................................... 62
14. Troubleshooting ............................................................................................................................ 62
15. Disposal ..........................................................................................................................................63
16. Technical data ................................................................................................................................63
17. Conformity information ................................................................................................................63
18. Legal notice ...................................................................................................................................64
19. General Warranty Conditions ........................................................................................................64
20. Service Address .............................................................................................................................66
16480 DE-FR-EN- NL eCommerce Content Final REV1.indb 4716480 DE-FR-EN- NL eCommerce Content Final REV1.indb 47 01.09.2015 09:59:4101.09.2015 09:59:41

48 of 86
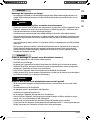
1. General information
1.1. Reading and safekeeping of operating instructions
Read the safety instructions carefully before using the appliance for the first time. Note the
warnings on the appliance and in the operating instructions.
Always keep the operating instructions close to hand. If you sell the appliance or give it away,
make sure you also hand over these instructions and the warranty card.
Explanation of symbols
The following symbols and signal words are used in these instructions, on the appliance or on the
packaging.
DANGER!
This signal word indicates a hazard with a high degree of risk that, if not avoided, is likely to result in death or
serious injury.
WARNING!
This signal word indicates a hazard with a medium level of risk which, if not avoided, could lead to death or
serious injury.
CAUTION!
This signal word indicates a hazard with a low level of risk which, if not avoided, could result in a minor or
moderate injury.
PLEASE NOTE!
This signal word warns of possible damage to property or gives useful additional information on assembly or
operation.
Follow the advice in the operating instructions
Recycling symbol
WEEE symbol (in accordance with the directive on electrical waste)
Declaration of conformity (see the chapter "Conformity Information"): products marked with this
symbol meet the requirements of the applicable EC directives.
Symbol - risk of crushing injury
Symbol - risk of electric shock
16480 DE-FR-EN- NL eCommerce Content Final REV1.indb 4816480 DE-FR-EN- NL eCommerce Content Final REV1.indb 48 01.09.2015 09:59:4101.09.2015 09:59:41

DE
FR
EN
NL
49 of 86
2. Package contents
After unpacking the product, please ensure that the following parts have been supplied:
• Food processor
• 1 mixing bowl
• Food processor accessories and attachments (see “Overview of accessories” on page 53)
• Operating instructions and warranty documents
3. Proper use
The appliance may only be used for kneading or mixing foodstuffs such as dough, mousse, cream or
egg whites. The mincer attachment is for mincing foodstuffs. With the appropriate fittings, you can make
minced meat, sausages or kebabs or extrude pasta or biscuits.
This appliance is intended for domestic use only.
The appliance is not suitable for commercial or industrial use.
Please note that we shall not be liable in cases of improper use:
• Do not modify the product and do not use any auxiliary equipment which we have not approved or
supplied.
• Use only spare parts and accessories that we have supplied or approved.
• Follow all the information in these operating instructions, especially the safety information. Any other
use is deemed improper and can cause personal injury or damage to property and will invalidate your
warranty.
• Do not expose the appliance to any extreme conditions. The following should be avoided:
• High levels of humidity or moisture
• Extremely high or low temperatures
• Direct sunlight
• Naked fl ames
This product is for indoor use only - do not use outdoors!
4. Safety information
WARNING!
Risk of injury due to improper handling
− Store the appliance and its accessories in a place out of the reach of children.
− This appliance is not intended for use by persons (including children) with reduced
physical, sensory or mental capabilities, or lack of experience and knowledge, unless
they have been given supervision or instruction concerning use of the appliances by a
person responsible for their safety.
− Children must not be allowed to play with the appliance. Close supervision is necessary
when any appliance is used by or near children.
4.1. Unpacking the appliance
− If damage has occurred during transit, contact the Medion Service Centre at once.
WARNING!
Risk of suffocation.
− Keep plastic bags and plastic packaging away from children. Please dispose of safely.
16480 DE-FR-EN- NL eCommerce Content Final REV1.indb 4916480 DE-FR-EN- NL eCommerce Content Final REV1.indb 49 01.09.2015 09:59:4201.09.2015 09:59:42

50 of 86
DANGER!
Risk of injury from electric shock!
− Before using the appliance for the first time and after each use, check the mains cable
for damage.
− If damage has occurred, DO NOT use the appliance. Contact the Medion Service Centre
for advice and repair.
4.2. Electrical Safety
DANGER!
Risk of injury from electric shock!
− Make sure that the mains cable does not present a trip hazard. Do not allow the
connecting cable to become trapped or squashed.
− Do not operate the appliance if there appears to be any damage to the machine or the
mains cable.
− There are dangerous voltages inside the appliance. Never open the housing or insert
objects into the ventilation slots.
− In order to disconnect the appliance completely from the power supply, remove the
plug from the socket. Always remove the plug using the plug, never by pulling on the
cable.
− Ensure that a defective appliance is repaired immediately by a specialist workshop. In
order to reduce risks: if the mains cable for this appliance is damaged then it must be
replaced by the Medion Service Centre or a similarly qualified person.
PLEASE NOTE!
Storm damage to the appliance
− Appliances left connected to the mains power supply during thunderstorms may be
damaged. Therefore, always remove the mains plug if there is a thunderstorm.
DANGER!
Risk of injury by rotating and moving parts
− DO NOT TOUCH moving parts. Keep hair, clothing, hands, cutlery, mixing spoons or
similar items away from the appliance during operation to avoid injuries or damage to
property.
− Never use different operating modes (e.g. mincer and mixer) at the same time.
− The appliance must be switched off and disconnected from the supply before changing
accessories or attachments that move when in operation.
− Before switching on, make sure that the accessory attachment is correctly fitted and
firmly seated.
− As soon as you turn on the appliance, the drive shaft will rotate. During operation, do
not reach into the area of the drive shaft! For your own safety, always fit the mixing
bowl, even if you are using the appliance as a mixer or mincer.
PLEASE NOTE!
Risk of damage to the appliance if it is set up incorrectly
− Place the appliance on a firm, level surface.
− Do not use an extension cable.
− Never place the appliance on the edge of a table - it could tip over and fall.
16480 DE-FR-EN- NL eCommerce Content Final REV1.indb 5016480 DE-FR-EN- NL eCommerce Content Final REV1.indb 50 01.09.2015 09:59:4201.09.2015 09:59:42

DE
FR
EN
NL
51 of 86
− Remove the plug from the mains socket after each use, before cleaning and during
periods when the appliance is left unattended.
− Unwind the cable fully when using the appliance.
− Do not allow the mains cable to come into contact with hot objects or surfaces (e.g.
cooker hob).
DANGER!
Risk of injury due to improper use of the appliance
− Do not allow the mains cable to come into contact with water or other liquids.
− Never immerse the appliance in liquids!
− Do not use the appliance outdoors.
− Do not leave the appliance unattended during operation.
− Ensure that no foreign objects (spoon, dough scraper or similar items) are in the mixing
bowl during operation.
− Do not unlock the tilting arm when the mixer is in operation.
− There is a risk of scalding if the appliance is being used with foodstuffs that are hotter
than 60°C. Do not fill the mixing bowl with hot foodstuffs.
4.3. Operating Times
PLEASE NOTE!
Risk of overheating due to excessive operation
− Do not operate the appliance continuously for longer than the times stated below.
− Maximum Operating Time: approx. 5 minutes
− After operating for 5 minutes, allow to cool for 10 minutes before using again.
16480 DE-FR-EN- NL eCommerce Content Final REV1.indb 5116480 DE-FR-EN- NL eCommerce Content Final REV1.indb 51 01.09.2015 09:59:4201.09.2015 09:59:42

52 of 86
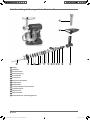
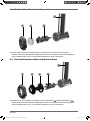
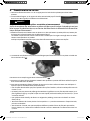
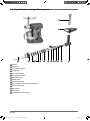
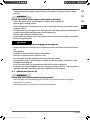
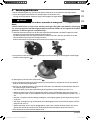
5. Controls
1
2
8
7
6
4
3
5
1
Knob to release front cover
2
Front cover of mincer drive
3
Rear cover
4
Tilt lever
5
Support grip for tilting
6
Operating LED
7
Control knob
8
Base plate with feet
16480 DE-FR-EN- NL eCommerce Content Final REV1.indb 5216480 DE-FR-EN- NL eCommerce Content Final REV1.indb 52 01.09.2015 09:59:4201.09.2015 09:59:42

DE
FR
EN
NL
53 of 86
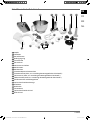
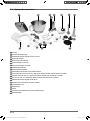
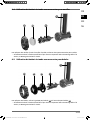
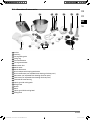
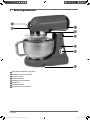
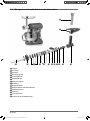
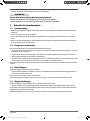
5.1. Overview of accessories
2
19 157
5
5
5
6
5
8
9
16
17
10
20
14
7
18
4
3
1
1
Pusher
2
Feed tray
3
Sausage filling tube
4
Fixing ring
5
Pasta attachments
6
Sausage attachment
7
Meat cutter discs
8
Kebab spout
9
Kebab attachment
10
Biscuit adapter with shaping attachment
11
Biscuit attachment (see “Exploded view showing all mincer parts”)
12
Meat cutter (see “Exploded view showing all mincer parts”)
13
Feed screw (see “Exploded view showing all mincer parts”)
14
Feed tube of screw housing
15
Splash guard for mixing tools
16
Dough hook
17
Beater
18
Whisk
19
Splash guard lid for mixing bowl
20
Mixing bowl
16480 DE-FR-EN- NL eCommerce Content Final REV1.indb 5316480 DE-FR-EN- NL eCommerce Content Final REV1.indb 53 01.09.2015 09:59:4401.09.2015 09:59:44

54 of 86
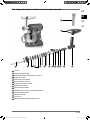
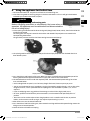
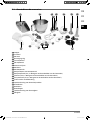
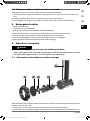
5.2. Exploded view showing all mincer parts
3 4 6 8 9 10 11 12 13 14
2
1
5
7
1
Pusher
2
Feed tray
3
Sausage filling tube
4
Fixing ring
5
Pasta attachments
6
Sausage attachment
7
Meat cutter discs
8
Kebab spout
9
Kebab attachment
10
Biscuit adapter with shaping attachment
11
Biscuit attachment
12
Meat cutter
13
Feed screw
14
Feed tube of screw housing
16480 DE-FR-EN- NL eCommerce Content Final REV1.indb 5416480 DE-FR-EN- NL eCommerce Content Final REV1.indb 54 01.09.2015 09:59:4701.09.2015 09:59:47

DE
FR
EN
NL
55 of 86
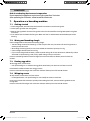
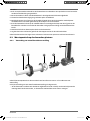
6. Using the appliance for the fi rst time
1. Set the control knob to “0” and press the tilt lever to raise the tilting arm.
2. Place the mixing bowl on the fixing tongues in the base and rotate it as far as it will go in the direction
indicated by the LOCK arrow to lock it in place.
DANGER!
Risk of injury by rotating and moving parts
Before changing accessories or attachments that move when in
operation, the appliance must be switched off and disconnected from the supply. There is a
risk of a crushing injury!
3. Fit the splash guard onto one of the three mixing tools (dough hook, beater, whisk), then fit the tool to the
machine as illustrated.
The mixing tools can only be inserted in the machine and rotated if the projections are seated in the
corresponding indentations.
The guard disc prevents the drive shaft from coming into contact with dough.
4. The splash guard for the mixing bowl is ready to fit and can simply be placed over the bowl after it has
been locked in place:
5. Press the tilt lever and lower the tilting arm. Make sure that it is latched home on the bottom part of the
housing. Reconnect the appliance to the mains supply and switch on at the wall socket.
6. The control knob can now be set for the required speed. The recommended speed settings for various
uses are listed below.
• Use the dough hook at speed 1, 2 or 3 for heavy doughs like bread, shortcrust pastry or pasta.
• You can use the beater for many ingredients ranging from medium-weight doughs, such as cake mixes,
to lighter mixtures, such as pancake batter and sponge mix. Use the beater at speed 4, 5, 6, 7 or 8 as
required.
• If you are whipping cream, egg white or blancmange, use the whisk at high speed (7 or 8).
• For short, powerful and continuous pulse movements, turn the control knob repeatedly to the “P”
position.
• The mincer can be used to make various dough products such as noodles and biscuits, to produce
kebabs, to mince meat or to fi ll sausages. The required speed setting is 6, 7 or 8.
7. After the test run, turn the control knob to “0”.
8. Press the tilt lever and lift the tilting arm, then remove the mixing tool from the bayonet fitting. Return the
tilting arm to its lowered position.
9. Switch off at the wall socket and unplug.
16480 DE-FR-EN- NL eCommerce Content Final REV1.indb 5516480 DE-FR-EN- NL eCommerce Content Final REV1.indb 55 01.09.2015 09:59:4901.09.2015 09:59:49

56 of 86
PLEASE NOTE!
Risk of overheating due to excessive operation
Do not operate the appliance continuously for more than 5 minutes.
After operating for 5 minutes, allow to cool for 10 minutes.
7. Operation as a kneading machine
7.1. Getting started
1. Fit the dough hook, whisk or beater to the machine and then insert the mixing bowl.
2. Fit the splash guard on the mixing bowl.
3. Now put the ingredients into the mixing bowl. Take care not to overfill the mixing bowl (about 1.5 kg flour
maximum).
4. Press the tilt lever and lower the tilting arm. Make sure that it is latched home on the bottom part of the
housing.
7.2. Mixing and kneading dough
Use the dough hook or the beater for kneading dough.
• The best dough mixture for kneading is a ratio of 5 parts fl our to 3 parts water. Fill the mixing bowl to a
maximum level of 3/4 full.
• When fi lling the mixing bowl, be sure not to exceed the maximum quantity of 1.5 kg.
• Use the dough hook or beater for mixing.
− If you use the dough hook or beater, switch to speed setting 1 for at least 30 seconds, followed by at least
30 seconds at speed setting 2 and, fi nally, speed setting 3 for up to 5minutes.
Do not use the dough hook or beater for longer than 5 minutes and then allow a pause of at least 10
minutes.
7.3. Beating egg white
To beat egg white, use the whisk.
− Use speed setting 7 or 8 and beat the egg white continuously for some 3 to 5 minutes until stiff.
Do not beat the whites of more than 12 eggs at once.
Do not use the whisk for longer than 5 minutes and then allow a pause of at least 10 minutes.
7.4. Whipping cream
To whip cream, use the whisk. Use fresh cream.
− For whipped cream, use speed setting 7 or 8 and whip for some 3 to 5 minutes.
Be sure not to exceed the maximum quantity when adding fresh milk, cream or other ingredients to the
mixing bowl.
Do not use the whisk for longer than 5 minutes and then allow a pause of at least 10 minutes.
16480 DE-FR-EN- NL eCommerce Content Final REV1.indb 5616480 DE-FR-EN- NL eCommerce Content Final REV1.indb 56 01.09.2015 09:59:4901.09.2015 09:59:49

DE
FR
EN
NL
57 of 86
7.5. Mixing shakes, cocktails or other liquids
To mix shakes, cocktails and other liquids, use the whisk.
− Mix the ingredients in accordance with the required recipe for some 3 to 5 minutes at a speed setting of
1 to 8.
Do not exceed the maximum quantity in the mixing bowl.
Do not use the whisk for longer than 5 minutes and then allow a pause of at least 10 minutes.
8. End of operation
1. Switch off the appliance.
2. Disconnect the mains plug.
3. Press down on the tilt lever to allow the arm to raise itself.
4. Remove the mixing tool. To release the tool, rotate it anticlockwise.
5. Rotate the mixing bowl slightly clockwise to remove it.
6. When the dough is ready, use a spatula to remove it from the mixing bowl.
7. Clean the parts used as described under “Cleaning”.
9. Working with the mincer
DANGER!
Risk of injury by rotating and moving parts
− When using the mincer, put the mixing bowl in position to protect the rotating fitting for
the mixing tool. There is a risk of a crushing injury!
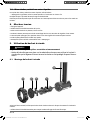
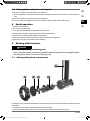
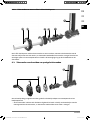
9.1. Setting up the mincer to mince meat
4 7 12 13
14
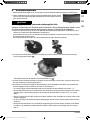
For mincing, use the most appropriate of the three meat cutting discs for the desired result together with the
meat cutter.
1. Pull out the mains plug to isolate the machine from the supply.
2. Hold in the knob to release the front cover and turn the front cover to the right to release.
16480 DE-FR-EN- NL eCommerce Content Final REV1.indb 5716480 DE-FR-EN- NL eCommerce Content Final REV1.indb 57 01.09.2015 09:59:4901.09.2015 09:59:49

58 of 86
3. If needed, press the tilt lever and lower the tilting arm. Make sure that it is latched home on the bottom
part of the housing.
4. Assemble the mincer with accessory parts in the order illustrated above.
5. Screw the end fixing ring clockwise onto the thread.
6. Hold in the knob to release the front cover and, with the bayonet fitting tilted slightly to the right, fit the
mincer onto the mincer drive shaft.
7. Rotate the mincer to the left to screw it on. Make sure that the mincer is firmly seated on its connection to
the machine.
8. Fit the feed tray on the top end of the mincer feed tube.
9. Place the meat in the feed tray and use the pusher to push it down the tube.
Do not use the mincer for longer than 5 minutes and then allow a pause of at least 10 minutes.
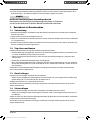
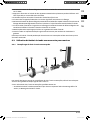
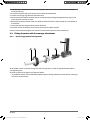
9.2. Fitting the mixer with the sausage attachment
9.2.1. Processing prepared sausage meat
43 13
14
6
To fill suitable natural or artificial sausage skin with sausage meat, use the sausage attachment and the
sausage filling tube.
To process prepared sausage meat, proceed as follows:
− Assemble the mincer as illustrated above, following the assembly procedure as described in “Setting up
the mincer to mince meat”.
16480 DE-FR-EN- NL eCommerce Content Final REV1.indb 5816480 DE-FR-EN- NL eCommerce Content Final REV1.indb 58 01.09.2015 09:59:5001.09.2015 09:59:50

DE
FR
EN
NL
59 of 86
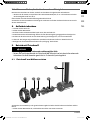
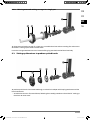
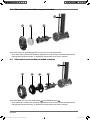
9.2.2. Mincing meat and making sausages in a single pass
43 13
14
7 12
To mince meat and make sausages in a single pass, assemble the mincer and meat cutting disc and cutter as
described in “Setting up the mincer to mince meat”.
Put on the sausage attachment next and screw the fixing ring onto the thread of the mincer body.
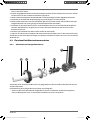
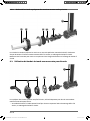
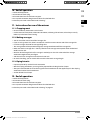
9.3. Setting up the mincer to produce spritz biscuits
10
4
13
14
11
To produce spritz biscuits from shortbread dough, use the biscuit adapter with shaping attachment and the
biscuit attachment.
− Assemble the mincer as illustrated above, following the assembly procedure as described in “Setting up
the mincer to mince meat”.
16480 DE-FR-EN- NL eCommerce Content Final REV1.indb 5916480 DE-FR-EN- NL eCommerce Content Final REV1.indb 59 01.09.2015 09:59:5001.09.2015 09:59:50

60 of 86
9.4. Setting up the mincer to produce pasta
4 13
14
5
To produce pasta from pasta dough, choose one of the four pasta attachments.
− Assemble the mincer as illustrated above, following the assembly procedure as described in “Setting up
the mincer to mince meat”.
9.5. Setting up the mincer to produce kebab meat
4 13
14
8 9
To produce kebab meat, use the kebab spout
8
and the kebab attachment
9
.
− Assemble the mincer as illustrated above, following the assembly procedure as described in “Setting up
the mincer to mince meat”.
16480 DE-FR-EN- NL eCommerce Content Final REV1.indb 6016480 DE-FR-EN- NL eCommerce Content Final REV1.indb 60 01.09.2015 09:59:5101.09.2015 09:59:51

DE
FR
EN
NL
61 of 86
10. End of operation
1. Switch off the appliance.
2. Disconnect the mains plug.
3. Dismantle the mincer and all accessory parts.
4. Use a spatula to remove dough/meat residues from the feed tube.
5. Clean the parts used as described under “Cleaning”.
11. Instructions for use of the mincer
11.1. Chopping meat
• Do not include any hard matter such as bones.
− Cut the meat into small pieces, about 20 x 20 x 60 mm, without gristle or bone, so that they are easily
broken up in the feed screw housing.
11.2. Making sausages
• You can use either natural or artifi cial sausage skin.
• If you are using natural skin, allow it to soften for a while in water. Knot one end of the sausage skin.
− Push the sausage skin onto the sausage fi lling tube.
− The sausage meat will be pushed through the sausage attachment to fi ll the sausage skin.
• Make sure that the sausage skin is “loosely” fi lled since the sausage meat expands when cooked and
could burst the skin.
− Once the desired length for the fi rst sausage is reached, press the skin at the end of the sausage
attachment together with your fi ngers
− and then twist the sausage once or twice on its own axis.
• For easier handling, you can switch off the machine after each sausage length.
11.3. Piping biscuits
− Prepare a place to lay out the biscuits once made.
− With the shaping attachment, you can give the prepared biscuit dough various shapes.
− After you have mounted the screw housing with biscuit attachment on the appliance, push the shaping
attachment into the biscuit attachment.
− Set the desired biscuit shape.
12. End of operation
1. Switch off the appliance.
2. Disconnect the mains plug.
3. Dismantle the mincer and all accessory parts.
4. Use a spatula to remove dough/meat residues from the feed tube.
5. Clean the parts used as described under “Cleaning” on page 62.
16480 DE-FR-EN- NL eCommerce Content Final REV1.indb 6116480 DE-FR-EN- NL eCommerce Content Final REV1.indb 61 01.09.2015 09:59:5101.09.2015 09:59:51

62 of 86
13. Cleaning
DANGER!
Risk of electrocution
− Before cleaning, turn the control knob to speed setting “0” and remove the mains plug.
− Never immerse the appliance in water or other liquids!
− Always disconnect the appliance plug from the mains socket before cleaning or
servicing the appliance and before fitting or dismantling the attachments.
− Before cleaning, all attachments must be removed from the main appliance.
PLEASE NOTE!
Risk of damage to the appliance if handled incorrectly
− Do not use a wire brush or other scourer or any sharp or scouring cleaning agents.
Motor housing:
− Only clean the external housing of the appliance, using a damp cloth with a small
amount of washing up liquid. Dry off with a cloth.
Dough hook, beater, mincer feed screw, feed tube with feed screw housing, feed tray
and fixing ring of the mincer:
− Do NOT clean these components in the dishwasher! Under the influence of heat and
aggressive cleaning agents, they can become distorted or discoloured. They can be
hand washed in hot water with washing-up liquid. Rinse and dry thoroughly.
Plastic accessories, whisk, mixing bowl, mix container, inner blade and meat cutting
discs:
− These accessory parts can be cleaned with hot water and washing-up liquid or in the
dishwasher. Do not use any scouring agents.
− After drying, wipe the meat cutting discs and cutting blade of the mincer with a little
vegetable oil.
14. Troubleshooting
Problem Possible cause Solution
The appliance will
not start
The mains plug is not
properly inserted.
Pull out the plug, wait 10 seconds and then plug it back
in again.
The socket is defective. Check the socket by connecting another appliance.
16480 DE-FR-EN- NL eCommerce Content Final REV1.indb 6216480 DE-FR-EN- NL eCommerce Content Final REV1.indb 62 01.09.2015 09:59:5101.09.2015 09:59:51

DE
FR
EN
NL
63 of 86
15. Disposal
15.3.1. Disposal of packaging
Sort packaging before disposal. Dispose of paper and cardboard, as well as plastic packing
materials, using the recycling facilities provided by your local authority.
15.3.2. Disposal of old appliances
(Applicable in the European Union and other European states with systems for separate collection of
recyclable materials)
Do not dispose of old appliances in normal household waste!
If the appliance is no longer fit for use, all consumers are required by law to hand in old
appliances separately from household rubbish, e.g. at a local authority waste collection point.
This guarantees that old appliances are recycled correctly and avoids negative effects on the
environment. For this reason, electrical appliances are marked with the above symbol.
16. Technical data
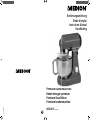
Model: MD 16480
Nominal voltage: 220-240 V~50/60 Hz
Protection Class: I (this appliance must be earthed)
Nominal power: 1000 W
Mixing bowl: 4.6 litres
Max. capacity (flour): 1.5 kg
Dimensions in cm
Appliance: approx. 40.5 x 47 x 29.5 (H x W x D)
Net weight: 7.8 kg
17. Conformity information
Medion AG hereby declares that the product MD 16480 conforms to the following European
requirements:
• EMC Directive 2004/108/EC
• Low Voltage Directive 2006/95/EC
• RoHS Directive 2011/65/EU
Full declarations of conformity are available at www.medion.com/conformity.
16480 DE-FR-EN- NL eCommerce Content Final REV1.indb 6316480 DE-FR-EN- NL eCommerce Content Final REV1.indb 63 01.09.2015 09:59:5101.09.2015 09:59:51

64 of 86
18. Legal notice
Copyright © 2015
All rights reserved.
This operating manual is protected by copyright.
Mechanical, electronic and any other form of reproduction is prohibited without the
written permission of the manufacturer
Copyright is owned by the company:
Medion AG
Am Zehnthof 77
45307 Essen
Germany
The operating manual can be reordered via the service hotline and is available for download via the service
portal at www.medion.com/gb/service/start/.
You can also scan the QR code above and download the operating manual onto your mobile device via the
service portal.
19. General Warranty Conditions
19.1. General information
The warranty period is 24 months and begins on the day the product is purchased. The warranty covers all
types of material and product damage that could occur during normal use.
Please keep your original proof of purchase in a safe place. The warranty provider reserves the right to re-
fuse to confirm the status of the warranty or to carry out a repair under warranty if a valid proof of purchase
cannot be produced.
If it is necessary to return your device for repair, please ensure that it is suitably packaged for transportation.
Unless otherwise specified, you shall bear the costs for sending the device and the transport risk. The war-
ranty provider does not assume any liability for additional materials sent with the product that do not be-
long to the original package contents supplied with the product.
Please enclose as much information as possible about the fault when sending the device to the warranty
provider. In order to make a valid claim under warranty and before returning the device, please contact the
Service Hotline operated by the warranty provider or the Service Portal. They will provide you with informati-
on on how to proceed further.
This warranty has no effect on your statutory warranty rights and is subject to the laws of the country in
which the first purchase of the product was made by the end customer.
19.1.1. Scope
In the event of a fault on your product that is covered by this warranty, the warranty provider guarantees to
repair or replace the product. The decision about whether to repair or replace the device is taken by the war-
ranty provider. Therefore, the warranty provider can at its own discretion decide to replace a device submit-
ted for repair under warranty with a refurbished device of the same quality.
No warranty is provided for batteries or rechargeable batteries or for consumable materials i.e. parts which
have to be replaced at regular intervals during the normal use of the product e.g. video projector lamps.
A pixel error (permanently coloured, light or dark point in an image) is not generally considered a fault.
Please refer to the information provided in the manual for this product for the precise number of permissible
defects in the image.
The warranty provider gives no warranty for burnt-in images on plasma or LCD devices that result from the
improper use of the device. Please refer to the information provided in the manual for this product for preci-
se instructions on operating your plasma or LCD device.
The warranty does not cover errors relating to the playback of data media that have been created in an in-
compatible format or as a result of using unsuitable software.
If it is discovered during the repair that the fault concerned is not covered under warranty, the warranty
provider reserves the right to invoice the customer for the costs already incurred in the form of a flat-rate
16480 DE-FR-EN- NL eCommerce Content Final REV1.indb 6416480 DE-FR-EN- NL eCommerce Content Final REV1.indb 64 01.09.2015 09:59:5101.09.2015 09:59:51
Page is loading ...
Page is loading ...
Page is loading ...
Page is loading ...
Page is loading ...
Page is loading ...
Page is loading ...
Page is loading ...
Page is loading ...
Page is loading ...
Page is loading ...
Page is loading ...
Page is loading ...
Page is loading ...
Page is loading ...
Page is loading ...
Page is loading ...
Page is loading ...
Page is loading ...
Page is loading ...
Page is loading ...
Page is loading ...
Page is loading ...
-
 1
1
-
 2
2
-
 3
3
-
 4
4
-
 5
5
-
 6
6
-
 7
7
-
 8
8
-
 9
9
-
 10
10
-
 11
11
-
 12
12
-
 13
13
-
 14
14
-
 15
15
-
 16
16
-
 17
17
-
 18
18
-
 19
19
-
 20
20
-
 21
21
-
 22
22
-
 23
23
-
 24
24
-
 25
25
-
 26
26
-
 27
27
-
 28
28
-
 29
29
-
 30
30
-
 31
31
-
 32
32
-
 33
33
-
 34
34
-
 35
35
-
 36
36
-
 37
37
-
 38
38
-
 39
39
-
 40
40
-
 41
41
-
 42
42
-
 43
43
-
 44
44
-
 45
45
-
 46
46
-
 47
47
-
 48
48
-
 49
49
-
 50
50
-
 51
51
-
 52
52
-
 53
53
-
 54
54
-
 55
55
-
 56
56
-
 57
57
-
 58
58
-
 59
59
-
 60
60
-
 61
61
-
 62
62
-
 63
63
-
 64
64
-
 65
65
-
 66
66
-
 67
67
-
 68
68
-
 69
69
-
 70
70
-
 71
71
-
 72
72
-
 73
73
-
 74
74
-
 75
75
-
 76
76
-
 77
77
-
 78
78
-
 79
79
-
 80
80
-
 81
81
-
 82
82
-
 83
83
-
 84
84
-
 85
85
-
 86
86


Ask a question and I''ll find the answer in the document
Finding information in a document is now easier with AI
in other languages
- français: Medion MD 16480 Manuel utilisateur
- Deutsch: Medion MD 16480 Benutzerhandbuch
- Nederlands: Medion MD 16480 Handleiding
Related papers
-
Medion AMBIANO MD 16480 User manual
-
-
-
-
-
-
-
Medion MD 17022 User manual
-
Medion MD 17023 User manual
-
Medion MD 17024 User manual
Other documents
-
Tristar MX-4162 User manual
-
ProfiCook PC-KM 1096 User manual
-
BOMANN KM 6010 CB Operating instructions
-
BOMANN KM 6030 CB Owner's manual
-
-
-
Tristar MX-4167 User manual
-
Tristar MX-4159 User manual
-
Tristar MX-4174 Owner's manual
-