Page is loading ...
®
USER MANUAL (GB) .........................2
MANUEL D’UTILISATION (FR) ........10
MANUAL DE USUARIO (ES) ...........18
2
INSTRUCTIONS FOR SAFE USE
This appliance should only be used for domestic cleaning, as described in this user guide.
Please ensure that this guide is fully understood before operating the appliance.
Always switch off and remove the charger from the socket before cleaning the appliance or
any maintenance task.
This appliance can be used by children aged from 8 years and above and persons with
reduced physical, sensory or mental capabilities or lack of experience and knowledge if they
have been given supervision or instruction concerning use of the appliance in a safe way and
understand the hazards involved. Children shall not play with the appliance. Cleaning and user
maintenance shall not be made by children without supervision.
If the power cord is damaged stop using the appliance immediately. To avoid a safety hazard, an
authorised Hoover service engineer must replace the power cord.
If the area to be cleaned contains a balcony or stairs, a physical barrier should be used to
prevent access to the balcony or stairs and ensure safe operation. Small children and pets
must be supervised while the Robot is cleaning.
Always store the appliance indoors. Do not use outdoors or expose the appliance to the
Do not
Do not drop the Robot or use any accessory if it has been dropped, damaged, left outdoors or
dropped in water.
Never unplug or pull the mains power adaptor by the power cord.
Do not use to clean stairs.
Battery Charging
Use only the original charger supplied with the appliance.
Check that your supply voltage is the same as that stated on the charger.
Never charge the batteries in temperatures above 30°C or below 0°C.
Plug the charger delivered with this appliance into a suitable socket.
Leaks from battery cells can occur under extreme usage or temperature conditions. If the liquid gets
water for a minimum of 10 minutes. Seek medical attention.
It is normal for the charger to become warm to the touch when charging.
Use only attachments, consumables or spares recommended or supplied by Hoover.
Do not pick up hard or sharp objects, matches, hot ashes, cigarette ends or other similar
items.
Do not
Do not continue to use your appliance or charger if it appears faulty.
Hoover service:
recommend that any servicing or repairs are only carried out by an authorised Hoover service
engineer.
Do not use the appliance to clean animals or people.
Do not replace the Robot batteries with non-rechargeable batteries.
End of life battery removal
be disconnected from the supply mains when removing the battery. Dispose of the batteries safely.
Run the appliance until it stops because the batteries are fully discharged. Used batteries should
be taken to a recycling station and not disposed of with household waste. To remove the batteries,
please contact the Hoover Customer Centre or proceed according to the following instructions.
Unplug the charger and switch off the Robot. Turn the Robot over and place on a level surface.
Remove the screws and battery compartment cover. Remove the battery pack.
[Fig. 7]
NOTE:
information on treatment, recovery and recycling of this appliance, please contact your local
* Certain Models Only ** May vary according to model
GB

3
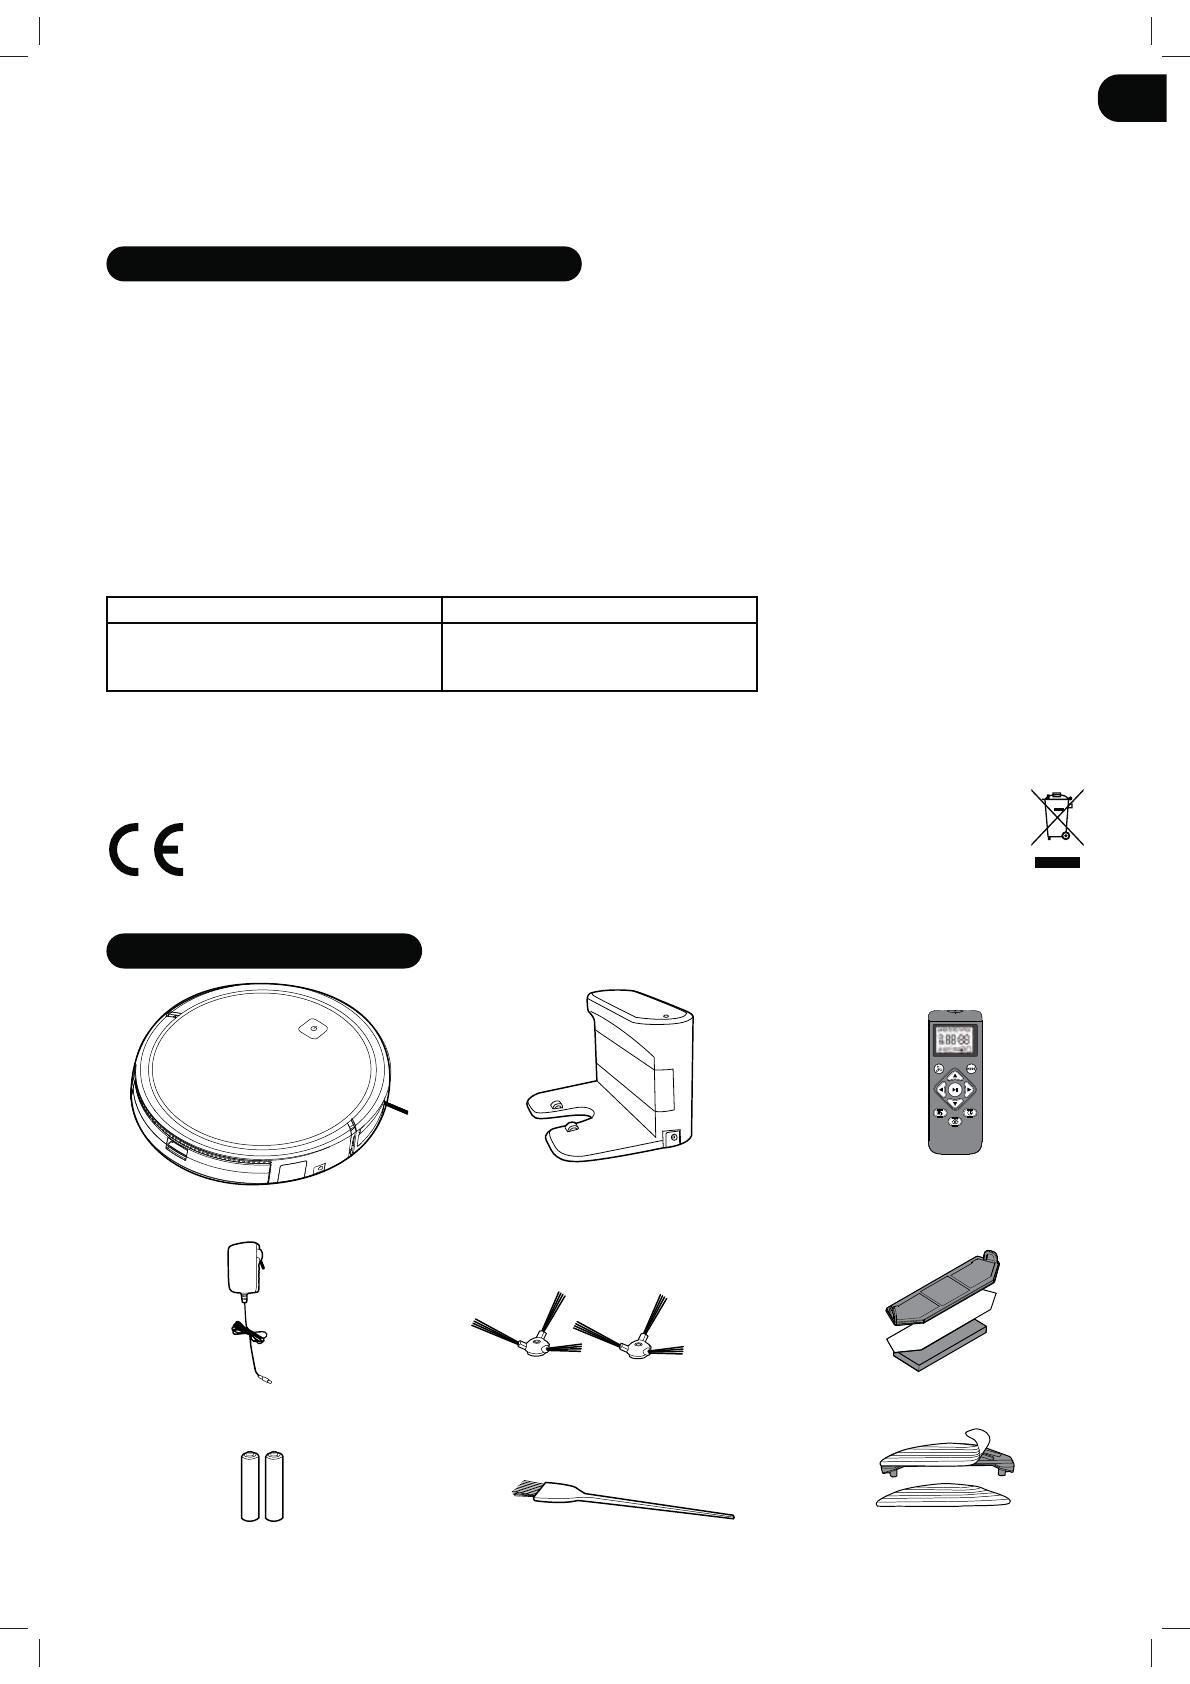
Robot Cleaner Charger Base Remote Control
Mains Power Adaptor X4 Edge Cleaning Brush Filter pack
X1 Additional Filter
X2 AAA Batteries Cleaning Brush Water tank and X2 Mops
IMPORTANT NOTES BEFORE USE
Please read the following information carefully before using your Robot or its accessories.
Do not disassemble the Robot and do not attempt to repair it yourself. If a fault occurs, please contact the Hoover after Sales Service for
professional advice.
Stairs: The Robot uses sensors to avoid falling down steps, stairs or over an edge. In some situations the sensors can become confused.
The Robot cannot detect steps that are less than 8cm in height. Steps less than 8cm may cause the Robot to fall down. If available, use the Virtual
Barrier to protect your Robot from falling.
If
available use the Virtual Barrier or place a carpet on the lower step to protect your Robot from falling.
Using your Robot on mezzanines, landings or raised areas without borders should be avoided. If available use the Virtual Barrier to prevent your
Robot entering these areas.
Battery Use: Your Robot is powered by rechargeable, high capacity lithium ion batteries. These rechargeable batteries are guaranteed for a
period of 6 months if they are maintained and operated according to this User Manual.
Only use Hoover approved replacement parts for your Robot. Use of parts that are not approved by Hoover are dangerous and will invalidate your
warranty.
Only use the supplied charging station and mains power adaptor to recharge your Robot. Use of the incorrect charging station or mains power
adaptor is dangerous and will invalidate your warranty.
The Environment
The symbol on this appliance indicates that this appliance may not be treated as household waste. Instead it must be handed over to the
applicable collection point for the recycling of electrical and electronic equipment. Disposal must be carried out in accordance with local
environmental regulations for waste disposal. For more detailed information about treatment, recovery and recycling of this appliance,
This appliance complies with the European Directives 2014/53/EU and 2011/65/EU
. To receive a copy of the declaration of conformity,
please contact the manufacturer through the website: www.candy-group.com
Frequency bands 2412Mhz ~ 2472Mhz
Maximum RF power transmitted in the frequency band
802.11 b: +16.32 dBm
802.11 g: +17.94 dBm
802.11 n20: +17.23 dBm
802.11 n40: +17.84dBm
CONTENTS OF THE BOX
GB
12
4
9
1818
19
10
1
15
12
11
13
14
16
17
19
3
5
16
19
20
21
22
17
6
7
8
44
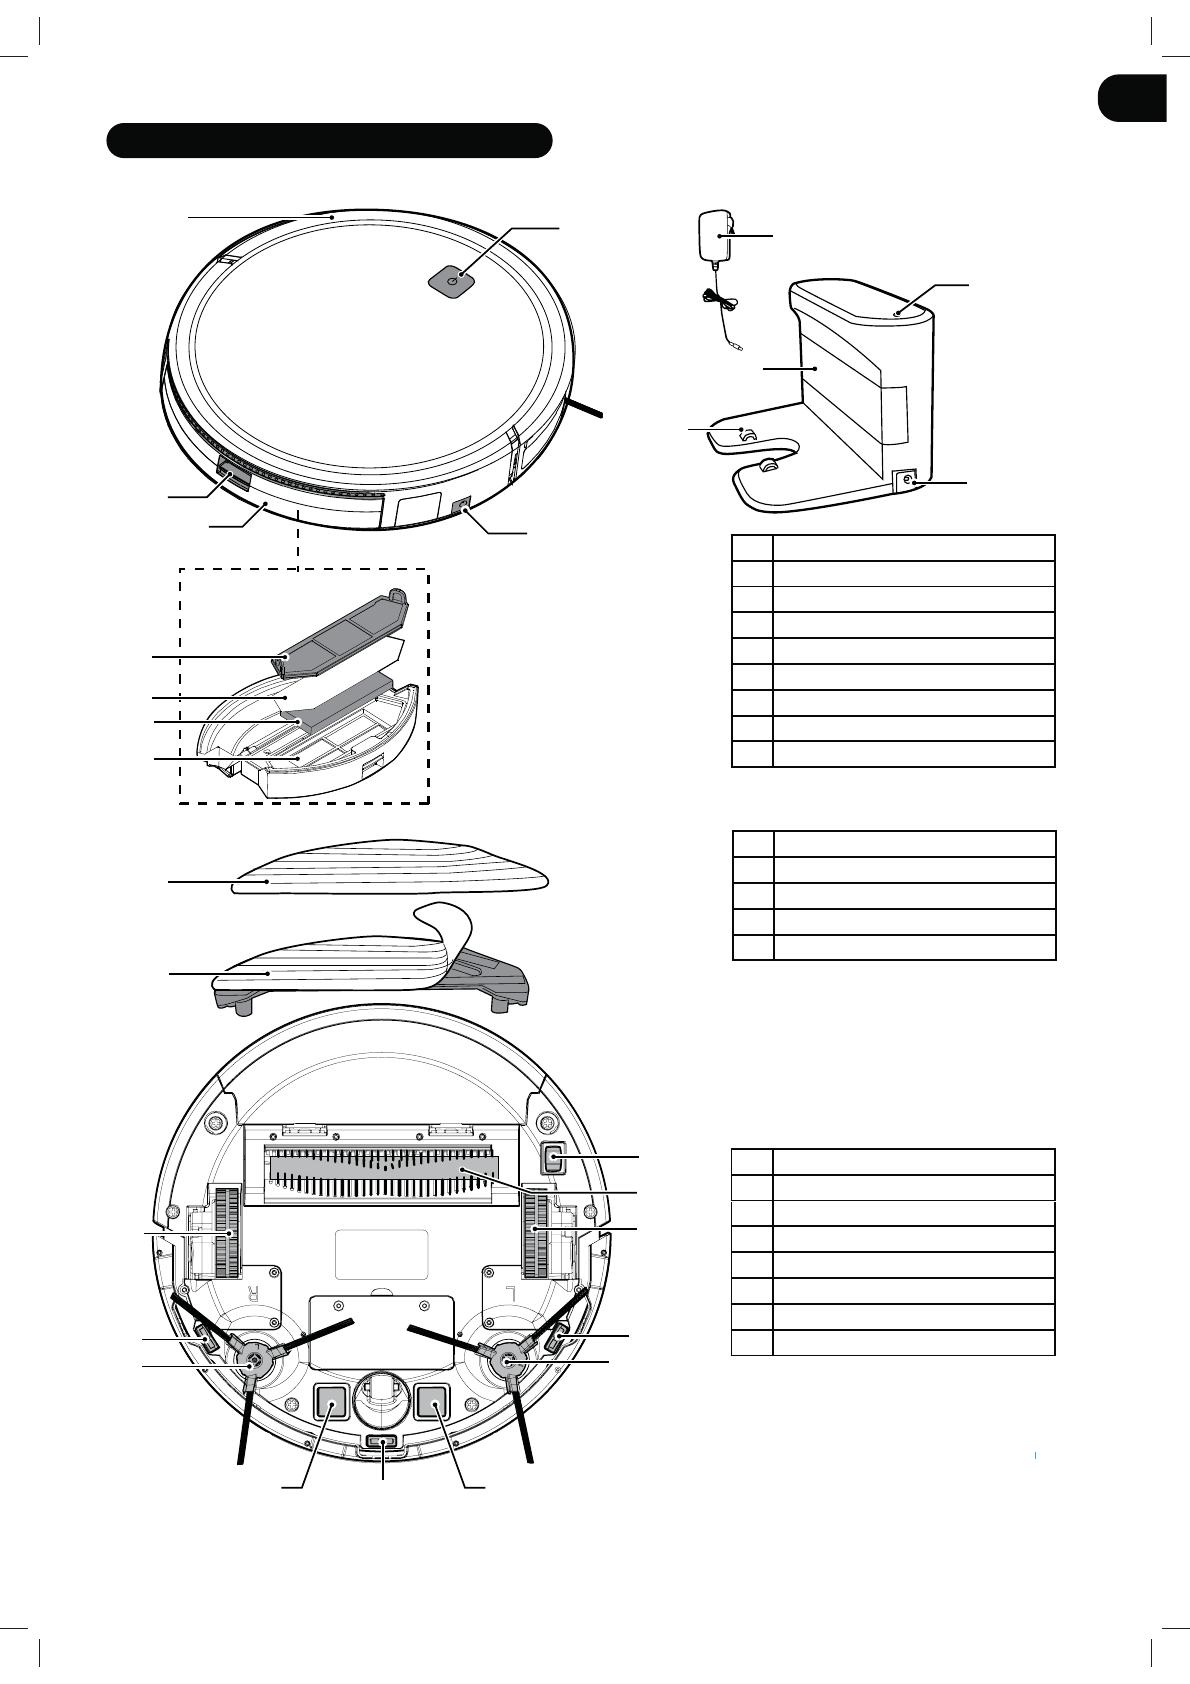
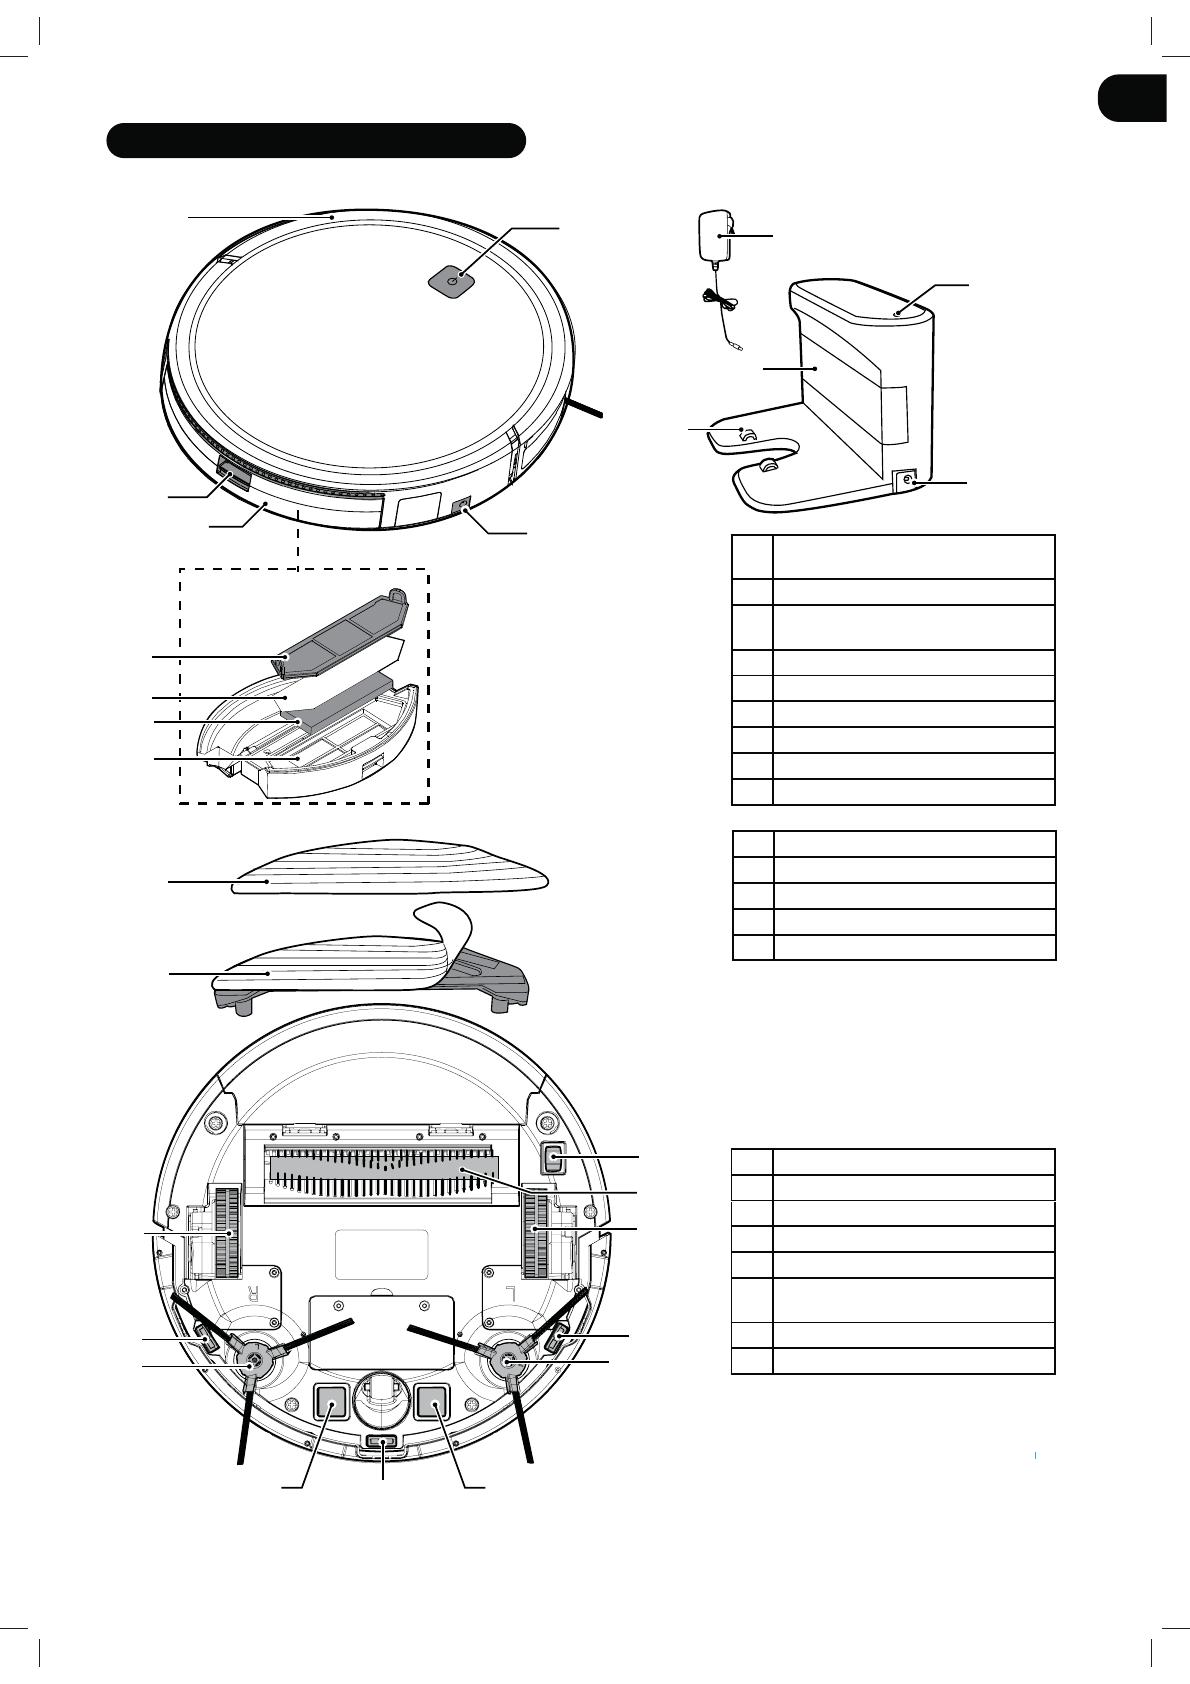
GETTING TO KNOW YOUR CLEANER
1 On/ Standby Switch with Power LED
2 Front Bumper
3 Dust Container Release Button
4 Dust Container
5 Filter mesh
6 Epa Filter
7 Sponge Filter
8 Filter Holder
9 DC Jack, vacuum Robot
10 Charging Contacts
11 Charger Base
12 Mains Power Adaptor
13 Charge Control LED
14 DC Jack, Charger Base
15 Agitator
16 Drive Wheel
17 Edge Cleaning Brush
18 Robot Charging Contacts
19 Anti-Fall Sensor
20 On/Off Switch
21 Water Tank
22 Mop
* Certain Models Only ** May vary according to model
GB
5
23
24
25
26
27
28
33
34
32
31
29
30
Fig. 3
Fig. 2
Fig. 1
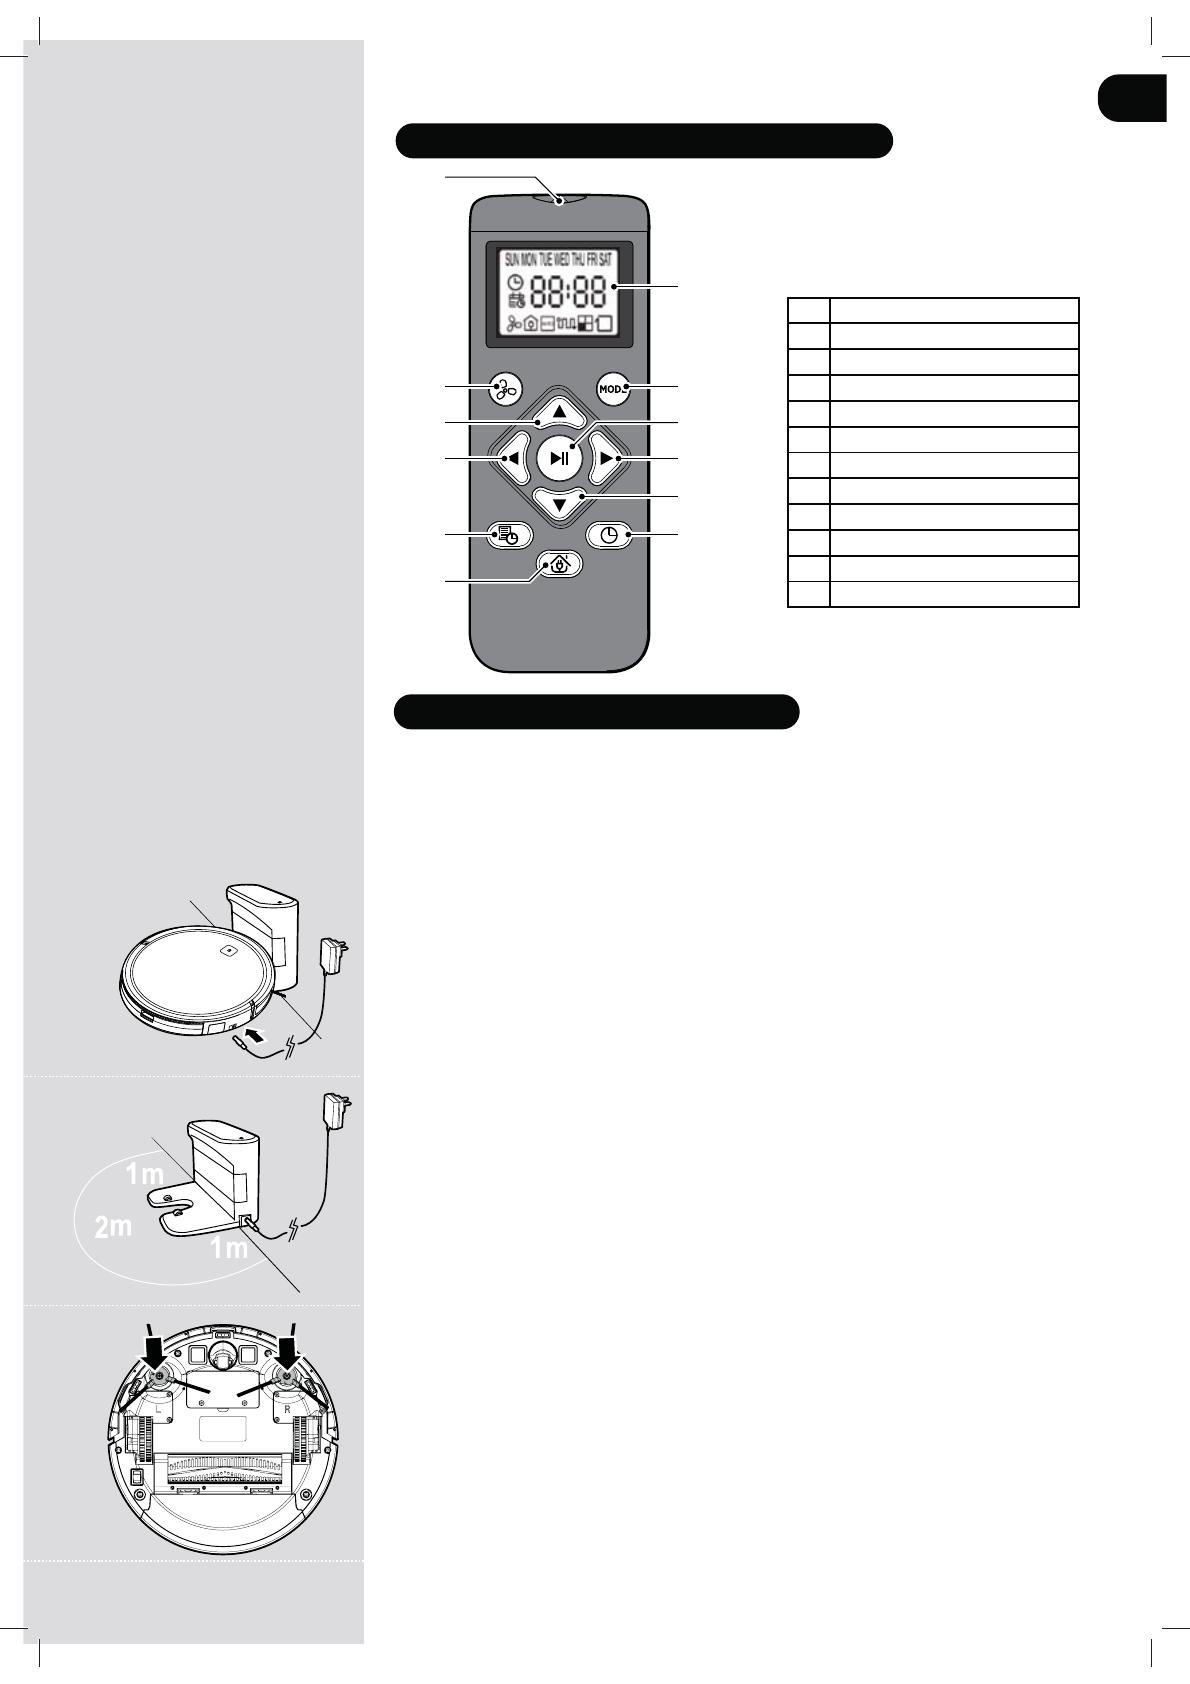
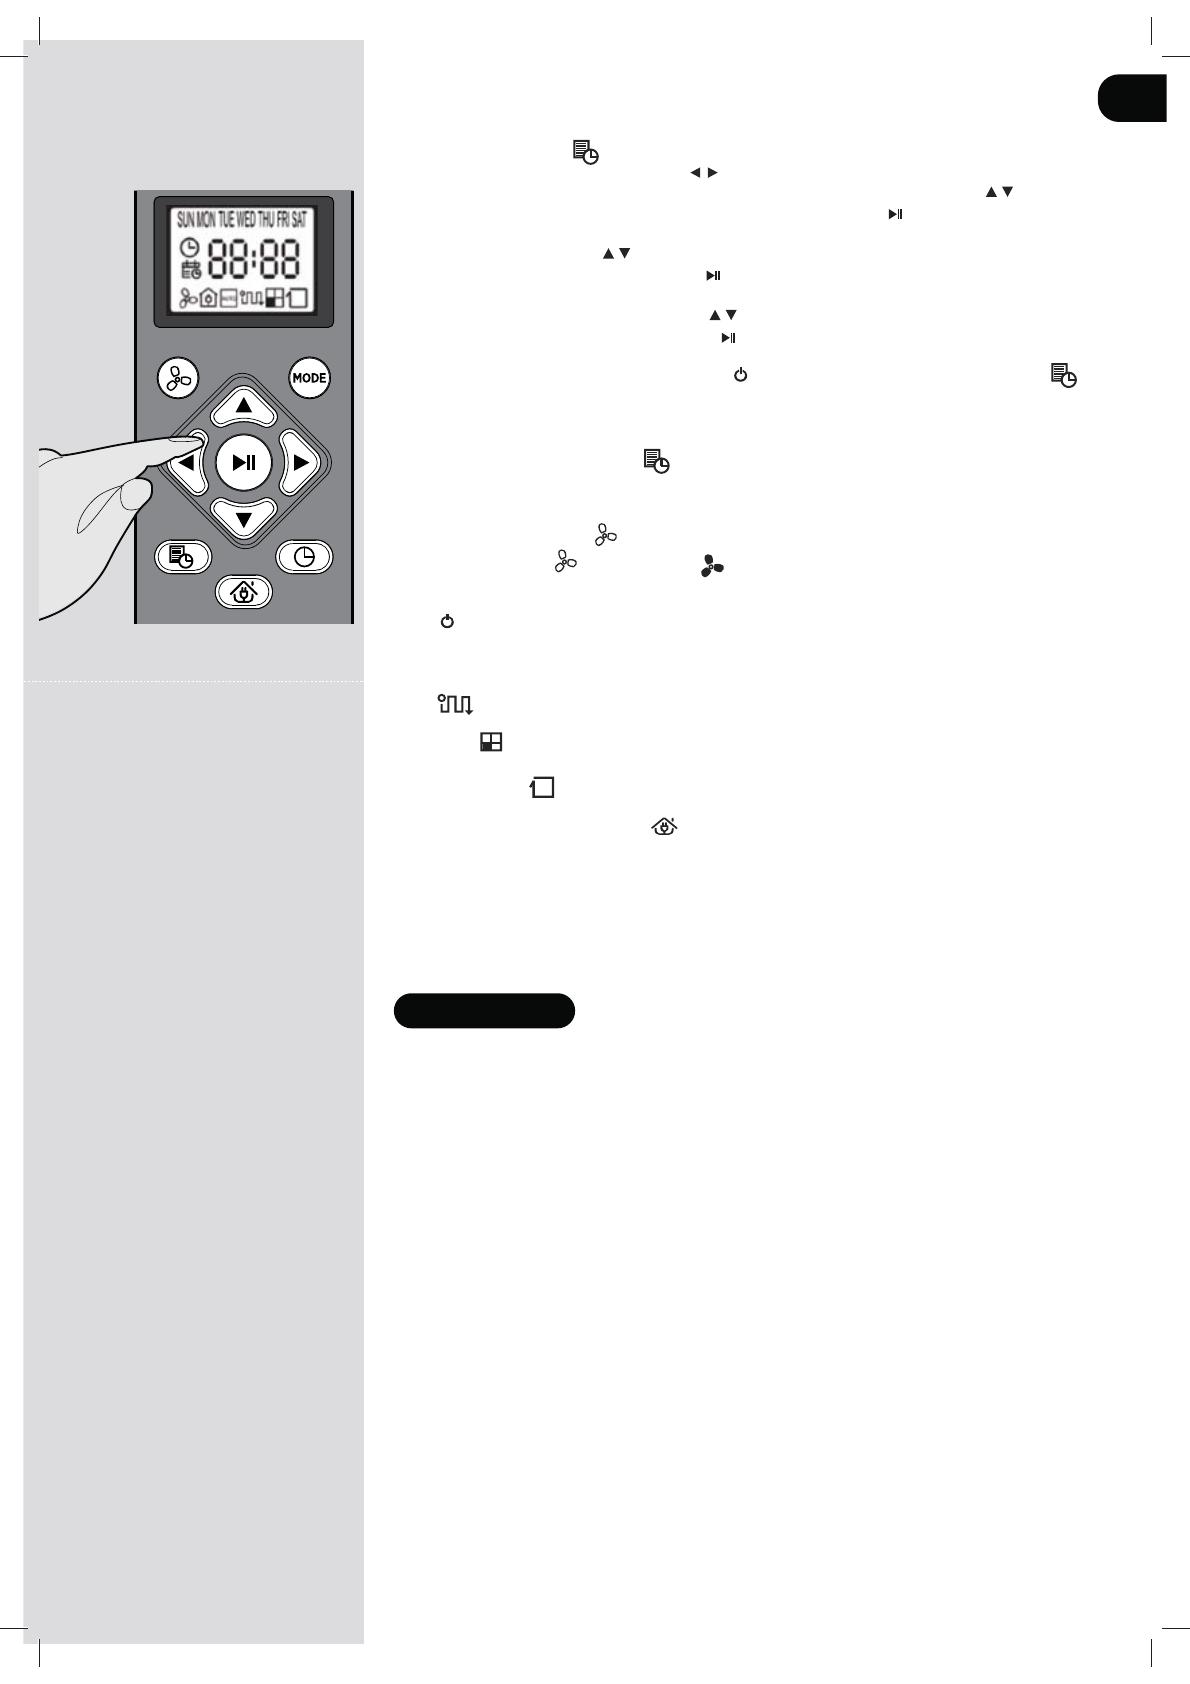
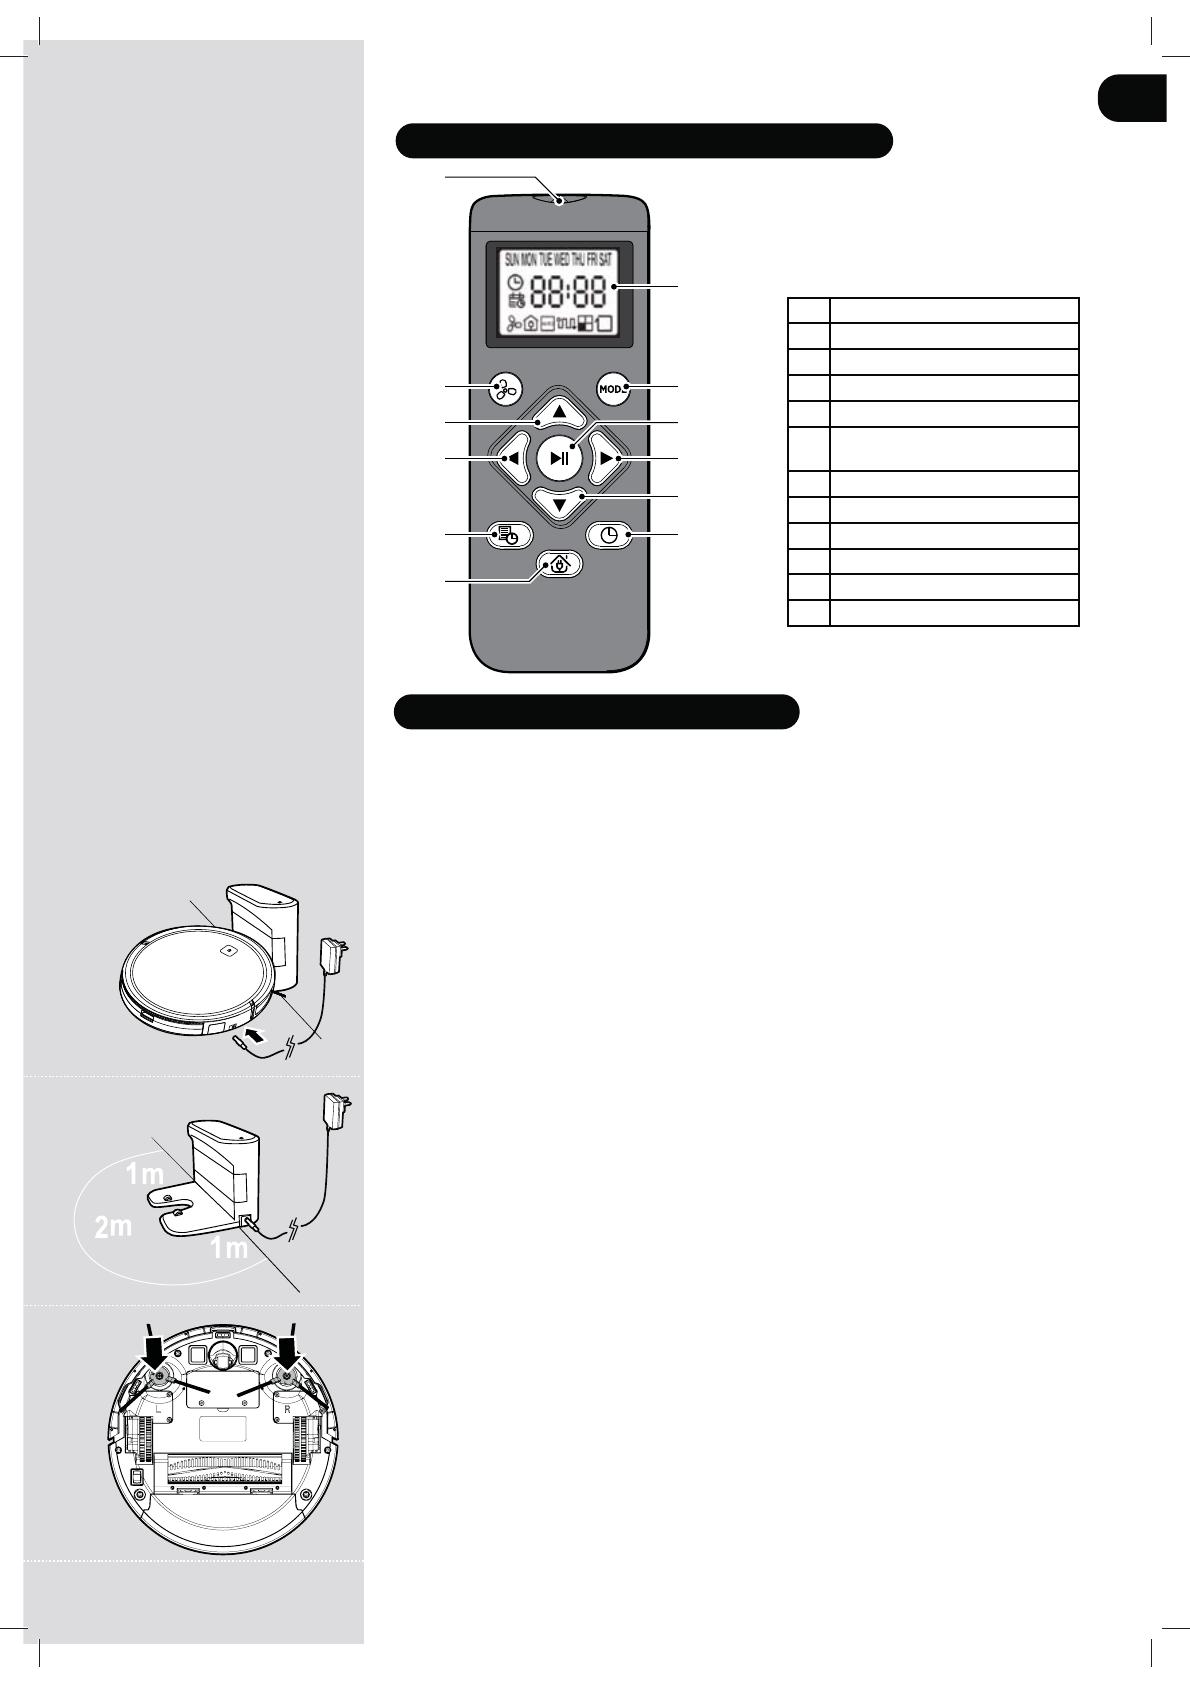
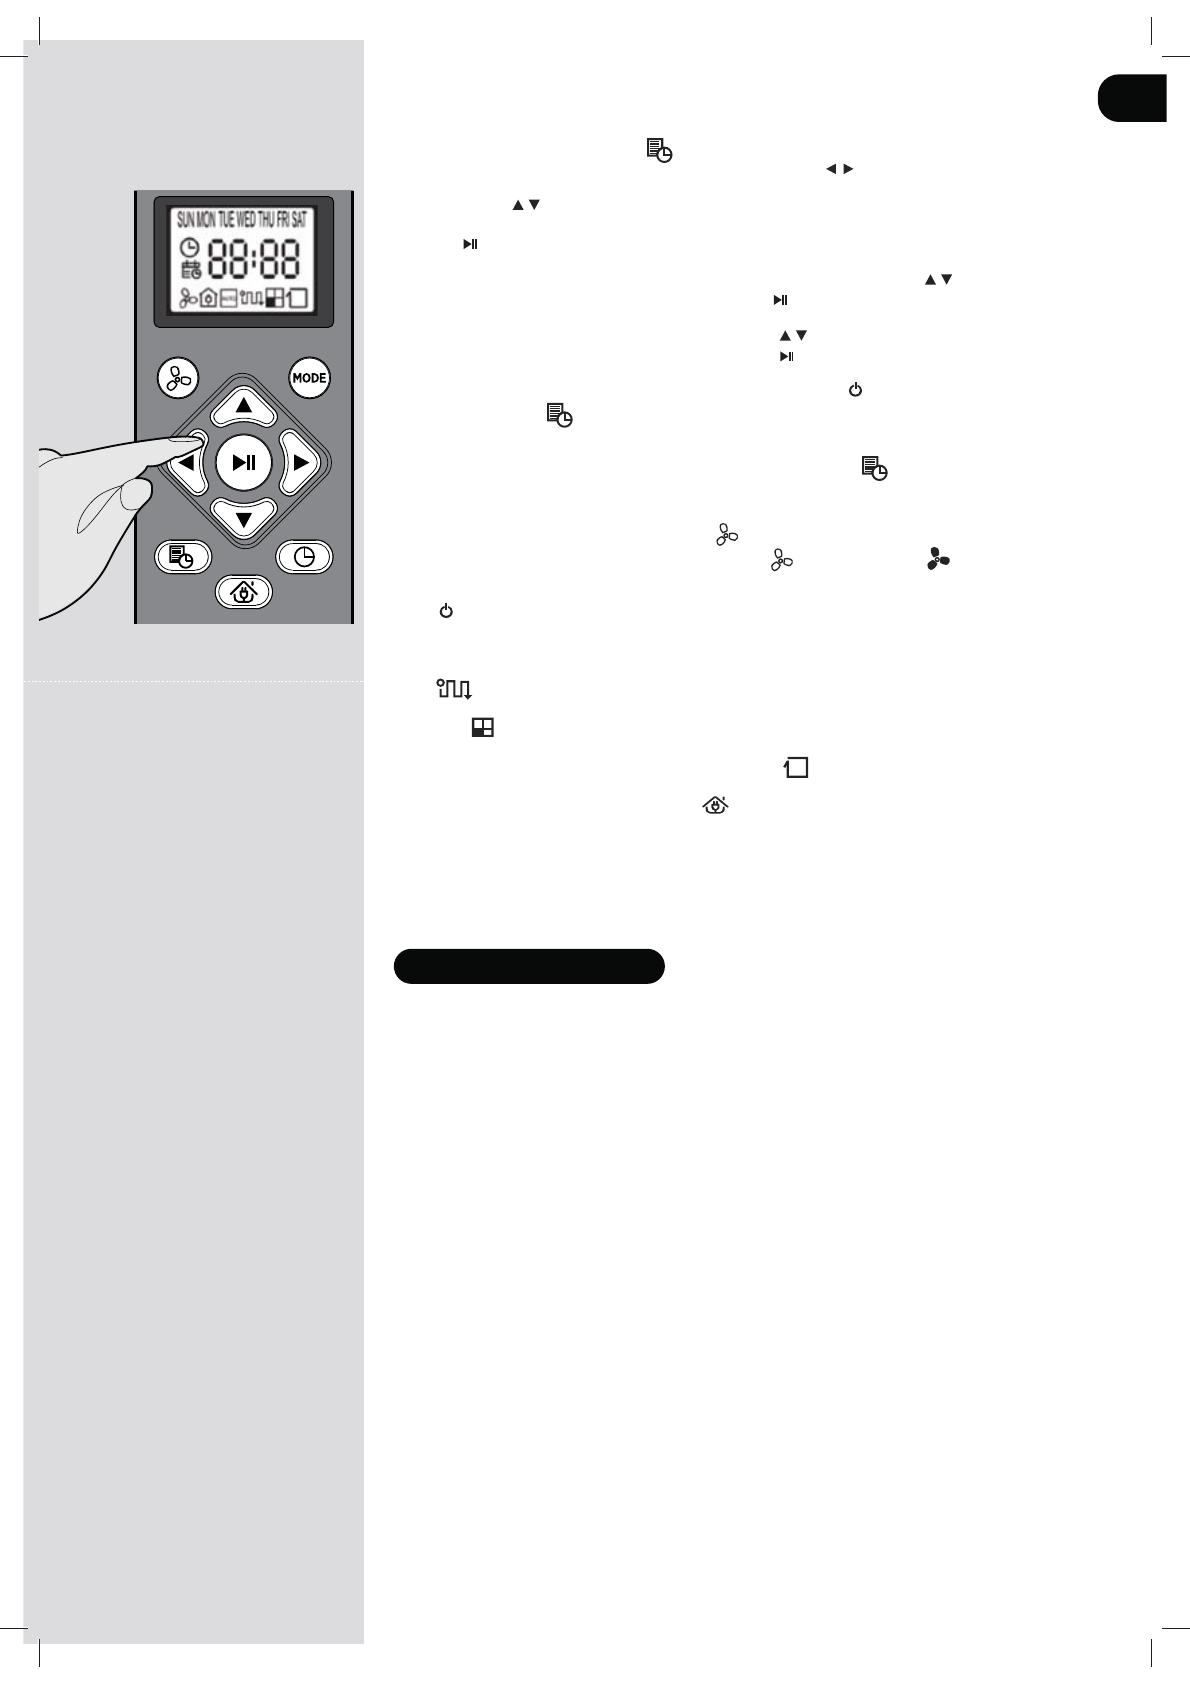
23 Trasmitter Diode
24 Suction Power
25 Button Forward
26 Button Left
27 Scheduling Button
28 Charging Station Button
29 Timing Setting Button
30 Button Backward
31 Button Right
32 Start/Pause Button
33 Mode Button
34 Display
GETTING TO KNOW YOUR ROBOT CLEANER
PREPARE YOUR ROBOT CLEANER
PACKAGING
Do not dispose of your Robot packaging. It may be required the validity of your guarantee in the future.
When unpacking your Robot and its accessories, take care to keep plastic bags away from babies,
young children and animals to avoid the risk of suffocation.
[Fig. 1]
From the second charge, it will take 4-5 hours to be fully recharged.
may damage the battery.
The mains power adaptor must only be connected to a standard mains power outlet.
BATTERY
For optimum battery performance it is recommended that you keep your robot batteries fully charged.
When the robot is not in use it should be left connected to the mains power adaptor. The robot has an
intelligent charging system. This prevents the batteries from becoming overcharged.
To avoid accidents, make sure that every person in the room is aware of the presence of the robot.
Charging Station Setup
Before use, remove obstacles that may get in the path of the Robot. Pay attention to:
• Objects that can be easily knocked over.
• Edges of carpets or rugs that it may get caught on.
• Floor length curtains and tablecloths.
• Power cords and cables.
• Fragile objects.
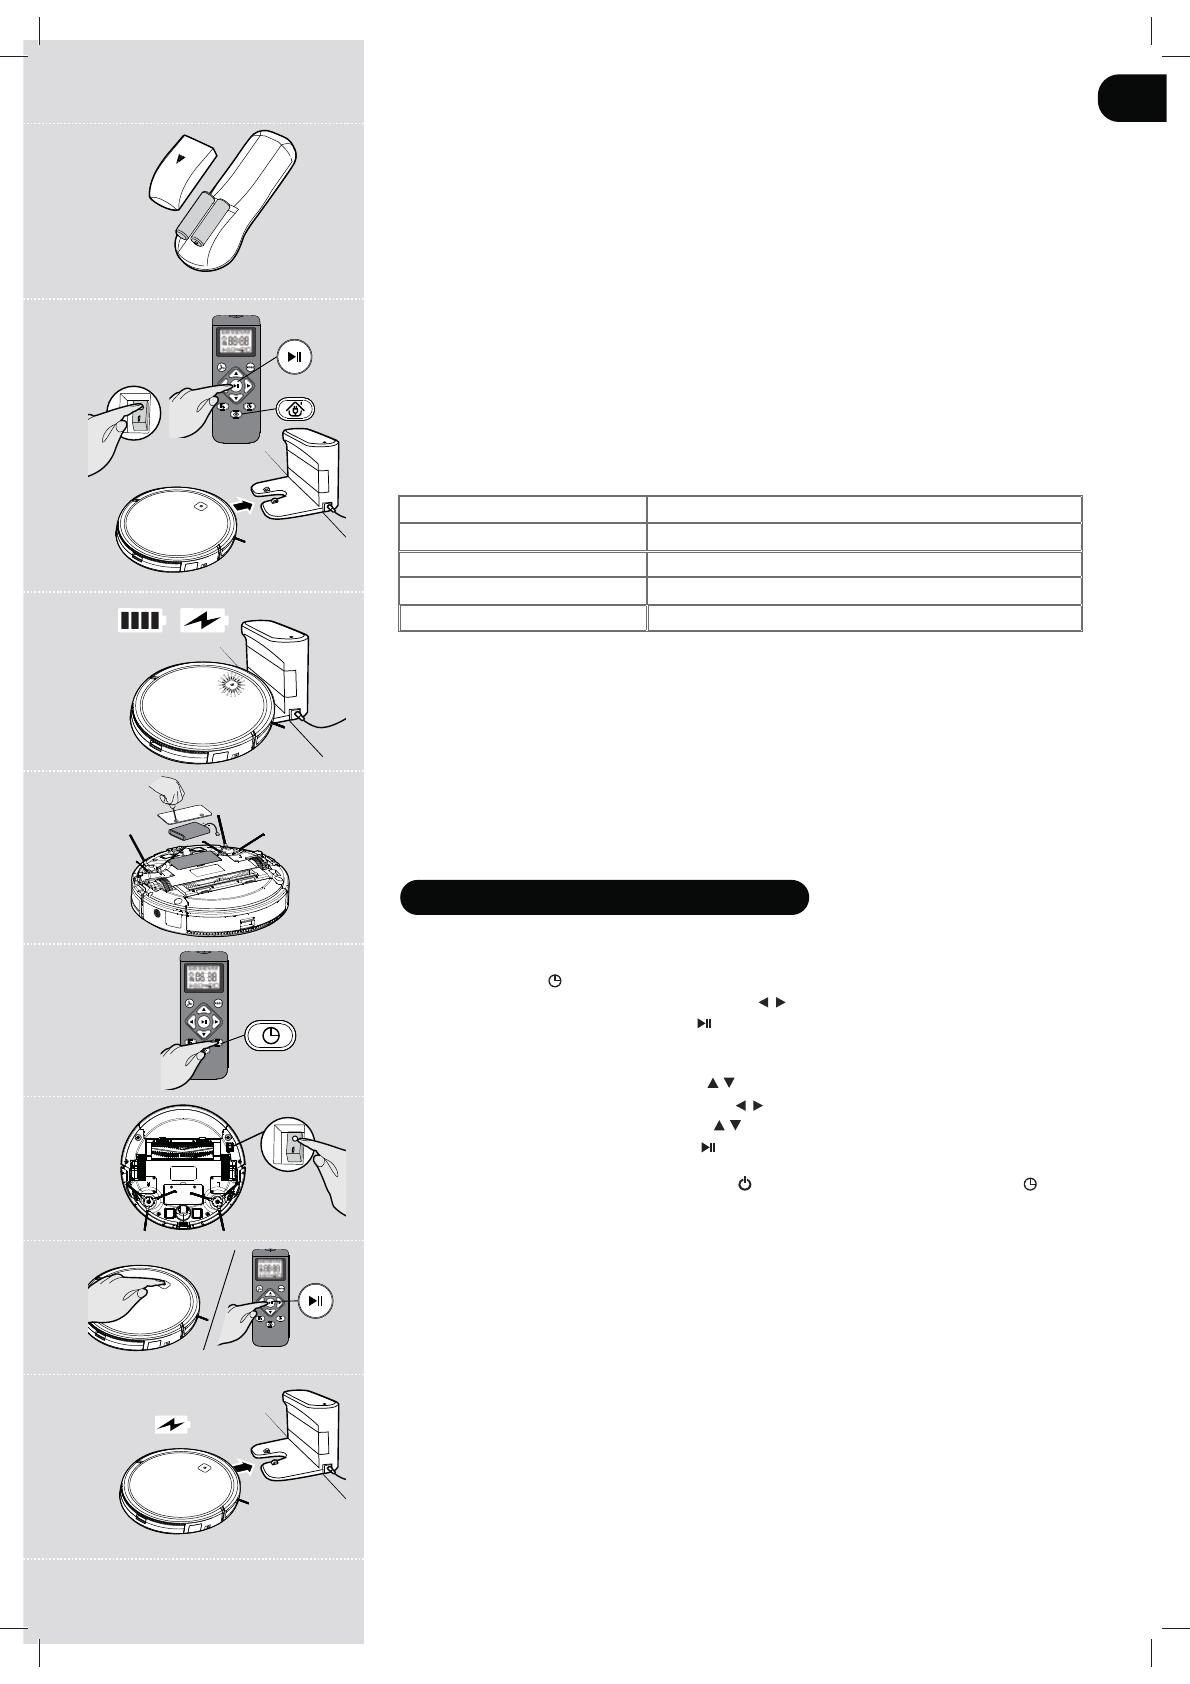
Plug in the mains power adaptor and connect to the charging station. [Fig. 2]
1. Make sure the power cord is not caught underneath the charging station.
locating the charging station.
3. There should not be any objects in the area around the charging station for 2 meters in front and 1
meter to each side. [Fig. 2]
4. Make sure the power cord is not tangled or stretched. If there is an excess, use the power cord tie
to store it neatly.
5. Check that the dust container is inside on Robot.
6. Press the two rotary brushes labelled L and R onto the brackets until they click into place. Pay
attention to the designation L and R on the device as well as the brushes. [Fig. 3]
7. Guide your Robot into the charging station to begin. During normal use, it will take approximately
4/5 hours to complete a full recharge.
NOTE:
* Certain Models Only ** May vary according to model
GB
6
USING YOUR ROBOT CLEANER
Set Time
[Fig. 8]
Press the time button.
Press the Left/Right buttons to select the current day.
Press the Play/Pause button to set the day.
Press the Left/Right buttons to select the minutes.
Press the Up/Down buttons to set the minutes.
Press the Left/Right buttons to select the minutes.
Press the Up/Down buttons to set the minutes.
Press the Play/Pause button to set the time.
An audible signal is given from the robot signifying that the time has been set.
button on the robot, then press the time button
on the remote control.
Power On
1. Press the ON/OFF power switch on the bottom robot. [Fig. 9]
2. Press the on/ standby button on the device or the start/ pause button on the remote control to start
the cleaning process. [Fig. 10]
In standby mode, the LED is off. To activate the vacuum robot press the on/ standby button on the
device or the start/ pause button on the remote control.
When the battery level is low, the robot automatically returns to the charging station. [Fig. 11]
Remote Control Setup
Open the battery compartment on the back of the remote control. Insert two AAA / LR03 batteries into
the battery compartment. [Fig. 4]
Charging the battery
Switch on the vacuum robot with the On/Off switch on the bottom ( I[Fig. 9] Set it down in front of
the charging station.
Press the on/ standby switch on the vacuum robot or the charging base button on the remote control
and then immediately the charging station button. Make sure the robotic vacuum cleaner is moving to
the charging station. [Fig. 5]
NOTE: Make sure that the charging contacts of the robot vacuum cleaner and charging base are not
dirty. Clean the contacts if necessary.
It is normal for the charging base and vacuum cleaner to become warm during charging.
Remove the water tank before charging the robot vacuum cleaner.
If the battery is charged, the
LED is on permanently. [Fig. 6]
LED indicator
LED COLOR CONDITION
PEMANENTLY BLUE
Battery is fully charged
BLUE FLASHING
During charging
INDICATOR LIGHT OFF
Product is swithced off
PEMANENTLY RED
Error
Battery
Over time the capacity of your robot battery will diminish and it will need to be replaced. A replacement
battery can be purchased from an approved Hoover retailer. Only use genuine Hoover spares and
accessories.
Removal and replacement
Ensure the robot is switched OFF.
Locate the battery compartment cover on the underside of the robot and remove the two screws.
Remove the battery from the compartment and disconnect the connector.
[Fig. 7]
* Certain Models Only ** May vary according to model
GB
Fig. 5
Fig. 4
Fig. 7
Fig. 6
Fig. 8
Fig. 9
Fig. 11
Fig. 10
7
Setting up the Cleaning Schedule [Fig. 12]
Press the schedule button.
Press the Left/Right buttons to select a day.
Press the Up/Down buttons to select or deselect that day, several days can be selected.
When all required days are selected, Press the Play/Pause button to set.
Down buttons to set the hours.
Press the Play/Pause button to set the hours.
Press the Up/Down buttons to set the minutes.
Press the Play/Pause button to set the minutes.
An audible signal is given from the robot signifying that the schedule has been set.
button on the robot, then press the schedule
button on the remote control.
start time, press the Schedule button
for approx. 3 seconds. The Schedule symbol in the display of
the remote control turns off.
Setting Power Level
Press POWER LEVEL button on the remote control to select the desired power level. Choose
between Normal Power
and Turbo Power .
Setting Cleaning Mode
AUTO : Press the on/ standby button on the device or the start/ pause button on the remote control
to start the cleaning process.
Robot will automatically choose the best cleaning mode to clean you room.
PARALLEL: Press MODE button on the remote control for the robot to start cleaning under this
mode
.
SPOT:
circular path .
EDGE: Press MODE button on the remote control, It will automatically start cleaning along walls,
around furniture etc
.
MANUAL: The Robot can be controlled using the arrows on the remote control.
RETURN TO BASE: Press the button
on the remote control to send the robot to the charging
base. This mode can be activated during any cleaning cycle and the robot will automatically return to
the charging base.
When a cleaning cycle has been completed or the R
the charging base automatically.
WARNING: If there are obstacles in the room being cleaned, the robot might not be able to reach the
charging base. In this case, take the robot manually.
WI-FI SETUP
In order to access all the R
H-GO 300 App.
You will be able to control the R
App advantages:
• Control your robot in an easy and intuitive way.
• Activate the cleaning process from anywhere.
• Carry out settings and daily scheduling.
• Choose between its different cleaning modes.
Instructions:
1. Download the Hoover H-GO300 App from App Store or Google Play Store.
2. Press the ON/OFF power switch on the bottom robot. [Fig. 9]
4. Open the APP, create an account with your e-mail and a password.
6. Turn on the WIFI on your smartphone, input the WIFI password and connect the robot.
WARNING
• The Wi-Fi name and password cannot exceed 32 characters.
Fig. 12
* Certain Models Only ** May vary according to model
GB
8
MAX
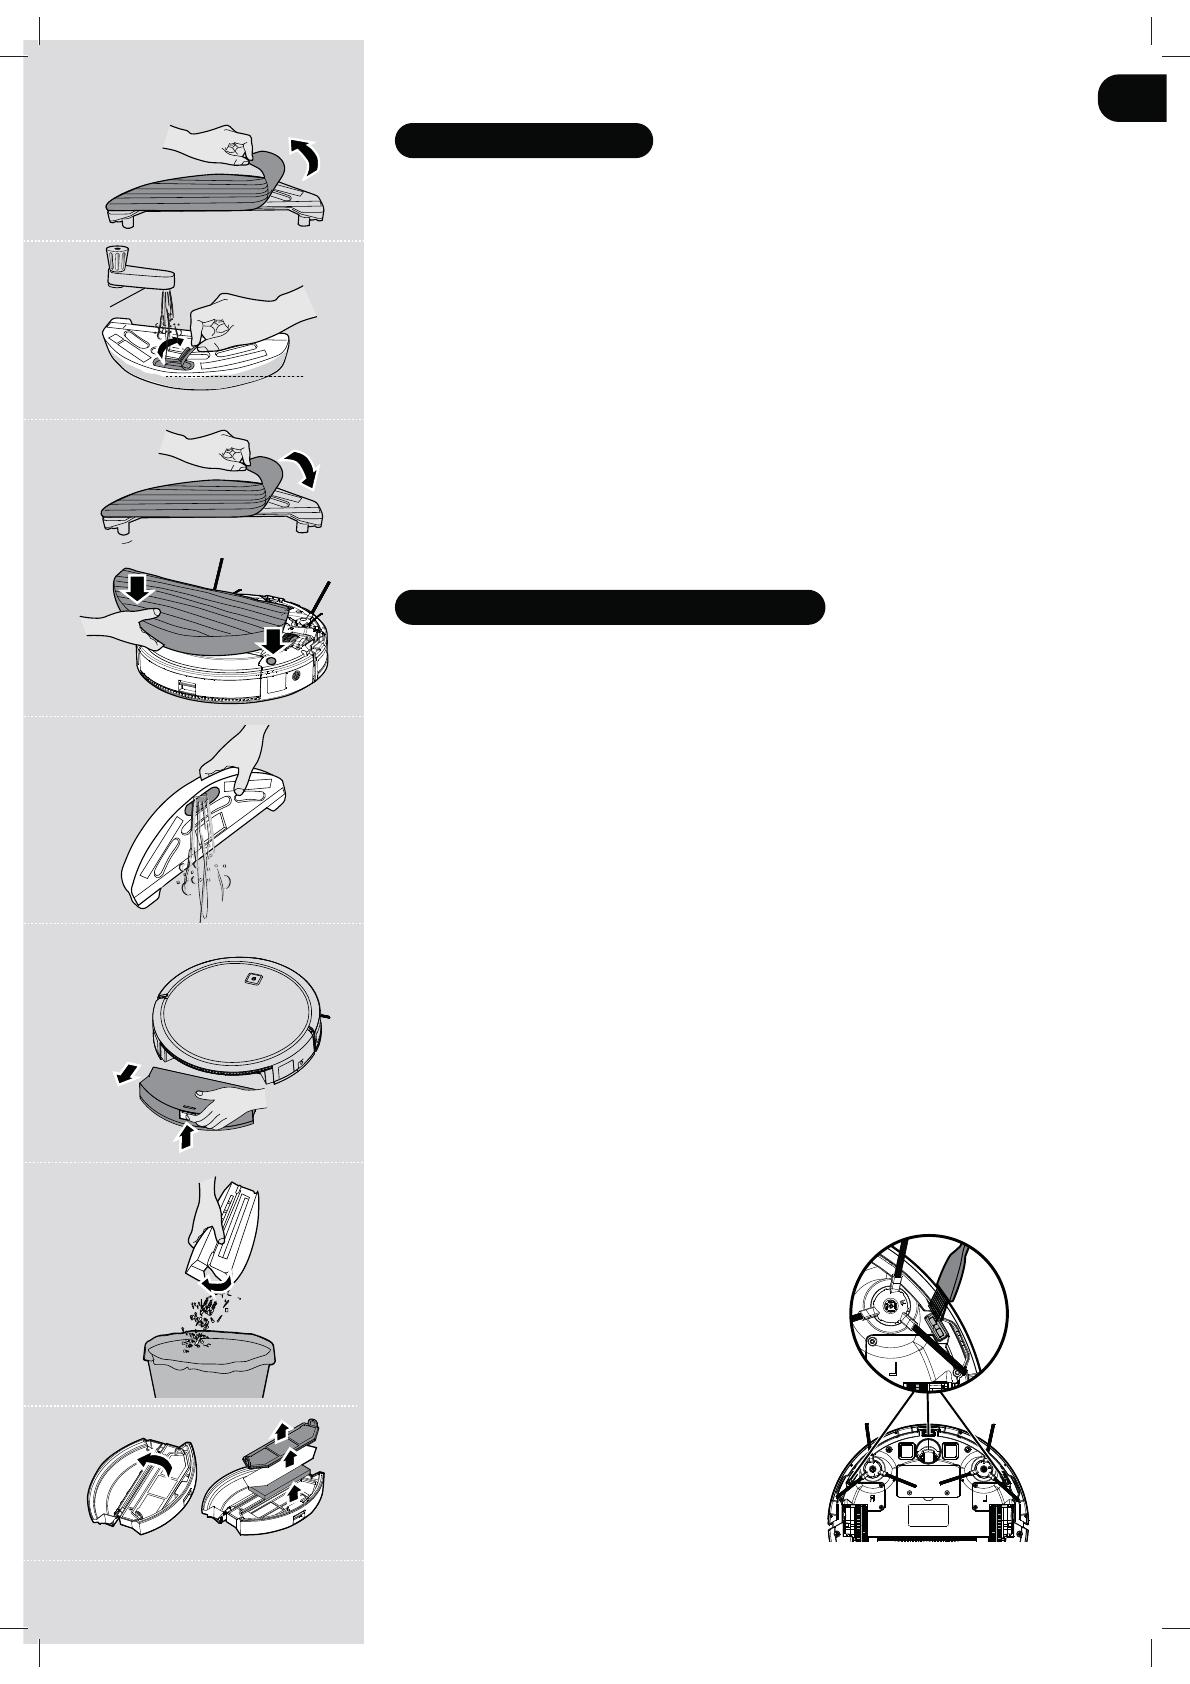
MOPPING FUNCTION
OPERATION
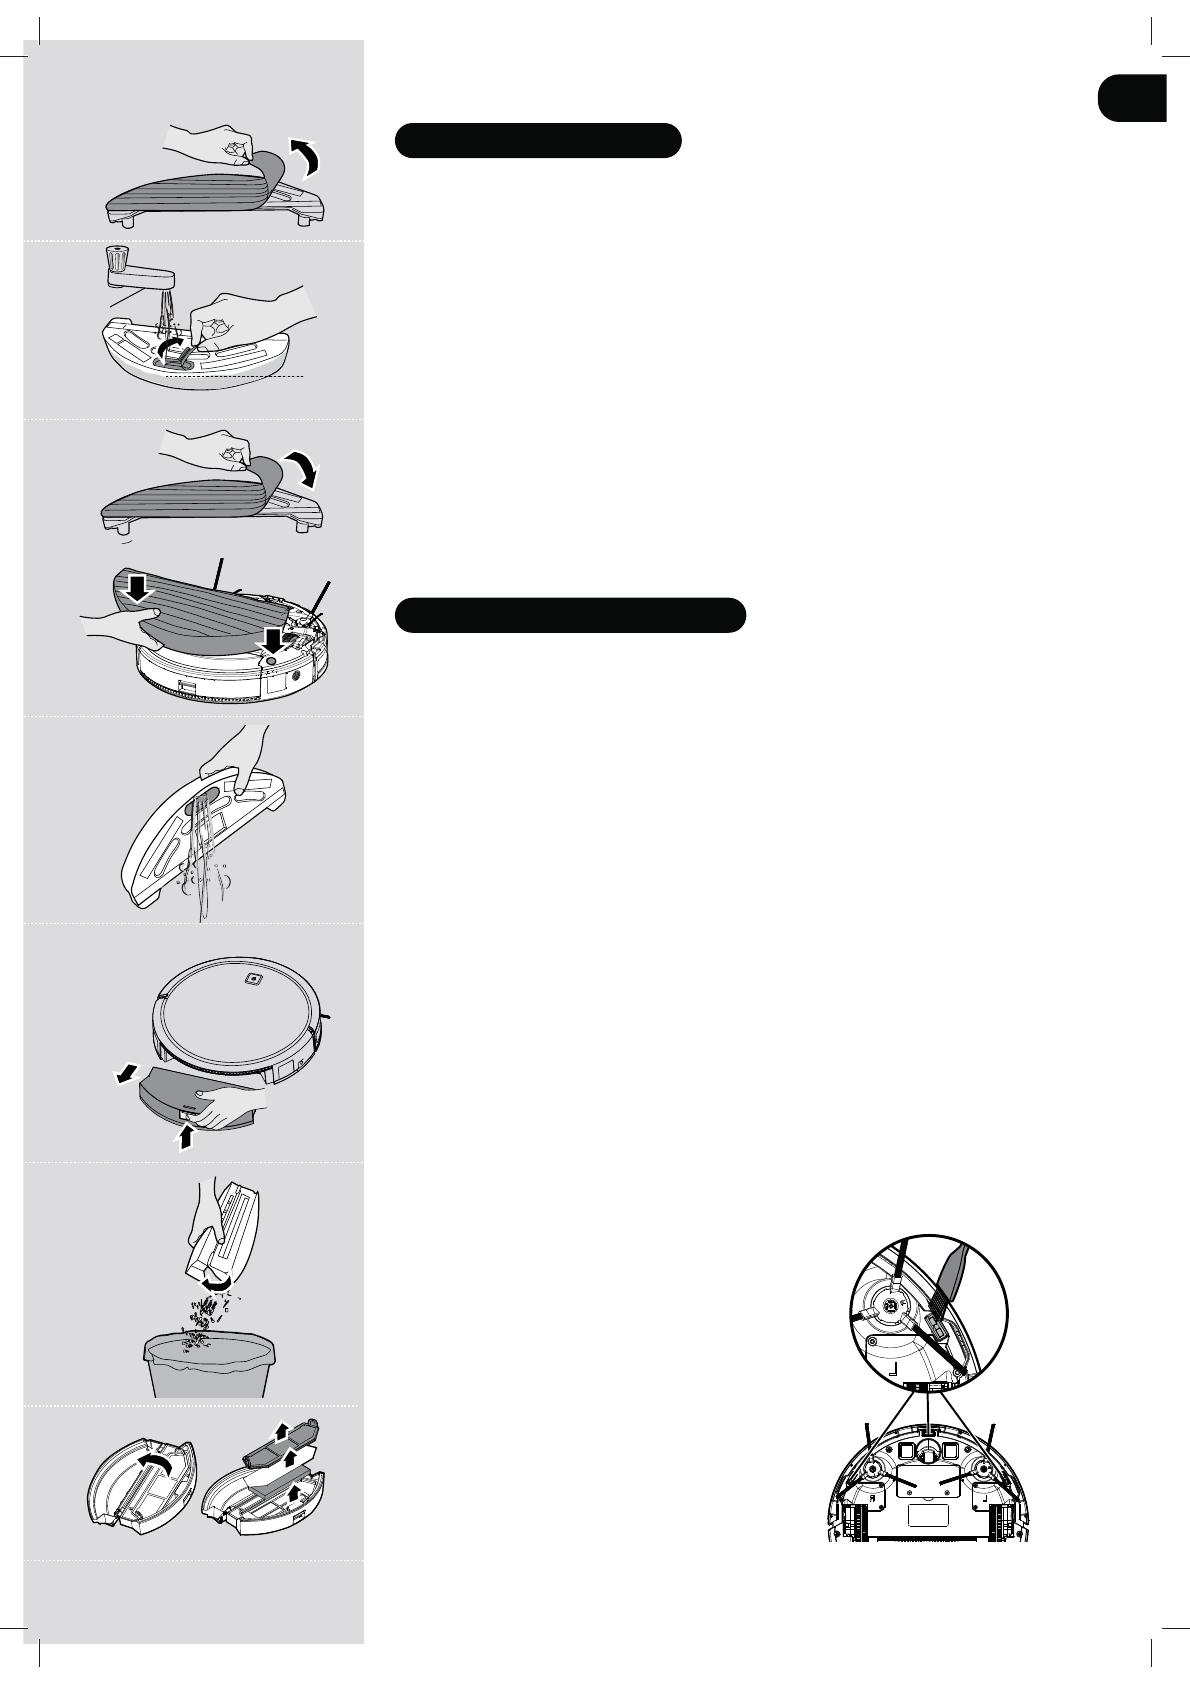
1. Remove the mopping cloth from the bottom part of the water tank. [Fig. 13]
[Fig. 14]
Add some cleaning agent if considered necessary.
3. Align the water tank with the R
[Fig. 15]
NOTE: Remove the water tank when the robot is charging or not in use.
NOTE:
necessary to soak the cleaning cloth under running water and slightly wring it out, before attaching it to
WARNING: Water will start to drip out of the attachment, as soon as the water tank has been inserted.
Start
Due to the same reason, remove the water tank directly after the cleaning process has ended.
robot should get stuck.
4. After mopping , remove the water tank and the mop. Open the rubber cap and pour remaining water
out of the tank. [Fig. 16]
5. Remove the mop from the water tank and wash it with delicate detergent and rinse it off. Wring the
mop and let it dry.
MAINTAINING YOUR ROBOT CLEANER
EMPTYING THE DUST CONTAINER
After vacuuming, remove the dust container.
1. Press the release button and pull it out. [Fig. 17]
2. Hold the dust container over a dust bin.
[Fig. 18]
3. Use the cleaning brush when necessary to remove any excess dust from the internal surface of the
Robot.
CLEANING THE FILTERS
container empties and should not be washed.
1. Turn the robot off and remove from the charging station.
2. Press the dust container release button and remove the dust container from the Robot.
[Fig. 17]
order. [Fig. 19]
IMPORTANT:
This will maintain your R
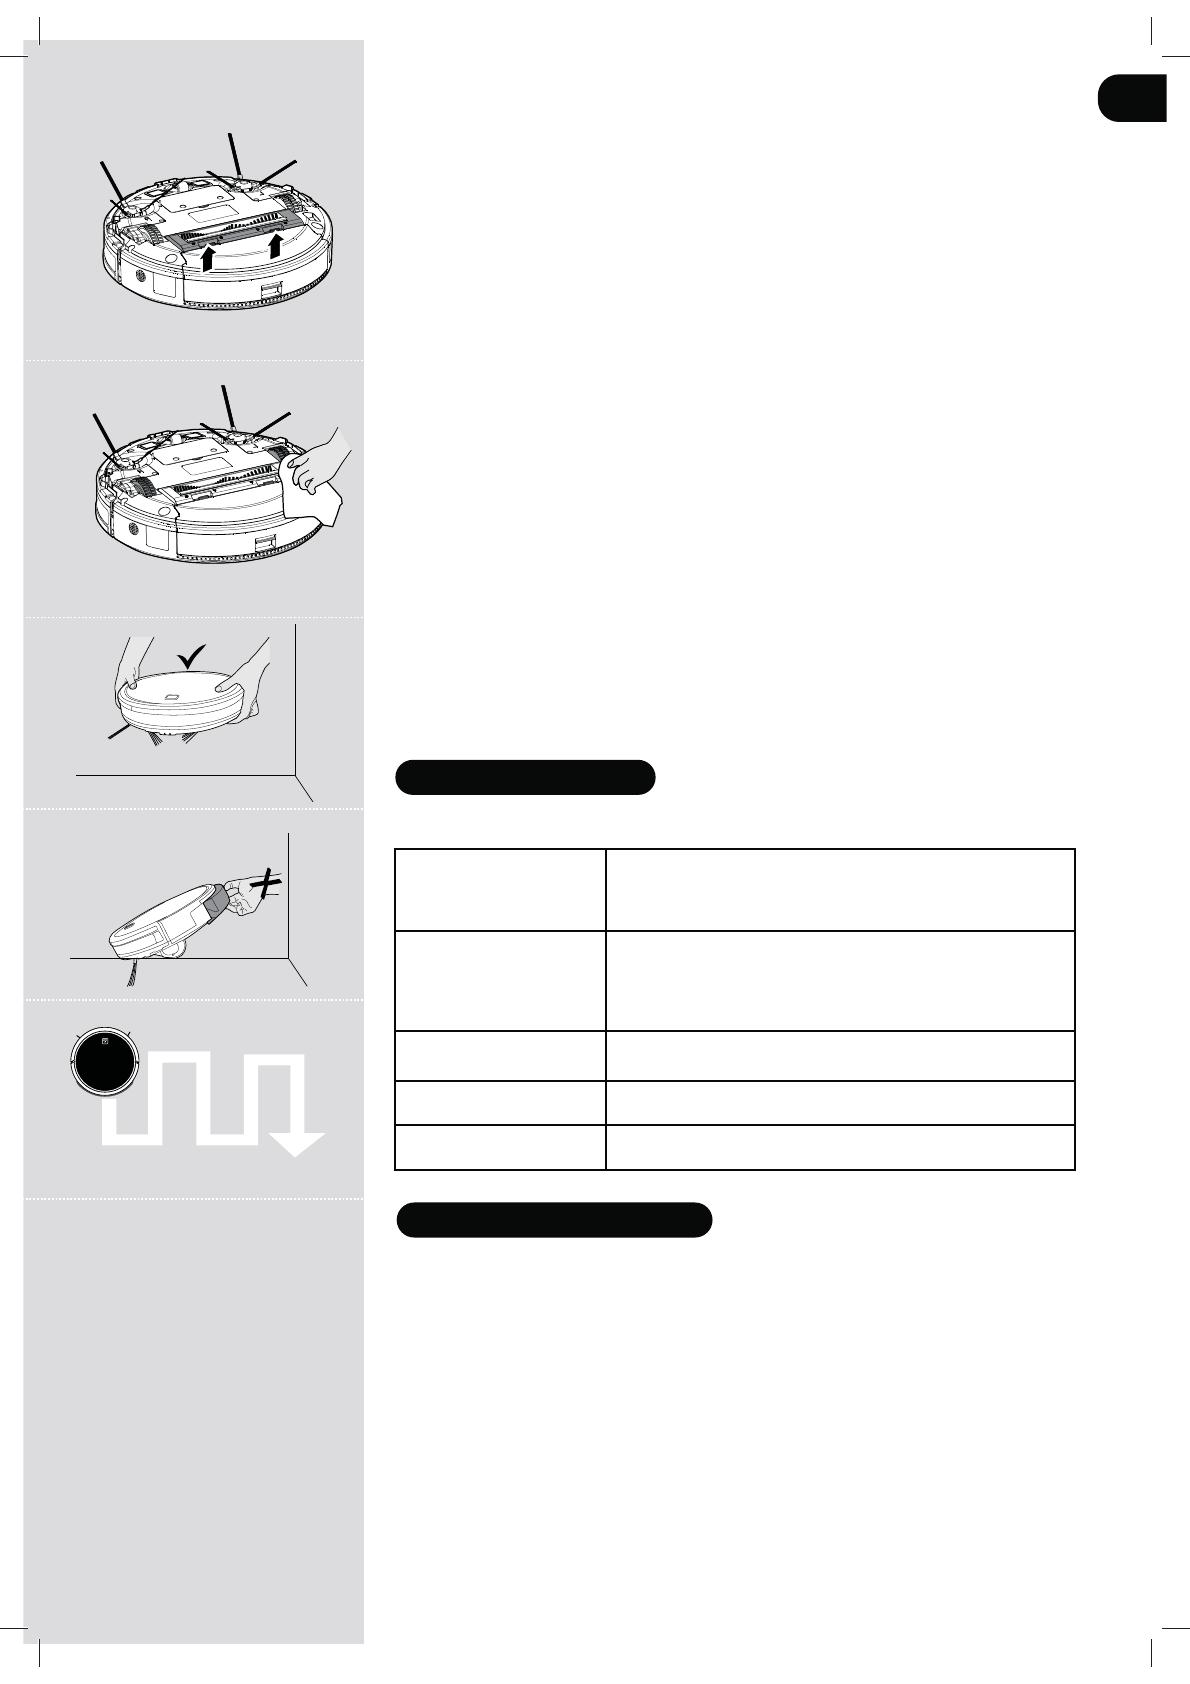
CLEANING ANTI FALL SENSORS
To maintain the safe operation of your robot it is important to keep the Anti fall sensors clean.
There are 3 sensors are located on the underside of the robot. Turn the robot upside down and clean
them with a soft brush to remove any accumulation of dust, dirt or debris. [Fig. 20]
Fig. 19
Fig. 17
Fig. 18
Fig. 13
Fig. 14
Fig. 16
Fig. 15
Fig. 20
GB
9
CLEANING THE AGITATOR
Regularly clean the agitator to maintain maximum cleaning performance.
1. Turn the Robot off.
2. Turn the Robot over. [Fig. 21]
3. Press the clips on the sole plate, remove the cap and then remove the agitator. Remove hair and
lint, etc. by hand or with a brush.
CLEANING THE EDGE SIDE BRUSHES
The edge cleaning brushes can be easily worn from heavy use so you should check them regularly to
monitor their condition.
1. Switch the Robot off and turn it over.
2. Unclip the two edge side brushes.
3. Use a pair of scissors to remove any trapped hair or debris.
CLEANING THE DRIVE WHEELS
1. Switch the Robot off and turn it over.
2. Remove any dirt or hair trapped in the wheels.
3. Clean the wheels with a dry cloth. [Fig. 22]
IMPORTANT NOTICE
Only use approved replacement parts for your Robot.
Using parts not validated by Hoover are dangerous and will invalidate your guarantee.
If the Robot will not to be used for several months, please remove the batteries and store in cool a dry
location.
IMPORTANT: Always make sure your device is switched off before changing.
Always use two hands to lift and carry, and ensure the robot is held level. [Fig. 23]
opening. [Fig. 24]
You should avoid using your robot cleaner in direct sunlight or on dark polished surfaces as these
conditions will adversely affect the behaviour of your robot. [Fig. 25]
Fig. 22
Fig. 21
IMPORTANT INFORMATION
Hoover Spares and Consumables
Always replace parts with genuine Hoover spares. These are available from your local Hoover dealer
or direct from Hoover. When ordering parts always quote your model number.
Quality
quality system which meets the requirements of ISO 9001.
Your Guarantee
it is sold. Details regarding these conditions can be obtained from the dealer from whom the appliance
was purchased. The bill of sale or receipt must be produced when making any claim under the terms of
this guarantee.
Subject to change without notice.
TROUBLESHOOTING
The following is a list of commonly encountered problems and solutions.
If any of these problems persist contact your local Hoover representative.
The Robot does not work
• Robot requires attention.
• Check that the Robot is switched on.
• Check that the dust container, filter are clean.
• Check if the Robot needs to be charged.
Cleaning power is weak
• Turn power off and empty dust container.
• Check and clean the filter and motor.
• Check and clean the Floor Brushes.
• Check and clean the sensors.
• Check and clean the drive wheels.
The Robot is very noisy
while cleaning
• Clean the dust container and filter.
• Check the brushes and drive wheels for dirt and debris.
The Robot does not
automatically charge
• Make sure there are no barriers between the Robot and the
charger station.
Robot is trapped
• The Robot will attempt to free itself but in some cases assist
the Robot manually.
GB
Fig. 23
Fig. 24
Fig. 25
10
Cet appareil ne doit être utilisé que pour un nettoyage domestique, conformément à ce guide
supervision.
Si la zone à nettoyer comporte un balcon ou des marches, une barrière physique doit être utilisée
petits enfants et les animaux domestiques doivent être supervisés pendant que le Robot nettoie.
Ne pas exposer le Robot ou les accessoires à une source de chaleur / de froid excessif (Garder
Ne pas
Ne pas utiliser pour nettoyer les escaliers.
Charger la batterie
Ne rechargez jamais les batteries dans des températures de plus de 30°C ou en-dessous de 0°C.
un médecin.
par Hoover.
Evitez
Evitez
aérosols ou leurs vapeurs.
Arrêtez
Service Hoover :
N’utilisez pas cet appareil pour nettoyer des personnes ou des animaux.
Ne remplacez pas les batteries du robot par des batteries non rechargeables.
doit
pas être branché à la prise, lorsque vous retirez les batteries. Mettez les batteries à la poubelle,
batteries sont entièrement déchargées. Des batteries usées doivent être amenées à un point de
recyclage et non pas être éliminées avec les ordures ménagères. Pour retirer les batteries, veuillez
Débranchez le chargeur et éteignez le Robot. Retournez le Robot et placez-le sur une surface plane.
Déposez les vis et le couvercle du logement batterie Retirez le bloc batterie.
[Fig. 7]
REMARQUE :
obtenir de plus amples informations concernant le traitement, la récupération et le recyclage de
cet appareil, veuillez contacter les services de votre ville locale ou un service de traitement des
ordures ménagères.
* Sur certains modèles uniquement ** Peut varier selon le modèle
FR

11
Robot Base de recharge Télécommande
Adaptateur secteur Brosse de nettoyage latérale
Batteries AAA
Brosse de nettoyage
Escaliers : Le Robot utilise des capteurs pour éviter de chuter sur des marches, dans des escaliers ou par-dessus un bord. Dans certaines situations,
les capteurs peuvent dysfonctionner :
Le Robot ne peut pas détecter les marches qui font moins de 8 cm de haut. Les marches de moins de 8 cm de haut peuvent faire chuter le Robot. Si
disponible, utilisez le mur virtuel* pour éviter la chute de votre Robot.
chuter le Robot.
Si disponible, utilisez le mur virtuel* ou placez un tapis sur la marche inférieure pour éviter la chute de votre Robot.
que votre Robot pénètre ces zones.
Utilisation des batteries : Votre Robot est alimenté par des batteries lithium ion rechargeables à haute capacité. Ces batteries rechargeables sont
En cas de perte de performance importante du Robot, des batteries de rechange sont disponibles auprès de votre revendeur Hoover.
invalidera votre garantie.
Environnement
le déposer dans un centre de recyclage des déchets électriques et électroniques. La déposition doit être effectuée conformément à la
Cet appareil est conforme aux Directives européennes 2014/53/UE, 2014/30/UE et
2011/65/UE. Pour recevoir une copie de la déclaration
de conformité, veuillez contacter le fabricant à travers le site Web :
Bandes de fréquence 2412Mhz ~ 2472Mhz
Puissance RF maximale transmise sur la bande de fréquence
802.11 b: +16.32 dBm
802.11 g: +17.94 dBm
802.11 n20: +17.23 dBm
802.11 n40: +17.84dBm
CONTENU DE LA BOÎTE
FR

12
4
9
1818
19
10
1
15
12
11
13
14
16
17
19
3
5
16
19
20
21
22
17
6
7
8
1212
CONNAITRE VOTRE ASPIRATEUR
1 Interrupteur on/veille avec LED
2 Pare-choc avant
3 Bouton pour détacher le bac à
poussière
4 Bac à poussière
5 Filtre à mailles
6 Filtre Epa
7
8 Support Filtre
9 Ion du robot aspirateur
10 Contacts de chargement
11 Base de recharge
12 Adaptateur secteur
13 LED Contrôle Recharge
14
chargement
15 Brossette rotative
16 Roue motrice
17 Brosse de nettoyage latérale
18 Contacts de Recharge du Robot
19 Capteur Anti-Chute
20 Bouton de Marche/Arrêt.
21 R
22 Lingette de nettoyage
* Sur certains modèles uniquement ** Peut varier selon le modèle
FR
13
23
24
25
26
27
28
33
34
32
31
29
30
Fig. 3
Fig. 2
Fig. 1
23 Diode Transmetteur
24
25 Bouton Avant
26 Bouton Gauche
27 Bouton de programmation
28 Bouton retour à la station de
chargement
29
30 Bouton Revenir
31 Bouton Droite
32 Bouton Start/Pause
33 Bouton Mode
34 Ecran
PREMIÈRE UTILISATION DE VOTRE ROBOT
PRÉPARATION DE VOTRE ROBOT
EMBALLAGE
Lorsque vous déballez le Robot et ses accessoires, veillez à garder les sacs plastique hors de portée des
Avant la première utilisation, chargez votre appareil pendant 8 heures. [Fig. 1]
À partir de la deuxième recharge, il faudra 4-5 heures pour une recharge complète
supérieures à 30°C, car cela peut endommager la batterie.
BATTERIE
Pour une performance optimale de la batterie, nous vous recommandons de garder les batteries de votre
Cela évite que les batteries se
surchargent.
Pour éviter les accidents, assurez-vous que toutes les personnes présentes dans la pièce ont conscience
de la présence du Robot.
Tion de la station de chargement
attention :
• Aux objets qui peuvent facilement se renverser.
• Aux bords de moquettes ou de tapis sur lesquels il pourrait rester coincé.
• Aux rideaux et nappes qui touchent le sol.
• Aux cordons et câbles électriques.
• Aux objets fragiles.
[Fig. 2]
3. Aucun objet ne doit se trouver à 2 m devant la station de chargement et à 1 m de chaque côté. [Fig. 2]
brosses. [Fig. 3]
recharge complète prendra environ 4/5 heures.
REMARQUE : Avant la première utilisation, les batteries doivent être rechargées pendant au moins 8
heures.
* Sur certains modèles uniquement ** Peut varier selon le modèle
FR

14
UTILISATION DE VOTRE ROBOT
Régler l’heure
Pour utiliser le timer, la première fois il faut le régler sur la télécommande. [Fig. 8]
Appuyez sur les boutons Gauche/Droite pour sélectionner le jour actuel.
Appuyez sur le bouton Lire/Pause pour régler le jour.
Appuyez sur les boutons Gauche/Droite pour sélectionner les minutes.
Appuyez sur les boutons Haut/Bas pour régler les minutes.
Appuyez sur les boutons Gauche/Droite pour sélectionner les minutes.
Appuyez sur les boutons Haut/Bas pour régler les minutes.
Appuyez sur le bouton Lire/Pause pour régler le temps.
Un signal audible est donné par le robot pour indiquer que le temps a été réglé.
du robot, puis appuyez sur le
bouton temps
de la télécommande.
Mise en marche
[Fig. 9]
lancer le processus de nettoyage. [Fig. 10]
En mode veille, la LED est éteinte. Pour activer le robot aspirateur, appuyez sur le bouton on/veille sur
Lorsque la charge de la batterie est faible, le Robot retourne automatiquement à la base de chargement.
[Fig. 11]
logement des piles. [Fig. 4]
Charger la batterie
de s
[Fig. 9] Posez-le en face de la station de chargement.
télécommande et, ensuite, immédiatement le bouton de la station de chargement. Assurez-vous que le
robot aspirateur se déplace vers la station de chargement. [Fig. 5]
REMARQUE : Assurez-vous que les contacts de recharge du robot aspirateur et la base de recharge ne
soient pas sales. Nettoyez les contacts si nécessaire.
Si la batterie est
[Fig. 6]
Indicateur LED
COULEUR LED ÉTAT
BLEU FIXE
La batterie est complètement rechargée
BLEU CLIGNOTANT
En recharge
VOYANT ETEINT
Le produit est éteint
ROUGE FIXE
Erreur
Batterie
Avec le temps la durée de la batterie de votre robot diminuera et elle devra être remplacée. Une batterie
rechange et des accessoires originaux Hoover.
Dépose et remplacement
Assurez-vous que le Robot est éteint.
Localisez le couvercle du logement de la batterie sur le dessous du robot et enlevez les deux vis. Enlevez
la batterie du logement et déconnectez le connecteur.
Remontez la nouvelle batterie et reconnectez le connecteur. Veillez à ce que le connecteur soit aligné
correctement.
Remontez le couvercle de la batterie et les deux vis. [Fig. 7]
* Sur certains modèles uniquement ** Peut varier selon le modèle
FR
Fig. 5
Fig. 4
Fig. 7
Fig. 6
Fig. 8
Fig. 9
Fig. 11
Fig. 10
15
[Fig. 12]
Appuyez sur le bouton Programmation.
Appuyez sur les boutons Gauche/Droite pour sélectionner un jour.
Appuyez sur les boutons Haut/Bas pour sélectionner ou désélectionner ce jour ; plusieurs jours peuvent
être sélectionnés.
Lorsque tous les jours requis sont sélectionnés, appuyez sur le bouton Lire/Pause pour appliquer les
réglages.
nettoyage programmé. Appuyez sur les boutons Haut/Bas pour régler les heures.
Appuyez sur le bouton Lire/Pause pour régler les heures.
Les minutes se mettront dès lors à clignoter.
Appuyez sur les boutons Haut/Bas pour régler les minutes.
Appuyez sur le bouton Lire/Pause pour régler les minutes.
Un signal audible est donné par le robot pour indiquer que la programmation a été réglée.
du robot, puis appuyez sur le
bouton Programmation de la télécommande.
désactiver le temps de début, appuyez sur le bouton de Programmation
pendant env. 3 secondes. Le
Régler Niveau de Puissance
Appuyez sur le bouton NIVEAU DE PUISSANCE sur la télécommande pour sélectionner le niveau de
puissance souhaité. Choisissez entre Puissance Normale et Puissance Turbo .
Réglez le Mode Nettoyage
AUTO : Press the on/ standby button on the device or the start/ pause button on the remote control to
start the cleaning process.
Le Robot sélectionnera automatiquement le meilleur mode de nettoyage pour nettoyer votre salle.
PARALLÈLE : Press MODE button on the remote control for the robot to start cleaning under this
mode
.
SPOT: Appuyez sur le bouton MODE placé sur la télécommande. Il nettoie une zone précise en décrivant
des cercles
.
COIN :
automatiquement le long des murs, autour des meubles etc
.
MANUEL : Le rO
RETOUR A LA BASE : Appuyez sur le bouton
sur la télécommande pour envoyer le robot à la base
automatiquement à la base de chargement.
Quand le cycle de nettoyage a été complété ou quAnd la charge du robot est faible, le robot reviendra
également automatiquement à la base de chargement.
MISE EN GARDE :
réussir à atteindre la base de chargement. Dans ce cas, prendre le robot manuellement.
CONFIGURATION WIFI
fonctions du robot où que vous soyez, il est recommandé de télécharger
Vous pourrez commander le robot L
Avantage de l’application :
• Commandez votre robot facilement et intuitivement.
• Effectuez les réglages et la programmation quotidienne.
Instructions :
[Fig. 9]
6. Activez le WIFI sur votre smartphone, entrez le mot de passe du routeur WIFI et connectez le robot.
AVERTISSEMENT
• Le nom et le mot de passe Wi-Fi ne peuvent pas dépasser 32 caractères.
Fig. 12
* Sur certains modèles uniquement ** Peut varier selon le modèle
FR
16
MAX
FONCTION NETTOYAGE
FONCTIONNEMENT
[Fig. 13]
[Fig. 14]
Ajoutez un produit de nettoyage si vous le jugez nécessaire.
D
[Fig. 15]
NOTE : E
NOTE :
lingette.
MISE EN GARDE : Water will start to drip out of the attachment, as soon as the water tank has been inserted.
[Fig. 16]
la lingette et laissez-la sécher.
ENTRETIEN DE VOTRE ROBOT
VIDER LE BAC DE POUSSIÈRE
1. Appuyez sur le bouton de relâchement et extrayez-le. [Fig. 17]
[Fig. 18]
3. Utilisez la brosse de nettoyage si nécessaire pour enlever tout excès de poussière de la surface interne
4. Replacez le bac à poussière dans le Robot.
NETTOYAGE DES FILTRES
doivent être nettoyés toutes les 5 vidanges du bac et ne doivent pas être lavés.
1. Éteignez le Robot et retirez-le de la station de chargement.
2. Appuyez sur le bouton pour détacher le bac à poussière et retirez le bac à poussière du Robot.
[Fig. 17]
[Fig. 19]
IMPORTANT :
Formances de votre robot.
NETTOYAGE DES CAPTEURS ANTI-CHUTE
propres.
Il y a 3 capteurs situés sur le dessous du robot. Retournez le robot et nettoyez-les avec une brosse douce
[Fig. 20]
Fig. 19
Fig. 17
Fig. 18
Fig. 13
Fig. 14
Fig. 16
Fig. 15
Fig. 20
FR

17
NETTOYAGE DE LA BROSSETTE ROTATIVE
Nettoyez la brossette rotative régulièrement pour maintenir la performance de nettoyage maximale.
1. Mettez le Robot hors tension.
2. Retournez le Robot. [Fig. 21]
Enlevez les cheveux et les peluches, etc. à la main ou avec une brosse.
NETTOYAGE DES BROSSES LATÉRALES
régulièrement pour contrôler leur état.
1. Mettez le Robot hors tension et retournez-le.
2. Décrochez les brosses latérales à deux coins.
3. Utilisez une paire de ciseaux pour retirer tout poil ou toute saleté coincé.
NETTOYAGE DES ROUES MOTRICES
1. Mettez le Robot hors tension et retournez-le.
2. Retirez toute saleté ou tout poil coincé dans les roues.
3. Nettoyez les roues avec un chiffon sec. [Fig. 22]
REMARQUE IMPORTANTE
Utilisez uniquement les pièces de rechange approuvées pour votre Robot.
Si le Robot ne sera pas utilisé pendant plusieurs mois, veuillez retirer les batteries et rangez-le dans un
endroit frais et sec.
IMPORTANT :
Saisissez le robot toujours avec deux mains pour le soulever et le transporter et assurez-vous de tenir le
robot droit. [Fig. 23]
[Fig. 24]
car ces conditions affecteront négativement le comportement de votre robot. [Fig. 25]
Fig. 22
Fig. 21
INFORMATIONS IMPORTANTES
Pièces détachées et consommables Hoover
Toujours remplacer les pièces par des pièces détachées de la marque Hoover. Celles-ci sont
disponibles auprès de votre revendeur Hoover. Lors de la commande de pièces, veuillez toujours
préciser le numéro de votre modèle.
Qualité
selon un système de qualité conforme à la norme ISO 9001.
Votre garantie
vendu et peuvent être obtenues auprès de votre revendeur. Les détails concernant ces conditions
le reçu doivent être présentés pour toutes réclamations relevant des conditions de cette garantie.
DÉPANNAGE
Voici une liste de problèmes rencontrés et leurs solutions.
Le Robot ne fonctionne pas
• Regardez votre Robot.
• Vérifiez que le Robot est bien allumé.
• Vérifiez que le bac à poussière et le filtre sont propres.
•
est faible
•
• Vérifiez et nettoyez le filtre et le moteur.
• Vérifiez et nettoyez les brosses à plancher.
• Vérifiez et nettoyez les capteurs.
• Vérifiez et nettoyez les roues motrices.
Le Robot fait beaucoup de
bruit en aspirant
• Nettoyez le bac à poussière et le filtre.
• Vérifiez la présence de saletés et de résidus dans les brosses
et les roues motrices.
Le Robot ne se charge pas
automatiquement
•
station de chargement.
Le Robot est coincé
• Le Robot va tenter de se libérer lui-même mais dans certains
cas, aidez-le.
FR
Fig. 23
Fig. 24
Fig. 25
18
* Sólo para algunos modelos ** Puede variar dependiendo del modelo
ES
INSTRUCCIONES PARA UN USO SEGURO
Este aparato solo debe utilizarse para la limpieza doméstica, como se describe en este manual de
usuario. Asegúrese de haber comprendido todo el contenido de este manual antes de poner en
funcionamiento el aparato.
Apague y quite el cargador de la toma de corriente antes de limpiar el aparato o de efectuar
cualquier operación de mantenimiento.
Este aparato puede ser usado por niños de 8 años en adelante y personas con capacidades
físicas, sensoriales o mentales reducidas o falta de experiencia y conocimiento bajo supervisión y
con una explicación de las instrucciones con respecto al uso del aparato de manera segura y que
comprendan los riesgos implicados. Los niños no deben jugar con el aparato. Los niños no deben
limpiar ni dar mantenimiento sin supervisión.
Si el cable de alimentación está dañado, deje de utilizar el aparato inmediatamente. Para evitar
riesgos de seguridad, el cable de alimentación sólo puede ser cambiado por un especialista del
servicio técnico de Hoover.
Si el área a limpiar es un balcón o escaleras, debe utilizarse una barrera física para impedir la
entrada al balcón o las escaleras y garantizar un funcionamiento seguro. Mientras el Robot está
limpiando, se debe vigilar a los niños pequeños y las mascotas.
Conserve el aparato siempre en interiores. No utilizar el aparato en exteriores ni exponerlo a la
No exponer
No cuelgue el Robot ni utilice ningún accesorio si se ha caído, dañado, dejado a la intemperie o
mojado.
Nunca desenchufe ni tire del adaptador tirando del cable de conexión.
No lo utilice para limpiar escaleras.
Recarga de las baterías
Utilice únicamente el cargador original suministrado con el aparato.
Controle que el voltaje de la corriente eléctrica sea el mismo que el indicado en el cargador.
Nunca cargue las baterías a una temperatura superior a 30ºC o inferior a 0ºC.
Enchufe el cargador suministrado con este electrodoméstico en una toma de corriente adecuada.
Bajo condiciones de uso excesivo o temperatura extrema, pueden producirse fugas de las celdas de
la batería. Si el líquido entra en contacto con la piel, lávela rápidamente con agua. Si el líquido entra
en contacto con los ojos enjuáguelos de inmediato y de forma continuada con agua limpia durante un
mínimo de 10 minutos. Solicite atención médica.
Es normal que el cargador esté caliente al tacto mientras se está cargando.
Utilice únicamente accesorios, consumibles o repuestos recomendados o distribuidos por Hoover.
No debe
No debe
aerosoles u otros vapores.
No debe seguir utilizando el electrodoméstico o el cargador si parece estar defectuoso.
Servicio Técnico de Hoover:
aspirador, recomendamos que las tareas de mantenimiento sean realizadas exclusivamente por
técnicos autorizados del servicio Técnico de Hoover.
No debe emplear el aparato para limpiar personas o animales.
No sustituya las baterías del Robot con baterías no recargables.
base de carga del suministro eléctrico.
Si se debe desechar el aparato, primero es necesario extraer la batería. Cuando extraiga la
batería, el electrodoméstico debe estar desconectado de la corriente eléctrica. Elimine la batería de
manera segura. Haga funcionar el electrodoméstico hasta que se detenga debido a que la batería
esté totalmente descargada. Las baterías usadas deben llevarse a un punto de reciclaje y no deben
desecharse con los residuos domésticos. Para quitar la batería, contacte con el Servicio Técnico de
Hoover o siga las instrucciones presentes.
19
Robot aspirador Base de Carga Control a distancia
Adaptador Cepillo para limpieza de rincones
Batería AAA
Cepillo para limpieza Depósito del agua y
CONTENIDO DE LA CAJA
ES
Retire los tornillos y la tapa del compartimento de las pilas. Extraiga el paquete de baterías.
[Fig. 7]
NOTA: Si llega a experimentar problemas al desmontar el aspirador o para obtener más
información sobre el funcionamiento, la recuperación y el reciclaje de este electrodoméstico,
contacte con su Ayuntamiento o con el servicio de recogida de residuos domésticos de su zona.
ANTES DE SU USO: NOTAS IMPORTANTES
Lea atentamente la siguiente información antes de utilizar el Robot o sus accesorios.
No desmonte el Robot ni intente repararlo usted mismo. En caso de fallos, contacte con el Servicio Postventa de Hoover para recibir
asesoramiento profesional.
Escaleras: El Robot utiliza sensores que impiden su caída en peldaños, escaleras o bordes. En ciertas situaciones, los sensores pueden resultar confundidos.
El Robot no puede detectar peldaños inferiores a 8 cm de altura, Los peldaños de altura inferior a 8 cm pueden causar la caída de Robot. Si está
disponible, utilice la Barrera Virtual, para evitar que el Robot se caiga.
la caída de Robot.
Si está disponible, utilice la Barrera Virtual o coloque una alfombra en el peldaño más bajo para evitar la caída del Robot.
Debe evitarse el uso del Robot en entresuelos, descansillos de escalera o áreas elevadas sin bordes. Si está disponible, utilice la Barrera Virtual,
para evitar que el Robot se introduzca en tales áreas.
Uso de la batería: El Robot está accionado por baterías recargables de ion-litio de alta capacidad. Estas baterías recargables están garantizadas por
un período de 6 meses, siempre que su mantenimiento y operación sean efectuados de acuerdo con las instrucciones de este manual de usuario.
Para su robot, utilice sólo repuestos autorizados. El uso de piezas de recambio no autorizadas por Hoover son peligrosas e invalidarán la garantía.
Utilice únicamente la estación de carga y el adaptador de corriente suministrados para recargar el Robot. El uso incorrecto de la base de carga o del
adaptador de corriente es peligroso e invalida su garantía.
El Medio Ambiente:
El símbolo que puede verse en el producto indica que este no puede tratarse como residuo doméstico. En su lugar, se debe entregar en un punto
de recogida de electrodomésticos para el reciclaje de equipos eléctricos y electrónicos. La eliminación debe llevarse a cabo según los reglamentos
medioambientales locales sobre eliminación de residuos. Para más información sobre el tratamiento, la recuperación y el reciclaje de este aparato,
ponte en contacto con tu Ayuntamiento, el servicio de recogida de residuos domésticos o con el establecimiento donde hayas comprado el
producto.
Este aparato cumple con las Directivas Europeas 2014/53/UE y 2011/65/UE.
Para recibir una copia de la declaración de
conformidad, contacte con el fabricante a través del sitio web: www.hoover.es
Bandas de frecuencias 2412Mhz ~ 2472Mhz
Potencia máxima de radiofrecuencia transmitida en la
banda de frecuencias
802.11 b: +16.32 dBm
802.11 g: +17.94 dBm
802.11 n20: +17.23 dBm
802.11 n40: +17.84dBm
12
4
9
1818
19
10
1
15
12
11
13
14
16
17
19
3
5
16
19
20
21
22
17
6
7
8
2020
INFORMACIÓN SOBRE EL APARATO
1 Interruptor de encendido/espera con
LED de encendido
2 Amortiguador frontal
3 Pulsador desbloqueo contenedor
recolector polvo
4 Depósito de suciedad
5
6 Filtro Epa
7 Filtro de la esponja de extracción
8
9 Clavija de CC, robot aspirador
10 Contactos de carga
11 Base de Carga
12 Adaptador
13 Luz LED de control de carga
14 Conector de CC, base de carga
15 Agitador
16 Rueda Motriz
17 Cepillo para limpieza de bordes
18 Contactos de carga del robot
19 Sensor anticaída
20 Interruptor de encedido/apagado
21 Depósito del agua
22 Mopa
* Sólo para algunos modelos ** Puede variar dependiendo del modelo
ES
/