Page is loading ...

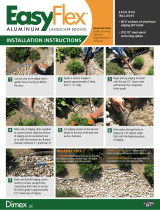
1Mark the installation area and
trench approximately 3" deep
along the border. Place edging
in trench, with no more than
½" - 1" of the edging showing
above ground.
2Secure the edging with anchoring
spikes (included in kit). Use a
rubber mallet to drive spikes
through the pre-drilled holes into
the soil at an angle.
3Backll with soil on both sides of
the edging. Compact soil to secure
the edging and cover with mulch
or stone. Ground cover material
should ll to the top of the edging.
-
HOW TO CONNECT:
An overlapping connection
system is used to adjoining
edging pieces. Slide ends of
edging strips together to
connect pieces prior to placing
in the ground. For best results,
overlap pieces 2 - 4 inches.
HOW TO CUT:
Carefully cut edging sections
to the desired length using a
hacksaw. Always take proper
safety precautions when cutting,
including wearing protective
eyewear.
INSTALLATION INSTRUCTIONS
INST-PALM-RV0
HELPFUL TIPS
GRADE CHANGES:
Cut a “V” shaped notch in the bottom of
the edging and bend to accommodate
the slope.
CREATE CORNERS:
Bend the edging around a 2x4 piece of
wood or other solid object to achieve the
desired angle.
CREATE CURVES:
Aluminum edging bends easily to create
curves as needed. Carefully bend the edging
to t the landscape design. Aggressive bends
can cause kinks in edging.
ANCHORING SPIKES:
Anchoring spikes are included in most kits.
Supplementary spikes kits are sold separately.
RECOMMENDED
TOOLS:
• Spade or shovel
• Rubber mallet
• Hacksaw
• 2x4 piece of wood
• Protective eyewear
Questions/Comments? Contact us at
/