Page is loading ...

Create columns, seat walls,
edging and more...
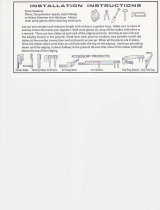
Lawn-and-Garden Project Block
Tango
TM
Inspiration and Installation Guide
One block does it
all and requires
no cutting!

Enhance your outdoor entry and living spaces with this amazingly versatile lawn-and-garden
project block. Let your imagination run free! With this unique T-shaped block you can create
columns, seat and freestanding walls, battered or vertical retaining walls, planters, edging and
more! For inspiration check out the ideas in this guide and view videos online. Then use the
installation information included in this book to efficiently build your project.
See how easily the Tango™ lawn-and-garden project
block can transform your yard.
Inspiration
Seat and Freestanding Walls
Straight Seat Wall .........................................................4-5
Straight Seat Wall Corner .............................................6
Straight Seat Wall Finished End .................................7
Curved Seat Wall ..........................................................8-9
Column ..................................................................................10-11
Retaining Walls
Battered Wall ................................................................... 12
Vertical Wall ...................................................................... 13
Planter................................................................................. 14
Edging ....................................................................................... 15
Estimating and Installation
Project Preparation and Tips .......................................16-17
How to Split a Block in Half .............................................. 18
How to Create Wedge Pieces .......................................... 19
Seat /Freestanding Wall .............................................. 20-22
Column ..................................................................................... 23
Retaining Wall .................................................................24-25
Edging ................................................................................26-27
Tango™ Lawn-and-Garden Project Block
2
More information online at
www.anchorblock.com/products/walls/tango-lawn-garden-project-block/default.aspx
Installation Videos
Scan the QR code with your
mobile device here to see the
full play list or visit us at:
http://bitly.com/TangoProjects

Product Overview
Available in:
Brown/Buff
Block shown with score line
side up and textured end
Score line
6"D
12"W
4"H
Textured
end
Smooth
end
Head
Tail
Neck
Face
Block shown with smooth
side up and smooth end
3
6.125"W
* Actual dimensions and weights may vary from these approximate values due to variations in
manufacturing processes. The minimum dimensions are smallest possible due to these variations.
** Based on front face of block.
† Minimum radius without cutting.
‡ Maximum heights that can be safely built without geosynthetic reinforcement, including
the buried course, but excluding the cap. Maximum gravity wall heights assume no slope
below or above the wall; no surcharge loads (e.g., driveway, parking pad, pool); and all
replaced soil is well compacted.
Approximate dimensions* 4"H x 12"W x 6"D
Minimum dimensions 3.93"H x 11.7"W x 5.54"D
Approximate weight* 16 lbs.
Coverage** 0.31 sq. ft.
System batter (battered wall) 10.6°
System batter (vertical wall) 0°
Minimum outside radius† 7'
Minimum inside radius† 4'
Maximum retaining gravity wall height‡ Battered: 2'
Vertical: 1'4"
Maximum seat wall height‡ Curved: 2'
Straight: 2'
Maximum column height‡ 4'

The design of the Tango™ project block allows for nested installation to
surround a backyard patio, enhance a front yard courtyard, and provide
seating. For nested installation example, see non-capped wall on page 5.
Straight Seat Wall
4
Design Parameters
• Wall depth: 9" without cap
• Maximum height, including buried course
but excluding the cap: 2'
• Recommended seating height: 1'7" to 1'11"
For estimating and installation see
pages 20-22.

5
Cap Ideas
• ShortCut
®
caps (shown above)
• 16" x 16" patio stones (shown on page 4)
• Add a row of pavers between wall blocks and caps
for color and/or texture accent (shown above)
• View cap options by project type on page 16
The angled tail
provides the
strength and
stability of a
dove-tailed joint!
Design Tip

Projects with a 90-degree corner are a
breeze. Ideal for enclosing a patio area
or defining a space.
Seat Wall Corner
6
Design Parameters
• Wall depth: 9" without cap
• Maximum height, including buried course
but excluding the cap: 2'
• Recommended seating height: 1'7" to 1'11"
Design Tip
One block
does it all —
just split and
place.
See page 18 for instructions.

Show off the clean lines at the end of a seat or
freestanding wall, or abut next to a structure,
such as a house or a column. This is perfect for
smaller spaces.
Seat Wall Finished End
Cap Ideas
• ShortCut
®
caps (shown on page 6)
• 16" x 16" patio stones (shown above)
• Add texture or color contrast with pavers
or patio stones (see photos on page 8)
• View cap options by project type on page 16
Split the block in half
to create wall end.
Design Tip
See page 18 for instructions.
7

8
Design Tip
Curved seat walls can be abutted
next to a structure, such as a
house, or a standalone element
flanked by column(s).
Design Parameters
• Wall depth: 1' without cap
• Maximum height, including buried course
but excluding the cap: 2'
• Recommended seating height: 1'7" to 1'11"
For estimating and installation
see pages 20-22.
Some landscapes lend themselves to a curved seat
wall. This more sophisticated tail-to-tail design and
installation project creates a softened, intimate
space. Add a column or two for visual impact. For
tail-to-tail installation example, see non-capped
wall on page 9.
Curved Seat Wall

9
Remove the
tail to fill void
for wall end.
Design Tip
See page 19 for instructions.
Cap Ideas
• Select cap to cover seat area with an overhang for
the best aesthetics and most comfortable seating
• Match or contrast the seat wall’s color and texture
by adding a row of pavers between wall and caps
• View cap options by project type on page 16

Columns make statements and add visual interest besides being functional.
Build columns in just minutes to enhance an entryway or showcase potted
plants; add ambience by including light fixtures.
Column
10
Design Parameters
• Column footprint: 1'3" x 1'3" without cap
• Maximum height, including buried course but
excluding the cap: 4'
• Hollow core provides space for wiring electricity
or mounting post: approximately 3" x 3"
For estimating and installation see page 23.
Design Tip
Build column 1-2 courses
higher than wall.

Column Cap Ideas
• 16" x 16" patio stone
Other cap ideas (not shown):
• Poured concrete top
• Glass block
• Granite
11
Textured end is exposed
on column exterior.
Smooth end is
concealed inside
the column.
Be sure that the
face and textured
end of each block
face outward as
shown here.
Design Tip

A wall built to retain soil is known as a retaining
wall. A battered wall has the blocks set back on
each course to improve the wall stability.
Battered Retaining Wall
12
Design Parameters
• Maximum battered height, including buried
course but excluding the cap: 2'
For cross-section details, estimating and
installation see pages 24-25.
Cap Ideas
• Anchor™ small cap (shown above)
• Ashlarstone™ wall cap (shown below)
• Match or contrast the wall’s color
and texture
• View cap options by project type
on page 16

Battered Retaining Wall Vertical Retaining Wall
Design Parameters
• Maximum vertical height, including buried
course but excluding the cap: 1'4"
For estimating and installation, see
pages 24-25.
A
Cap Ideas
• Holland pavers; fill gaps with mortar (A)
• Ashlarstone™ wall cap (B)
• Anchor™ small cap (shown below)
• Match or contrast the wall’s color
and texture
• View cap options by project type on
page 16
B
13
A wall built to retain soil is known as a retaining wall. A vertical wall has the
blocks stacked vertically on each course to maximize use of space for lawn,
garden or other plantings.

Planter
Design Parameters
• Maximum vertical height, including buried course but
excluding the cap: 1'4"
For cross-section details, estimating and installation
see pages 24-25.
Cap Ideas
• Ashlarstone™ wall cap (shown above)
• ShortCut
®
cap (shown below)
• Match or contrast the wall’s color
and texture
• View cap options by project type on
page 16
14
Small vertical retaining wall projects are ideal for herb,
floral or vegetable gardens.

This versatile block can also be used in multiple ways to create garden and project
edging. Edgers provide landscape detail and keep mulch, soil and weeds from
entering your garden or landscape area.
For estimating, installation and design options, see pages 26-27.
Edging
15

Project Preparation and Tips
Advance planning and careful layout at the job site help ensure successful projects.
Read all instructions prior to installation.
1. Have utilities location(s) marked.
2. Develop a plan; confirm lot lines, project location and area.
3. Stake project location with string line or garden hose.
Tips
• Score line does not indicate top or bottom of project block. See example on next page.
• Texture irregularities are a characteristic of this block. Flip blocks as needed during
installation to minimize gaps between blocks, being mindful of whether your project
has exposed textured ends (e.g., columns, corners).
• Wall projects require a running bond pattern. See example on page 17.
• Use an exterior-grade concrete adhesive. Apply a
1
/
4
-inch bead (string) of glue on the
project block prior to capping, as shown on page 17.
• Multiple cap options are available for each project. See chart below.
16
Exterior-Grade
Concrete Adhesive
Drainage Aggregate
(retaining walls only)
Tools
Materials
Base Material
Safety Glasses
Gloves
Stakes
String
Trowel
Level
Metal Chisel
Framing Hammer
Rubber Mallet
Garden Hose
Curved Wall
Straight Wall
Freestanding Wall Retaining Wall Column
ShortCut
®
cap Holland paver 4" X 8" 16" X 16" patio stone
Dutch Cobble square paver 5
1
/
2
" X 5
1
/
2
" Ashlarstone™ wall cap
Dutch Cobble rectangle paver 5
1
/
2
" X 8
1
/
4
" Anchor™ small cap
Holland paver 4" X 8"
ShortCut
®
cap Holland paver 4" X 8"
Holland paver 4" X 8" Ashlarstone™ wall cap
Anchor™ small cap
Anchor™ Cap Options for Tango™ Wall Projects
Tools and Materials Needed
Type
Project
* Itisrecommendedthatyoupurchase
5percentmoreproductthanestimated
toaccountforcuttingandbreakage.
Addanextra10percentforcurvedwalls.
**Averageiftwodifferentlengths.
Select wall cap product; then calculate number of caps needed for project.
calculate linear coverage of cap
wall length (in.)
linear coverage of cap (in.)
minimum # of caps
cap length (in.)**
______=
_
:
estimated#ofcaps
=
1.05*
X
wall length in inches
=
Tamper
Shovel
Rake
Post Hole
Digger
Cap Estimating:

Stagger block alignment as shown
Helpful tip –
Score line does
not indicate top
or bottom
Glue Placement
Apply along middle of block head for:
• Column (all courses)
• Seat/freestanding walls (top two courses)
• Vertical retaining walls (all courses)
• Capping
Middle
17
Calculate exterior-grade concrete adhesive needed.
length of courses to glue (lin. ft.)
use approximately 3 oz. of
exterior-grade concrete
adhesive per lin. ft.
oz.ofadhesive
_
:
10
=
=
minimum # of 10 oz. exterior-
grade concrete adhesive tubes
oz. per lin. ft.
calculate total length of courses
to glue, including cap course
wall
length (in.)
______X______12=
# of courses
to glue
_
:
X
Apply along back of block head for:
• Battered retaining walls (all courses)
Back
Project Preparation and Tips (continued)
Running Bond Pattern
block
length (in.)
3

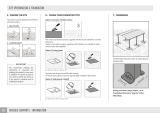
How to Split a Block in Half
Just four simple steps split a Tango™ lawn-and-garden project
block into two L-shaped pieces which are used for corners and
ends. Following these steps will result in cleaner splits.
1. Place the block on the grass or soft surface with the score
line facing up. With a metal chisel and framing hammer,
lightly tap starting from the face of the block to extend the
score line. Continue tapping along the score line to the tail.
2. Stand block on its face and again lightly tap, creating
a score line on the end of the block.
3. Flip the block over and continue lightly tapping, creating
another centered score line from the tail to the face of
the block.
4. Repeat process with solid force as needed until the block
splits in half.
18
Score line
If needed,
chisel away
texture to
create a
tighter fit
Design Tip

How to Create Wedge Pieces
Option 1. Use the tail to create a wedge piece for ends of curved
walls or for one of the edger options.
1. Place the block on the grass or soft surface.
2. With a metal chisel and framing hammer, lightly tap along
the neck.
3. Flip the block over and continue lightly tapping, creating a
score line all the way around the four sides of the block.
4. Repeat process with solid force as needed until the block
splits in two.
19
Head
Tail
Neck splitting
line
Tail
Head
Neck splitting
line
Option 2. Use L-shaped pieces (see page 18) and split
at the neck to create wedge pieces.

Use the quick reference chart or calculate number of blocks needed per formula below.
Note: Quick reference chart is rounded up to account for additional pieces for splitting.
Seat/Freestanding Wall Estimating
20
Calculate number of blocks needed for project. If building on top of existing paver or concrete base, exclude adding
number of blocks needed for buried base course.
=
calculate exposed area of wall
area of both sides of wall (sq. in.)
area of block face
# of blocks needed for exposed wall
wall
length (in.)
______X______x2=
exposed wall
height (in.)
_
:
+
minimum # of blocks*
Calculate base material (paver base or
3
/
4
-inch minus [with fines] aggregate) needed for project. Base material is
not needed if building on top of existing paver or concrete base. Calculations are based on an average of straight
and curved walls.
calculate average
volume of base material
volume of base (cu. in.)
cu. in. of base material
_
:
1,728
=
=
total cu. ft. of base material
wall
length (in.)
______X74=
X
compensation
for compaction
compensation for compaction
Quick Reference Chart Number of Blocks Needed
estimated # of blocks
X
1.05*
=
calculate number of blocks
needed for buried base course
# of blocks needed for base course
wall
length (in.)
______11.7x2=
block
length (in.)
_
:
*Itisrecommendedthatyoupurchase5percentmoreproductthanestimatedtoaccountforsplittingandbreakage.
1.25
Number of Courses (Height)
5' 10' 15' 20' 25' 30'
1 Course/base course (4") 12 22 32 42 54 64
2 Courses (8") 22 42 64 84 106 126
3 Courses (12") 32 64 96 126 158 190
4 Courses (16") 42 84 126 168 210 252
5 Courses (20") 54 106 158 210 264 316
6 Courses (24") 64 126 190 252 316 378
average
trench area
(sq. in.)
Wall Length
46
(sq. in.)
For cap estimating see page 16.
/