Festo CPX-FB37 User manual

Type
User manual

Festo CPX-FB37 is a bus node that seamlessly integrates into your CPX terminal, acting as a gateway between your EtherCAT network and the individual modules within the terminal. With two 4-pin M12 sockets, it establishes a reliable connection to the EtherCAT network, allowing for efficient data exchange and control of your automation processes.

Festo CPX-FB37 is a bus node that seamlessly integrates into your CPX terminal, acting as a gateway between your EtherCAT network and the individual modules within the terminal. With two 4-pin M12 sockets, it establishes a reliable connection to the EtherCAT network, allowing for efficient data exchange and control of your automation processes.

Bus node
CPX-FB37
Festo AG & Co. KG
Postfach
73726 Esslingen
Germany
+49 711 347-0
www.festo.com
Brief description 8029653
1406NH
[8029655]
Original: de
Bus node CPX-FB37 English............................................
EtherCAT
®
and TORX
®
are registered trademarks of the respective trade-
mark owners in certain countries.
1Intendeduse
The bus node CPX-FB37 is intended exclusively for use in CPX terminals, as a parti-
cipant in the EtherCAT network and as follows:
in excellent technical condition
in original status, without unauthorised modifications
within the limits of the product defined through the technical data
in an industrial environment.
You can find detailed information in the bus node description
(P.BE-CPX-FB37-...) and in the CPX system description (P.BE-CPX-SYS-...).
You can receive information on EtherCAT in the Internet:
EtherCAT Technology Group www.ethercat.org.
2Targetgroup
The target group of this documentation consists of trained specialists in control
and automation technology.
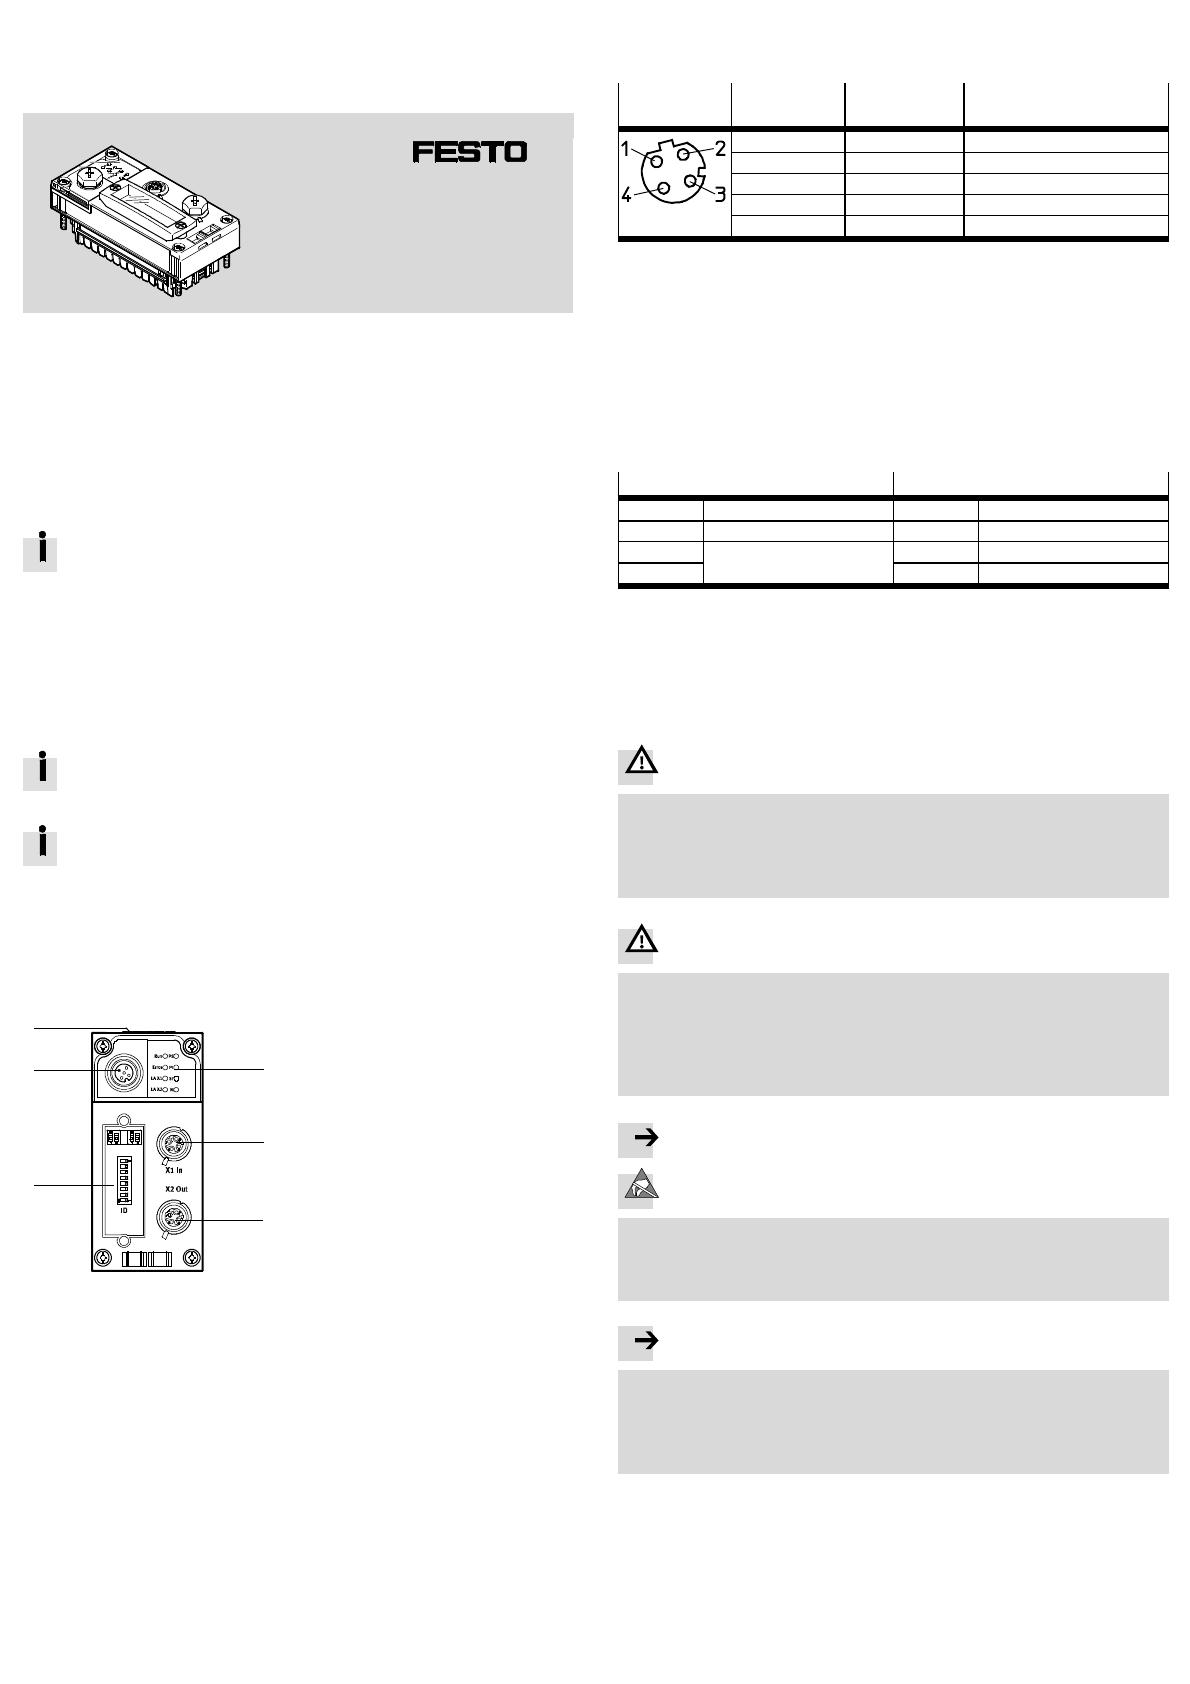
3 Connection and display components
6
5
3
1
2
4
1EtherCAT-specific network status
LEDs and CPX-specific LEDs
2Network connection 1
(input “X.1 In”)
3Network connection 2
(output “X2 Out”)
4Cover for DIL switches
5Service interface for operator unit
(CPX-MMI) and USB adapter for
CPX-FMT
6Rating plate
Fig. 1
3.1 Network connections
There are two 4-pin M12 sockets (D-coded) on the bus node for connection of the
bus node to the EtherCAT network.
M12 socket,
D-coded
Pin Signal Explanation
1TD+ Transmitted data (Transmit Data) +
2RD+ Received data (Receive Data) +
3TD– Transmitted data –
4RD– Received data –
Housing FE Screening/functional earth
Fig. 2
3.2 LED displays
Behaviour of the LED indicators in normal operating status:
The LEDs “Run”, “PS” and “PL” are illuminated.
The LEDs “LA/X1” and “LA/X2” are illuminated or flash if the assigned network
connection is used.
The LEDs “Error” and “SF” are not illuminated.
The LED “M” is illuminated with the setting “System start with saved
parameters”.
The LED “M” flashes if “Force” is active.
EtherCAT network status LEDs
1)
CPX-specific LEDs
1)
Run (green) Operating status PS (green) Power system
Error (red) EtherCAT error PL (green) Power Load
LA/X1 (green) Connection status X1 In/
X2 Out
2)
SF (red) System Failure
3)
LA/X2 (green) M (yellow) Modify
4)
1) Detailed information: bus node description (P.BE-CPX-FB37-…)
2) Network connection or data traffic at “X1 In” or “X2 Out
3) Flashes in case of error, diagnostics by means of error number: CPX system description
(P.BE-CPX-SYS-...)
4) “System start with saved parameters” or “forcing” active
Fig. 3
4 Mounting/dismounting
Warning
Danger of injury to people, damage to the machine and system resulting from
uncontrolled movements of the actuators and undefined switching states
Switch off the operation and load voltage supplies.
Switch off the compressed air supply.
Exhaust the valve terminal pneumatics.
Warning
Danger of electric shock
For the electrical power supply, use only PELV circuits in accordance with
IEC/EN 60204-1 (Protective Extra-Low Voltage, PELV).
Observe the general requirements of IEC/EN 60204-1 for PELV circuits.
Only use voltage sources that ensure a reliable electric separation of operat-
ing voltage in accordance with IEC/EN 60204-1.
Note
Damage to the electronics
The bus node includes electrostatically sensitive devices.
• Donottouchanycomponents.
Observe the handling specifications for electrostatically sensitive devices.
Note
Only commission a CPX terminal which has been completely mounted and
connected.
Observe the specifications in the CPX system description, in the descriptions
of the valve terminal used as well as in the assembly instructions of the indi-
vidual components.
When built-in, the bus node is located in an interlinking block of the CPX terminal.
3
1
2
1TORX T10 screws; tightening
torque 0.9 … 1.1 Nm
2CPX bus node
3Interlinking block with contact rails
Fig. 4
4.1 Dismantling
1. Unscrew screws using a TORX screwdriver (size T10).
2. Pull bus node off cautiously and without twisting.
4.2 Mounting
Note
Damage to the interlinking block
Use appropriate screws, dependent on the material of the interlocking block:
plastic interlinking block: thread-cutting screws
metal interlinking block: screws with metric thread
Both types of screws are enclosed respectively when ordering the bus
nodeasasinglepart.
1. Check seal and seal surfaces. Replace damaged parts.
2. Push the bus node carefully and without tilting into the interlinking block up to
the stop.
3. Turn the screws into the existing thread.
4. Tighten the screws in diagonally opposite sequence. Tightening
torque: 0.9 … 1.1 Nm.
Note
Use cover caps to seal unused connections. In this way, protection class
IP65/IP 67 is assured.
5 Setting the DIL switches
12
3
1DIL switch 1: Operating mode, EtherCAT interface
2DIL switch 2: Diagnostics mode, data field size, bootloader
3DIL switch 3: EtherCAT address
Fig. 5
5.1 Removal of the DIL switch cover
To set the DIL switches, you must remove the cover:
1. Switch supply power off.
2. Unscrew the two mounting screws of the transparent cover and remove the
cover.
5.2 Setting the operating mode with DIL switch 1
You can set the operating mode of the bus node with switch element 1.1 of DIL
switch 1.
DIL switch 1 Setting Operating mode
DIL 1.1: OFF
(Factory setting)
Remote I/O
All functions of the CPX terminal are controlled
directly by the EtherCAT I/O controller or
a higher-level PLC.
DIL 1.1: ON Remote controller
A CPX-FEC or CPX-CEC integrated into the terminal
controls all functions
Fig. 6
5.3 Setting the EtherCAT interface with DIL switch 1
You set the EtherCAT interface of the bus node with switch element DIL 1.2 of DIL
switch 1.
DIL switch 1 Setting Function
DIL 1.2: OFF
(Factory setting)
Modular device profile (MDP)
DIL 1.2: ON Fixes I/O size (64 byte I/A),
compatible with the bus node CPX-FB38
Fig. 7
5.4 Setting the diagnostics mode, I/O bytes or starting of the bootloader with
DIL switch 2
The function of DIL switch 2 is dependent on the set operating mode of the CPX
terminal:
setting of the diagnostics mode in Remote I/O operating mode
setting the data field size in the remote controller operating mode
starting the bootloader in both operating modes.
DIL switch 2 Setting Remote I/O Remote controller
DIL 2.1: OFF
DIL 2.2: OFF
(Factory setting)
I/O diagnostics inter-
face and status bits
switched off
8byteI/8byteOfor
communication of the
bus node with the
CPX-FEC or CPX-CEC
DIL 2.1: OFF
DIL 2.2: ON
Status bits are
switched on
+ 16 I bits (only 8 bits
used)
Reserved
DIL 2.1: ON
DIL 2.2: OFF
I/O diagnostics inter-
face is switched on
+16I/Obits
16 byte I/16 byte O for
communication of the
bus node with the
CPX-FEC or CPX-CEC
DIL 2.1: ON
DIL 2.2: ON
Bootloader
(Restore the firmware in
case of loss of function)
Bootloader
(Restore the firmware in
case of loss of function)
Fig. 8
5.5 Setting the EtherCAT address with DIL switch 3
Assign a free EtherCAT address (device identification value) to the bus node with
the switch elements DIL 3.1 … 3.8. Setting an EtherCAT address is optional (e.g. for
the Hot Connect function).
DIL switch 3 Function
12 34 56 7
8
2
0
2
1
2
2
2
3
2
4
2
5
2
6
2
7
Binary-coded input of the EtherCAT address
1)
Example on left in figure:
EtherCAT address
=2
1
+2
2
+2
5
=2+4+32=38
12 34 56 78
2
0
2
1
2
2
2
3
2
4
2
5
2
6
2
7
Binary-coded input of the EtherCAT address
Example on left in figure (all switch elements are OFF):
EtherCAT address = 0, the programmed EtherCAT address in the EEPROM
is used (factory setting).
1) Possible EtherCAT addresses are 1 to 255.
Fig. 9
5.6 Mounting the DIL switch cover
1. Place cover on the bus node. Make sure that the seal is positioned correctly!
2. Tighten the two mounting screws with a max. torque of 0.4 Nm.
6 Connecting to the network
Use shielded Industrial Ethernet cables of category Cat 5 or higher.
6.1 Cable specification
Feature Requirement
Cable type Ethernet twisted pair cable, screened
Transmission class Category Cat 5 or higher
Core cross section 0.14 ... 0.75 mm
2
22 AWG required for max. connection length between
network participants
Connection length Max. 100 m
Fig. 10
7 Power supply of the CPX terminal
The operating and load voltage supply for the CPX terminal runs over interlinking
blocks. The interlinking blocks carry the operating and load voltage over contact
rails to the adjacent modules (CPX system description P.BE-CPX-SYS…).
8 Start-up behaviour of the CPX terminal
If the LED “M” illuminates or flashes permanently after the system start, “System
start with saved parameterisation and saved CPX expansion” is set or “Force” is
active.
9 Note on module replacement
Note
Loss of settings
If the LED “M” of the bus node is permanently lit, parameterisation of the CPX
terminal is saved locally in the bus node. In this case, parameterisation is lost if
the bus node is replaced.
Before replacement, secure required settings and make them again after
replacement.
10 Parameterisation
The CPX terminal and the related bus node can be parameterised by means of the
Festo operator unit (CPX-MMI), Festo Maintenance Tool (CPX-FMT) or EtherCAT
(CoE). The CPX modules are made available in the configuration file (ESI file).
You can find the current configuration files (ESI files) and additional in-
formation on the Festo Internet page in the Support Portal
(
www.festo.com
/sp).
Further information on parameterisation and module replacement can be
found in the bus node description P.BE-CPX-FB37-...
(
www.festo.com
/sp).
11 Technical data
Feature Specification/value
General technical data CPX system description P.BE-CPX-SYS-...
Degree of protection through housing
in accordance with IEC/EN 60529,
completely mounted, plug connector
inserted or provided with cover cap
IP65/IP67
Protection against electric shock
Protection against direct and indirect
contact in accordance with IEC/EN 60204-1
by means of PELV power circuit
Bus node intrinsic current consumption
from operating voltage supply for
electronics/sensors (U
EL/SEN
)
typically 100 mA at 24 V (internal electronics)
Separation
EtherCAT interfaces for U
EL/SEN
galvanically separated
Module code (CPX-specific)
Remote I/O 224/2
Remote controller 171/2
Network-specific characteristics
Protocol EtherCAT, based on the Ethernet protocol IEEE
802.3, optimised for process data, real-time
capable
Transmission rate 100 Mbit/s
Crossover detection Auto-MDIX
Fig. 11
  • Page 1 1
  • Page 2 2
  • Page 3 3

Festo CPX-FB37 User manual

Type
User manual

Festo CPX-FB37 is a bus node that seamlessly integrates into your CPX terminal, acting as a gateway between your EtherCAT network and the individual modules within the terminal. With two 4-pin M12 sockets, it establishes a reliable connection to the EtherCAT network, allowing for efficient data exchange and control of your automation processes.

Ask a question and I''ll find the answer in the document

Finding information in a document is now easier with AI