
KVH Industries, Inc.
TracVision® RV1
User’s Guide

TracVision RV1 User’s Guide
KVH Part # 54-1032 Rev. C
© 2014-2018, KVH Industries, Inc., All rights reserved.
TracVision RV1
User’s Guide
This user’s guide provides all of the basic information you need to
operate, set up, troubleshoot, and maintain the TracVision RV1
system. For detailed installation information, please refer to the
TracVision RV1 Installation Guide.
If you have any comments regarding this manual, please e-mail
them to [email protected]. Your input is greatly appreciated!
Technical Support
North/South America, Australasia:
Phone: +1 401 847-3327
Email: [email protected]
Europe, Middle East, Africa, Asia-Pacific:
Phone: +4545160180
Email: [email protected]

Trademark Information
TracVision, KVH, and the unique light-colored dome with dark contrasting baseplate (Reg. No.
2,864,752) are trademarks of KVH Industries, Inc.
All other trademarks are the property of their respective owners.
Disclaimer
Every effort has been made to ensure the correctness and completeness of the material in this
document. No company shall be liable for errors contained herein. The information in this
document is subject to change without notice. No warranty of any kind is made with regard to
this material, including, but not limited to, the implied warranties of merchantability and fitness
for a particular purpose.

TracVision RV1 User’s Guide
i
Table of Contents
1 Introduction
Documentation Overview...................................................................3
Important Safety Information.............................................................4
System Overview ...............................................................................6
2 Getting Started
Receiving Satellite TV Signals..........................................................11
Avoiding Blockage ...........................................................................12
Turning On the System ....................................................................13
Accessing the Web Interface ...........................................................14
3 Network Settings
Connecting the TV-Hub to Your Onboard Network...........................17
TV-Hub Ethernet Settings ................................................................19
Connecting to the TV-Hub Using its Built-in Wi-Fi ...........................20
TV-Hub Wireless Settings ................................................................21
Connecting Directly to the TV-Hub Ethernet Port.............................22
Resetting Network Settings to Factory Defaults..............................23
4 Antenna Settings
Adjusting the LNB Skew Angle (Linear Only) ...................................27
Understanding Skew ..............................................................29
Advanced Settings ...........................................................................30
Sleep Mode.............................................................................30
Band/Polarization Control.......................................................30

TracVision RV1 User’s Guide
ii
5 Receiver Settings
Configuring a Linear Receiver for Automatic Switching ..................33
Configuring DIRECTV Receivers for Automatic Switching................34
Allowing External Access on a DIRECTV Receiver ...........................38
Setting the Dish Type on a DIRECTV Receiver .................................39
Running a Check Switch Test on a DISH Network or
Bell TV Receiver ...............................................................................40
Running a Check Switch Test on a Wally Receiver ................42
Check Switch Mode................................................................43
Activating Your Receiver(s)..............................................................44
6 Satellite Settings
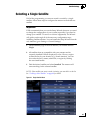
Selecting a Single Satellite ..............................................................47
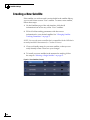
Creating a New Satellite ..................................................................48
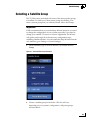
Selecting a Satellite Group ..............................................................49
Satellite Elevation Limitations ................................................51
Creating a New Satellite Group........................................................54
Changing Satellites in a Group.........................................................56
Changing Satellite Tracking Parameters .........................................57
7 Switching Satellites
Automatic Satellite Switching for Linear, DISH Network, or
Bell TV..............................................................................................61
Setting Up a Linear Receiver for Automatic Switching...........62
Setting Up a DISH Network/Bell TV Receiver for Automatic
Switching................................................................................63
Setting Up an IP AutoSwitch...................................................64
Automatic Satellite Switching for DIRECTV......................................65
DIRECTV Coax Network Connections......................................66
Additional Equipment for Old DIRECTV Receivers ..................67
Setting Up a DIRECTV Receiver for Automatic Switching.......69
Understanding DIRECTV SWM Technology .............................70

TracVision RV1 User’s Guide
iii
Selecting Automatic Switching Mode..............................................72
Selecting the Master Receiver.........................................................73
Manual Satellite Switching..............................................................74
8 Troubleshooting
Basic Checks ...................................................................................77
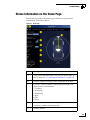
Status Information on the Home Page.............................................79
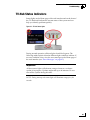
TV-Hub Status Indicators.................................................................81
IP AutoSwitch Status Indicator ........................................................84
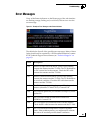
Error Messages................................................................................85
System Logs ....................................................................................88
Operational Log ......................................................................89
Event Log................................................................................90
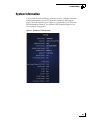
System Information .........................................................................91
Technical Support............................................................................93
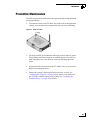
9 Maintenance
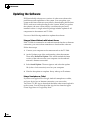
Preventive Maintenance ..................................................................97
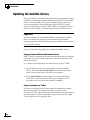
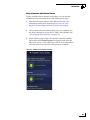
Updating the Satellite Library ..........................................................98
Updating the Software...................................................................100
Corrective Maintenance.................................................................102
Restarting the System ...................................................................103
ASpecifications
System Specifications ...................................................................107

TracVision RV1 User’s Guide
1
Introduction
1. Introduction
This section provides important safety information you need to know
before using the system. It also provides an overview of the system and
its documentation.
Contents
Documentation Overview ..................................................................................3
Important Safety Information ............................................................................4
System Overview...............................................................................................6

TracVision RV1 User’s Guide
3
Introduction
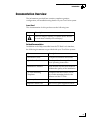
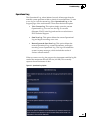
Documentation Overview
The information provided here contains complete operation,
configuration, and troubleshooting details for your TracVision system.
Icons Used
The documentation for this product uses the following icon:
Related Documentation
In addition to the Help accessible from the TV-Hub’s web interface,
the following documents are provided with your TracVision system:
Icon Description
This is a danger, warning, or caution notice. Be sure
to read these carefully to avoid injury!
Document Description
Installation Guide Complete installation instructions
Quick Start Guide Handy quick reference guide with
basic operating instructions
Installation Checklist Form that the installer must return to
validate the quality of the installation
TV-Hub Mounting
Templates
Templates that the installer uses to
lay out the mounting holes for the
antenna and the TV-Hub
Warranty Statement Warranty terms and conditions
Kitpack Contents List List of every part supplied in the kit

TracVision RV1 User’s Guide
4
Introduction
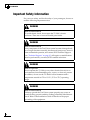
Important Safety Information
For your own safety, and for the safety of your passengers, be sure to
read the following important notices.
WARNING
Risk of Electric Shock
To avoid electric shock, do not open the TV-Hub’s chassis
enclosure. There are no user-serviceable parts inside.
WARNING
Risk of Electric Shock
If any component of the TracVision system becomes damaged and/
or no longer functions normally, disconnect it from power, secure it
from unintended operation, and contact KVH Technical Support
(see “Technical Support” on page 93). All repairs or modifications
must be performed by a trained, KVH-certified technician.
WARNING
Risk of Explosion
Do not operate the TV-Hub (or any other electrical device) in an
environment where flammable gases, vapors, or dusts are present.
In addition, do not use the TV-Hub in an environment with a
temperature outside its 5°F to 131°F (-15°C to 55°C) operating
range.
WARNING
Risk of Electric Shock
Failure to ground the TracVision system properly may cause an
unsafe floating ground condition, risking potentially lethal electric
shock. Refer to the Installation Guide for details on the proper
grounding of the equipment.

TracVision RV1 User’s Guide
5
Introduction
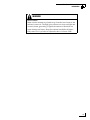
WARNING
Risk of Burns
Make sure the antenna is pointed away from the sun whenever the
radome is removed. The high-gloss reflector can focus sunlight into
a narrow beam, generating a significant amount of heat that can
cause damage and injury. Keep the radome installed at all times.
Only remove it if you need to adjust the skew of a linear LNB.

TracVision RV1 User’s Guide
6
Introduction
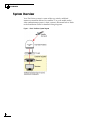
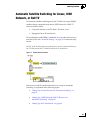
System Overview
Your TracVision system is a state-of-the-art, actively stabilized
antenna system that delivers live satellite TV to your mobile audio/
video entertainment system. A basic system is illustrated below. Refer
to the Installation Guide for detailed wiring diagrams.
Figure 1-1 Basic TracVision System Diagram

TracVision RV1 User’s Guide
7
Introduction
The TracVision system includes the following components:
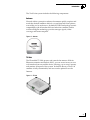
Antenna
Housed within a protective radome, the antenna quickly acquires and
tracks the desired satellite to deliver a crystal-clear television picture,
even while you’re on the move. Its built-in DVB-S2 technology ensures
compatibility with all modern Ku-band television satellites, and its
exclusive RingFire technology provides stronger signals, wider
coverage, and better reception.
Figure 1-2 Antenna
TV-Hub
The IP-enabled TV-Hub powers and controls the antenna. With its
Ethernet connection and built-in Wi-Fi, you can access its easy-to-use
web interface from any mobile device, allowing you to set up, operate,
and monitor all aspects of the system. Its built-in library of over 100
satellites is fully customizable, and can even be updated over the
Internet.
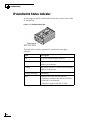
Figure 1-3 TV-Hub

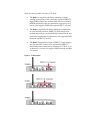
There are three possible versions of TV-Hub:
•TV-Hub A+: Supplied with North American systems
starting in the spring of 2018; includes a built-in DIRECTV
digital SWM (single wire multiswitch) with its associated
DSWM connector on the rear panel that supports up to 13
tuners; also supports DISH Network and Bell TV services
•TV-Hub A: Supplied with North American systems prior
to 2018; includes a built-in DIRECTV SWM (single wire
multiswitch) with its associated SWM connector on the rear
panel that supports up to eight tuners; also supports DISH
Network and Bell TV services
•TV-Hub B: Supplied with linear, DIRECTV Latin America,
and Tri-Americas systems; does not include DIRECTV
SWM component/connector(s); identical to TV-Hub A+ or
A otherwise, so it can also support DISH Network and Bell
TV services
Figure 1-4 TV-Hub Versions

TracVision RV1 User’s Guide
9
Getting Started
2. Getting Started
This section explains how to turn on the system for the first time and
access the web interface.
Contents
Receiving Satellite TV Signals .........................................................................11
Avoiding Blockage ...........................................................................................12
Turning On the System ....................................................................................13
Accessing the Web Interface...........................................................................14

TracVision RV1 User’s Guide
11
Getting Started
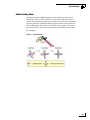
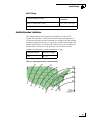
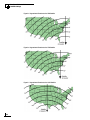
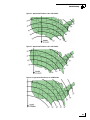
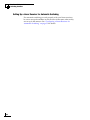
Receiving Satellite TV Signals
Television satellites are located in fixed positions above the Earth’s
equator and beam TV signals down to the earth within certain regions
that they serve. Therefore, to receive TV signals from a given satellite,
you must be located within that satellite’s unique coverage area, also
known as its “footprint.” To view the latest TracVision satellite
coverage maps, visit KVH’s website at www.kvh.com/footprint.
Figure 2-1 Example of a Satellite Footprint
The size of the antenna makes a big difference in determining which
satellites it can track and where. Larger antennas have the following
advantages over smaller models:
•Collects more signal: As you move further away from the
center of a satellite footprint, the power level, referred to as
EIRP (effective isotropic radiated power), gradually fades,
just like a radio station. Larger antennas can pull in more of
the weak signal, so they can track a satellite at a lower EIRP
than smaller antennas.
•Narrower beamwidth: Some satellites are very close
together in the sky, separated by only a few degrees in
longitude. Larger antennas receive signals within a
narrower beam, reducing the chance of interference caused
by transmissions from adjacent satellites.

TracVision RV1 User’s Guide
12
Getting Started
Avoiding Blockage
Since satellites are located 22,300 miles (35,900 km) above the equator,
the TracVision antenna must have a clear view of the sky to receive
satellite TV signals. Anything that stands between the antenna and the
satellite can block the signal, resulting in lost reception. Common
causes of blockage include the following:
• Trees, buildings, and bridges
• Other rooftop equipment, such a air-conditioning units
Severe weather conditions or excessive dirt on the antenna can also
affect reception.
Figure 2-2 Example of Satellite Blockage

TracVision RV1 User’s Guide
13
Getting Started
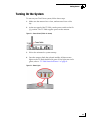
Turning On the System
To turn on your TracVision system, follow these steps:
1. Make sure the antenna has a clear, unobstructed view of the
sky.
2. At the rear panel of the TV-Hub, set the power switch to the On
(|) position. The TV-Hub supplies power to the antenna.
Figure 2-3 Power Switch (TV-Hub A+ shown)
3. Wait a few minutes for system startup.
4. Once the antenna finds the selected satellite, all three status
lights on the TV-Hub should be lit green. If any lights are not lit
green, refer to “TV-Hub Status Indicators” on page 81.
Figure 2-4 Status Lights

TracVision RV1 User’s Guide
14
Getting Started
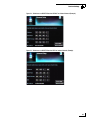
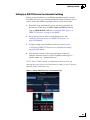
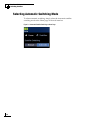
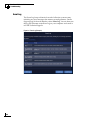
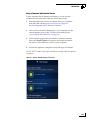
Accessing the Web Interface
The TV-Hub’s web interface allows you to check system status, switch
satellites and master receiver, update software and the satellite library,
and configure all aspects of the system. To access the web interface
using any Wi-Fi-enabled mobile device (such as a smartphone, tablet,
or laptop), follow these steps:
1. Select the TVHub-<TV-Hub serial number> network from
your device’s Wi-Fi settings to connect to the TV-Hub.
2. Start your web browser and enter http://tvhub.kvh. As long as
the TV-Hub is turned on and functioning properly, the Home
page will appear in your browser. (If the web interface does not
appear, try entering http://172.16.0.1, which is the default IP
address of the TV-Hub.) For details on the information
provided on the home page, see “Status Information on the
Home Page” on page 79.
Figure 2-5 Wireless Connection to TV-Hub Web Interface
NOTE: If the TV-Hub is connected to an onboard network, you may also
access the web interface over the network by entering the TV-Hub’s IP
address in your browser. (You can find the IP address on the Settings page of
the web interface. See “TV-Hub Ethernet Settings” on page 19).

TracVision RV1 User’s Guide
15
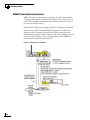
Network Settings
3. Network Settings
This section explains the various ways you can connect to the TV-Hub to
access the web interface. It also explains how to connect the TV-Hub to
an onboard network.
Contents
Connecting the TV-Hub to Your Onboard Network ..........................................17
TV-Hub Ethernet Settings ................................................................................19
Connecting to the TV-Hub Using its Built-in Wi-Fi...........................................20
TV-Hub Wireless Settings ................................................................................21
Connecting Directly to the TV-Hub Ethernet Port ............................................22
Resetting Network Settings to Factory Defaults..............................................23

TracVision RV1 User’s Guide
17
Network Settings
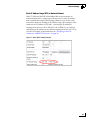
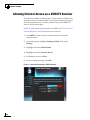
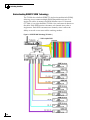
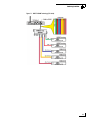
Connecting the TV-Hub to Your Onboard Network
You can connect the TV-Hub to an onboard local area network (LAN).
A network connection is necessary if either of the following conditions
apply:
• You have one or more IP AutoSwitches installed to enable
automatic satellite switching (Linear/DISH Network/Bell TV
only).
• You want to have the ability to access the TV-Hub’s web
interface using any device connected to your onboard
network.
By default, the TV-Hub’s Ethernet port is configured as a DHCP client,
which means your network’s router will automatically assign it an IP
address. Simply connect the TV-Hub’s Ethernet port to your onboard
network then turn on the TV-Hub.
NOTE: Use a straight-through 100 Mbps fast Ethernet UTP CAT5 cable (or
better) with RJ45 connectors.
Figure 3-1 TV-Hub Wired Network Connection (TV-Hub A+ shown)
Once the TV-Hub is connected to your onboard network, you can
access its web interface by entering the TV-Hub’s dynamically
assigned IP address in the web browser of any device connected to the
network. You can find the TV-Hub’s IP address on the web interface
(select Settings > Network Settings).
Page is loading ...
Page is loading ...
Page is loading ...
Page is loading ...
Page is loading ...
Page is loading ...
Page is loading ...
Page is loading ...
Page is loading ...
Page is loading ...
Page is loading ...
Page is loading ...
Page is loading ...
Page is loading ...
Page is loading ...
Page is loading ...
Page is loading ...
Page is loading ...
Page is loading ...
Page is loading ...
Page is loading ...
Page is loading ...
Page is loading ...
Page is loading ...
Page is loading ...
Page is loading ...
Page is loading ...
Page is loading ...
Page is loading ...
Page is loading ...
Page is loading ...
Page is loading ...
Page is loading ...
Page is loading ...
Page is loading ...
Page is loading ...
Page is loading ...
Page is loading ...
Page is loading ...
Page is loading ...
Page is loading ...
Page is loading ...
Page is loading ...
Page is loading ...
Page is loading ...
Page is loading ...
Page is loading ...
Page is loading ...
Page is loading ...
Page is loading ...
Page is loading ...
Page is loading ...
Page is loading ...
Page is loading ...
Page is loading ...
Page is loading ...
Page is loading ...
Page is loading ...
Page is loading ...
Page is loading ...
Page is loading ...
Page is loading ...
Page is loading ...
Page is loading ...
Page is loading ...
Page is loading ...
Page is loading ...
Page is loading ...
Page is loading ...
Page is loading ...
Page is loading ...
Page is loading ...
Page is loading ...
Page is loading ...
Page is loading ...
Page is loading ...
Page is loading ...
Page is loading ...
Page is loading ...
Page is loading ...
Page is loading ...
Page is loading ...
-
 1
1
-
 2
2
-
 3
3
-
 4
4
-
 5
5
-
 6
6
-
 7
7
-
 8
8
-
 9
9
-
 10
10
-
 11
11
-
 12
12
-
 13
13
-
 14
14
-
 15
15
-
 16
16
-
 17
17
-
 18
18
-
 19
19
-
 20
20
-
 21
21
-
 22
22
-
 23
23
-
 24
24
-
 25
25
-
 26
26
-
 27
27
-
 28
28
-
 29
29
-
 30
30
-
 31
31
-
 32
32
-
 33
33
-
 34
34
-
 35
35
-
 36
36
-
 37
37
-
 38
38
-
 39
39
-
 40
40
-
 41
41
-
 42
42
-
 43
43
-
 44
44
-
 45
45
-
 46
46
-
 47
47
-
 48
48
-
 49
49
-
 50
50
-
 51
51
-
 52
52
-
 53
53
-
 54
54
-
 55
55
-
 56
56
-
 57
57
-
 58
58
-
 59
59
-
 60
60
-
 61
61
-
 62
62
-
 63
63
-
 64
64
-
 65
65
-
 66
66
-
 67
67
-
 68
68
-
 69
69
-
 70
70
-
 71
71
-
 72
72
-
 73
73
-
 74
74
-
 75
75
-
 76
76
-
 77
77
-
 78
78
-
 79
79
-
 80
80
-
 81
81
-
 82
82
-
 83
83
-
 84
84
-
 85
85
-
 86
86
-
 87
87
-
 88
88
-
 89
89
-
 90
90
-
 91
91
-
 92
92
-
 93
93
-
 94
94
-
 95
95
-
 96
96
-
 97
97
-
 98
98
-
 99
99
-
 100
100
-
 101
101
-
 102
102


Ask a question and I''ll find the answer in the document
Finding information in a document is now easier with AI
Related papers
-
 TracVision TV1 User guide
-
 TracVision TV3 User guide
-
 TracVision TracVision RV1 Installation guide
-
 TracVision TV8 User guide
-
 TracVision TV6 User guide
-
 TracVision RV1 Quick start guide
-
 TracVision A9 Quick start guide
-
 TracVision UHD7 in V7-HTS Dome Installation guide
-
 TracVision TV10 Installation guide
-
 TracVision TV6 Installation guide


Other documents
-
KVH Industries TracVision TV6 User manual
-
 WallyHome WALLY Quick start guide
-
KVH Industries TracVision UHD7 Installation guide
-
-
-
-
-
-
-
 KVH mini-VSAT Broadband User guide

