Page is loading ...

QUICK-START INSTALLATION GUIDE
TELOS INFINITY LINK
Gateway IP Codec
INTRODUCTION
Telos Infinity Link enables Infinity systems in remote locations to connect to one another using an
embedded, versatile, speech-optimized OPUS codec over the public Internet or private infrastructure.
This Telos Infinity Link Gateway is a dedicated, rack-mounted, hardware platform with dual redundant
internal power supplies and dual Gigabit Ethernet ports. It can be configured with either eight or sixteen
bi-directional mono codecs, making it an ideal choice for higher density applications.
Infinity Link is also available as licensed software in Infinity Intercom Master Panels, Infinity Expansion
Panels, and Infinity Desktop Panels (4 or 8 codecs) and Infinity Beltpacks (2 codecs).

HARDWARE
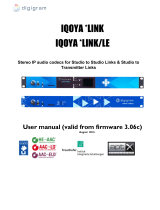
Infinity Link Gateway Front Panel
Figure 1: Front panel
PSU 1 LED (A) and PSU 2 LED (B)
The status of each power supply is shown on its respective LED. Green indicates proper operation. Red
indicates a fault. No LED indicates power is not being delivered to the supply from the mains source.
Status LED (C)
The Status LED is used to show a general fault in the hardware. Green indicates normal operation. Red
indicates a fault.
Sync LED (D)
When the Link Gateway locks to its reference clock, this LED will be solid green. A blinking green LED
indicates the unit is drifting from its reference to some degree, with more rapid blinking indicating more
jitter. If the unit cannot locate or sync to a reference signal, this LED will remain dark.
Front Panel LCD (E)
The color front panel LCD is used during initial setup and to display basic system information.
Navigation Cluster (F)
The navigation cluster consists of five keys: Left, Right, Up, Down, and OK. These keys are used during
initial setup and to change between system screens.
QUICK-START INSTALLATION GUIDE

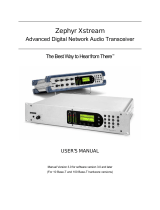
Infinity Link Gateway Rear Panel
Figure 2: Rear panel
Network Connections (G, H)
The Primary Ethernet port is used to receive AoIP audio from your LAN side network. The Secondary port
should be connected to the network on which you intend to stream. This network should have internet
access and must be connected to a Gigabit (1000Base-T) port on your router.
Power Supply Inlets (I, J)
Two redundant internal auto-ranging power supplies are provided with IEC-320 female connections.
External access to fuses is provided for each supply.
QUICK-START INSTALLATION GUIDE

INITIAL SETUP
Power
Plug the supplied IEC power cords into the Infinity Link Gateway and connect each to different mains
power sources. Remember that while redundant supplies do protect against the unit losing power
in the event of a PSU failure, the loss of mains supply voltage is a bigger concern. Accordingly, each
supply should be fed from a different circuit equipped with adequate surge protection and fitted with an
uninterruptable power supply (UPS).
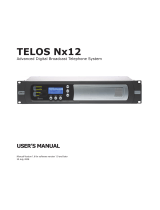
Boot Up and Splash Screen
The front panel of the unit will remain dark during the boot process, after which an Infinity Link splash
screen will appear.
Figure 3: Front panel Splash screen
QUICK-START INSTALLATION GUIDE

Setting IP Addresses
The Primary Ethernet port is used to receive Livewire+ AES67 audio from your LAN side network. The
Secondary port should be connected to the network on which you intend to stream which include (but are
not limited to) slower Internet, WAN or VPN connections that lack the bandwidth needed to support LW+
AES67. The Secondary port must be connected to a Gigabit (1000Base-T) port on the router.
The web-based user interface can be accessed over either port.
By default, Infinity Link Gateway is set up with DHCP enabled so that it will receive an IP address
automatically when connected to a network with a DHCP server. DHCP can be disabled and a static
address entered if preferred.
Each port contains a field for entering a gateway address, however, both ports will use the most
recently entered gateway address. Since the gateway of the Secondary port will be most critical in most
applications, it should be entered second.
Pushing the Right arrow on the front panel from the Splash screen will display the Network Interface
status screen for both Primary and Secondary networks.
Figure 4: Front panel Network Status screen
QUICK-START INSTALLATION GUIDE

Pressing the Right arrow key a second time will display the Setup menu for the Primary port, which
shows current information and allows front panel network setup. This includes setting DHCP (enabled or
disabled), the IP address, the netmask, and the gateway. Pressing the Right arrow again will display the
same menu for the Secondary network connection if connected.
Figure 5: Front panel Network Setup screen
In most cases, a static (fixed) IP address will be desirable, especially on the streaming (Secondary) port. To
set a static address in the Primary Network connection:
1. Press the OK button to highlight the DHCP status
2. Press the Up and Down arrows to toggle DHCP on and off
3. With DHCP disabled, press the Right arrow to move the cursor to the first character of the
IP address
4. The Up and Down arrows change the value of the selected character
5. The Left and Right arrows move the cursor back and forth between characters
6. Once the IP address is set, press the Right arrow to move the cursor to the netmask field
7. The Up and Down arrows scroll through the available netmask values
8. Once the netmask is set, press the Right arrow to move the cursor to the gateway field; the
process for setting the gateway address is the same as setting the IP address
9. Once the gateway is set, press the Right arrow to highlight “OK”, then press the OK button to save
your changes
10. If you need to back out of this menu without saving any changes, highlight “Cancel” instead and
press the OK button
To set a fixed address for the Secondary connection, press the Right arrow twice from the Splash screen
and follow the above steps.
QUICK-START INSTALLATION GUIDE

CONNECTING TO THE WEB-BASED
USER INTERFACE
Infinity Link Gateway is configured, controlled, and monitored through a web-based user interface.
Enter the IP address of either port into the web browser of your choice; once connected, enter the
default user name of “user” (minus the quotes). There is no default password, so leave this field blank.
Home Screen
The Home screen is displayed showing the unit’s serial number and software version along with basic
networking and PTP clock information and other statistics.
It also displays the Device ID, which by default is a unique value based on the unit’s MAC address. We
recommend you leave this value unchanged and use the Label field to create an easily-recognized name
for the Link Gateway.
If you do elect to change the ID, it must maintain a unique value among all devices in the system as
this is the field Infinity Dashboard software uses to identify the hardware in its database.
Important!
It is highly recommended that if you intend to change the Device ID, you do so
before adding it to your system configuration in Dashboard. If the Gateway has
already been added using its original Device ID and the value is then changed,
duplicate instances of input and outputs will be created in the database which can
result in corrupted paths.
Figure 6: Home screen
QUICK-START INSTALLATION GUIDE

Setup Screen
Detailed configuration of both the Primary and Secondary network connections, configuration of the
PTP clock, and front panel display behavior are managed from the Setup screen.
Figure 7: Setup screen
Click on the “Primary” or “Secondary” buttons to select which connection is visible and configurable.
After making any changes to the IP settings, click “Apply” to apply and save any changes. Refreshing the
browser page to rescan the network may be necessary after doing so.
When the Slave Only mode is “On,” Infinity Link Gateway listens for an external PTP clock and can act as
a slave. This is the recommended mode. If an external PTP clock is not available, Infinity Link Gateway
can be set as an arbitrary (non-GPS) Grand Master clock.
Adjust the front panel brightness, dim level, and display timeout to your liking.
QUICK-START INSTALLATION GUIDE

Link Screen
Each of the available OPUS codecs - a total of eight or sixteen depending upon licensing - is configured
in this menu.
Figure 8: Link screen
QUICK-START INSTALLATION GUIDE

Maintenance Screen
The Maintenance menu is used to upload new system firmware, choose between installed firmware
versions, and upgrade the unit from 8 channels to 16 channels. It also provides a means by which to
perform a soft reboot of the unit, execute a self-test, perform a factory reset (with or without retaining
the unit’s IP address), or download a log file if instructed to do so by customer support.
The current user license is displayed on this screen along with a field into which additional licenses may
be entered when adding features or codecs.
Important!
The current license can also be completely disabled from this screen, but doing
so will also remove the license number. If you do not have access to the license
number by any means other than the remote interface itself, disabling the license
can result in an unusable unit.
Figure 9: Maintenance screen
QUICK-START INSTALLATION GUIDE

SETTING UP A LINK
To configure a link, set the operating state of a codec to Enable in the Link menu.
Next, connect local audio from the Infinity System to Link. The Input Channel/Address field will be set
by the Dashboard software in the next step. However, a “friendly” name should be entered into the
Input Label field and will appear in Dashboard.
Figure 10: Input label
Once the Input Label is set, open Dashboard Basic or Advanced. Navigate to the Output pane and type
the Input label into the search box. Drag and drop the output into the Virtual Port or Group you wish to
send via Link. It will automatically be assigned a Livewire+ AES67 channel number. Link will also accept
multicast addresses in this field.
Note:
For an overview of the relationship between Livewire+ AES67 channel numbers
and multicast addresses, please see the following section, “Livewire+ Channel
Numbers and Multicast Addresses”.
QUICK-START INSTALLATION GUIDE

Figure 11: Dashboard output
Type an available Livewire Channel or Multicast Address into the Output Channel/Address field. Add a
label to describe the audio source you are receiving in the Output Label field. Below is an example of a
fully filled in Audio Configuration section.
Figure 12: Remote end configured
QUICK-START INSTALLATION GUIDE

Now that audio can be sent between Link and other Telos Infinity devices, it is time to configure Link to
send and receive audio across the WAN connection or internet.
Enter the static IP address and port number of the Telos Infinity Link at the other end of your internet
connection in the Peer Device Information field using the format “IP Address:Port Number”. Be sure
to us a public IP address as FQDN is not supported. The moment you exit the Peer Device Information
field, the input will start streaming to peer the Infinity Link.
Select an appropriate bitrate and type from the Codec Profile dropdown menu. Each codec represents
a single audio channel, so choosing 2-channel (stereo) from the Channel menu automatically uses the
next available codec for the second channel.
Finally, set the Receive Port to the IP address of the interface connected to the Internet and the port
number forwarded through your firewall. In general, we recommend a non-standard port starting at
21000.
Note:
For additional information on router configuration and port forwarding, please see
the following section, “Router Configuration and Port Forwarding”.
Figure 13: Peer Device, Receive Port, and Codec setup
QUICK-START INSTALLATION GUIDE

LIVEWIRE+ CHANNEL NUMBERS AND
MULTICAST ADDRESSES
As part of the Telos Infinity family of products, Infinity Link Gateway supports Livewire+ AES67 and
receives its output channel information from the Dashboard software as a Livewire+ channel.
Each Livewire+ channel number has a corresponding multicast IP address. Since Livewire+ channels are
assigned by Dashboard, their multicast addresses will inherently fall within the available range which is
between 1 and 32767. The range of channels available to Infinity can be managed when setting up the
Dashboard software (please see the Dashboard user manual for detailed information).
Livewire+ devices on the network will automatically resolve to a Livewire+ channel number while non-
Livewire+ AES67 devices will display the multicast address.
Avoiding duplicate addresses and the resulting conflicts is critical, and so knowing how to convert a
Livewire+ channel number to a multicast address is handy when determining whether or not non-
Livewire+ devices exist on the network with a multicast address that falls within the range assignable
by Dashboard.
The first two octets of a standard Livewire+ source will be 239.192. To derive the third octet, divide the
Livewire+ channel number by 256, rounding the product to the nearest whole number. To determine the
fourth octet, multiply the value of the third octet by 256 and subtract the product from the Livewire+
channel number.
Using Channel 401 as an example:
• Solve for X
• 239.192.X.Y
• 401 / 256 = 1.56
• X = 1
• Solve for Y
• 401 – (1 * 256) = 145
• Y = 145
The multicast address of Channel 401 is then 239.192.1.145.
QUICK-START INSTALLATION GUIDE

ROUTER CONFIGURATION AND
PORT FORWARDING
While it is impossible to describe in specific detail the steps required to set up every available router
to work with Link, the function of the router remains the same and so the same recommendations for
basic connectivity, security, and port forwarding apply and certain requirements must be met.
The Infinity Link Gateway can connect to another Link-enabled Telos Infinity device using the public
Internet. In this application, we highly recommend keeping the Secondary port behind a router as you
would any computer with Internet access. Remember that the Secondary port must be connected to a
Gigabit (1000Base-T) port on the router.
The Secondary port will have a local IP address (ideally a static address). This is the IP address entered
into the Receive Port field in the Link menu. The public IP address entered into the Peer Device field in
the Link menu must have a UDP port specified which will need to be forwarded through your router
so that audio can be received by link. As mentioned earlier, any port number can be used, but we
recommend a non-standard port starting at 21000.
Some Notes on Port Forwarding
The concept of port forwarding (also known as port mapping) is often misunderstood but critical to
making Link work, and so a brief explanation is in order.
Because the IP address in the Peer Device field can be a public Internet address, having a means of
allowing certain traffic to penetrate a firewall while preventing other traffic from getting through is
required.
Let’s use the analogy of mail delivery as an example. A public IP address is akin to the street address
of an apartment complex. The port number is like the individual apartment number. The router acts
like a mailroom, sorting everything out to ensure your mail gets to you and you alone, and not to your
neighbor’s apartment.
All routers are slightly different, but in general, logging into your router’s web interface and locating the
“Port Forwarding” configuration page is the first step. It can be located in a number of different places,
but it’s usually under a “Security” tab. Some routers will locate it in the “Gaming” tab, or in the case of
the example below, in a section called “Virtual Servers.” In any case, the page should look something like
this:
QUICK-START INSTALLATION GUIDE

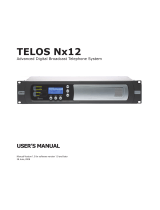
Figure 14: An example of a router’s port forwarding page
In this example, we have forwarded port 24001 (UDP) to the local IP address of the Secondary port on
our Link Gateway, which is 10.0.0.102. Now when the Link Gateway unit on the far end configures its
Peer Device Information as “PublicIPAddress:24001”, the router will send any traffic on port 24001 to
10.0.0.102.
QUICK-START INSTALLATION GUIDE

EXAMPLES OF LINK GATEWAY WITHIN
AN INFINITY SYSTEM
Below is an example of how to Infinity Link Gateways might connect a studio together with a remote
location:
Figure 15: Example with Infinity Link Gateways at both locations
QUICK-START INSTALLATION GUIDE

Figure 16: Example with Infinity Link Gateway with Link Gateway studio location only
QUICK-START INSTALLATION GUIDE

This Page Intentionally Blank
QUICK-START INSTALLATION GUIDE

1241 Superior Ave. • Cleveland, Ohio, 44114, USA • +1.216.241.7225 • TelosAlliance.com
© 2020 TLS Corp. The Telos Alliance®. All Rights Reserved. C20/17057 1490-00220-001 --- QUICK START GUIDE: INFINITY LINK
Subscribe to DirectCurrent
Weekly updates on all things broadcast via email
TelosAlliance.com/directcurrent
Social Media
Facebook: /TelosAlliance
Twitter: @TelosAlliance
LinkedIn: /TelosAlliance
YouTube: TelosAllianceTV
Product Catalog
TelosAlliance.com/now
24/7 Tech Support
Radio: +1 (216) 622-0247
TV: +1 (717) 735-3611
Radio: [email protected]
TV: [email protected]om
QUICK LINKS
QUICK-START INSTALLATION GUIDE
/