Page is loading ...

Operator's Handbook
®
Monarch 9906
Printer
©2010 Avery Dennison Corp. All rights reserved.
TC9906OH Rev. AC 9/11
28028 28028
0 0


Each product and program carries a respective written warranty, the only warranty on which the
customer can rely. Avery Dennison Corp. reserves the right to make changes in the product, the
programs, and their availability at any time and without notice. Although Avery Dennison Corp.
has made every effort to provide complete and accurate information in this manual, Avery
Dennison Corp. shall not be liable for any omissions or inaccuracies. Any update will be
incorporated in a later edition of this manual.
2010 Avery Dennison Corp. All rights reserved. No part of this publication may be reproduced,
transmitted, stored in a retrieval system, or translated into any language in any form by any
means, without the prior written permission of Avery Dennison Corp.
WARNING
This equipment has been tested and found to comply with the limits for a Class A digital
device, pursuant to Part 15 of the FCC Rules. These limits are designed to provide reasonable
protection against harmful interference when the equipment is operated in a commercial
environment. This equipment generates, uses, and can radiate radio frequency energy and, if
not installed and used in accordance with the instruction manual, may cause harmful
interference to radio communications. Operation of this equipment in a residential area is likely
to cause harmful interference in which case the user will be required to correct the interference
at their own expense.
CANADIAN D.O.C. WARNING
This digital apparatus does not exceed the Class A limits for radio noise emissions from digital
apparatus set out in the Radio Interference Regulations of the Canadian Department of
Communications.
Le présent appareil numérique n’émet pas de bruits radioélectriques dépassant les limites
applicables aux appareils numériques de la classe A prescrites dans le Réglement sur le
brouillage radioélectrique édicte par le ministère des Communications du Canada.
Trademarks
Monarch and MPCL are trademarks of Avery Dennison Retail Information Services LLC.
Avery Dennison® is a trademark of Avery Dennison Corp.
TrueType is a registered trademark of Apple Computer, Inc.
Other products are trademarks or registered trademarks of their respective countries and are hereby acknowledged.
Aver
y Dennison
170 Monarch Lane
Miamisburg, OH 45342


TOC-i
TABLE OF CONTENTS
GETTING STARTED...........................................................................................................1-1
Audience .....................................................................................................................1-2
Using this Manual.........................................................................................................1-2
Ordering Programmer's Manuals.....................................................................................1-2
About Monarch® MPCL™ Toolbox Utilities ......................................................................1-2
Connecting the Power Cable..........................................................................................1-3
Establishing Communications.........................................................................................1-3
Connecting the Communication Cable..........................................................................1-3
Using the Control Panel.................................................................................................1-4
Power Save Mode......................................................................................................1-4
Selecting a Function .....................................................................................................1-4
Exiting a Function.........................................................................................................1-4
LOADING SUPPLIES..........................................................................................................2-1
Loading Labels or Tags.................................................................................................2-2
Loading Labels for Optional Peel Mode........................................................................2-6
Using Optional Internal Liner Take-Up ............................................................................2-8
Removing a Full Liner Take-Up Roll ............................................................................2-9
Using the Optional Tear Bar......................................................................................... 2-10
Adjusting the Printhead Pressure Dials......................................................................... 2-11
LOADING RIBBON.............................................................................................................3-1
Loading Ribbon ............................................................................................................3-2
SETTING SUPPLY OPTIONS...............................................................................................4-1
Setting the Supply Type ................................................................................................4-2
Setting the Ribbon........................................................................................................4-3
Using a High Energy Ribbon ..........................................................................................4-4
High Energy Ribbon Limitations ..................................................................................4-4
Setting the Speed.........................................................................................................4-5
Setting the Feed Mode ..................................................................................................4-6
Setting the Backfeed.....................................................................................................4-7
Changing the Position Settings ......................................................................................4-8
Setting the Print Position............................................................................................4-8
Setting the Supply Position.........................................................................................4-9
Setting the Margin Position....................................................................................... 4-10
Setting the Dispense Position................................................................................... 4-11
Setting the Backfeed Distance.................................................................................. 4-12

ii Operator’s Handbook
Using Batch Separators............................................................................................... 4-13
Using Skip Index......................................................................................................... 4-14
Using Rotate Image .................................................................................................... 4-15
Setting the Print Contrast............................................................................................ 4-16
SETTING COMMUNICATIONS.............................................................................................5-1
Setting the Baud Rate...................................................................................................5-2
Setting the Word Length................................................................................................5-3
Setting the Stop Bits.....................................................................................................5-4
Setting the Parity..........................................................................................................5-5
Setting the Flow Control................................................................................................5-6
Resetting to Default Values ...........................................................................................5-7
SETTING DEFAULTS .........................................................................................................6-1
Setting the Monetary Sign..............................................................................................6-2
Setting the Secondary Sign............................................................................................6-3
Setting the Number of Decimal Places ............................................................................6-4
Setting the Slashed Zero Appearance.............................................................................6-5
Setting the Power-Up Mode ...........................................................................................6-6
Changing the Prompt Set...............................................................................................6-7
Setting the Numeric Format ...........................................................................................6-8
Examples..................................................................................................................6-8
Using Flash Storage......................................................................................................6-9
Using Flash Memory.................................................................................................... 6-10
Formatting Flash Memory......................................................................................... 6-10
Checking Available Flash Memory............................................................................. 6-11
Packing Flash Memory............................................................................................. 6-12
Setting the Image Error Mode ...................................................................................... 6-13
Setting the Configuration Packet Mode ......................................................................... 6-14
Setting the Error Retry Mode........................................................................................ 6-15
Memory Guidelines ..................................................................................................... 6-16
USING SCRIPTS................................................................................................................7-1
Initial Script Startup Procedures.....................................................................................7-1
Viewing Script Information.............................................................................................7-2
Downloading a Script ....................................................................................................7-3
Enabling a Script..........................................................................................................7-4
Deleting a Script...........................................................................................................7-5
Enabling Status Polling .................................................................................................7-5
Enabling Status Polling .................................................................................................7-6
Using Immediate Commands..........................................................................................7-7

TOC-iii
SETTING RFID OPTIONS....................................................................................................8-1
Using RFID Supplies.....................................................................................................8-2
Using the RFID Setup Menu...........................................................................................8-2
Read Tag..................................................................................................................8-2
RF Power (Read/Write Value).....................................................................................8-3
Clear Data................................................................................................................8-4
Printing a Configuration Label........................................................................................8-4
Setting the Error Action.................................................................................................8-5
PRINTING .........................................................................................................................9-1
Printing........................................................................................................................9-1
Printing a Test Label.....................................................................................................9-2
On-Demand Mode Printing.............................................................................................9-2
Pausing a Batch ...........................................................................................................9-3
Restarting a Batch........................................................................................................9-3
Canceling a Paused Batch.............................................................................................9-3
Canceling a All Batches.................................................................................................9-4
Repeating a Batch ........................................................................................................9-4
Printing TrueType® Fonts..............................................................................................9-5
Licensing Your Fonts ....................................................................................................9-5
CARE & MAINTENANCE................................................................................................... 10-1
Clearing Label Jams ................................................................................................... 10-1
Cleaning.................................................................................................................... 10-2
Replacing the Printhead .............................................................................................. 10-4
DIAGNOSTICS & TROUBLESHOOTING ............................................................................. 11-1
Factory Set Password ................................................................................................. 11-1
Checking the Software Version..................................................................................... 11-2
Checking Supply Quality.............................................................................................. 11-3
Using Password Protection.......................................................................................... 11-4
Enabling the Password (System Administrators only) .................................................. 11-4
Service Diagnostics .................................................................................................... 11-4
Troubleshooting.......................................................................................................... 11-5
Error Messages .......................................................................................................... 11-6
Common Errors .......................................................................................................... 11-6
SPECIFCATIONS...............................................................................................................A-1
Printer.........................................................................................................................A-1
Supplies ......................................................................................................................A-2
Ribbon Specification.....................................................................................................A-2
About Ribbons...........................................................................................................A-2

iv Operator’s Handbook
Cable Pinouts...............................................................................................................A-3
ACCESSORIES & OPTIONS................................................................................................B-2
Accessories .................................................................................................................B-2
Packaging Materials......................................................................................................B-2
Shipping the Printer......................................................................................................B-2
Factory-Installed Options...............................................................................................B-2
GLOSSARY...................................................................................................................... G-1
INDEX................................................................................................................................I-1

1
GETTING STARTED
The Monarch® 9906 printer prints text, graphics, and bar codes on thermal transfer
(ribbon) and thermal direct labels or tags. The printer prints labels continuously (in one
strip) or on-demand (one label at a time).
You can print on inside edge aperture, die cut, black mark, or continuous (non-indexed)
supplies. Continuous supply must be used in continuous mode. See "Supply Type
" in
Chapter 4 for more information about the supply types.
This chapter includes information about:
connecting the power cord.
connecting the communication cable.
using the printer's control panel.
Several chapters of this manual have one or more charts showing the printer's menu
structure. For example:
Main Menu
Cancel
All
Online
Batch
Entry
Repeat
Batch
Format
Options
Setup
Scripts
Diagnostics
Supply
Contrast
Defaults
Port
Settings
Flash
Memory
RT
Clock
Interpreter
The solid black box shows where you are; the bordered box and path show how you got
there.
The printer is packaged with a power cord and a ribbon take-up core (may already be on
take-up reel). Keep the box and packaging material in case the printer ever needs repair.
Getting Started 1-1

1-2 Operator's Handbook
Audience
The Operator's Handbook is for the person who prints and applies labels.
Using this Manual
Manual content summary:
Chapter Contents
1 Getting Started
Contains information about connecting the power cable and using the
control panel.
2 Loading Supplies Describes how to load a roll of supply, fan-fold supply, and tag supply.
3 Loading Ribbon Describes how to load a roll of ribbon.
4
Setting Supply
Options
Using the Supply menu to set the various supply options (supply,
ribbon, feed mode, etc.).
5
Setting
Communication
Values
Using the Port Settings menu to set the serial and parallel
communication values (baud rate, parity, etc.).
6 Setting Defaults
Using the Defaults menu to set the monetary sign, number of decimal
places, prompt set, etc.
7 Using Scripts
Using the Scripts menu to load a script, enable a script, delete a script,
etc.
8 Printing Explains how to print labels and use the Pause menu.
9 Care & Maintenance
Describes how to clear a label jam, clean the printer, and replace the
printhead.
10
Diagnostics &
Troubleshooting
Describes how to print a test label and lists common problems and
their solutions.
A Specifications Contains printer and supply specifications.
B
Accessories &
Options
Contains printer accessories and optional equipment.
Ordering Programmer's Manuals
The 9906 Packet Reference Manual can be downloaded from our Web site. It describes
how to create format and batch packets for printing labels, how to configure the printer
online, how to diagnose printer error messages, and how to perform other advanced
techniques.
About Monarch® MPCL™ Toolbox Utilities
The Monarch® MPCL™ Toolbox utilities are available on our Web site and are free to
download. This group of development utilities helps you configure the printer, customize
fonts, and download files. Monarch MPCL Toolbox utilities are not label production
software. Call Customer Service for information about label production software.

Getting Started 1-3
Connecting the Power Cable
The power supply automatically switches between 115V or 230V. Operator settings are
not required.
1. Plug the power cable into the connection located at the back of the printer. Plug the
other end of the cable into a grounded electrical outlet.
Note: Only use a certified power cable with proper voltage for the country of
installation.
2. Turn on the printer. Press ( I ) to turn on and ( O ) to turn off the printer.
Establishing Communications
Before the printer can accept print jobs from the host, you must:
connect the communication cable to the printer (make sure printer is turned off) and to
the host.
set the communication values on the
printer to match those at the host (only
required if you are using the serial port).
Ask
your System Administrator which method
to use for communication with the host:
Serial Port
Optional
P
arallel Port/
Ethernet Card
Power Cable
Connection
Host USB
Type A Port
Se
rial Communication 9 to 9-pin cable
(Part #126716)
Host USB, Device USB
Device USB
Type B Port
Pa
rallel Communication (optional)
Et
hernet (optional)
Connecting the Communication Cable
Connect the communication cable into the appropriate port. Secure the cable with the
connecting screws (serial) or spring clips (parallel).
If you are communicating with the host through the serial port, make sure the printer's
communication values match those at the host. The printer’s default values are 9600
Baud, 8 bit data frame, 1 stop bit, no parity, and DTR flow control.

1-4 Operator's Handbook
Using the Control Panel
The control panel consists of a four-line LCD display and five buttons. The top three
buttons are function buttons. The function of each button varies depending on the task.
Each button’s function is shown on the display above the button. The two bottom buttons
are navigation buttons. Use these buttons to scroll through menus.
The LCD display:
indicates power when text or other information is shown.
indicates conditions requiring immediate attention
(low battery, faults, errors) using a red background.
Navigation
Buttons
Function
Buttons
MPCL
Online
FEED TLabel
MENU
shows menu prompts, printer settings,
function button assignments, values, etc.
For more information see Chapter 10,
"Diagnostics & Troubleshooting
."
Power Save Mode
When the printer is idle for longer than 55 minutes, it goes into power save mode, turning
off the display’s back light and all motors. The printer wakes from power save mode
when it receives a format or any button is pressed (printer performs the button’s action).
Selecting a Function
The Main Menu has several functions (operating modes). These functions are shown in
the chart below.
Main Menu
Cancel
All
Online
Batch
Entry
Repeat
Batch
Format
Options
Setup
Scripts
Diagnostics
Supply
Contrast
Defaults
Port
Settings
Flash
Memory
RT
Clock
Interpreter
To display menu options, press or .
Press SELECT when you see the menu option you need.
The Main Menu controls the printer's setup and operation. Through the Setup Menu, you
can select a sub-menu for the supply, contrast, default, port settings, flash memory, or
real-time (RT) clock. Each of the sub-menus has several options, such as ribbon, speed,
monetary symbols, and baud rate.
Exiting a Function
There are two ways to exit an option. Pressing BACK once exits to the previous menu
and saves any changes. Pressing CANCEL exits to the previous menu; however, changes
are not saved.

2
LOADING SUPPLIES
This chapter describes how to load:
a roll of supply
fan-fold supply
a roll of tag supply.
There are two types of supplies:
Thermal Direct specially treated thermal supplies that do not use a ribbon for
printing
Thermal Transfer standard supplies that require a ribbon for printing
If you are using thermal direct supplies, do not load a ribbon.
If you switch from black mark to die cut supplies, make sure the printer's supply type is
set correctly. See "Supply Type
" in Chapter 4 for more information. Your System
Administrator can also send the supply setup packet to change the supply type. Refer to
the optional 9906 Packet Reference Manual for more information about sending the
supply setup packet.
Loading Supplies 2-1

Loading Labels or Tags
1. Open the cover.
2. Unlock the printhead by turning the retaining latch.
3.
Lift the printhead assembly using the printhead tab until the assembly locks into place.
Note: User “touch parts” are yellow.
Printhead Tab
2-2 Operator's Handbook

4. Place rolled supply on the supply holder, located against the inside of the printer.
Rolled label supply unrolls from the top or the bottom; rolled tag supply unrolls from
the bottom only (tag rolls are wound face in).
Note: Do not pick the printer up by the supply holder.
Supply
Holder
Supply Holder Guide
Pla
ce a fan-fold supply stack behind the printer, label side facing up. Lay the label
strip over the supply holder.
5.
Adjust the supply holder guide so that it barely touches the supply, making sure the
supply moves freely.
Loading Supplies 2-3

6. Push down on the supply lever to unlock the supply guides.
7. Lay the label strip across the supply guide so that a few inches extend past the front
of the printer. Tuck the supply under the nibs and supply sensor. Do not feed supply
between the supply roller and deflector.
Nibs
Supply
Sensor
Supply Guide
Supply Lever
8.
Adjust the supply guide so it barely touches the supply. Push up on the supply lever
to lock the supply guide into place.
9. Hold the printhead assembly by the printhead tab while pushing the printhead release.
2-4 Operator's Handbook
Printhead
Assembly
Printhead
Release

10. Close the printhead by pressing down on the thumb well until you hear it click into
place.
11
. Close the printer’s cover.
12. Press FEED to position the supply under the printhead.
You may need to adjust the printhead pressure dials depending on the width of
your supply. See "Adjusting the Printhead Pressure Dials”
for more information.
Note: If the printer will be unused for extended periods of time, we recommend leaving
the printhead unlatched.
Loading Supplies 2-5

Loading Labels for Optional Peel Mode
Peel mode is optional and must be purchased separately. In peel mode, the printer
separates the liner from the label. The next label is not printed until the completed one is
removed from the printer. Make sure the printer is configured for on-demand mode and
the correct supply type.
The minimum feed length is 1.5 inches for peel mode. We recommend using 0.5-inch gap
supplies in peel mode when backfeed is disabled. Hold the leading edge of peeled labels
when printing on stock longer than six inches. You must use non-perforated supplies for
peel mode.
Follow the steps for loading supplies from the previous section, close the printhead, and
follow these steps.
1. Remove the labels from the first 10 inches of the liner.
2. Press down on the exit cover tabs to open the exit cover on the front of the printer.
Exit Cover
3.
Feed the liner over the peel roller, along the chute, and out through the lower opening
in the exit cover.
Peel Bar
Platen Roller
Lower Opening
Peel Roller
2-6 Operator's Handbook

4. Close the exit cover.
Saw-Toothed
Tear Edge
Liner
5.
Close the printer’s cover.
6. Press FEED to position the supply under the printhead.
Note: When removing the liner, pull up across the saw-toothed tear edge.
Loading Supplies 2-7

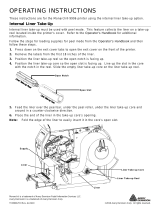
Using Optional Internal Liner Take-Up
Internal liner take-up must be used with peel mode. This feature collects the liner on a
take-up reel located inside the printer’s cover. See “Setting the Feed Mode” for
instructions to set the printer for Internal Liner Take-Up.
Follow the steps for loading supplies for peel mode and then follow these steps.
1. Press down on the exit cover tabs to open the exit cover on the front of the printer.
2. Remove the labels from the first 18 inches of the liner.
3. Position the liner take-up reel so the open notch is facing up.
4. Position the liner take-up core so the open slot is facing up. Line up the slot in the core
with the notch in the reel. Slide the empty liner take-up core on the liner take-up reel.
O
p
en Notch
O
p
en Slot
5. Feed the liner over the peel bar, under the peel roller, under the liner take-up core
and around in a counter-clockwise direction.
6. Place the end of the liner in the take-up core’s opening.
Note: Fold the edge of the liner to easily insert it in the core’s open slot.
Supply
Liner
Liner
Liner Take-up Reel
Liner Take-up Core
2-8 Operator's Handbook
/