Page is loading ...

INSTALLATION INSTRUCTIONS –FRONT & REAR JK ALUM. TUBE FENDER FLARES
PART NUMBERS- 1500201;2500201;1500202;2500202
PARTS LIST:
(1) DRIVER SIDE TUBE FENDER FLARE
(1) PASSENGER SIDE TUBE FENDER FLARE
(16) 6MM FLAT HEAD SCREWS
(14) 6MM THREADED METAL INSERTS
(16) 6MM FLAT WASHERS
(16) 6MM SPLIT WASHERS
(1) 6MM INSERT TOOL
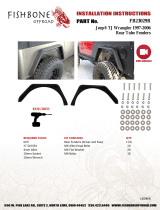
Notice: pls notice that the REAR JK FENDER FLARES have 16 pcs threaded metal inserts
PRE INSTALLATION AND NOTICES:
1. INSPECT PACKAGING FOR ALL ITEMS LISTED PRIOR TO INSTALLATION
2. INSTALL AND TEST FIT FENDER FLARES BEFORE APPLYING FINISH (PAINT/POWDER COAT)
3. CHECK WITH YOUR LOCAL REGULATION TO ENSURE THAT THE FENDER COMPLIES WITH TIRE
COVERAGE AND TURN SIGNAL COVERAGE. IT IS THE RESPONSIBILITY OF THE USER.
4. CAREFULLY READ THE PRODUCT WARRANTY AND DISCLAIMER.
INSTALL:
1. READ AND UNDERSTAND INSTRUCTIONS BEFORE INSTALL
2. HAVE VEHICLE ON LEVEL SURFACE AND SET EMERGENCY BRAKE
3. START WITH THE DRIVER SIDE, REMOVING THE INNER FENDER WELL BY USING 10MM SOCKET
TO REMOVE ALL HEX HEAD BOLTS. REMOVE ALL PUSH IN RETAINERS (FACTORY PLASTIC CLIPS).
CAREFULLY OBSERVE THE PLASTIC INNER FENDER FLARE, AND TRY NOT TO DAMAGE WHEN
REMOVE CLIPS. ONCE REMOVED SET THE INNER FENDER ASIDE, AS YOU’LL BE REINSTALLING
LATER.

4. DISCONNECT THE SIDE MARKER LIGHT FROM THE FENDER FLARE BY ROTATING ONE HALF TURN
AND PULLING.
5. REMOVE THE PLASTIC FENDER FLARE SUPPORT. NOTE, THERE ARE A FEW MORE HEX HEAD
BOLTS HOLDING IT IN PLACE.
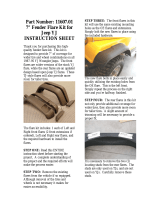
6. PRE INSTALL THE ARIES FENDER, BY CAREFULLY PLACING IT UP AGAINST THE JEEP BODY AND
ALIGNING THE MOUNTING HOLES. THE FRONT CAN BALANCE ON THE FACTORY METAL BRACE.
AVOID SCRATCHING THE PAINT DURING THIS PROCESS. SEE FIGURE 1 TO LOCATE BRACE.
7. AT THIS POINT YOU CAN IDENTIFY MATCHING HOLES FROM THE ARIES FENDER WITH THE OE
HOLES OF THAT HELD THE OE FLARE. MARK THE LOCATIONS WHERE THERE ARE NO HOLES TO
DRILL NEW ONES.
8. REMOVE THE FLARE AND DRILL HOLES TO FIT THE THREADED METAL INSERTS SUPPLIED WITH
YOUR ARIES FENDER.
9. INSTALL THE THREADED METAL INSERT WITH THE TOOL SUPPLIED. THIS ASSEMBLY WILL BE THE
6MM INSERT TOOL, (1) 6MM THREADED METAL INSERT, (1) 6MM FLAT WASHER, (1) 6MM HEX
BOLT: SEE FIGURE 2. INSERT THE ASSEMBLY INTO FACTORY HOLE, HOLD TOOL HANDLE AND
ASSEMBLY UP TIGHT AGAINST THE CROSS MEMBER AND TIGHTEN THE HEX HEAD UNTIL INSERT
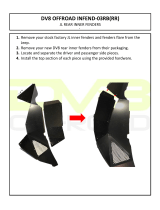
IS FULLY EXPANDED INTO HOLE: SEE FIGURES 3 & 4. ONCE METAL INSERT IS FULLY
COMPRESSED, REMOVE THE BOLT AND TOOL FROM THE METAL INSERT. REPEAT THIS STEP FOR
THE REMAINING HOLES.
10. ALIGN THE METAL INSERTS WITH THE HOLES ON THE ARIES FENDER AND ATTACH USING THE
6MM BOLT, SPLIT AND FLAT WASHERS. SEE FIGURES 5 & 6.
11. REPEAT STEPS FOR THE OTHER SIDE
NOTE- IF YOU INTEND TO USE RE-USE THE FACTORY INNER FENDER, PLEASE READ THE FOLLOWING
STEPS:
1. CAREFULLY TRIM THE STOCK INNER FENDER TO WORK WITH YOU NEW ARIES FENDER. THERE IS
NO TEMPLATE FOR TRIMMING SO BE CONSERVATIVE AND TRIM A LITTLE AT A TIME. REFIT TO
GET TO YOUR SATISFACTION.
2. YOU WILL FIND AREAS WHERE YOU CAN RE USE BOLTS TO HOLD THE PLASTIC IN PLACE. IN
OTHER AREAS YOU CAN RE USE THE FACTORY PLASTIC FASTENERS OR NON SUPPLIED ZIP TIES.
TURN SIGNALS- IF YOU VEHICLE IS STREET DRIVEN PLEASE REMEMBER TO CHECK INTO YOUR LOCAL
REGULATIONS BEFORE MAKING THE DECISIONS REGARDING YOUR TURN SIGNALS OR MARKER
LIGHTS. ARIES DOESN’T OFFER A SIDE MARKER/TURN SIGNAL LIGHT FOR THEIR TUBE FENDERS.

FIGURE 1 FIGURE 2
FIGURE 3 FIGURE 4
FIGURES 5 & 6
COMPLETED- 1500201 SHOWN

WARRANTY
Aries Automotive warranties their JK Fenders for 1 year from the date of sale. These products
will be free from defects in material and workmanship under normal installation and use. Due
to the intended use, the powder coat finish is warranted for 6 months. The finish warranty will
not cover a product if it has been damaged in anyway. Warranty is limited to repair or
replacement. Aries Automotive does not offer any type of labor or shipping allowance, and all
warranty claims are subject to inspection by Aries.
At the discretion of Aries Automotive, the products in question can be repaired or replaced
when found defective. Prior to any replacement or repair, an RGA must be obtained from Aries
Automotive. Failure to contact Aries Automotive prior to having warranty work performed will
immediately void all applicable warranties. The warranty expressed above is the sole warranty
of Aries Automotive, and any other expressed or implied warranties are hereby specifically
excluded and disclaimed.
/