ESX VN715-MB-A1-DAB Installation guide

Type
Installation guide

ESX VN715-MB-A1-DAB is the ultimate infotainment system for Mercedes-Benz vehicles, offering a range of features to enhance your driving experience. With built-in navigation, you'll never get lost again, and the DAB+ tuner ensures crystal-clear radio reception. The touchscreen display is intuitive and easy to use, allowing you to control all your music, videos, and apps with ease. Connect your smartphone via Bluetooth for hands-free calling and audio streaming, and enjoy your favorite tunes through the powerful built-in amplifier.

ESX VN715-MB-A1-DAB is the ultimate infotainment system for Mercedes-Benz vehicles, offering a range of features to enhance your driving experience. With built-in navigation, you'll never get lost again, and the DAB+ tuner ensures crystal-clear radio reception. The touchscreen display is intuitive and easy to use, allowing you to control all your music, videos, and apps with ease. Connect your smartphone via Bluetooth for hands-free calling and audio streaming, and enjoy your favorite tunes through the powerful built-in amplifier.

1
VN715-MB-A1-DAB
V1.1
INSTALLATION
GUIDE
VISION SERIES FOR ANDROID
INFOTAINMENT
TOUCHSCREEN NAVICEIVER
2
IMPORTANT NOTES
This guide is an aid for the professional installation of the device.
Please note the following notes before installation:
Always handle all parts of the device and the components of your vehicle with
care.
Under all circumstances observe the regulations of the vehicle manufacturer
and do not make any changes to the vehicle which could impair driving safety.
For safety reasons, disconnect the vehicle battery’s ground connection before
installation.
Please always pay attention to the correct polarity of the connections.
Please do not modify any harnesses or connections of the device or the vehicle
as this may affect the warranty.
Make sure that no cables are squashed or cause a short circuit.
Do not lay cables in front of the airbags, e.g. in the dashboard or in a way that
affects their function.
3
RECOMMENDED TOOLS
Torx T25
screwdriver or bit
Plastic mounting wedges Cable ties
Mercedes-Benz*
A-Class W169 (2004-2012)
B-Class T245 (2005-2011)
Sprinter W906 (2006-2018)
Viano/Vito W/V639 (2003-2014)
Viano/Vito W 447 (since 2014)
* Only for vehicles with CAN bus on the radio connection. For vehicles with ISO preparation and with-
out CAN bus, the connection cable VNA-POW-i15 must also be ordered.
COMPATIBILITY
4
ITEM FIGURE QUANTITY
Main device 1
System connector
QUADLOCK Standard 1
System connector
QUADLOCK with
CAN-Bus decoder 1
CAN-Bus connection cable 1
Antenna adapter Fakra on ISO 1
AV connector
with all audio and video
connections and
additional USB port
1
SCOPE OF DELIVERY
5
ITEM FIGURE QUANTITY
GPS antenna 1
DAB antenna 1
4G/LTE antennas 2
4G/LTE dongle 1
WIFI antenna 1
SCOPE OF DELIVERY
6
15 A
9 107 86
12 1114 1315
4 52 31
17 1619 1820
11
10
12
9
13
8
14
7
15
6
16
5
17
4
18
3
19
2
20
1
1 BATTERY (+12V) 11 LIGHT CONTROL
12 STEERING GND
13 KEY1
14 CAN -TX
15 BRAKE CONTROL
16 FRONT LEFT OUT (+)
17 REAR LEFT OUT (+)
18 FRONT RIGHT OUT (–)
18 REAR RIGHT OUT (–)
20 GND (BATTERY –)
2 REAR RIGHT OUT (+)
3 FRONT RIGHT OUT (+)
4 REAR LEFT OUT (–)
5 FRONT LEFT OUT (–)
6 ACC +
7 REVERSE CONTROL
8 ANT/AMP CONTROL
9 KEY2 (SPARE BIT)
10 CAN-RX
1 VIDEO OUT 2 11 FRONT LEFT OUT
12 SUBWOOFER OUT
13 GND
14 AUX IN-LEFT
15 GND
16 AUX IN-RIGHT
17 GND
18 USB-DP
18 USB-DN
20 USB +5V
2 GND
3 VIDEO OUT 1
4 CAMERA IN
5 GND
6 AUX VIDEO IN
7 AMPLIFIER CONTROL
8 REAR RIGHT OUT
9 REAR LEFT OUT
10 FRONT RIGHT OUT
System connector
with device fuse
AV connector
WIRING DIAGRAM
Connector
for external
microphone
(optional)
AV connectorRadio antenna
USB port
Connector for
4G/LTE dongle
GPS antenna
WiFi antenna
4G/LTE antenna
DAB antenna
System connector
with device fuse
7
MICRO SD SLOT FOR NAVIGATION SOFTWARE
Here you can insert the MicroSD card of the navigation software. For the device
to have access, you may need to assign the access path in the Apps menu under
“Settings”.
If the device stops responding to input, the system is overloaded or crashed. Then reboot
the system by pressing the reset button (RST) on the front panel. Use a suitable object,
such as a paper clip or a ballpoint pen. After pressing the reset button, the system re-
starts without losing your previous settings.
RESET BUTTON
8
SETUP THE 4G/LTE INTERNET CONNECTION
1. First lay the two 4G/LTE antennas inside the dashboard towards the windshield,
one antenna for the left and one for the right.
2. Ideally, you should stick the antennas to the windshield to ensure optimal recep-
tion.
3. Then insert your SIM card in the 4G/LTE dongle:
Open the dongle by pushing the ap
to the right.
Then insert your SIM card with the
contacts facing down.
Close and lock the metal ap carefully
by pushing the ap down.
Compatible SIM cards:
Micro SIM Nano SIM with adapter
for Micro SIM
Now open the metal ap carefully
with a suitable tool by pushing the
ap up.
9
SETUP THE 4G/LTE INTERNET CONNECTION
4. Then turn on the device to test the 4G/LTE connection.
5. After a successful test, install the 4G/LTE dongle in the radio slot or dashboard.
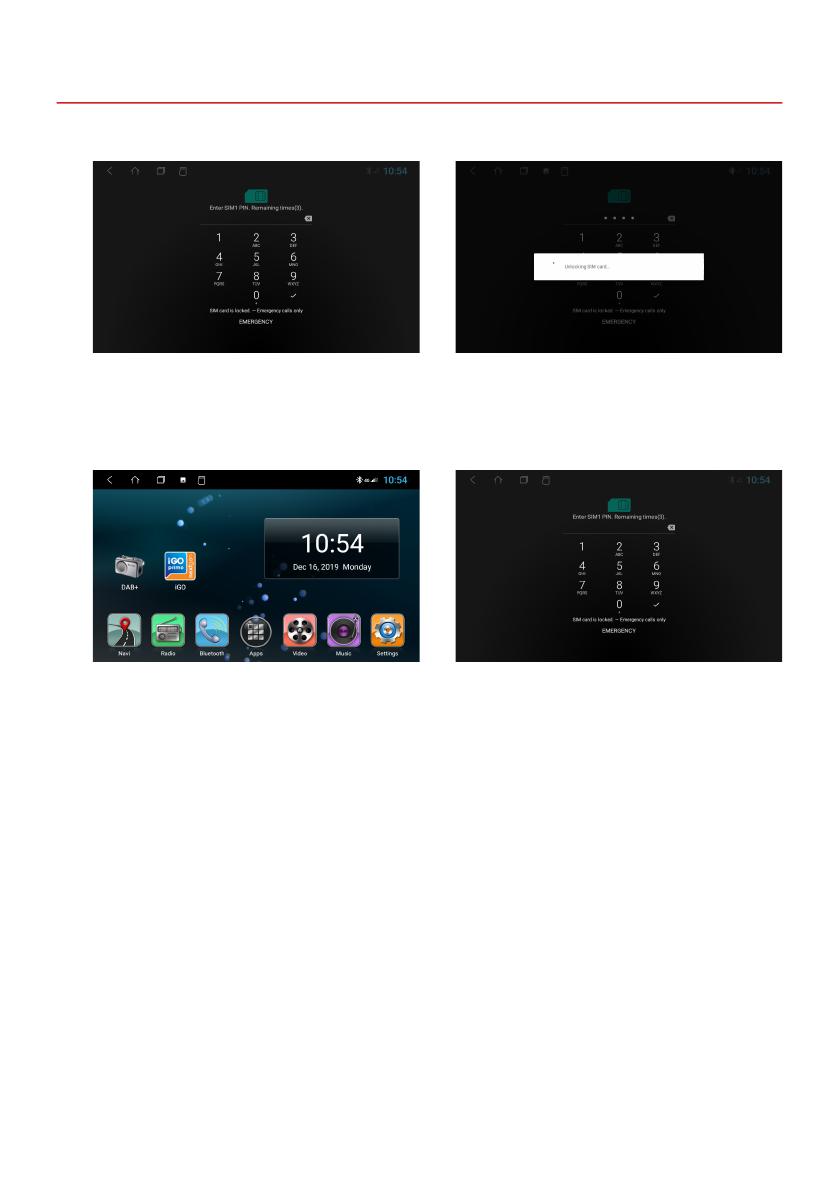
After the device has started, enter
your 4-digit PIN code of the SIM card
here. Conrm the entry with the tick.
If the device is successfully connect-
ed to the mobile Internet, the „4G“
symbol appears in the status bar at
the top right.
After successful entry, the SIM card is
unlocked.
If the device is turned off, you have
to enter the PIN code of the SIM card
again after each restart, just like with a
smartphone.
10
INSTALLATION TIPS
GPS antenna:
The GPS antenna must be mounted horizontally, if
possible on the front of the dashboard (ensure a clear
view to the sky). No reception is possible with a met-
al-coated windscreen.
DAB + antenna:
Glue the DAB+ antenna to the windscreen on the right
or left and lay the connection cable through the dash-
board to the radio slot.
USB connection:
Lay the cable to the desired installation location, e.g.
in the glove compartment. If necessary, openings
have to be drilled for this.
Shipping locks:
Remove both shipping locks on the top of the device
before starting installation.
11
INSTALLATION GUIDE MERCEDES-BENZ VITO (2007 >)
Use a Phillips screwdriver to remove the four retain-
ing screws from the radio. Then carefully pull the ra-
dio out of the slot.
1
Then remove all cable plugs and the antenna plug on
the radio. Now lay the connection cables of the ESX
device (see p. 6) in the vehicle to the desired instal-
lation location and connect them accordingly at the
new ESX device. Also connect the vehicle-specic
cable connector and the antenna connector.
2
3
Check the function of the device before assembly.
It may take up to 5 minutes to receive a GPS signal
outdoors.
After successfully checking the functions, carry out
the assembly (1-2) in reverse order.
4
Loosen the lower panel with a mounting wedge on
both sides.
12
INSTALLATION GUIDE MERCEDES-BENZ A CLASS (W169 10/2004 - 4/2012)
Then loosen the fan unit with assembly wedges. Be
careful not to disconnect the hazard switch from its
cable.
1
Now remove both upper retaining screws on each
side using the Torx T25 screwdriver.
2
3
Then loosen the lower radio cover with mountin-
gwedges.
4
Carefully unlatch the fan unit above the radio on
both sides. You will nd the brackets in the top rst
slot on each side. Use a small slotted screwdriver to
loosen the bracket.
13
INSTALLATION GUIDE MERCEDES-BENZ A CLASS (W169 10/2004 - 4/2012)
Now remove both lower retaining screws on each
side using the Torx T25 screwdriver.
5
Then carefully pull the radio out of the slot.
6
7
Then remove all cable plugs and the antenna plugs
on the radio.
8
Now carefully remove the lower radio cover.
14
INSTALLATION GUIDE MERCEDES-BENZ A CLASS (W169 10/2004 - 4/2012)
Now connect all connection cables and plugs at the
ESX device (see p. 6). Then also connect the vehi-
cle-specic cable connector and the antenna con-
nector. Then slide the ESX device into the slot of the
dashboard.
9
Check the function of the device before assembly.
It may take up to 5 minutes to receive a GPS signal
outdoors.
After successfully checking the functions, carry out
the assembly (1-4) in reverse order.
10
11
Now lay the connection cables of the ESX device (see
p. 6) in the vehicle to the desired installation location.
15
DESIGN
ESX Car Media Systems · Audio Design GmbH
Am Breilingsweg 3 · D-76709 Kronau/Germany
Tel. +49 7253 - 9465-0 · Fax +49 7253 - 946510
www.esxnavi.de - www.audiodesign.de
© All rights reserved. Technical changes, errors and mistakes reserved.
  • Page 1 1
  • Page 2 2
  • Page 3 3
  • Page 4 4
  • Page 5 5
  • Page 6 6
  • Page 7 7
  • Page 8 8
  • Page 9 9
  • Page 10 10
  • Page 11 11
  • Page 12 12
  • Page 13 13
  • Page 14 14
  • Page 15 15
  • Page 16 16

ESX VN715-MB-A1-DAB Installation guide

Type
Installation guide

ESX VN715-MB-A1-DAB is the ultimate infotainment system for Mercedes-Benz vehicles, offering a range of features to enhance your driving experience. With built-in navigation, you'll never get lost again, and the DAB+ tuner ensures crystal-clear radio reception. The touchscreen display is intuitive and easy to use, allowing you to control all your music, videos, and apps with ease. Connect your smartphone via Bluetooth for hands-free calling and audio streaming, and enjoy your favorite tunes through the powerful built-in amplifier.

Ask a question and I''ll find the answer in the document

Finding information in a document is now easier with AI