Trendnet TE100-P1P Quick Installation Guide

Category
Gateways/controllers
Type
Quick Installation Guide

Trendnet TE100-P1P is a 10/100Mbps Mini Print Server that allows you to share a single printer with multiple computers on your network. It features one parallel printer port and connects to your network via a standard Ethernet cable. The TE100-P1P supports various operating systems, including Windows, Mac, and Linux, and offers flexible printing options such as LPR and PTP (Peer-to-Peer) printing. With its compact design and easy setup process, the TE100-P1P is an ideal solution for small offices and home networks looking to share printing resources efficiently.

Trendnet TE100-P1P is a 10/100Mbps Mini Print Server that allows you to share a single printer with multiple computers on your network. It features one parallel printer port and connects to your network via a standard Ethernet cable. The TE100-P1P supports various operating systems, including Windows, Mac, and Linux, and offers flexible printing options such as LPR and PTP (Peer-to-Peer) printing. With its compact design and easy setup process, the TE100-P1P is an ideal solution for small offices and home networks looking to share printing resources efficiently.

TRENDware, USA
TRENDnet
Quick Installation Guide
<a href="mailto:webmaster@
trendnet.com">
Product Warranty
Registration
Please take a moment to register
your product online. Go to TRENDware’s
website at http://www.trendnet.com
www.trendnet.com
Product Warranty
Registration
TRENDware International, Inc.TRENDware International, Inc.
Torrance, CA USA
www.trendnet.com
Copyright TRENDware International, Inc. 2003. All Rights Reserved.
10/100Mbps Mini Print Server with
1 Parallel Printer Port
10/100Mbps Mini Print Server with
1 USB Printer Port
Page 1
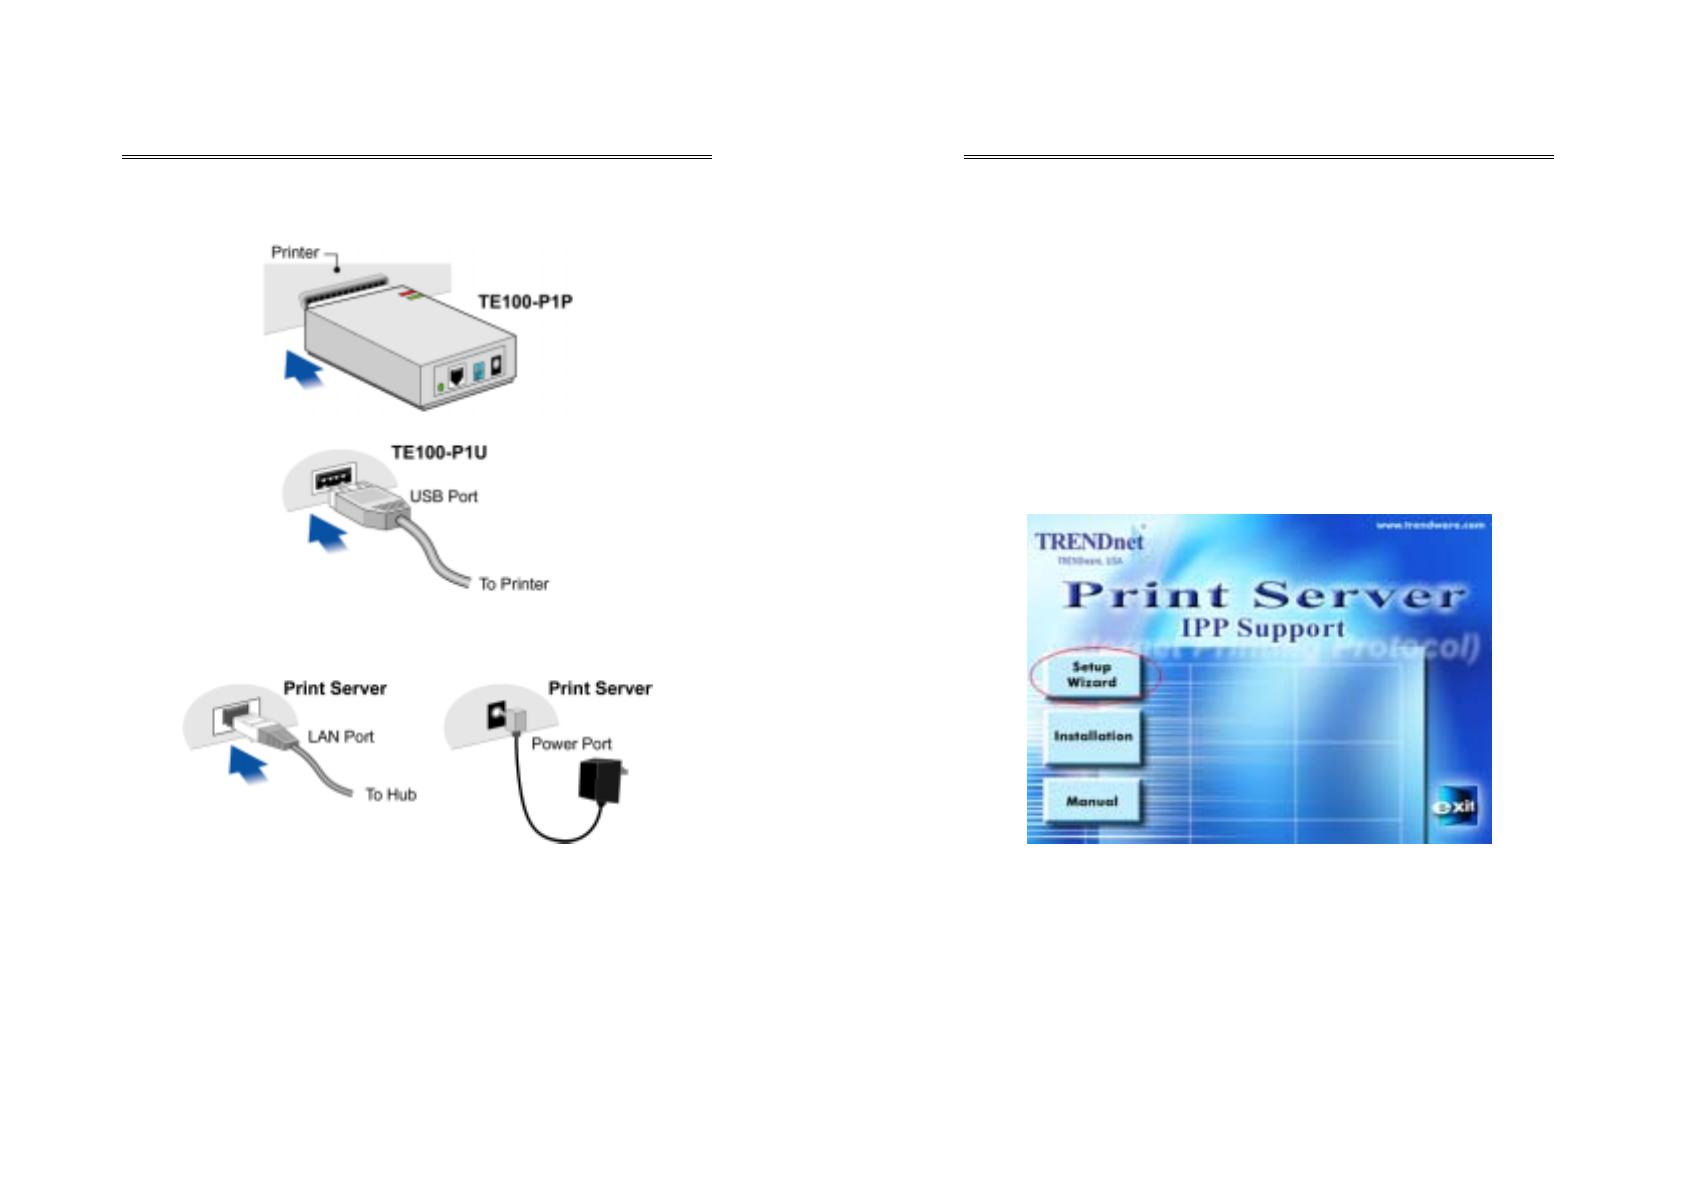
Hardware Installation
1. Make sure the Print Server and Printer are powered OFF.
2. Connect the printer to the Print Server's printer port.
3. Use a standard LAN cable to connect the LAN port on the
Print Server to a 10/100Mbps switch..
4. Connect the supplied Power Adapter, power up both the
Printer and Print Server and check the Printer Server
LEDs:
The Error LED should flash, then turn off. If it stays on,
there is a hardware error.
On the TE100-P1U, the Red Error LED will remain
flashing if the Print Server can't connect to the printer.
Page 2
Configure Print Server
Please complete the following steps to setup the Print Server
to work with your computers.
1. Configure the Print Server (Perform once from any PC on
the network)
2. PC Setup (Perform on each PC in the network)
For Windows 9x/ME/2000/XP
1. Insert the supplied CD-ROM into your drive. If the setup
program does not start automatically, double click on
Autorun.exe
in the root folder to run the Setup Wizard.
2. Click on the
Setup Wizard
button
3. Click
Next
on the first screen, to view a list of Print Serv-
ers on your LAN.
4. Select your new Print Server, then click
Next
to continue.
5. Enter the required data on the
Print Server
screen.
Name can be changed if you wish.
Comment is optional.
Page 3
Select or enter the Workgroup name for this Print
Server.
You can enter a name (eg. Printer Model) for each
Printer.
6. Click
Next
to configure the
TCP/IP
screen.
Select
Obtain IP Address automatically
if your LAN
has a DHCP Server, otherwise select
Fixed IP Address
.
(In the TCP/IP protocol network’s environment ,
Fixed
IP
is recommended.)
For
Fixed IP Address
, enter an unused address from the
range used on your LAN, or click the
Suggest New Val-
ues
Button.
Use the same
Network Mask
and
Gateway
as PCs on
your LAN.
7. Click
Next
to continue to the final screen.
8. Click
Finish
to save the data to the Print Server.
9. The PTP Driver Window will appear, click
No
and exit.
Print Server configuration is now complete.
Each PC must now be configured.
Page 4
PC Setup
Windows PTP (Peer-to-Peer) Printing
With this system, each PC prints directly to the Print Server.
Windows 2000 & XP require no additional software. For
other versions of Windows, the supplied PTP (Peer-to-Peer)
Printer Port software must be installed on each PC.
Windows 2000/XP Setup
The recommended printing method is to use LPR, as follows:
1. Go to Start
Æ
Settings
Æ
Printers & Faxes option, click
on
Add a Printer
.
2. Click
Next
on the Add Printer Wizard.
3. Choose the
Local Printer attached to this computer
option
and click
Next
.
Page 5
4.
Choose
Create a New Port
option and select
Standard
TCP/IP Port
.
5. Click
Next
on the
Add Standard TCP/IP Port
Wizard.
6. Enter the
IP Address
of the Print Server that was set be-
fore, then click
Next
.
Page 6
7. Choose the
Custom
option and click on the
Settings
button.
8. Choose
LPR
in the Protocol section, then enter the
Queue
name
L1 and ensure the
LPR Byte Counting Enabled
set-
ting is
Enabled
and click
OK.
Page 7
9. Follow the prompts to install the printer driver and click
Finish
to complete the setup
PC Setup is now complete and the Printer is ready to use.
Windows 9x/ME Setup
1. Insert the supplied CD-ROM into your drive. If the setup
program does not start, run
Autorun.exe
in the root folder.
2. Click the
Installation
button
3. Choose
1. User
and click on
Next
.
Page 8
4. Follow the prompts to complete the installation of the
Peer-to-peer Printer Port Driver.
5. The Printer Port Driver Setup will then run.
In future, you can use
Start
-
Programs
-
Print Server Utility
-
Printer Driver Setup
to run the program again.
PTP Printer Port Setup
1. The program will search for Print Servers on the network,
and a screen like the following will be displayed.
2. Select the desired port on a Print Server, then click
Next
.
3. The printer port will be created, then a screen like the fol-
lowing will be displayed.
Page 9
4. Select the correct Windows printer in the
Existing Print-
ers
list, and click the
Connect
button.
If the correct printer type is not listed:
1. Click
Add New Printer
to run the Windows
Add
Printer
wizard.
2. Step through the Wizard and install the required printer
on the default printer port.
3. After installation, the printer will be listed in the
Con-
figure Printer Port
screen above. Select it and click
Connect
.
PC Setup for is now complete and Printer is ready to use.
Note: If using the Epson Spooler Manager, this program
must be disabled, as follows:
1. Run the Epson Spooler Manager
2. Select
Queue Setup
from the menu
3. Click
Use Print Manager for this port
4. Click
OK
to exit.
Page 10
Macintosh Setup
Macintosh AppleTalk Printing
No Print Server configuration is required if using AppleTalk.
Just configure your Mac as follows:
1. Click the
Apple
icon and then
Control Panel
-
AppleTalk
.
2. Ensure that
Ethernet
is selected under
AppleTalk Connec-
tion
.
3. Click
Chooser
. The Chooser panel will open.
4. Click on either the
LaserWriter 8
icon (recommended) or
the
LaserWriter 7
icon.
5. Choose a PostScript printer from the list.
6. Click
Create
and it will search the PPD automatically.
7. Select a printer description from the list.
8. Click
Select
. Configuration is now complete
Macintosh OS X - LPR Printing
If using LPR printing, you need to ensure the Print Server has
a valid IP address before configuring your Mac as follows.
1. Select the
Printer List
icon.
2. Click the
Add Printer
button.
3. Choose
LPR Printers Using IP
.
Page 11
4. Enter the Printer's Address and the Queue Name (L1)
5. Select the Printer Model from the drop-down list.
6. Click
Add
. Configuration is now complete.
Technical Support
You can find the most recent software and use
r
documentation on the TRENDware website.
TRENDware provides free technical support fo
r
all customers for the duration of the warranty pe-
riod on this product.
TRENDware Technical Support
Tel: +1-310-891-1100
Fax: +1-310-891-1111
www.trendnet.com
Support Hours: 7:30AM ~ 6:00PM,
Monday ~ Friday (except holidays)
  • Page 1 1
  • Page 2 2
  • Page 3 3
  • Page 4 4
  • Page 5 5
  • Page 6 6
  • Page 7 7

Trendnet TE100-P1P Quick Installation Guide

Category
Gateways/controllers
Type
Quick Installation Guide

Trendnet TE100-P1P is a 10/100Mbps Mini Print Server that allows you to share a single printer with multiple computers on your network. It features one parallel printer port and connects to your network via a standard Ethernet cable. The TE100-P1P supports various operating systems, including Windows, Mac, and Linux, and offers flexible printing options such as LPR and PTP (Peer-to-Peer) printing. With its compact design and easy setup process, the TE100-P1P is an ideal solution for small offices and home networks looking to share printing resources efficiently.

Ask a question and I''ll find the answer in the document

Finding information in a document is now easier with AI