Page is loading ...

Robotiq Palletizing Solution
for Universal Robots
Instruction Manual
ROBOTIQ PALLETIZING SOLUTION
robotiq.com | leanrobotics.org
Original Notice
© 2021 Robotiq Inc.

Revisions 4
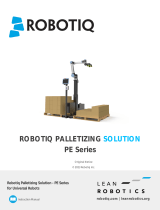
1. General Presentation 6
1.1. Palletizing Solution Components 6
1.2. Object Picking 10
1.3. Palletizing Operation Diagrams 11
2. Safety 13
2.1. Disclaimer 13
2.2. Intended Use 14
2.3. Warnings, risk assessment and final application 15
3. Installation 19
3.1. Scope of Delivery 20
3.2. Required Tools and Equipment 21
3.3. Environmental and Operating Conditions 22
3.4. Mounting and Installation 23
3.5. Other Grippers 47
3.6. Installation for Universal Robots 49
3.7. URCap Package 49
3.8. Robot Configurations 55
3.9. License Agreement 58
4. Operation 61
4.1. Starting Up 61
4.2. Lights States 61
5. Software 64
5.1. Installation on Universal Robots e-Series 64
5.2. Vacuum Gripper behavior 74
5.3. AirPick Vacuum control over Universal Robots with URCaps 74
6. Specifications 75
6.1. Technical dimensions 75
6.2. Mechanical specifications 80
6.3. Electrical specifications 84
7. Maintenance 87
7.1. Linear Axis 88
Palletizing Solution - Instruction Manual
2

7.2. Fasteners 89
7.3. Air Filter Cleaning 89
7.4. AirPick Vacuum Gripper 89
7.5. Solution Cleaning 90
7.6. Solution Storage 90
8. Spare Parts, Kits and Accessories 91
9. Troubleshooting 92
9.1. Palletizing Solution (except the AirPick Gripper) 92
9.2. AirPick Vacuum Gripper 93
10. Warranty 96
11. Harmonized Standards 98
11.1. Applied standards 98
12. Appendix 99
12.1. Anchoring pattern 99
12.2. Safety Connections 100
13. Contact 102
3

Revisions
Robotiq may modify this product without notice, when necessary, due to product improvements, modifications or changes in
specifications. If such modification is made, the manual will also be revised, see revision information. See the latest version of this
manual online at: support.robotiq.com.
2021/03/29
lUpdate of the Software section: label orientation option added.
lUpdate of the Specifications section
lUpdate of the Installation section (Robot configurations)
2020/12/16
lUpdate of the safety section
lUpdate of the installation section
lUpdate of the specifications section
2020/11/30
Update of the Installation section.
2020/11/25
Initial release
Palletizing Solution - Instruction Manual
4

Copyright
© 2020-2021 Robotiq Inc. All rights reserved.
This manual and the product it describes are protected by the Copyright Act of Canada, by laws of other countries, and by international
treaties, and therefore may not be reproduced in whole or in part, whether for sale or not, without prior written consent from Robotiq.
Under copyright law, copying includes translation into another language or format.
Information provided by Robotiq in this document is believed to be accurate and reliable. However, no responsibility is assumed by
Robotiq for its use. There may be some differences between the manual and the product if the product has been modified after the
edition date.
The information contained in this document is subject to change without notice.
5

1. General Presentation
The terms '' Palletizing'', ''Palletizing Solution'' and ''Solution'' used in the following manual all refer to the Robotiq Palletizing Solution.
The Robotiq Palletizing Solution is a hardware and software solution already connected and ready to install. It is composed of a base
fully integrated with the linear axis, pallet sensors and status lights. The extra reach gripper bracket is also included in the Solution to
extend the AirPick Gripper of 200 mm from the robot tool flange. The Material Handling Copilot and accessories such as a box sensor,
an anchor kit and a cable management system are parts of the Solution.
Info
The following manual uses the metric system. Unless specified, all dimensions are in millimeters.
1.1. Palletizing Solution Components
Palletizing Solution - Instruction Manual
6

Info
The following section presents the key features of the Robotiq Palletizing Solution and must not be considered as
appropriate to the operation of the Solution. Each feature is detailed in the appropriate section.
1.1.1. Base and Column
The Robotiq Palletizing Solution is composed of a base and a column on which all the components that are necessary to the good
operation of the Solution are attached. Its geometry is designed to facilitate the positioning of the Right and Left pallets without any
surrounding obstructions. The base has to be anchored in the floor. For more details, please see the Installation section
1.1.2. Linear Axis
To extend the reach of the robot, a linear axis is installed inside the column. It allows the robot to move vertically in order to build high
pallets.
1.1.3. Linear Axis Controller
All the components of the Solution are integrated and controlled via the linear axis controller. It allows simultaneous motion of the axis
and the robot during palletizing motion.
1.1.4. Pallet Sensors
The Solution is composed of four (4) sensors to detect pallets presence (two per pallet). The sensors will allow the Solution to ensure
that the pallets are well positioned on each side of the base to optimize the application process.
1.1.5. Status Lights
Two (2) status lights are positioned on the top of the base. Each status light is associated to the nearest pallet. The color of the light
allows to know the status of the system or the state of a specific pallet. Please refer Lights States section.
1.1.6. AirPick Vacuum Gripper
The AirPick is a Vacuum Gripper that creates a vacuum via a pneumatic vacuum generator. It is equipped with one or multiple suction
cups. Each suction cup can be adapted to your application and grasping needs. The AirPick Gripper is compatible with the Robotiq
standard coupling interface.
7

Palletizing Solution - Instruction Manual
Fig. 1-1: Robotiq AirPick Gripper
1.1.7. Suction Cup System
A Robotiq Suction Cup System can be installed directly under the Vacuum Gripper. Each Robotiq Suction Cup System includes a
bracket, a manifold, air nodes, port plugs, bumpers, tubing and additional suction cups.
Fig. 1-2: Suction cup system
Info
Please refer to the Installation section for more information on how to integrate the Suction Cup System to the AirPick.
8

Tip
The owner can use a custom bracket or a mounting plate. The bracket or mounting plate can be installed directly under the
manifold.
1.1.8. Extra Reach Gripper Bracket
The extra reach gripper bracket is included in the Solution to extend the AirPick Gripper of 200 mm from the robot tool flange. This way,
the Robotiq Palletizing Solution will be able to palletize boxes on large size pallets. Please refer to the Extra Reach Bracket section for
more details about the limitations of the extension bracket
Fig. 1-3: AirPick Vacuum Gripper Extra Reach Bracket
1.1.9. Box Detection Sensor
The Solution includes a box sensor that needs to be installed at the end of the conveyor in a way that it is triggered when a box is ready
to be picked up.
Fig. 1-4: Box Sensor
9

Palletizing Solution - Instruction Manual
1.2. Object Picking
The AirPick Gripper allows:
1. Main unit suction cup
2. Auxiliary system with multiple suction cups
Warning
Object picking causes the compression of the suction cup(s) , which can result in pinching points between the gripper and the
load. Avoid presence of body parts in this zone during operation.
Warning
Before picking any new object or material in autonomous mode, always check that the resulting vacuum level is sufficient to
ensure safe gripping, in order to prevent dropping or ejection of the load.
1.2.1. Main Unit Suction Cup
lIn order to use only one suction cup, the single cup can be mounted right in the port of the vacuum generator.
1.2.2. Auxiliary System with Multiple Suction Cups
lA standard Suction Cup System can be attached to the AirPick Vacuum Gripper. The bracket normally holds two or four suction cups
(corresponding to the four ports of the manifold).
lAny unused manifold port should be blocked with a mating plug to avoid air leakage.
lOther custom mounting options can also be used to benefit from a multiple suction cups solution.
Info
For the collision avoidance algorithm, the robot control software considers a generic gripper geometric envelope that does
not overlap the box.
Caution
Custom brackets and plates must meet the required technical specifications (refer to the Technical dimensions section.
10

1.3. Palletizing Operation Diagrams
The following diagrams explain the logical operation of the Palletizing Solution, based on the operator's actions and all responses
coming out from them such as signals, pallet and box sensors behaviors, etc.
11

Palletizing Solution - Instruction Manual
12

2. Safety
2.1. Disclaimer
The intent of this section is to provide general guidelines for safe use of the Robotiq Palletizing Solution, always follow local
regulations. The installer is responsible for the safe installation and commissioning of the Palletizing Solution. Robotiq accepts no
liability for damage, injury or any legal responsibility incurred directly or indirectly from the use of this product. The user (installer and
operator) shall observe safe and lawful practices including but not limited to those set forth in this document.
Info
The terms “operator”, ''installer'', ''commissioning'' or ''installation'' refer to anyone responsible for any of the following
operations on the Robotiq Palletizing Solution:
lInstallation
lControl
lMaintenance
lInspection
lCalibration
lProgramming
lDecommissioning
The present section is based on the following international standards and technical specifications:
lISO 10218-1:2011 : Safety Requirements For Industrial Robots - Robots
lISO 10218-2:2011 : Safety Requirements For Industrial Robots - Robots Systems and Integrators
lIEC 60204-1 : Safety Of Machinery - Electrical Equipment Of Machines
lISO/TS 15066:2016 : Robots and robotic devices — Collaborative robots
This manual explains various components of the Robotiq Palletizing Solution and the general operations regarding the whole life-cycle
of the product, from installation to operation and decommissioning.
The drawings and photos in this manual are representative examples. However, discrepancies may be observed between the visual
supports and the actual product.
Palletizing Solution - Instruction Manual
13

2.2. Intended Use
The Robotiq Palletizing Solution is specifically designed for palletization.
Warning
Only use the application in its original condition without unauthorised modifications.
Warning
Only use the application if it is in perfect technical condition.
Warning
The emergency stop function is intended for use in emergency conditions and not for normal condition stop.
Info
The Solution is intended to be used with a UR10 or UR10e from Universal Robots.
Info
Always comply with local, state, province and/or federal laws, regulation and directives automation safety and general
machine safety.
Caution
The unit should be used exclusively within the range of its technical data. Any other use of the solution is deemed improper
and unintended. Robotiq will not be liable for any damages resulting from any improper or unintended uses.
14

Palletizing Solution - Instruction Manual
2.3. Warnings, risk assessment and final application
Warning
The operator must have read and understood all of the instructions in the following manual before operating the Robotiq
Palletizing Solution.
Caution
Any use of the Palletizing Solution in non-compliance with these warnings is deemed inappropriate and may cause injury or
damage.
The robot, the AirPick Vacuum Gripper or any other gripper used, the linear axis and any other equipment used in the final application
must go through a comprehensive risk assessment process before they can be used. Special care must be taken during this step if
custom mounting options are used for the suction cups.
Caution
It is the installer/operator's responsibility to ensure that all local safety measures and regulations are met.
The following non-exhaustive list presents risks that must be assessed during the integration process:
lRisk of load ejection resulting from loss of vacuum;
lRisk of load dropping resulting from loss of vacuum;
lRisk of pinching any moving component of the Robotiq Palletizing Solution or the robot;
lRisk of damage or breaking if using a custom suction cup bracket that does not meet the technical requirements;
Depending on the application, there may be hazards that require additional protection and/or safety measures. For instance, the
workpiece handled by the gripper could be inherently dangerous to the operator.
Warning
The linear axis is NOT power and force limited. Pinching or crushing risk must be considered seriously.
15

Warning
When the robot is not moving, the collaborative collision detection is disabled. If the linear axis moves, it can hurt people with
the robot.
Warning
Depending on the supply sources, when an emergency stop (e-Stop) button is pressed, the following consequences may
occur. The robot owner has the responsibility to do a risk assessment and choose the appropriate option.
Supply sources e-Stop consequences
Robot tool supply
(tool connector)
Power failure to the Vacuum Gripper. The vacuum level will drop to ambient pressure and
the object will be lost.
Caution
For the Palletizing Solution, it is not recommended to connect the Gripper to
the tool connector.
Robot controller supply*
(Any 24V pin)
Vacuum Gripper powered ON.
lIf an object is detected: the vacuum level will continue to be regulated and the object will
not be lost.
lIf no object is detected: the Vacuum Gripper will go into a standby state 2 seconds after
the e-Stop button is pressed.
*The AirPick Vacuum Gripper that comes with the Robotiq Palletizing Solution is connected via the robot controller.
Warning
Loss of vacuum can occur due to power failure or air supply interruption.
2.3.1. Expected system behavior in normal operations:
lNormal mode: when no human operator is present within the palletizing cell.
lSafeguard mode: when a human operator is present within the palletizing cell in order to manipulate a filled pallet, place pallets in an
empty pallet slot or troubleshoot the system or any other operations requiring human intervention. In such a state the robot will be
maintained in a stop category 2 and the linear axis will undergo stop category 1 transitioning to stop category 0*. When the safe-
guards are removed, the system will resume normal operation.
Info
See IEC 60204-1 for definitions of stop categories.
16

Palletizing Solution - Instruction Manual
Emergency stop mode when the emergency stop button is pressed. All components of the system will undergo stop category 1
transitioning to stop category 0.
Operation mode
Robot Linear Axis
Force (N) Power (W) Speed
(mm/s) Force (N) Power (W) Speed
(mm/s)
Normal mode
(Up to safety limits)
up to 250 up to 1000 up to 5000 2400*
690
(nominal)
500
Protective stop
0
(Stop Cat 2)
Safeguard stop
0
(Stop Cat 2)
N/A
(Stop Cat 1 and transition to Cat 0)
Emergency stop
N/A
(Stop Cat 1 and transition to Cat 0)
*Calculated using the following assumptions: static force at peak current with a 90% efficient ball screw and no friction.
Fig. 2-1: Safety Logical Schema
17

2.3.2. Linear Axis Stop Category 0 and 1
When a stop is required, the robot and the linear axis start the process at the same time, even if they are independent, so the stopping
time can differ.
lFor robot information, please refer to the Universal Robots documentation.
lFor the linear axis:
oMaximal stopping time for Category 1: 500 ms;
oMaximal stopping time for Category 0: 100 ms*;
oTravelled distance when there is a stopping time: 33 mm (1-5/16 in)*
*For cases where the robot is immobile, with a payload of 8 kg and the initial speed of the linear axis is 500 mm/s, which is the
maximum allowed speed.
18

3. Installation
The following subsections will guide you through the installation and general setup of your Robotiq Palletizing Solution.
Info
Before installing:
lRead and understand the safety instructions related to the Palletizing Solution.
lVerify your package according to the scope of delivery and your order.
lMake sure to have the required parts, equipment and tools listed in Scope of delivery.
Warning
When installing:
lMeet the recommended environmental conditions.
lDo not operate the Palletizing Solution, or even turn on the power supply, before the device is firmly anchored and the
machine area is cleared. Make sure that the air supply is secured.
Warning
Failure to properly secure and install the equipment can result in material damage and serious injury. In addition, note that in
situations where the installation is not compliant, the warranty is void.
Warning
When mounting sections of the linear axis base, and when moving it, make sure to let enough of safe space around, so you
can avoid material damages and serious injuries.
Palletizing Solution - Instruction Manual
19

Warning
lMake sure to follow all the safety rules and regulations of your workplace while using the Robotiq Palletizing Solution.
lAlways wear all recommended personal protective equipment in accordance with your workplace's safety standards,
including:
oSafety glasses;
oHearing protection;
oHard hats;
oSteel-toe boots
lAlways use proper safety precautions when working with tools that contain sharp edges, pinching surfaces, or generate
heat.
lAlways lift heavy objects with your legs, not your back. If you can not lift an object alone, ask for help or find another method
to move it.
3.1. Scope of Delivery
l1 x robot base including:
o1 x Linear axis (1500 mm stroke)
o1 x Motor
o1 x Linear axis controller
o4 x Pallet sensors
o2 x Status lights
o1 x Cable management system
l6 x concrete anchors (1/2 - 13)
l1 x Box detection sensor
l1 x Extra reach bracket
l1 x Vacuum Gripper kit (Airpick, suctions cups, brackets for 2 or 4 cups)
l1 x Air tube 8mm (already mounted on the column)
l1 x Gripper coupling kit
l1 x Material Handling Copilot software dongle license
l1 x set of four (4) wheels
20
/