Page is loading ...

August 2005 RLC-SVD03A-EN
© American Standard Inc. 2005
Model
RTAA 70-125 Ton
RTWA 70-125 Ton
RTUA 70-125 Ton
Diagnostic
Troubleshooting
Repair
Series R
®
70-125 Ton Air-Cooled and Water-Cooled
Rotary Liquid Chillers

2 RLC-SVD03A-EN
Important - Read This First!
This manual is intended for experienced service personnel familiar with the
proper use of electrical diagnostic instruments and all personal safety
procedures when working on live electrical circuits.
This Manual is not intended for individuals who have not been properly trained
in handling live electrical circuits.
Environmental Concerns!
Scientific research has shown that certain man-made chemicals can affect the
earth’s naturally occurring stratospheric ozone layer when released to the
atmosphere. In particular, several of the identified chemicals that may affect the
ozone layer are refrigerants that contain Chlorine, Fluorine and Carbon (CFCs)
and those containing Hydrogen, Chlorine, Fluorine and Carbon (HCFCs). Not all
refrigerants containing these compounds have the same potential impact to the
environment. Trane advocates the responsible handling of all refrigerants—
including industry replacements for CFCs such as and HCFCs and HFCs.
Responsible Refrigerant Practices!
Trane believes that responsible refrigerant practices are important to the
environment, our customers, and the air conditioning industry. All technicians
who handle refrigerants must be certified. The Federal Clean Air Act (Section
608) sets forth the requirements for handling, reclaiming, recovering and
recycling of certain refrigerants and the equipment that is used in these service
procedures. In addition, some states or municipalities may have additional
requirements that must also be adhered to for responsible management of
refrigerants. Know the applicable laws and follow them.
WARNING
Contains Refrigerant!
System contains oil and refrigerant under high pressure. Recover refrigerant to
relieve pressure before opening the system. See unit nameplate for refrigerant
type. Do not use non-approved refrigerants, refrigerant substitutes, or refrigerant
additives.
Failure to follow proper procedures or the use of non-approved refrigerants,
refrigerant substitutes, or refrigerant additives could result in death or serious
injury or equipment damage.
NOTICE: Warnings and Cautions appear at appropriate sections through-
out this literature. Read these carefully.
WARNING: Indicates a potentially hazardous situation which, if not
avoided, could result in death or serious injury.
CAUTION: Indicates a potentially hazardous situation which, if not
avoided, may result in minor or moderate injury. It may also be used to
alert against unsafe practices.
CAUTION: Indicates a situation that may result in equipment or property-
damage only accidents.

RLC-SVD03A-EN 3
Contents
General Information . . . . . . . . . . . . . . . . . . . . . . . . . . . . . . . . . . . . . . . . . . 4
Service Philosophy . . . . . . . . . . . . . . . . . . . . . . . . . . . . . . . . . . . . . . . . . . . . . . 4
System Description . . . . . . . . . . . . . . . . . . . . . . . . . . . . . . . . . . . . . . . . . . . . . . 5
System Level Components . . . . . . . . . . . . . . . . . . . . . . . . . . . . . . . . . . . . . . . . 5
Interprocessor Communications . . . . . . . . . . . . . . . . . . . . . . . . . . . . . . . . 8
IPC Diagnostics . . . . . . . . . . . . . . . . . . . . . . . . . . . . . . . . . . . . . . . . . . . . . . . . . 8
Troubleshooting Modules Using IPC Diagnostics . . . . . . . . . . . . . . . . . . . . . . . 9
Troubleshooting Procedure . . . . . . . . . . . . . . . . . . . . . . . . . . . . . . . . . . . . . . . 12
Temperature Sensor Checkout . . . . . . . . . . . . . . . . . . . . . . . . . . . . . . . . 15
Temperature Sensor Checkout Procedure . . . . . . . . . . . . . . . . . . . . . . . . . . . 15
Compressor Operation . . . . . . . . . . . . . . . . . . . . . . . . . . . . . . . . . . . . . . . 19
Restart Inhibit Timer . . . . . . . . . . . . . . . . . . . . . . . . . . . . . . . . . . . . . . . . . . . . 19
Compressor Start/Stop . . . . . . . . . . . . . . . . . . . . . . . . . . . . . . . . . . . . . . 20
Variable Speed Inverter/Condenser Fan Control . . . . . . . . . . . . . . . . . . 21
Outdoor Air Temperature and Fan Control . . . . . . . . . . . . . . . . . . . . . . . . . . . 22
VSF Inverter Fault . . . . . . . . . . . . . . . . . . . . . . . . . . . . . . . . . . . . . . . . . . . . . . 22
Current Transformer . . . . . . . . . . . . . . . . . . . . . . . . . . . . . . . . . . . . . . . . . 23
CT and MCSP Compressor Current Input Checkout Procedure . . . . . . . . . . . 24
Under-Over Voltage Transformer . . . . . . . . . . . . . . . . . . . . . . . . . . . . . . 32
Under-Over Voltage Transformer Checkout . . . . . . . . . . . . . . . . . . . . . . . . . . 32
Compressor Capacity . . . . . . . . . . . . . . . . . . . . . . . . . . . . . . . . . . . . . . . . 34
Checkout Procedure for MCSP Load/Unload Outputs . . . . . . . . . . . . . . . . . . 35
Checkout Procedure for the Slide Valve and Load/
Unload Solenoids . . . . . . . . . . . . . . . . . . . . . . . . . . . . . . . . . . . . . . . . . . . . . . . 36
Checkout Procedure for MCSP Step Load Output . . . . . . . . . . . . . . . . . . . . . 39
Checkout Procedure for Step Load Solenoid Valve
and Piston . . . . . . . . . . . . . . . . . . . . . . . . . . . . . . . . . . . . . . . . . . . . . . . . . . . . 40
Module Power and Miscellaneous I/O . . . . . . . . . . . . . . . . . . . . . . . . . . 41
Power Supply . . . . . . . . . . . . . . . . . . . . . . . . . . . . . . . . . . . . . . . . . . . . . . . . . 41
Clear Language Display (CLD) 1U6 Keypad Overview . . . . . . . . . . . . . . . . . . 42
Chiller Module (CPM) (1U1) . . . . . . . . . . . . . . . . . . . . . . . . . . . . . . . . . . . . . . . 46
Options Module (CSR) (1U2) . . . . . . . . . . . . . . . . . . . . . . . . . . . . . . . . . . . . . . 50
Electronic Expansion Valve Module (EXV) (1U3) . . . . . . . . . . . . . . . . . . . . . . . 58
Compressor Module (MCSP) (1U4 AND 1U5) . . . . . . . . . . . . . . . . . . . . . . . . . 72
Interprocessor Communication Bridge Module (IPCB) (1U7) . . . . . . . . . . . . . 78
LonTalk® Communications Interface - Chillers Module
(LCI-C) (1U8) . . . . . . . . . . . . . . . . . . . . . . . . . . . . . . . . . . . . . . . . . . . . . . . . . . 79
Variable Speed Fan System . . . . . . . . . . . . . . . . . . . . . . . . . . . . . . . . . . . 80
Inverter Diagnostics . . . . . . . . . . . . . . . . . . . . . . . . . . . . . . . . . . . . . . . . . . . . 80
Troubleshooting Procedure . . . . . . . . . . . . . . . . . . . . . . . . . . . . . . . . . . . . . . . 82
Other Service Features . . . . . . . . . . . . . . . . . . . . . . . . . . . . . . . . . . . . . . . 85
Service Pumpdown . . . . . . . . . . . . . . . . . . . . . . . . . . . . . . . . . . . . . . . . . . . . . 85
Circuit Lockout . . . . . . . . . . . . . . . . . . . . . . . . . . . . . . . . . . . . . . . . . . . . . . . . 87
Circuit Diagnostic Reset . . . . . . . . . . . . . . . . . . . . . . . . . . . . . . . . . . . . . . . . . 87

4 RLC-SVD03A-EN
General Information
The Unit Control Modules (UCMs) described in this troubleshooting guide
provide a microprocessor based refrigeration control system, intended for
use with Trane 70-125 ton helical rotor chillers. Six types of modules are
used, and throughout this publication will be referred to by their abbreviations
or their Line Wiring Drawing Designations, see Table 1.
Service Philosophy
With the exception of the fuses, no other parts on or within the modules are
serviceable. The intent of the troubleshooting is to determine which module
is potentially at fault and then to confirm a module problem. This is done
either through voltage or resistance measurements at the suspected input or
output terminals or by checking related wiring and external control devices
(connectors, sensors, transformers, contactors etc.) in a process of elimi-
nation. Once a problem has been traced to a module, the module can be
easily replaced using only basic tools. In general, all dip switch settings of the
replaced modules should be copied onto the replacement module's dip
switches before applying control power. CPM replacement is more involved
as there are numerous configuration and set-up items that must be
programmed at the Clear Language Display in order to insure proper unit
operation.
It is helpful to include with the return of a module, a brief explanation of the
problem, sales office, job name, and a contact person for possible follow-up.
The note can be slipped into the module enclosure. Early and timely
processing of Field Returns allows for real measurements of our product
quality and reliability, providing valuable information for product improvement
and possible design changes.
Table 1 Unit Control Module Designations
Line Drawing
Designation
Controller Name
Chiller Module
Abbrev.
CPM
1U2 Options Module CSR
1U3 Expansion Valve Module EXV
1U4 & 1U5 Compressor Module MCSP A & B
1U6 Clear Language Display CLD
1U7 Interprocessor
Communications Bridge
(Remote Display Buffer)
IPCB

RLC-SVD03A-EN 5
General Information
System Description
The CPM is the master module and coordinates operation of the entire
system. One is used per chiller. The MCSP is a compressor protection
module with one being used for each of the compressors in the chiller. The
EXV is the expansion valve controller module which controls two Electronic
Expansion Valves. There is one valve on each of the two refrigeration circuits.
The CLD is a two line, 40 character alphanumeric interface to the system. It
allows the operator to read operating and diagnostic information, as well as
change control parameters. The Interprocessor Communications Bridge
(IPCB) provides an extension of the IPC link to the Remote Clear Language
Display, while protecting the integrity of the IPC communications link
between the local modules.
The CSR is an optional communications module which allows for communica-
tions between the chiller and a remote building automation system (i.e.
Tracer, Tracer Summit, Generic BAS).
All modules in the system communicate with each other over a serial inter-
processor communications bus (IPC) consisting of a twisted wire pair “daisy
chain” link and RS485 type signal levels and drive capability. Multiple modules
of the same type (i.e. MCSPs) in an operating system are differentiated by
address dip switches.
All the modules operate from 115VAC, 50 or 60Hz power and each have their
own internal step-down transformer and power supply. Each is individually
fused with a replaceable fuse. The modules also are designed to segregate
their high and low voltage terminals by placing the high voltage on the right
side of the module and the low voltage on the left. When stacked, segre-
gation is maintained.
In addition to the modules, there are a number of “system level” compo-
nents that are closely associated with the modules. These components were
specifically designed and/or characterized for operation with the modules. For
this reason, the exact Trane part must be used in replacement.
System Level Components
Description
The following is a list of all the components that may be found connected to
the various modules.
Transformer, Under/Over voltage
Current Transformer - Compressor
Evap EntlLvg Water Temp Sensor Pair
Sat Evap/Cprsr Suc Rfgt Temp. Sensor Pair
Sat Cond RfgtIOil Temp Sensor Pair
Outdoor Air Temperature Sensor
Zone Temp Sensor
Connector (UCM mating connectors)
Connector Keying Plug
Electronic Expansion Valve

6 RLC-SVD03A-EN
General Information
High Pressure Cutout Switch
Low Pressure Cutout Switch
Variable Speed Fan Drive
Motor Temperature Thermostats
Slide Valve Load/Unload Solenoids
Step Load Solenoid Valve
Chiller Module (CPM) IU1
The CPM module performs machine (chiller) level control and protection
functions. Only one CPM is present in the chiller control system. The CPM
acts as the master controller to the other modules, running top level machine
control algorithms, initiating and controlling all inter-module communication
over the IPC, and providing parameters and operational requests (i.e. loading
and unloading, starting and stopping) to the other modules in the system via
the IPC. The CPM also contains nonvolatile memory, which allows it to
remember configuration and set-up values, setpoints, historical diagnostics
etc. for an indefinite period of time following a power loss. Direct hard wired
I/O associated with the CPM includes low voltage analog inputs, low voltage
binary inputs, 115 VAC binary inputs and 115 VAC (rated) relay outputs. See
Chiller Module (CPM) (1U1) on page 46 for further details.
Compressor Module (MCSP) 1U4 and 1U5
The MCSP module employs the input and output circuits associated with a
particular compressor and refrigeration circuit. Two MCSP modules are used
in the UCM system, one for each compressor. Included are low voltage
analog and digital circuits, 115 VAC input, and 115 VAC output switching
devices. The output switching devices associated with the compressor motor
controlling function are contained in this module. The outputs of this module
control one compressor motor stop/start contactor, one compressor motor
transition contactor, one oil heater, three solenoid valves (compressor load,
compressor unload, step loader), and up to four fan motor contactors or
groups of contactors. Refer to the chiller's line wiring diagrams for details. Dip
switches are provided for redundant programming of the compressor current
overload gains, and for unique IPC address identification during operation.
Inputs to this module include motor temperature thermostats, thermisters,
and safety switches. See Compressor Module (MCSP) (1U4 AND 1U5) on
page 72 for details.
Expansion Valve Module (EXV) 1U3
The EXV module provides power and control to the stepper motor driving the
electronic expansion valves of the chiller. Each module handles two valves,
one in each refrigeration circuit.
Input to the EXV Module is provided by four temperature sensors (two per
refrigeration circuit). The sensors are located in the respective refrigeration
circuits of the chiller and sense Saturated Evaporator and Suction tempera-
tures and calculate the superheat temperatures. High level operational
commands as well as superheat setpoints are received by the EXV Module
over the IPC from the CPM module to modulate the EXV's.

RLC-SVD03A-EN 7
General Information
Real time data for temperatures, diagnostics and control algorithms etc. are
made available to the CPM and the other modules for display and for input to
higher level functions. See Electronic Expansion Valve Module (EXV) (1U3) on
page 58 for details.
Options Module (CSR) 1U2
The CSR module is an optional part of the system and employs communica-
tions circuits for interface to Trane Building Automation Systems, done
through 1C17. The CSR also provides inputs for hard wired external setpoints
and reset functions. Included are low voltage analog and digital input circuits.
See Options Module (CSR) (1U2) on page 50 for details.
Clear Language Display (CLD) 1U6
The CLD Module provides an operator interface to the system, through a two
line, 40 character alphanumeric display. Three reports may be displayed and
various operating parameters may be adjusted by depressing a minimal
number of keys on the CLD. Also, chiller Start/Stop functions may be
performed at this keypad. See Clear Language Display (CLD) 1U6 Keypad
Overview on page 42 for details.
Interprocessor Communication Bridge (IPCB) 1U7
The IPCB module allows connection of a Remote Clear Language Display
module to the UCM, for distances of up to 1500 feet. The Remote Clear
Language Display communicates with the UCM, utilizing the same IPC
protocol, and provides most of the same functions as the local CLD. The IPCB
then serves to protect the UCM's IPC if wires to the Remote CLD become
shorted or broken. See Section 2 and on page 75 for details.

8 RLC-SVD03A-EN
Interprocessor Communications
The respective modules communicate with each other via an InterProcessor
Communication link (IPC). The IPC allows the modules to work in a coordi-
nated manner with the CPM directing overall chiller operation while each
module handles specific subfunctions. This IPC link is integral and necessary
to the operation of the Unit Controls and should not be confused with the
Optional ICS (Integrated Comfort System) communication.
In the IPC communication protocol scheme, the CPM acts as the initiator and
the arbitrator of all module communication. The CPM essentially requests all
the possible “packets” of information from each module in turn, (including
itself), in a predefined serial sequence. The other modules act as
“responders” only and cannot initiate communication. Modules which are not
currently responding to a specific request, can listen to the data and thus,
indirectly, they communicate with each other. It is helpful to remember when
troubleshooting that a module must be able to hear a request for its infor-
mation from the CPM, or it will not talk.
The link is non-isolated, which means that a good common ground between
all the modules is necessary for trouble-free operation (provided by the
module enclosures' mounting using star washers). Also, the link requires
consistent polarity on all of the module interconnections. Connections
between modules are made at the factory, using unshielded #18 gauge
twisted pair cable terminated into a 4-position MTA type connector (orange
color code). This connector is plugged onto the 4 pin IPC connection jack
designated as J1, located in the upper left corner of the PC board edge on all
of the modules. The 4 pins actually represent 2 pairs of communications
terminals (J1-1 (+) internally connected to J1-3, and J1-2 (-) internally
connected to J1-4) to allow for easy daisy chaining of the bus.
IPC Diagnostics
The modules, in order to work together to control the chiller, must constantly
receive information from each other over the IPC. Failure of certain modules
to communicate or degradation of the communication link, could potentially
result in chiller misoperation. To prevent this situation, each module monitors
how often it is receiving information from designated other modules. If a
module fails to receive certain other module's transmitted data over a 15
second time period it will:
1. On its own, take specific action to safely shut-down (or to default) its con-
trolled loads.
2. Report a diagnostic to the CPM (over the IPC link).
The CPM (if it properly receives such) will then report and display the
diagnostic on the Clear Language Display accordingly. The diagnostic will:
• identify which module is reporting the communication problem and
• identify which module was to have sent the missing information.
The CPM itself will then send out further commands to the other modules to
shutdown or take default actions as the particular case may warrant.
All IPC diagnostics are displayed in the Clear Language Display's diagnostics
section. For example, “Chiller Mod indicating Options Mod Comm Failure”
indicates that the CPM Module has detected a loss of IPC communication

RLC-SVD03A-EN 9
Interprocessor Communication
from the Options Module. When some problem exists with the IPC link or a
module fails, it is not uncommon for more than one of these IPC diagnostics
to be displayed. Note that only those diagnostics that are indicated to be
active currently exist. All other historic diagnostics should be disregarded for
the purpose of the following troubleshooting discussion. See RTAA-IOM-4 for
a complete listing of diagnostics.
Troubleshooting Modules Using IPC Diagnostics
WARNING
Live Electrical Components!
During installation, testing, servicing and troubleshooting of this
product, it may be necessary to work with live electrical
components. Have a qualified licensed electrician or other
individual who has been properly trained in handling live
electrical components perform these tasks. Failure to follow all
electrical safety precautions when exposed to live electrical
components could result in death or serious injury.
Communication problems can result from any of the following:
1. Improperly set IPC address dip switches
2. Opens or shorts in the twisted pair IPC wiring or connectors
3. Loss of power to a module
4. Internal module failure
5. Improper connections on terminal J2
6. High levels of EMI (Electro-Magnetic Interference)
7. Module specific function selected without the Options Module.
These are discussed in more detail in the following paragraphs.
1. Improperly set IPC address dip switches:
This could result in more than one module trying to talk at the same time,
or cause the mis-addressed module to not talk at all. Only the MCSP and
the EXV modules have IPC address dip switches, found in the upper left
hand portion of the Module labeled as SW-1. The proper dip switch set-
ups are shown in Table 2.
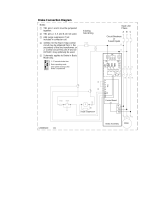
2. Opens or shorts in the twisted pair IPC wiring or connectors:
One or more modules may be affected by an open or a short in the IPC
wiring, depending on the location of the fault in the daisy chain. The dia-
gram below shows the daisy chain order and is helpful in diagnosis of an
open link.
Extreme care should be used in making any dip switch changes or when
replacing MCSP modules. “Swapping” of addresses on the MCSPs
cannot be detected by the communication diagnostics discussed above
and serious chiller misoperation will result.

10 RLC-SVD03A-EN
Interprocessor Communication
Figure 1 IPC Link Order For 70-125 Ton RTAA
*
#,$
5
*
-3#0"
5
*
-3#0!
5
*
#32
5
*
)0#"
5
2%-/4%
#,$
*
%86
-!34%2
5
*
#0-
5
*
,#)#
5
/R
5AND5AREMUTUALLYEXCLUSIVEOPTIONS
4HE2EMOTE#,$ISNOTAVAILABLEIFTHE5OPTIONISINSTALLED

RLC-SVD03A-EN 11
Interprocessor Communication
.
3. Loss of power to a module:
Generally a power loss to a particular module will only affect communica-
tions with that module. The module can usually be identified by analysis
of the IPC diagnostics. (When the display is blank, check power at the
CLD). Loss of power can most directly be diagnosed by measuring the
AC voltage at the top of the fuse with respect to the neutral of the power
connection (pins 4 or 5) on the terminal just below the fuse:
4. Internal module failure:
Internal module failures usually result only in communication loss to the
failed module, but could, in some cases, affect all the modules because
the failed module may “lock up” the IPC bus and prevent all communica-
tions. The former can be identified by analyzing all of the active IPC diag-
nostics. The latter can be identified in a process of elimination, whereby
each module, in turn, is taken out of the IPC link and a jumper installed in
its place. See Figure 3. The CPM can then be reset and the new IPC diag-
nostics that result can be analyzed.
Table 2 IPC Address Dip Switch (SW1) Settings for MCSP an EXV Modules
MODULE DESIG. CONTROLLING DIP SWITCH SETTING
SW1-1 SW1-2
MCSP “A” 1U4 COMPRESSOR A OFF OFF
MCSP “B” 1U5 COMPRESSOR B OFF ON
EXV 1U3 CKTS. 1 & 2 OFF OFF
Figure 2 Module Fuse and Power Connection, Except CLD
1(875$/
IXVHGVLGH
)86(
XQVZLWFKHGVLGH
9$&3RZHU
&RQQHFWLRQ
833(55,*+7
&251(52)
02'8/(
³9$&´
7R&KHFN
)XVH
-
+
+
1
1
+
1
1&

12 RLC-SVD03A-EN
Interprocessor Communication
5. Improper connections to terminal J2:
Jack J2, present on all modules except CLD, should have no connections.
This input is for manufacturing test purposes only and any connections,
shorts, etc. will potentially cause the module to not respond, respond to
the wrong address, or (in the case of the CPM) fail to initiate any commu-
nications and thus fail the entire IPC.
6. High levels of Electro-Magnetic Interference:
The modules and the IPC have been qualified under severe EMI (both
radiated and conducted) and the system was determined to be immune
to all but extremely high noise levels. Always be sure to close and latch
the control panel cabinet doors as the panel enclosure provides signifi-
cant shielding and is integral in the overall noise immunity of the control
system.
7. Module specific function selected without the Options Module:
If any of the functions on the Options Module are selected but the
Options Module is not present, the UCM will look for this module and
generate an error. The Options Module functions include Chilled Water
Reset, Ice Machine Control, External Chilled Water Setpoint, External
Current Limit Setpoint, and Tracer/Summit Communications.
Troubleshooting Procedure
1. Place the CPM in “Stop”. Record the active IPC diagnostics as shown in
the Diagnostics Report of the CLD. The communication failure diagnos-
tics and their meanings are shown in IPC Diagnostics of the RTAA-IOM-4
manual.
2. Determine which modules are not talking. These modules must be
affected by one of the previously stated problems. If there is a group of
modules not talking, suspect a wiring problem early in the daisy chain
link. If only one module is not talking, suspect a loss of power or blown
fuse.
Figure 3 IPC Jumper For Bypassing Modules (to be inserted into MTA
connector in place of module)
:LUH
MXPSHUV
VROGHUHGRU
ZUDSSHGLQWR
SLQV
$03FF
KHDGHUSLQV
RUHTXLY
-

RLC-SVD03A-EN 13
Interprocessor Communication
3. Determine which modules are still talking. Wiring up to these is likely to
be OK.
4. Try disconnecting the link or jumping out modules in the link at various
places (use Figure 1). Reset the diagnostics and note which diagnostics
reappear.
Here are some examples of IPC diagnostics:
Diagnostics present:
Chiller Mod Indicating EXV Mod Communications
Cprsr A Indicating EXV Mod Communications
Cprsr B Indicating EXV Mod Communications
The CPM and both MCSP modules are detecting a loss of communications
with the EXV. Suspect power to the EXV or its fuse or a wiring problem
downstream of the MCSP A and B modules.
Diagnostics present:
Chiller Mod Indicating Options Mod Communications
Chiller Mod Indicating EXV Mod Communications
Chiller Mod Indicating Cprsr A Communications
Chiller Mod Indicating Cprsr B Communications
The CPM is reporting that it cannot talk to any of the other modules. Suspect
a shorted IPC bus or a module locking up the bus. The CPM could also be bad
and not be sending recognizable tokens. Discriminating between these possi-
bilities is done by disconnecting the link or jumping out modules in the link at
various places. Refer to Item 4 in Troubleshooting Modules (Troubleshooting
Modules Using IPC Diagnostics on page 9) for the procedure and the IPC
Jumper for bypassing the Modules.
Diagnostics present:
Chiller Mod Indicating Cprsr B Communications
EXV Mod Indicating Cprsr B Communications
The CPM and EXV have both detected a communication loss with MCSP B.
Suspect the address switch on MCSP B or a power/fuse problem.
Diagnostics present:
Chiller Mod Indicating Cprsr A Communications
Chiller Mod Indicating Cprsr B Communications
EXV Mod Indicating Cprsr A Communications
EXV Mod Indicating Cprsr B Communications
The CPM and EXV have both detected a communication loss with MCSP A
and MCSP B. Suspect that the address switches on both modules are set to
the same address. Wiring is probably OK since the EXV can talk to the CPM.
Diagnostics present:
Chiller Mod Indicating Cprsr B Communications
Chiller Mod Indicating Cprsr A Communications
Chiller Mod Indicating EXV Mod Communications

14 RLC-SVD03A-EN
Interprocessor Communication
The CPM has detected loss of communications with MCSP A, MCSP B,
and EXV. Suspect an open early in the IPC link between the CPM and
MCSP B.
There are a large number of possible combinations of diagnostics. One must
deduce what is causing the problem using all available information.
If the CLD Comm link to the CPM is broken, the message is:
No Communication, Data Not Valid

RLC-SVD03A-EN 15
Temperature Sensor Checkout
With the exception of the thermostats located in the motor windings of the
screw compressors, all the temperature sensors used on the UCMs are
negative temperature coefficient (NTC) thermistors. The thermistors
employed all have a base resistance of 10 Kohms at 77F (25C) and display a
decreasing resistance with an increasing temperature. The UCMs “read” the
temperature by measuring the voltage developed across the thermistors in a
voltage divider arrangement with a fixed internal resistance. The value of this
“pull-up” resistor is different depending on the temperature range where the
most accuracy is desired. The voltage source for this measurement is a
closely regulated 5.0 VDC supply.
An open or shorted sensor will cause the UCM to indicate the appropriate
diagnostic. In most cases, an open or short will cause a CMR or MMR
diagnostic that will result in a machine or circuit shutdown. Open or shorts on
less critical Outdoor Air or Zone Temperature sensors will result in an
Informational Warning Diagnostics and the use of default values for
that parameter.
Temperature Sensor Checkout Procedure
WARNING
Live Electrical Components!
During installation, testing, servicing and troubleshooting of this
product, it may be necessary to work with live electrical
components. Have a qualified licensed electrician or other
individual who has been properly trained in handling live
electrical components perform these tasks. Failure to follow all
electrical safety precautions when exposed to live electrical
components could result in death or serious injury.
1. Measure the temperature at the sensor using an accurate thermometer.
Record the temperature reading observed.
2. With the sensor leads connected to the UCM and the UCM powered,
measure the DC voltage across the sensor leads at the terminal or probe
the back of the MTA plug.
NOTE: Always use a digital volt-ohmmeter with 10 megohm or greater input
impedance to avoid “loading down” the voltage divider. Failure to do so will
result in erroneously high temperature calculations.
3. Locate the appropriate sensor table. Table 3: Evaporator Water and
Refrigerant Temperature Sensors, Table 4: Saturated Condenser Refriger-
ant and Entering Oil Temperature Sensors. Then compare the tempera-
ture in the table corresponding to the voltage reading recorded in Step 2
with the actual temperature observed in Step 1. If the actual temperature
measured falls within the allowable tolerance range, both the sensor and
the UCM's temperature input circuits are operating properly. However, if
the actual temperature is outside the allowable sensor tolerance range,
proceed to Step 4.

16 RLC-SVD03A-EN
Temperature Sensor Checkout
4. Again measure the temperature at the sensor with an accurate thermom-
eter; record the temperature reading observed.
5. Remove the sensor leads from the terminal strip or unplug the respective
MTA. Measure the resistance of the sensor directly or probe the MTA
with a digital volt-ohmmeter. Record the resistance observed.
6. Next, with the sensor still disconnected from the module, check the
resistance from each of the sensor leads to the control panel chassis.
Both readings should be more than 1 Megohm. If not, the sensor or the
wiring to the sensor is either shorted or leaking to chassis ground and
must be repaired.
7. Select the appropriate sensor table and locate the resistance value
recorded in Step 5. Verify that the temperature corresponding to this
resistance value matches (i.e. within the tolerance range specified for
that sensor) the temperature measured in Step 4.
8. If the sensor temperature is out of range, the problem is either with the
sensor, wiring, or the MTA connector (if applicable). If an MTA connector
is used and the thermistor reads open, first try cutting off the MTA, strip-
ping a small amount of insulation from the sensor wire's end and repeat-
ing the measurement directly to the leads. Once the fault has been
isolated in this manner, install a new sensor, connector or both. When
replacing a sensor, it is easiest to cut the sensor wire near the MTA end
and splice on a new sensor using wire nuts.
9. A decade box can be substituted for the sensor and any sensor table
value used to relate resistance to temperature. By removing the MTA
plug and applying the resistance to the proper pin terminals, the tempera-
ture, as sensed by the UCM, can be confirmed. Using the CLD menu dis-
plays, scroll to the display of the temperature of interest.
NOTE: All displayed temperatures are slew rate limited and only accurate
within a specified normal range. It is therefore important to be certain that
the temperature readings are stable and that adequate time, up to 1 minute,
is allowed after step changes in resistance inputs are made.
10. In all instances where module replacement is indicated, first perform the
power supply/fuse check according to the information in the section
“Module Power and Miscellaneous I/O” starting on page 41.

RLC-SVD03A-EN 17
Temperature Sensor Checkout
.
1. Overall accuracy for any of the sensors is at least + 2 F over the range shown. Accuracy of matched sensors is + 1 F over specific ranges.
2. As you compare a thermistor resistance (or input voltage) reading with the “actual” temperature indicated by the thermometer, be sure to
consider the precision and location of the thermometer when you decide whether or not the thermistor is out of specified accuracy.
3. The thermistor resistances given do not account for the self-heating effects that are present when connected to the UCM. A connected
“operating” thermistor will read a slightly lower (less than 1%) resistance.
Table 3 Sensor Conversion Data: Outdoor Air (6RT3), Entering and Leaving Evap Water Temp Matched
Pairs (6RT7, 6RT8), and Saturated Evap and Comp Suction Refrigeration Temp (6RT9, 3B1RT5; 6RT10, 4B1RT6)
Actual
Te m p .
(F)
Actual
Resistance
(Ohms)
Thermistor
Vol tage
(Volts DC)
Actual
Te m p .
(F)
Actual
Resistance
(Ohms)
Thermistor
Vol tage
(Volts DC)
Actual
Te m p .
(F)
Actual
Resistance
(Ohms)
Thermistor
Vol tage
(Volts DC)
-20.0 170040.3 4.448 30.0 34838.9 3.120 80.0 9297.5 1.533
-19.0 164313.4 4.434 31.0 33833.3 3.086 81.0 9075.9 1.509
-18.0 158796.5 4.414 32.0 32861.4 3.047 82.0 8860.2 1.484
-17.0 153482.9 4.395 33.0 31935.3 3.018 83.0 8650.4 1.460
-16.0 148365.0 4.380 34.0 31038.7 2.983 84.0 8446.2 1.436
-15.0 143432.2 4.360 35.0 30170.5 2.949 85.0 8247.5 1.411
-14.0 138679.6 4.341 36.0 29329.5 2.910 86.0 8054.1 1.387
-13.0 134098.6 4.321 37.0 28515.0 2.876 87.0 7865.8 1.362
-12.0 129684.9 4.302 38.0 27725.9 2.842 88.0 7682.5 1.343
-11.0 125428.5 4.282 39.0 26961.4 2.808 89.0 7504.2 1.318
-10.0 121326.1 4.263 40.0 26220.8 2.773 90.0 7330.5 1.294
-9.0 117369.6 4.238 41.0 25503.0 2.739 91.0 7161.4 1.274
-8.0 113554.9 4.219 42.0 24807.5 2.705 92.0 6996.7 1.250
-7.0 109876.5 4.194 43.0 24133.3 2.671 93.0 6836.3 1.230
-6.0 106328.1 4.175 44.0 23479.7 2.637 94.0 6680.1 1.211
-5.0 102904.9 4.150 45.0 22846.1 2.603 95.0 6528.0 1.187
-4.0 99602.3 4.126 46.0 22231.9 2.568 96.0 6379.8 1.167
-3.0 96416.1 4.106 47.0 21636.2 2.534 97.0 6235.5 1.147
-2.0 93341.6 4.082 48.0 21058.7 2.505 98.0 6094.8 1.128
-1.0 90374.2 4.058 49.0 20498.4 2.471 99.0 5957.8 1.108
0.0 87510.3 4.033 50.0 19955.0 2.437 100.0 5824.3 1.089
1.0 84745.9 4.004 51.0 19427.9 2.402 101.0 5694.2 1.069
2.0 82077.1 3.979 52.0 18916.5 2.368 102.0 5567.4 1.050
3.0 79500.5 3.955 53.0 18420.3 2.334 103.0 5443.8 1.030
4.0 77012.3 3.926 54.0 17938.8 2.305 104.0 5323.3 1.016
5.0 74609.7 3.901 55.0 17471.6 2.271 105.0 5205.9 0.996
6.0 72288.8 3.872 56.0 17018.0 2.236 106.0 5091.5 0.977
7.0 70047.4 3.848 57.0 16577.8 2.207 107.0 4979.9 0.962
8.0 67881.9 3.818 58.0 16150.5 2.173 108.0 4871.1 0.942
9.0 65790.2 3.789 59.0 15735.7 2.144 109.0 4765.0 0.928
10.0 63768.7 3.760 60.0 15332.9 2.109 110.0 4661.5 0.913
11.0 61815.3 3.730 61.0 14941.7 2.080 111.0 4560.6 0.894
12.0 59927.8 3.701 62.0 14561.9 2.046 112.0 4462.2 0.879
13.0 58103.1 3.672 63.0 14193.0 2.017 113.0 4366.3 0.864
14.0 56339.6 3.643 64.0 13834.6 1.987 114.0 4272.6 0.850
15.0 54634.7 3.608 65.0 13486.5 1.958 115.0 4181.3 0.835
16.0 52986.4 3.579 66.0 13148.3 1.924 116.0 4092.2 0.820
17.0 51392.6 3.550 67.0 12819.8 1.895 117.0 4005.3 0.806
18.0 49851.6 3.516 68.0 12500.5 1.865 118.0 3920.5 0.791
19.0 48360.9 3.486 69.0 12190.2 1.836 119.0 3837.7 0.776
20.0 46919.2 3.452 70.0 11888.7 1.807 120.0 3756.9 0.762
21.0 45524.6 3.418 71.0 11595.6 1.777 121.0 3678.1 0.747
22.0 44175.6 3.389 72.0 11310.7 1.753 122.0 3601.1 0.732
23.0 42870.3 3.354 73.0 11033.7 1.724 123.0 3526.5 0.723
24.0 41607.6 3.320 74.0 10764.4 1.694 124.0 3453.6 0.708
25.0 40385.3 3.286 75.0 10502.6 1.670 125.0 3382.4 0.698
26.0 39202.7 3.257 76.0 10248.0 1.641 126.0 3313.0 0.684
27.0 38057.9 3.223 77.0 10000.4 1.616 127.0 3245.1 0.674
28.0 36950.0 3.188 78.0 9759.6 1.587 128.0 3178.9 0.659
29.0 35877.4 3.154 79.0 9525.4 1.563 129.0 3114.2 0.649
130.0 3051.0 0.635

18 RLC-SVD03A-EN
Temperature Sensor Checkout
1. Overall accuracy for the sensor is at least + 2 F over the range shown.
2. As you compare a thermistor resistance (or input voltage) reading with the “actual” temperature indicated by the thermometer, be sure to
consider the location and precision of the thermometer when you decide whether or not the thermistor is out of specified accuracy.
3. The thermistor resistances given do not account for the self-heating effects that are present when connected to the UCM. A connected
“operating” thermistor will read a slightly lower (less than 1%) resistance.
Table 4 Sensor Conversion Data: Saturated Condenser and Entering Oil Temperature Matched Pairs
(6RT12, 3B1RT1; 6RT13, 4B1RT2)
Actual
Te m p .
(F)
Actual
Resistance
(Ohms)
Thermistor
Voltage
(Volts DC)
Actual
Te m p .
(F)
Actual
Resistance
(Ohms)
Thermistor
Vol tage
(Volts DC)
Actual
Te m p .
(F)
Actual
Resistance
(Ohms)
Thermistor
Voltage
(Volts DC)
0.0 87510.3 4.651 50.0 19955.0 3.765 100.0 5824.3 2.356
1.0 84745.9 4.641 51.0 19427.9 3.740 101.0 5694.2 2.327
2.0 82072.1 4.630 52.0 18916.5 3.715 102.0 5567.4 2.300
3.0 79500.1 4.619 53.0 18420.3 3.689 103.0 5443.8 2.272
4.0 77012.3 4.608 54.0 17938.8 3.664 104.0 5323.3 2.244
5.0 74609.7 4.596 55.0 17471.6 3.638 105.0 5205.9 2.217
6.0 72288.8 4.584 56.0 17018.0 3.611 106.0 5091.5 2.189
7.0 70047.4 4.572 57.0 16577.8 3.585 107.0 4979.9 2.162
8.0 67881.9 4.560 58.0 16150.5 3.558 108.0 4871.1 2.135
9.0 65790.2 4.547 59.0 15735.7 3.531 109.0 4765.0 2.108
10.0 63768.7 4.534 60.0 15332.9 3.504 110.0 4661.5 2.082
11.0 61815.3 4.521 61.0 14941.7 3.477 111.0 4560.6 2.055
12.0 59927.8 4.507 62.0 14561.9 3.450 112.0 4462.2 2.029
13.0 58103.1 4.494 63.0 14193.0 3.422 113.0 4366.3 2.003
14.0 56339.6 4.479 64.0 13834.6 3.394 114.0 4272.6 1.977
15.0 54634.7 4.465 65.0 13486.5 3.366 115.0 4181.3 1.951
16.0 52986.4 4.450 66.0 13148.3 3.338 116.0 4092.2 1.926
17.0 51392.6 4.435 67.0 12819.8 3.310 117.0 4005.3 1.901
18.0 49851.6 4.420 68.0 12500.5 3.282 118.0 3920.5 1.876
19.0 48360.9 4.404 69.0 12190.2 3.253 119.0 3837.7 1.851
20.0 46919.2 4.388 70.0 11888.7 3.225 120.0 3756.9 1.826
21.0 45524.6 4.372 71.0 11595.6 3.196 121.0 3678.1 1.802
22.0 44175.6 4.355 72.0 11310.7 3.167 122.0 3601.1 1.777
23.0 42870.3 4.338 73.0 11033.7 3.139 123.0 3526.5 1.754
24.0 41607.6 4.321 74.0 10764.4 3.110 124.0 3453.6 1.730
25.0 40385.3 4.303 75.0 10502.6 3.081 125.0 3382.4 1.707
26.0 39202.7 4.285 76.0 10248.0 3.051 126.0 3313.0 1.684
27.0 38057.9 4.266 77.0 10000.0 3.022 127.0 3245.1 1.661
28.0 36950.0 4.248 78.0 9759.6 2.993 128.0 3178.9 1.638
29.0 35877.4 4.229 79.0 9525.4 2.964 129.0 3114.2 1.615
30.0 34838.9 4.209 80.0 9297.5 2.935 130.0 3051.0 1.593
31.0 33833.3 4.190 81.0 9075.9 2.905 131.0 2989.2 1.571
32.0 32861.4 4.170 82.0 8860.2 2.876 132.0 2928.9 1.549
33.0 31935.3 4.150 83.0 8650.4 2.847 133.0 2870.0 1.528
34.0 31038.7 4.130 84.0 8446.2 2.817 134.0 2812.4 1.506
35.0 30170.5 4.109 85.0 8247.5 2.788 135.0 2756.2 1.485
36.0 29329.5 4.088 86.0 8054.1 2.759 136.0 2701.2 1.464
37.0 28515.0 4.067 87.0 7865.8 2.730 137.0 2647.5 1.444
38.0 27725.9 4.045 88.0 7682.5 2.700 138.0 2595.0 1.423
39.0 26961.4 4.024 89.0 7504.2 2.671 139.0 2543.7 1.403
40.0 26220.8 4.002 90.0 7330.5 2.642 140.0 2493.6 1.383
41.0 25503.0 3.979 91.0 7161.4 2.613 141.0 2444.6 1.364
42.0 24807.5 3.957 92.0 6996.7 2.584 142.0 2396.7 1.344
43.0 24133.3 3.934 93.0 6836.3 2.555 143.0 2349.9 1.325
44.0 23479.7 3.910 94.0 6680.1 2.526 144.0 2304.1 1.306
45.0 22846.1 3.887 95.0 6528.0 2.498 145.0 2259.2 1.287
46.0 22231.9 3.863 96.0 6379.8 2.469 146.0 2216.0 1.269
47.0 21636.2 3.839 97.0 6235.5 2.440 147.0 2172.8 1.250
48.0 21058.7 3.815 98.0 6094.8 2.412 148.0 2131.6 1.232
49.0 20498.4 3.790 99.0 5957.8 2.384 149.0 2090.4 1.215
150.0 2051.2 1.197

RLC-SVD03A-EN 19
Compressor Operation
This feature is called the Auto Lead/Lag and can be found in the Service
Settings Group, under the “Balanced CPRSR Starts and Hours” menu. When
this function is disabled, the UCM always starts compressor “A” first. When
this function is enabled, the following occurs:
The UCM equalizes operating starts and hours. This will cause the
compressor with the least amount of starts to be started first. When a
compressor starts, it is always started unloaded.
When a compressor is stopped, it shuts down in an unloaded state, unless
taken out by a manual reset diagnostic.
When the first compressor is brought on line, it attempts to meet the load by
staging on the step load solenoid and by pulsing the male slide valve load
solenoid. If one compressor cannot meet the load demand, the second
compressor is brought on line. It also attempts to meet the load demand by
staging on its step load solenoid and by pulsing its male slide valve solenoid.
When both compressors are running and both of their step load solenoids are
energized, the male load and unload solenoids on both compressors are
pulsed, thus modulating their respective slide valves to balance the load. The
UCM attempts to distribute the load evenly between the two compressors.
When the load drops off, the compressor with the most hours will always be
the first to unload and turn off. The anti-recycle timer is approximately 5
minutes from start to start. The minimum time between compressor
shutdown and restart is approximately 10 seconds, but only if the
compressor has been running over 5 minutes or longer prior to shutting down
on temperature. Otherwise, it is the remaining portion of the 5 minutes.
Restart Inhibit Timer
If compressor operation is interrupted by an extended (not momentary) loss
of power or a manual reset, there will be a two minute delay between the
power up or manual reset and the start of a compressor, assuming there is a
call for cooling. The timer is factory set at 2 minutes but can be field adjusted
from 30 seconds to two minutes in the Service Settings Group.

20 RLC-SVD03A-EN
Compressor Start/Stop
To start a compressor after either a “normal' shutdown, a Diagnostic reset, or
power-on-reset, the following sequence will occur:
1. On a call for a compressor, the Restart Inhibit Timer will time out, if any
time remains.
2. The EXV is positioned to the initial closed start position. At the same
time, the unload solenoid is energized and the load solenoid is de-ener-
gized. Timing is determined by the time required to position the EXV
3. After the EXV is positioned:
• the compressor is turned on
• the compressor heater is de-energized
• the saturated evaporator ref. temp. cutout ignore time is set, based on
the saturated condenser temperature. Prior to start, the condenser tem-
perature approximates the ambient temperature.
• the fan control algorithm is executed
To stop a compressor due to either the Stop button on the CLD or an
External/Remote “STOP”, the sequence shall be as follows:
1. The unload solenoid is energized for 20 seconds and the load solenoid is
de-energized. The compressor continues to run for the remaining 20 sec-
onds. This is defined as the RUN:UNLOAD mode.
2. The compressor and the fans are turned off. The crankcase heater is
energized.
3. The unload solenoid remains energized for 60 minutes after the compres-
sor stops. The load solenoid is de-energized.
4. The EXV is closed. Closing begins at maximum speed when the com-
pressor is turned off. (Max. speed is 25 steps per second, full stroke is
757 steps.
5. After 60 minutes, the unload solenoid de-energizes.
The RUN:UNLOAD mode is also used to stop a compressor due to normal
LWT control, Low Ambient Run Inhibit, or Freeze Avoidance.
A compressor stop due to any diagnostic will skip step 1 above and go
directly to step 2.
/