Metra. The World’s Best Kits.
®
MetraOnline.com © COPYRIGHT 2020 METRA ELECTRONICS CORPORATION REV. 9/17/20 INST107-MZ1B
INSTALLATION INSTRUCTIONS
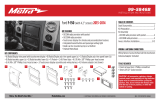
107-MZ1B
U.S. Patent Pending
Attention! Let the vehicle sit with the key
out of the ignition for a few minutes before
removing the factory radio. When testing the
aftermarket equipment, ensure that all factory
equipment is connected before cycling the
key to ignition.
KIT FEATURES
• ISO DDIN radio provision †
• Pioneer modular DDIN radio provision ‡
KIT COMPONENTS
• A) Trim panel • B) Back panel • C) Radio bracket • D) Pioneer brackets • E) Panel clips (2) • F) Flat-head radio screws (8)
TOOLS REQUIRED
• Panel removal tool • Phillips screwdriver
• 10mm Socket wrench
TABLE OF CONTENTS
Dash Disassembly ..................................................2
Kit Preparation .......................................................3
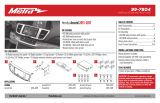
Kit Assembly
–ISO DDIN radio provision .................................4-5
–Pioneer modular DDIN radio provision ......... 6-7
WIRING & ANTENNA CONNECTIONS
(sold separately)
Wire harness: 70-7903L, 70-7905
Antenna adapter: 40-HD10L
Steering wheel control:
Go to AXXESSINTERFACES.COM for options
A B C D
F
E
Mazda CX-3 2016-2020
Toyota Yaris 2019-2020
Visit MetraOnline.com for more detailed information about the product and up-to-date vehicle
specific applications
† Kit designed for “L” shaped aftermarket radio, with chassis at bottom
‡ Pioneer radios DMH-C2550NEX and DMH-C2500NEX