Page is loading ...

High Performance
WHOLE HOUSE SYSTEMS
Large Capacity
Use & Care Guide for
Homeowner: Please retain for operational
and future maintenance instructions.
4WH-QS-S01
4WH-QCTO-S01
USE & CARE GUIDE
34-8716-6559-1
Systems tested and certifi ed by NSF International against
NSF/ANSI Standard 42 for the reduction of claims
specifi ed on the Performance Data Sheet.
®

2
• Read and follow Use & Care Guide before installation and
use of this system.
• Change the disposable fi lter cartridge at the recommended
interval; the disposable fi lter cartridge MUST be replaced
every 12 months or sooner.
• Failure to replace the disposable fi lter cartridge at
recommended intervals may lead to reduced fi lter
performance and failure of the fi lter, causing property
damage from water leakage or fl ooding.
• Installation and use MUST comply with all state and local
plumbing codes.
• Protect from freezing, remove fi lter cartridge when
temperatures are expected to drop below 33 °F (4.4 °C).
• DO NOT install systems in areas where ambient
temperatures may go above 110 °F (43.3 °C).
• DO NOT install on hot water supply lines. The maximum
operating water temperature of this fi lter system is 100 °F
(37.8 °C).
• DO NOT install if water pressure exceeds 125 psi (862kPa).
If your water pressure exceeds 80 psi (552 kPa), you
must install a pressure limiting valve. Contact a plumbing
professional if you are uncertain how to check your water
pressure.
• DO NOT install where water hammer conditions may occur.
If water hammer conditions exist you must install a water
hammer arrester. Contact a plumbing professional if you are
uncertain how to check for this condition.
• Where a backfl ow prevention device is installed on a
water system, a device for controlling pressure due to
thermal expansion MUST be installed. Contact a plumbing
SAFETY INFORMATION
Read, understand, and follow all safety information contained in these instructions
prior to installation and use of the Filtrete
™
Quick Change Whole House Systems,
Large Capacity. Retain these instructions for future reference.
WARNING
WARNING
NOTICE
Read entire Use & Care Guide. Failure to follow all guides and rules could cause personal injury or
property damage.
• Check with your local public works department for plumbing codes. You must follow their guidelines as you install the
water fi ltration system.
• Your water fi ltration system will withstand up to 125 pounds per square inch (psi) water pressure. If your house water
supply pressure is higher than 80 psi, install a pressure reducing valve before installing the water fi ltration system.
To reduce the risk associated with choking:
• DO NOT allow children under 3 years of age to have access to small parts during the installation of this product.
To reduce the risk associated with the ingestion of contaminants:
• DO NOT use with water that is microbiologically unsafe or of unknown quality without adequate disinfection before or
after the system.
To reduce the risk associated with hazardous voltage due to an installer drilling through existing
electric wiring or water pipes in the area of installation:
• DO NOT install near electric wiring or piping which may be in path of a drilling tool when selecting the position to mount
the fi lter bracket.
To reduce the risk associated with hazardous voltage:
• If the home electrical system requires use of the cold water system as an electrical safety ground, a jumper MUST
be used to ensure a suffi cient ground connection across the fi lter installation piping — refer installation to qualifi ed
personnel.
To reduce the risk of physical injury:
• Depressurize system as shown in manual prior to cartridge removal.
EXPLANATION OF SIGNAL WORD CONSEQUENCES
Indicates a potentially hazardous situation, which, if not avoided, could
result in death or serious injury and/or property damage.
Indicates a potentially hazardous situation, which, if not avoided, may
result in property damage.
Intended use:
Filtrete
™
Quick Change Whole House Systems, Large Capacity (4WH-QS-S01 and 4WH-QCTO-S01) is intended
for use in fi ltering potable water and has not been evaluated for other uses. The product is installed at the point
of entry (main distribution pipe) and must be installed as specifi ed in the installation instruction by a qualifi ed
professional.
NOTICE
To reduce the risk associated with property damage due to water leakage or fl ooding:

IMPORTANT NOTES:
• Failure to follow instructions will void warranty.
• Allow a minimum of 3" clear space under fi lter to facilitate change.
• Install with the inlet and outlet ports as labeled. Make sure not to reverse connections.
• Some local codes may require the use of a licensed plumber or certifi ed installer when disrupting a potable water line.
Installer: Please leave this manual with owner/operator.
Homeowner: Please retain for operation and future maintenance instructions.
IMPORTANT NOTES:
Installation schematic is based on suggested materials. Installation of this fi lter can be modifi ed by using various adapters,
or alternative connection methods and fi ttings to accommodate larger or smaller copper pipe or plastic tubing.
PARTS AND MATERIALS: (included)
•
Fil
ter
H
ea
d
(A)
• Filter Cartridge (B)
GETTING STARTED
A. B.
3
professional if you are uncertain how to select/install/
maintain a thermal expansion device.
• Where a booster pump is installed on a water system,
you MUST maintain and inspect the attached pressure
switch regularly in accordance with the booster pump
manufacturer’s instructions. Contact a plumbing
professional if you are uncertain how to maintain your
booster pump system.
• Where a booster pump is installed on a water system,
you MUST install an appropriate pressure relief valve.
Pressure relief valve must be maintained and inspected
every 6 months. Contact a plumbing professional if you are
uncertain how select/install/maintain a pressure relief valve.
• Where a booster pump is installed on a water system,
you MUST install an appropriate pressure regulating valve
and regulate water pressure to <80psi. Contact a
plumbing professional if you are uncertain how select/
install/maintain a pressure regulating valve.
• DO NOT use a torch or other high temperature sources near
fi lter system, cartridges, plastic fi ttings or plastic plumbing.
• On plastic fi ttings, never use pipe sealant or pipe dope.
Use PTFE thread tape ONLY, pipe dope properties may
deteriorate plastic.
• Take care when using pliers or pipe wrenches to tighten
plastic fi ttings, as damage may occur if over tightening
occurs.
• DO NOT install in direct sunlight or outdoors.
• DO NOT install near water pipes which will be in path of
a drilling tool when selecting the position to mount the
bracket.
• Mount fi lter in such a position as to prevent it from being
struck by other items used in the area of installation.
• Ensure that the location and fasteners will support the
weight of the system when installed and full of water.
• Ensure all tubing and fi ttings are secure and free of leaks.
• Shut off fuel or electric power supply to water heater after
water is shut off during system installation.
To reduce the risk of water leakage or fl ooding, and to ensure optimal fi lter performance:
• Change the disposable fi lter cartridge every 12 months or
sooner if you observe a noticeable reduction in water fl ow
rate.
• Failure to replace the disposable fi lter cartridge at
recommended intervals may lead to reduced fi lter
performance and cracks in the fi lter housing, causing
water leakage or fl ooding.

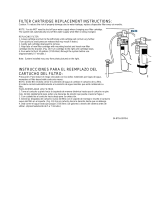
Master
Shut-Off
Valve
Main
Valve
Main
Valve
To Household
Plumbing
Pump
Master
Shut-Off
Valve
To Household
Plumbing
Pressure
Tank
00 00 6 9
Gallons
2700
3000
Model BRP
20
10
30
40
50
70
80
90
0
Badger Meter
300
600
1600
1800
12002100
2400
Water
Meter
Figure 1
4
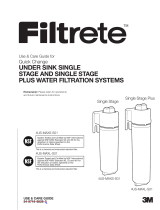
TOOLS AND MATERIALS REQUIRED: (Not included)
Gather the required tools and materials before beginning installation. Read and follow the instructions provided with any tools listed here.
A) Pipe Cutter
B) Two 3/4" Female Adapters
C) 3/4" Ball Valve (3 total)
D) Plumbers Tape
E) Two Adjustable Wrenches
F) 3/4" pipe
G) Two 3/4" elbows
H) Two 3/4" x 3/4" x 3/4" tees
I) Mounting hardware
J) Safety Glasses
K) Bucket
L) Towel
City Water Installation
Well Water Installation
NOTICE
To reduce the risk associated with property damage due to water leakage:
• Installation and use MUST comply with all state and local plumbing codes.
A
B
C
D
F
J
K
L
G
H
I
E

5
NOTICE
Instructions below reference Figure 2.
1. Plan system location, support, layout and size.
2. Shut off main water supply. Depressurize water lines by opening a faucet downstream.
3. Using pipe cutters, remove a section of pipe in the install location corresponding to the size of the predetermined system assembly.
Keep a bucket and towel handy to catch and wipe up any water that drains from the line while cutting.
4. Assemble and install system as shown, observing correct fl ow direction of manifold. Use three shut-off valves and one fi ltration unit as shown.
Use pipe and sweated connections to assemble system. Support system by fastening bracket to wall or other framing. Alternatively, pipe hangers
may be installed on both sides of the fi lter head.
5. Insert fi lter into fi lter head. Push fi lter up, then turn one quarter of a turn to the right until it stops.
6. Ensure valve 1 and faucet downstream are open. Close valves 2 and 3. Turn on water supply, check for leaks.
7. While water is running through faucet, close valve 1, open valves 2 and 3. Allow fi lter to fi ll up.
8. Close valve 3, check for leaks again. If leaks, see Troubleshooting Section. If no leaks occur, open valve 3, let water run,
fl ushing air from the system for 10 gallons.
9. Close faucet.
To reduce the risk associated with property damage due to water leakage:
• On plastic fi ttings, never use pipe sealant or pipe dope. Use PTFE thread tape only, pipe dope properties may deteriorate plastic.
• Take care when using pliers or pipe wrenches to tighten plastic fi ttings, as damage may occur if overtightening occurs.
IMPORTANT INSTALLATION INSTRUCTIONS
NOTICE
To reduce the risk associated with property damage due to water leakage or fl ooding:
• The disposable fi lter MUST be replaced every 12 months or at the rated capacity or sooner if a noticeable reduction in fl ow rate occurs.
Filter life depends on local water conditions and the volume of water
used. We recommend you change your fi lter at the rated service interval
or earlier if a noticeable reduction in fl ow rate occurs.
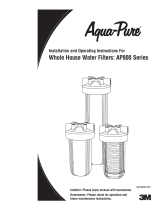
Note: Before changing fi lter, turn off water supply. Place a bucket
under fi lter to catch the small amount of water that will run out after
fi lter removal.
1. Close shut-off valve before fi lter head. Depressurize water lines by opening a
faucet downstream until water fl ow stops. Leave faucet open. Close shut-off
valve after fi lter head.
2. With both hands, turn fi lter one quarter of a turn to the left until it releases
from the fi lter head.
3. Insert new fi lter into fi lter head, turn one quarter of a turn to the right until it
stops. Ensure the lock icons line up with the hash mark on the fi lter head.
4. Open shut-off valve after fi lter head. Open shut-off valve before fi lter head.
Let water fl ush for 10 gallons (approx. 15 minutes).
5. Close faucet and check for leaks.
Replacement fi lters can be purchased at original point of sale.
Available fi lters include 4WH-QS-F01 for sediment reduction and
4WH-QCTO-F01 for chlorine taste and odor and sediment fi ltration.
FILTER REPLACEMENT INSTRUCTIONS
Step 2
Step 3

6
Water Leaks at Fittings:
Repeat install procedure.
If Leaks Persist:
Check joints, unions and fi lter head connections. Shut off water at the main water supply shut-off
valve, remove threaded fi ttings, strip off existing PTFE tape and apply new tape in a clockwise (to the right) direction and screw back
onto head assembly.
TROUBLESHOOTING GUIDE
LIMITED WARRANTY:
3M warrants this Product will be free from defects in material and manufacture for one (1) year from the date of purchase. This warranty does not cover failures
resulting from abuse, misuse, alteration or damage not caused by 3M or failure to follow installation and use instructions. No warranty is given as to the
service life of any fi lter cartridge or membrane as it will vary with local water conditions and water consumption. 3M MAKES NO OTHER WARRANTIES OR
CONDITIONS, EXPRESS OR IMPLIED, INCLUDING, BUT NOT LIMITED TO, ANY IMPLIED WARRANTY OR CONDITION OF MERCHANTABILITY OR FITNESS
FOR A PARTICULAR PURPOSE OR ANY IMPLIED WARRANTY OR CONDITION ARISING OUT OF A COURSE OF DEALING, CUSTOMER OR USAGE OF
TRADE. If the Product fails to satisfy this Limited Warranty during the warranty period, 3M will replace the Product or refund your Product purchase price.
This warranty does not cover labor. The remedy stated in this paragraph is Customer’s sole remedy and 3M’s exclusive obligation.
This warranty gives you specifi c legal rights, and you may have other rights which may vary from state to state, or country to country. For any warranty questions,
please call 1-800-388-3458 or mail your request to: Warranty Claims, 3M, Customer Care Center, 3M Center 225-3S-06, St. Paul, MN 55144-1000. Proof of
purchase (original sales receipt) must accompany the warranty claim, along with a complete description of the Product, model number and alleged defect.
LIMITATION OF LIABILITY:
3M will not be liable for any loss or damage arising from this 3M Product, whether direct, indirect, special, incidental, or consequential, regardless of the legal
theory asserted, including warranty, contract, negligence or strict liability. Some states and countries do not allow the exclusion of limitation of incidental or
consequential damages, so the above limitation or exclusion may not apply to you.
Distributed by:
3M, Constructionand Home Improvement Markets Division
3M Center, St. Paul, MN 55144-1000
1-800-388-3458
3M and Filtrete are trademarks of 3M Company.
NSF is a trademark of NSF International.
Timestrip is the registered trademark of Timestrip UK Limited.
All other trademarks are the property of their respective owners.
© 2015, 3M. All rights reserved.
Push to activate
Solid line will appear
and begin to ll within
a couple of minutes
6 months
Replace the lter
1. Press fi lter change indicator bubble fi rmly to activate.
2. Tape or place the fi lter change indicator on the system housing or in a noticeable location, such as your refrigerator door.
3. Do not place fi lter change indicator in refrigerator.
ACTIVATE FILTER CHANGE INDICATOR
To reduce the risk associated with choking, do not allow children under 3 years of age
access to the fi lter change indicator.
To reduce the risk of property damage, do not puncture fi lter change indicator bubble. The
non-toxic fl uid may stain certain materials.
WARNING
NOTICE

7
Mail Product Registration Form to:
3M, Customer Care Center
3M Center 225-3S-06
St. Paul, MN 55144-1000
Product Name: Model: Date Code:
Dr. □ Mr. □ Ms. □ Mrs. □ Miss □
First Name Last Name
Street Address Apt. #
City State ZIP Code
Email Address
*
Phone Number
Date of Purchase
PRODUCT REGISTRATION FORM
*Submitting your email address is optional. This information will be used only to provide you with information about 3M products and in
accordance with 3M’s privacy policy found at www.3M.com/privacy.
3M, Construction and Home Improvement Markets Division
3M Center, St. Paul, MN 55144-1000
1-800-388-3458
34-8716-6559-1

4WH-QS-S01
4WH-QCTO-S01
SISTEMAS
de Alto Rendimiento de Gran Capacidad
PARA CASAS ENTERA
Guía de uso y cuidado para
Propietario: por favor retenga este manual
para instrucciones futuras de operación y
mantenimiento.
GUÍA DE USO Y CUIDADO
34-8716-6559-1
Sistemas probados y certifi cados por NSF International contra
la norma 42 de NSF/ANSI para la reducción de reclamos
especifi cados en la Hoja de datos de rendimiento.
®

9
•
Lea y siga la Guía de uso y cuidados antes de instalar y usar este
sistema.
•
Reemplace el cartucho del fi ltro desechable según los intervalos
recomendados; el cartucho del fi ltro descart able se DEBERÁ
reemplazar cada 12 meses o antes.
•
Si no reemplaza el cartucho de fi ltro desechable según los
intervalos recomendados, puede disminuir el rendimiento del
fi ltro y provocar fallas en el fi ltro, causando daños a la propiedad
por pérdidas de agua o inundación.
•
La instalación y el uso DEBEN cumplir con todos los
códigos de plomería locales y estatales.
•
Proteja del congelamiento, retire el cartucho del fi ltro
cuando se espera que la temperatura caiga por
debajo de 33 °F (4,4 °C).
•
NO instale sistemas en áreas donde las temperaturas ambiente
puedan superar los 110 °F (43,3 °C).
•
NO instale en líneas de suministro de agua caliente.
La máxima temperatura del agua en funcionamiento
para este sistema de fi ltro es de 100 °F (37,8 °C).
•
NO instale si la presión del agua supera los 862 kPa.
Si la presión de agua es mayor a 552 kPa, debe
instalar una válvula limitadora de presión.Contacte
a un plomero profesional si no está seguro de cómo
verifi car la presión del agua.
•
NO instale donde podría haber condiciones de
golpes con un ariete. Si existen tales
condiciones, debe instalar un supresor de golpes de
ariete. Contacte a un plomero profesional si no estáseguro
de cómo verifi car esta condición.
INFORMACIÓN DE SEGURIDAD
Lea, comprenda y tenga en cuenta toda la información sobre seguridad que contienen estas
instrucciones antes de instalar y utilizar los Sistemas de Cambio Rápido para Todo el Hogar Filtrete
™
,
de capacidad superior. Por favor retenga estas instrucciones para referencia futura.
ADVER TENCIA
ADVERTENCIA
AVISO
Lea la Guía de uso y cuidado en su totalidad. El incumplimiento de cualquier guía y medida puede
causar lesiones o daños a la propiedad.
• Consulte los códigos de plomería en el departamento local de obras públicas. Debe seguir las pautas que
le provean al instalar el sistema de fi ltrado de agua.
• Su sistema de fi ltrado de agua resistirá una presión de agua de hasta 862 kPa. Si la presión de suministro
de agua de su casa es mayor a 80 psi, instale una válvula reductora de presión antes de instalar el sistema
de fi ltrado de agua.
Para reducir el riesgo asociado con asfi xia:
• NO permita que niños menores de 3 años de edad tengan acceso a las piezas pequeñas durante la instalación de este
producto.
Para reducir el riesgo asociado con la ingesta de contaminantes:
•
NO use la unidad con agua microbiológicamente no apta para el consumo o de calidad desconocida sin una
adecuada desinfección previa o posterior al sistema.
Para reducir el riesgo asociado con voltajes peligrosos que se presenten por taladrar cableado
eléctrico o tuberías de agua existentes en el área de la instalación:
•
NO instale el producto cerca de cableado eléctrico o de tuberías que pudieran estar en el camino del taladro al
seleccionar la posición de montaje del soporte del fi ltro.
Para reducir el riesgo asociado con voltajes peligrosos:
•
Si el sistema eléctrico del hogar requiere el uso de un sistema de agua fría como protección eléctrica a tierra, DEBERÁ usar
un puente para garantizar una conexión a tierra sufi ciente en toda la tubería donde se instala el fi ltro;
asigne la instalación a personal califi cado.
Para reducir el riesgo de lesiones físicas:
•
Despresurice el sistema como se muestra en el manual antes de retirar el cartucho.
EXPLICACIÓN DE LAS CONSECUENCIAS DE LAS PALABRAS DE SEÑALIZACIÓN
Indica una situación potencialmente peligrosa, la cual, si no se evita,
puede resultar en muerte o lesiones serias y/o daños a la propiedad.
Indica una situación potencialmente peligrosa, la cual, si no se evita,
puede resultar en daños a la propiedad.
Uso previsto: Los Sistemas de Cambio Rápido para Todo el Hogar Filtrete
™
de capacidad superior
(4WH-QS-S01 y 4WH-QCTO-S01) están diseñados para ser usados en la fi ltración de agua potable y no han sido
evaluados para otros usos. El producto se instala en el punto de entrada (tubería de distribución principal) y debe ser
instalado por un profesional debidamente califi cado según lo especifi cado en las instrucciones de instalación.
AVISO
Para reducir el riesgo asociado con los daños materiales debidos a pérdidas de agua
o inundación:

ANOTACIONES IMPORATNTES:
• No seguir las instrucciones resultará en la anulación de la garantía.
• Deje un mínimo de 3" de espacio debajo del fi ltro para facilitar el cambio del cartucho.
• Instale con los puertos de entrada y salida según se indica en la etiqueta. Asegúrese de no reversar las conexiones.
• Algunos códigos locales de plomería pueden requerir el uso de un plomero con licencia o de un instalador certifi cado
al perturbar las líneas de agua potable.
Instalador: por favor deje este manual con el propietario/operador.
Propietario: por favor retenga estas instrucciones para la operación y mantenimiento futuros.
ANOTACIONES IMPORTANTES:
El esquema de instalación está basado en materiales sugeridos. La instalación de este fi ltro puede ser modifi cado utilizando
varios adaptadores o con métodos alternativos de conexión y conectores para acomodar tuberías de cobre o plástico más
grandes o pequeñas.
PARTES Y MATERIALES: (incluidos)
•
C
a
b
eza
d
e
l
fi
l
tro
(A)
• Cartucho del fi ltro (B)
PARA COMENZAR:
A.
B.
10
• Si hay un dispositivo de prevención de retorno instalado en un
sistema de agua, se DEBE instalar un dispositivo controlador
de presión debida a la expansión térmica. Comuníquese con
un plomero profesional si no está seguro de cómo seleccionar
instalar/realizar el mantenimiento del dispositivo de expansión
térmica.
• Cuando haya una bomba elevadora de presión en un sistema
de agua, DEBE mantener e inspeccionar regularmente
el interruptor de presión adjunto de conformidad con las
instrucciones del fabricante de la bomba elevadora de
presión. Comuníquese con un plomero profesional si no está
seguro de cómo realizar el mantenimiento del sistema de
bomba elevadora de presión.
• Cuando haya una bomba elevadora de presión
instalada en un sistema de agua, DEBE instalar una
válvula de alivio de presión adecuada. La válvula de
alivio de presión debe mantenerse e inspeccionarse
cada 6 meses. Comuníquese con un plomero
profesional si no está seguro de cómo seleccionar/
instalar/realizar el mantenimiento de la válvula de
alivio de presión.
• Cuando haya una bomba elevadora de presión instalada en
un sistema de agua, DEBE instalar una válvula reguladora
de presión adecuada y regular la presión de agua a <80 psi.
Comuníquese con un plomero profesional si no está seguro
de cómo seleccionar/instalar/realizar el mantenimiento de la
válvula reguladora de presión.
• NO use un soplete ni otra fuente de alta temperatura cerca
del sistema de fi ltro, los cartuchos, los accesorios plásticos o
las tuberías de plástico.
• Nunca aplique sellador de tuberías o grasa para tuberías
sobre los accesorios plásticos. Use solamente cinca para
roscado de PTFE, ya que las propiedades de la grasa
podrían deteriorar el plástico.
• Tenga cuidado cuando use pinzas o llaves para tuberías para
ajustar los accesorios plásticos, ya que podría producir daños
si los ajusta en exceso.
• NO instale bajo luz solar directa ni en exteriores.
• NO instale el producto cerca de tuberías de agua que
pudieran estar en el camino de un taladro al seleccionar la
posición de montaje del soporte.
• Monte el fi ltro en una posición tal que prevenga que
se atasque con otros elementos usados en el área de
instalación.
• Asegúrese de que la ubicación y las sujeciones puedan
soportar el peso del sistema cuando esté instalado y lleno de
agua.
• Asegúrese de que todas las tuberías y accesorios están
seguros y de que no haya pérdidas.
• Corte el suministro de combustible o de alimentación eléctrica
al calentador de agua después de cerrar el suministro de agua
durante la instalación del sistema.
Para reducir el riesgo asociado con la asfi xia:
• Cambie el cartucho de fi ltro desechable cada 12 meses
o antes si observa una reducción considerable del caudal
de agua.
• Si no reemplaza el cartucho de fi ltro desechable durante
los intervalos recomendados, puede disminuir el
rendimiento del fi ltro y provocar grietas en la carcasa del
fi ltro, lo que generaría pérdidas de agua o inundación.

Válvula maestra
para cierre del
paso de agua
Válvula
principal
Válvula
principal
Conexión a la
plomería del hogar
Bomba
Válvula maestro
Para cierre del
paso de agua
Conexión a la
plomería del hogar
Tanque
de presión
Medidor
de agua
00 00 6 9
Gallons
2700
3000
Model BRP
20
10
30
40
50
70
80
90
0
Badger Meter
300
600
1600
1800
12002100
2400
Figura 1
11
HERRAMIENTAS Y MATERIALES REQUERIDOS: (no incluidas)
Reúna las herramientas y materiales requeridos antes de comenzar la instalación. Lea y siga las instrucciones proporcionadas con
cualquiera de las herramientas enlistadas aquí.
A) Cortatubos
B) Dos adaptadores hembra
de 19 mm (3/4 pulg.)
C) Válvula esférica
de 19 mm (3/4 pulg.) (3 en total)
D) Cinta de plomería
E) Dos llaves inglesas ajustables
F) Tubo de 19 mm (3/4 pulg.)
G) Dos tubos de conexión
acodados de 3/4"
H) Dos tubos de conexión en
“T” de 3/4" x 3/4" x 3/4"
I) Tornillos para montaje
J) Gafas de seguridad
K) Balde (cubo)
L) Toalla
Instalación para agua proveniente
del acueducto de la ciudad
Instalación para
agua proveniente de un pozo:
AVISO
Para reducir el riesgo asociado con daños a la propiedad debido a fugas de agua:
• La instalación y uso DEBEN cumplir con todos los códigos locales y estatales de plomería.
A
B
C
D
F
J
K
L
G
H
I
E

12
AVISO
Las instrucciones a continuación hacen referencia a la Figura 2.
1. Planee la ubicación, el soporte, el diseño y tamaño del sistema.
2. Cierre el suministro principal de agua. Despresurice las líneas de agua abriendo un grifo más abajo en el sistema.
3. Usando un cortatubos, remueva una sección de tubería de la ubicación escogida para la instalación correspondiente al tamaño predeterminado
del ensamblaje del sistema. Mantenga un balde y una toalla a la mano para recoger agua que puede salir de la línea al cortarla.
4. Ensamble y instale el sistema como se indica, observando la dirección correcta del fl ujo del tubo múltiple. Utilice el tubo y las conexiones
reblandecidas para ensamblar el sistema. Utilice tubería de cobre y conectores para uso con calor para ensamblar el sistema. Proporcione
soporte al sistema adjuntando el soporte a la pared o a cualquier otro marco. De lo contrario, puede instalar colgadores de tuberías a cada lado
de la cabeza del fi ltro.
5. Inserte el fi ltro en la cabeza del fi ltro. Empuje el fi ltro hacia arriba, luego gírelo u cuarto de giro hacia la derecha hasta que se detenga.
6. Asegúrese de que la válvula 1 y el grifo más abajo en el sistema están abiertos. Cierre las válvulas 2 y 3. Encienda el suministro de agua y
revise para ver si hay fugas.
7. Mientras que haya agua pasando por el grifo, cierre la válvula 1 y abra las válvulas 2 y 3. Permita que el fi ltro se llene.
8. Cierre la válvula 3 y revise para ver si hay fugas. Si hay fugas, consulte la sección de resolución de problemas. Si no hay fugas, abra la
válvula 3, deje correr el agua para sacar aire del sistema durante el paso de 10 galones de agua.
9. Cierre el grifo.
Para reducir el riesgo asociado con daños a la propiedad debido a fugas de agua:
•
Nunca utilice sellante ni barniz de tuberías sobre los accesorios plásticos. Utilice únicamente cinta de tefl ón para plomería, ya que el barniz y
los sellantes pueden deteriorar el plástico de los accesorios.
•
Tenga cuidado al utilizar alicates o llaves Para tuberías para apretar las conexiones plásticas, ya que se pueden dañar si se aprietan demasiado.
INSTRUCCIONES IMPORTANTES DE INSTALACIÓN:
AVISO
Para reducir el riesgo asociado con los daños materiales debidos a pérdidas de agua o inundación
•
El fi ltro desechable DEBE ser reemplazado cada 12 meses o antes la capacidad nominal si ocurre una reducción notable en el fl ujo de agua.
La vida útil del fi ltro depende de las condiciones del agua local y el volumen de
agua fi ltrada. Le recomendamos cambiar el fi ltro en el intervalo sugerido o antes si
ocurre una reducción notable en el fl ujo de agua.
Nota: Antes de cambiar el fi ltro, apague el suministro de agua. Coloque un balde
pequeño debajo del fi ltro para recoger la pequeña cantidad de agua que saldrá del
fi ltro una vez que lo remueva.
1. Cierre la válvula de paso de agua que se encuentra antes de la cabeza del fi ltro.
Abra un grifo más abajo en el sistema para despresurizar las líneas de agua
hasta que el fl ujo de agua se detenga. Deje el grifo abierto. Cierre la válvula de
paso después de la cabeza del fi ltro.
2. Con ambas manos, gire el fi ltro un cuarto de giro hacia la izquierda hasta que se
desprenda de la cabeza del fi ltro.
3. Inserte un fi ltro nuevo en la cabeza del fi ltro, gírelo un cuarto de giro hacia la
derecha hasta que se detenga. Asegúrese de que el ícono de candado se alinee
con el numeral (#) en la cabeza del fi ltro.
4. Abra la válvula de paso que se encuentra después de la cabeza del fi ltro.
Abra la válvula que está antes de la cabeza del fi ltro. Deje pasar 10 galones
(aproximadamente 15 minutos).
5. Cierre el grifo y verifi que que no haya fugas.
Los fi ltros de reemplazo pueden ser comprados en el punto original
de compra del fi ltro.
Los fi ltros disponibles incluyen 4WH-QS-F01 para reducción de sedimentos y
4WH-QCTO-F01 para el fi ltrado de sabor y el olor a cloro y de sedimentos.
INSTRUCCIONES PARA REEMPLAZAR EL FILTRO:
Step 2
Step 3

13
Hay fugas de agua en las conexiones:
Repita el proceso de instalación.
Si persisten las fugas de agua:
Revise las uniones soldadas, las demás uniones y las conexiones de la cabeza del fi ltro. Cierre el paso de agua en la válvula principal,
remueva las conexiones roscadas, remueva la cinta de plomería y aplique cinta nuevamente en dirección de las manecillas del reloj
(hacia la derecha) y vuelva a atornillar para adjuntar al ensamblaje de la cabeza del fi ltro.
GUÍA PARA SOLUCIÓN DE PROBLEMAS
GARANTÍA LIMITADA:
3M garantiza que este producto estará libre de defectos en materiales y manufactura por un (1) año a partir de la fecha de compra. Esta garantía no cubre
fallas resultantes del abuso, mal uso, alteraciones o daños no realizados por 3M o por no seguir las instrucciones de uso e instalación. No se otorgan garantías
respecto a la vida útil de ningún cartucho/repuesto de fi ltro ni sus membranas, ya que éstas pueden variar según las condiciones locales del agua y la cantidad
de agua consumida. 3M NO OTORGA NINGUNA OTRA GARANTÍA O CONDICIÓN, EXPRESA O IMPLÍCITA, INCLUYENDO, PERO NO LIMITADA A CUALQUIER
GARANTÍA IMPLÍCITA O CONDICIÓN DE COMERCIALIZACIÓN O IDONEIDAD PARA UN PROPÓSITO PARTICULAR O CUALQUIER GARANTÍA IMPLÍCITA O
CONDICIÓN EMERGENTE DE UN CURSO DE GESTIÓN, DEL CLIENTE O USO DE COMERCIO. Si el producto no satisface esta garantía limitada durante el
periodo de garantía, 3M reemplazará el producto o reembolsará el precio de compra del producto. Esta garantía no cubre el costo de mano de obra. El remedio
declarado en este párrafo es el remedio único para el consumidor y la obligación exclusiva de 3M.
Esta garantía le otorga derechos legales específi cos y usted puede tener otros derechos que varían de estado a estado o de país a país. Para cualquier
pregunta relacionada con la garantía, por favor llame al 1-800-388-3458 o envíe su solicitud a: Warranty Claims, 3M, Customer Care Center, 3M Center 225-
3S-06, St. Paul MN 55144-1000. El comprobante de compra (recibo original de compra) debe acompañar la solicitud de garantía, junto con una descripción
completa del producto, el número de modelo y el defecto presunto.
LIMITACIÓN DE RESPONSABILIDAD:
3M no será responsable de ninguna pérdida o daños resultantes de este producto 3M, ya sean directos, indirectos, especiales, incidentales o consecuentes,
independientemente de la teoría legal afi rmada, incluyendo responsabilidad de garantía, contractual, negligente o estricta. Algunos estados o países no
permiten la exclusión de la limitación de daños incidentales o consecuentes, así que la limitación anterior podría no aplicar a usted.
Distribuido por:
3M, Construction Home Improvement Markets Division
3M Center, St. Paul, MN 55144-1000
1-800-388-3458
Filtrete y 3M son marcas comerciales de 3M Company.
NSF es una marca comercial de NSF International.
Timestrip es la marca registrada de Timestrip UK Limited.
Todas las demás marcas comerciales son la propiedad de sus respectivos dueños.
© 2015, 3M. Todos los derechos reservados.
Presione para activar
Una línea sólida aparecerá
y se comenzará a llenar
dentro de un par de minutos
6 meses
Reemplace el ltro
1. Presione fi rmemente la burbuja indicadora de cambio del fi ltro para activarla.
2. Coloque o pegue con cinta adhesiva el indicador de cambio del fi ltro en la carcasa del sistema o en una
ubicación notable, tal como la puerta de su refrigerador.
3. No coloque el indicador de cambio del fi ltro adentro de su refrigerador.
ACTIVE EL INDICADOR DE CAMBIO DEL FILTRO
Para reducir el riesgo asociado con asfi xia, no permita que los niños menores de 3 años
tengan acceso al indicador de cambio del fi ltro.
Para reducir el riesgo de daños a la propiedad, no perfore la burbuja indicadora de cambio
del fi ltro. El fl uido (no tóxico) puede manchar ciertos materiales.
ADVER TENCIA
PRECAUCÍON

Envíe el formato de registro del producto a:
3M, Customer Care Center
3M Center 225-3S-06
St. Paul, MN 55144-1000
Nombre del producto: Modelo: Código de fecha en el filtro:
Dr. Sr. Sra. Srta.
Nombre Apellido
Dirección Apto. #
Ciudad Estado Código postal
Dirección de email*
Número telefónico
Fecha de compra
FORMATO DE REGISTRO DEL PRODUCTO
*Otorgar su dirección de email es opcional. Esta información será usada únicamente para proveerle información acerca de los productos de 3M, de
acuerdo con la política de privacidad de 3M que se encuentra en www.3M.com/privacy.
3M, Construction and Home Improvement Markets Division
3M Center, St. Paul, MN 55144-1000
1-800-388-3458
34-8716-6559-1
/