Page is loading ...

OUTPUT OPTIONS
TYP-9180-Vxxxx
INSTRUCTION MANUAL

2
2
ANALOG OUTPUT OPTION
- TYP-9180-Vx1xx ...................................................... Pag. 5
COMMUNICATION PROTOCOLS ..................................... Pag. 11
RS232C OUTPUT OPTION
-TYP-9180-Vxx1x ...................................................... Pag. 15
RS485 OUTPUT OPTION
-TYP-9180-Vxx2x ...................................................... Pag. 23
SETPOINTS OPTION RELAIS / OPTOCOUPLER
-TYP-9180-Vxxx1 ...................................................... Pag. 33
-TYP-9180-Vxxx2
-TYP-9180-Vxxx3
-TYP-9180-Vxxx4
WIRING DIAGRAMS ...................................................... Pag. 47

3
3
OPTION INSTALLATION
Lift out the electronics assembly from the case and
use a screwdriver to pull on the junctions between
the case and the selected area to detach it from
the case.
The so performed orifi ce will allow the analog
output board connector be brought out at the rear
of the instrument.
Install the circuit board so that the lower pin fi ts
into the corresponding main board insertion slot
and push down to plug the option connector in the
main board conection location.
If the instrument is to be installed in high vibrating
environments, it is recomended to solder the card
to the main board making use of the copper tracks
on both sides of the card pin and around the main
board hole on its solder side.
Before inserting the electronics in the case, you
should verfy that the access to the programming
modules is enabled, since this is next operation to
be made powering the unit.
Vxxx1
Vxxx2
Vxxx3
Vxxx4
Vx1xx
Vxx1x
Vxx2x
Vx1xx
Vxx1x
Vxx2x
Vxxx1
Vxxx2
Vxxx3
Vxxx4

4
4
OPTION INSTALLATION
Each output card is supplied with an adhesive label that
indicates the wiring connections of each option. To help
identifying each terminal, this label should be placed
in the lower side of the meter case, beside the basic
functions label.
WARNING
In order to guarantee electromagnetic compatibility, the
following guidelines for cable wiring must be followed:
- Power supply wires must be routed separated from
signal wires. Never run power and signal wires in the
same conduit.
- Use shielded cable for signal wiring and connect the
shield to ground of the indicator (pin2 CN1).
- The cable section must be 0.25 mm2
If not installed and used according to these
instructions, protection against hazards may be
impaired.
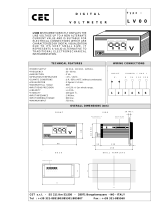
CONNECTORS
To perform wiring connections, remove the
terminal block from the meter’s connector,
strip the wire leaving from 7 to 10 mm
exposed and insert it into the proper
terminal while pushing the fi ngertip down
to open the clip inside the connector as
indicated in the fi gure.
Proceed in the same manner with all pins and plug the
terminal block into the corresponding meter’s connector.
Each terminal can admit cables of section comprised between
0.08 mm² and 2.5 mm² (AWG 26 ÷ 14).
The blocks provide removable adaptors into each terminal to
allow proper fastening for cable sections of <0.5 mm².
SEE WIRING CONNECTIONS
ON PAGE 47

5
5
TYP-9180-Vx1xx
ANALOG OUTPUT OPTION

6
6
INTRODUCTION
Two ranges of analog output (0-10V and 4-20mA) can be
incorporated to the TYP 9180 instrument by means of an
additional card TYP 9180-Vx1xx which is installed on the
meter’s main board via plug-in connector.
The outputs are opto-isolated with respect to the signal input
and the main supply .
The optional board provides a two terminal connector [ANA(+)
and ANA(-)] that drives out a signal variation from 0 to 10V or
from 4to 20mA proportional to a user-defi ned display range.
This way, the meter is furnished with an output signal that can
be utilized for proportional purposes and also be used to drive
a variety of terminal equipment such as graphic recorders,
controlers remote displays or other devices that accept input
data in analog form.
An exceptional feature is the possibility of setting the range at
which the output signal may change by either making it follow
the display or the input signal conversion rate.
The voltage and current outputs cannot simultaneously
be used; the output type is selectable via the software
programming module that is included automatically in the
program routines when the card is installed.
The display values producing the full scale output
(OUT-HI and OUT-LO) are also introduced via fron-panel
buttons in the same programming module. The analog output
then follows the display variations between the HI and LO
programmed points.
A display HOLD command also freezes the analog output data.
(See logical functons on TYP9180).
The output signal can be set up for reverse action by
programming the high display for the low output (OUT-LO)
and the low display for the high output (OUT-.HI).
TECHNICAL SPECIFICATIONS
CHARACTERISTICS 0-10V OUTPUT 4-20mA OUTPUT
Resolution ...................................................... 12 bits ..................... 12 bits
Accuracy ........................................................ 0.1% F.S. ±1bit@ 23º±5 ºC ................ 0.1% F.S. ±1bit@ 23º±5ºC
Response Time ............................................... 60ms .................................. 60ms
Temperature Coefi cient ................................... 0.2 mV / ºC .................................. 0,5 μA / ºC
Load Max. ...................................................... 500Ω .................................. 800Ω
Isolation between analog output
and input signal (1 min) .................................. 500 VAC .................................. 500 VAC
Isolation respect to supply and
relay output ................................................... 2300 VAC .................................. 2300 VAC

7
7
ANALOG OUTPUT PROGRAMMING
MODUL 40 – ANALOG OUTPUT
The enclosed fi gure shows the diagram of the MODULE 40 for confi guration of the analog output that appears in the
programming routines of model TYP 9180-Vx1xx when the corresponding option is installed.
The module provides three menus of independent access that permit user-selection of the following parameters:
Menu 41 -tYPE- : Selection of the output type (0-10V or 4-20mA)
Menu 42 -SCAL- : Programming of the display values that are wanted to prodece the high and low output values .
Menu 43 -FILt- : Selection of wheter the analog output must change at the same rate as the input signal
conversion (fi lter OFF) or as the display (fi lter ON).

8
8
[1.1] Access to the programming Press the key to pass from the run mode to the programming mode (-Pro-
indication, PROG LED) and press repeatetly the key until the meter displays
the indication given on the fi g. 1.1. Press to acceed to the fi rst programming
menu, or:
To advance to the next program module.
To return to the programming access level (indication -Pro-).
MENU 41 - OUTPUT TYPE SELECTION
[1.2] Type of output From the level shown in fi gure 1.1. a push of key, makes the meter read the
indications corresponding to the entry stage of menu 41 (fi g. 1.2., “Udc” for 0-10 V
or “Idc” for 4-20 mA). If the existing confi guration is already the desired one, press
the key to skip over this menu and acceed to the output scaling (fi g. 2.1.).
Acceed to this menu.
To return to the programming access level (indication -Pro-).
[1.3] Selection of output type
By pressing the key, the display alternates between the indication (“Udc” for
0-10 V and “Idc” for 4-20 mA. When the desired option is present on the display,
press key to validate the choice and return to the -Pro- stage.
Returns the meter to the -Pro- stage without saving changes.

9
9
MENU 42 - SCALE
[2.1] Display Confi guration By pressing key and key from the programming stage shown in fi gure
11.1, the meter displays the indication given by the left fi gure corresponding to the
entry stage of the menu 42. The programmable parameters of this menu are the
display values corresponding to both extremes of the analog output range.
Press to set up these parameters, or:
To pass to the next menu (fi g 2.1).
To return to the -Pro- stage.
[2.2] Display Value HIGH At this step, the display shows the current display value corresponding to 10V or
20mA with the fi rst digit in fl ash. To modify this item, press repeatedly the
key to change the value of the fl ashing digit and the key to advance to the
next digit to be modifi ed. Repeat these operations for every digit until the desired
value is composed on the display.
Validate the entry and advance to the next programming step.
Return to the –Pro- stage
[2.3] Display Value LOW
Repeat the process described for the previous phase ( and keys) to
program the display value corresponding to 0V or 4mA.
Reverse operation is acomplished by programming the high display in this step and
the low display in the previous one.
Validate the entry and return to the programming access stage (indication
-Pro-).
Return to the –Pro- stage.

10
10
MENU 43 - FILTER
[3.1] Filter Confi guration
From the program step indicated in fi gure 2.1 press once the key to acceed
to the top menu and twice the key to bring the meter to the entry stage of
the Menu 43 (-FILt-) (fi g. 3.1).
This Menu offers the possibility of selecting whether the analog output should be
transmitted at the same rythm as the display updating or at the input signal
conversion rate. Press to get access to the programming of this parameter
and go to fi g. 3.2
Skips over this menu and pass to the output type selection (fi g. 1.2.).
Returns the meter to the programming access level (-Pro- indication).
[3.2] Filter Activation
Under some conditions, the rate at which the input signal is converted may result
so fast, thus making the analog output refl ect all variations and even unwanted
phenomena present at the input. In such cases it is convenient to increase the
output response time by fi ltering the output signal to the same level as it has been
selected for the display.
At this menu step the display shows one of the following options; The “OFF” option
will make the analog output be updated at the same rythm as the input conversion
( without fi lter) and the “ON” option will allow to use the output signal as a display
image, presenting the same fi ltered values.
If it is desired to modify the existing confi guration, press to alternate the
display indication [“on” / “oFF”] and to validate the choice and go to the
-Pro- stage.
If the existing confi guration is already the desired one, press to return to the
-Pro- stage witout saving changes.

11
11
TYP-9180-Vxx1x
COMMUNICATION
PROTOCOLS
TYP-9180-Vxx2x

12
12
DESCRIPTION OF OPERATION FOR RS OUTPUTS
Three communication mode are provided: The ASCII mode utilizes an easy to use protocol. The ISO mode conforming the ISO
1745 standard, permits a more safe communication in noisy environments since the data transfer is verifi ed at the transmission
and the reception ends.
As it can be seen in the table of functions on page 13, the protocol 1 uses 1 or 2 bytes depending of the command type while the
ISO 1745 forces the use of two bytes per command.
Prot-1- = Protocol ASCII, Prot-2- = Protocol ISO1745, Prot-3- = Protocol MODBUS-RTU.
Specifi c information of MODBUS-RTU protocol (Ask for specifi c manual).
Prot-1- ASCII PROTOCOL
The transmission format is 1 START Bit, 8 DATA bits and 1 STOP Bit.
• RECEIVING MESSAGES
A message sent from the master device to the
instrument must be composed of the following
sequence of ASCII characters:
• One “ * “ byte [ASCII42] of start of message.
• Two address bytes (from 00 to 99).
• One or two ASCII-Characters corresponding to the
desired comand according to the table of functions
(page 13).
• In case that the command request for a modifi cation
of parameters, the new value shall be transmitted
with one byte of sign + [ASCII 43] or – [ASCII 45]
followed by a block of N ASCII-Characters including
the decimal point.
• One “ CR “ character of end of message [ASCII 13].
* D d C C X....................X CR
• TRANSMISSION OF MESSAGES
The data sent from the instrument as a response to a
data request type command from the master device is
the following:
• One byte of blank space [ASCII 32].
• One text (requested value) consisting of a byte of
sign + [ASCII 43] or – [ASCII 45] followed by a block
of N ASCII-Codes including decimal point.
• One “ CR “ character of end of message [ASCII 13] .
If the command belongs to “orders” or “ changing
parameters”, the instrument gives no response.
SP X....................X CR

13
13
COMMAND FUNCTION TYPE OF
FUNCTION
ASCII ISO
V 0V Transmission of the valley reading
Data
Request
P 0P Transmission of the peak reading
T0T
Transmission of the tare/offset value
D0D
Transmission of the display reading
L1 L1 Transmission of the setpoint 1
L2 L2 Transmission of the setpoint 2
L3 L3 Transmission of the setpoint 3
L4 L4 Transmission of the setpoint 4
I 0I Transmission of the CN2 status
Z 0Z Transmission of the TOTAL value
X 0X Transmission of the BATCH value
v 0v Reset the valley memory
Orders
p 0p Reset the peak memory
r 0r Reset the tare memory
t 0t Tare the display
n 0n Reset of RELAIS “LATCH”
z 0z Reset of the TOTAL anb BATCH
M1 M1 Change the setpoint 1
Changing
Parameters
M2 M2 Change the setpoint 2
M3 M3 Change the setpoint 3
M4 M4 Change the setpoint 4
Prot-2- ISO1745 PROTOCOL
The transmission format is 1 START Bit, 7 DATA bits, 1
Parity bit (even) and 1 STOP Bit.
• RECEIVING MESSAGES
The message format, as sent from the master device,
must consist of the following sequence of characters:
• One byte SOH of start of message [ASCII 01].
• Two bytes corresponding the fi rst to the tens and the
second to the units of the instrument address number.
• One byte STX of start of text [ASCII 02].
• Two command bytes according to the table functions.
• In case of commands that change parameters, a block
of N bytes corresponding to the new value including sing
and decimal point.
• One byte ETX of end the text [ASCII 03].
• One control byte BCC calculated in the following
manner:
Perform an Exclusive-OR with all bytes comprised
between the STX (not included) and the ETX (enclosed).
-If the obtained byte (in ASCII format) is higher than
32, it can be taken as the BCC.
-If the result (in ASCII) is lower than 32, the BCC byte
will be obtained adding 32.
SOH D d STX C C X..........X ETX BCC

14
14
• TRANSMISSION OF MESSAGES
The format of a message as sent from the instrument in response to a command from the master device is the following:
1./ In case of commands that ask for the trans-
mission of a value ( data request type):
• One byte SOH of start of message [ASCII 01].
• Two address byte.
• One byte STX of start of text. [ASCII 02].
• N bytes corresponding to the requested value
(including the sign and the decimal point).
• One byte ETX of end of text [ASCII 03].
• One control byte BCC calculated with the method
described in page 13.
2./ In case of commands that do not imply the
return of a value (command type or changing
parameters) :
The instrument sends a confi rmation to the master
device when it receives a message.
• If the message has been correctly received and
interpreted, the response will consist of two address
byte and one " ACK " byte [ASCII 06].
• If the received message has not been well
interpreted or it has been detected as to have
errors, the response will be two address bytes and
a " NAK " byte [ASCII 21].
SOH D d STX X..........X ETX BCC D d ACK D d NAKoder
When the master device transmits a message to the address 00, the command will be received by all the instru-
ments on the bus and there will not be any response.

15
15
TYP-9180-Vxx1x
RS232C OUTPUT OPTION

16
16
GENERAL INFORMATION
The RS232C output option consists of an additional card
(reference TYP 9180 Vxx1x) that is installed in the M1
plug-in connecto rof the instrument’s main board. The
card incorporates one telephone socket protruding out of
the rear of the meter.
The serial output permits to construct a communication
line through which a master device can request to the
TYP 9180 instrument the transmission of data such as
display value, setpoint values, peak, valley, tare (or offset
in case of thermometers) and to perform operations such
as tare of the display, reset of the peak, valley or tare
memories and update setpoint values.
The TYP 9180 model provides also a special command
that allows to copy the programming data from one
meter to other of the same type.
Fully sotware programmable, the option permits selection
of the transmission rate (1200, 2400, 4800, 9600, 19200
baud), the instrument’s address (from 00 to 99) and the
communication protocol (ASCII , ISO1745 or MODBUS-
RTU).
The RS232C option allows one instrument be connected
to a master device with RS232C output.
The operating mode is half-duplex. The serial chanenel
does only function when the instrument is in the run
mode and it normally stands in data reception mode until
reception of a message.
A valid data transmission may cause the inmediate
execution of an action ( tare, reset of the peak, valley or
tare memories, modifi cation of setpoint values) or the
transmission of a response from the instrument ( display
value, one of the setpoint value, peak, valley, tare/
offset).
The display value (solely) can be requested by means of
an external button as shown in schematics of page 10

17
17
RS232C OUTPUT PROGRAMMING
PROGRAMMING INSTRUCTIONS
The upper fi gure represents the MODULE 50 for the serial output confi guration, which is valid for the TYP 9180 models.
This module is composed of fi ve menus of independent access that allow confi guration of the following parameters:
• Menu 51 –SoFt-: Selection of the communication Protocol 1= ASCII, 2= ISO1745 or 3= MODBUS-RTU.
• Menu 52 –bAud-: Confi guration of the transmission rate.
• Menu 53 _AdrS- : Programming of the instrument address.
• Menu 54 –trAnS-: Validation of inhibition of the SEnd command. This command, if validated, permits to copy the
confi guration of the meter into another TYP 9180 connected in the RS232C communication link.

18
18
[1.1] Access to the programming
Press the key to pass from the run mode to the programming mode (the -Pro-
indication appears on the second display) and press repeatedly until the meter
displays the indication given by fi gure 1.1).
Press to acceed to the fi rst programming menu or:
to advance to the next programming module
to return to the (-Pro-) stage.
MENU 51 - COMMUNICATION PROTOCOL
The fi gure shows the indication corresponding to the entry stage of the
communication protocol selection menu.
Press the key to acceed this menu or
to pass to the next programming menu.
to return to the (-Pro-) stage.
The display shows the previously selected type of protocol:
[Prot-1 = Protocol ASCII, Prot-2 = Protocol ISO 1745, Prot-3 = MODBUS-RTU]
.
See pages 13, 14 and 15 for a detailed description of protocols type 1 and 2..
Press the key if desired to change the option present on display and the
key to save the choice and automatically return to the –Pro- stage.
Returns the meter to the –Pro- stage without saving changes.
[1.2]
[1.3]

19
19
MENU 52 - TRANSMISSION RATE
The fi gure 2.1 shows the indication corresponding to the entry stage of the baud
rate confi guration menu. Press to acceed to this menu.
If the programming of this parameter has been already made and it is desired to
pass to the following menu, press and go to fi g 3.1.
Returns the meter to the programming access level ( -Pro- )
A press of key made at previous step makes the main display show the
initially programmed transmission rate.
The available options are 1200, 2400, 4800, 9600, 19200 baud.
Press repeatedly the key until the desired option appears on the display and
press to validate the choice and automatically go to the -Pro- stage.
Returns the meter to the -Pro- stage without data memory storage.
[2.1]
[2.2]

20
20
MENU 53 - ADDRESS
From the phase represented in fi gure 1.1, press the key to acceed to the
menu selection level and to bring the meter to the entry stage of the Address
change menu (see fi gure 3.1).
Press key to get access to the programming of this parameter, or:
to go to the next menu.
to return to the programming access level (-Pro- indication).
The main display shows a number of two digits corresponding to the previously
programmed address, with the fi rst digit in fl ash.
If it is wanted to change the number, press repeatedly the key to make the
fl ashing digit rotate from 0 to 9, and once it has taken the desired value,
press to advance to the next digit to be modifi ed. Repeat this operation until
the desired address appears on the display. It can be assigned address numbers
between 00 and 99.
Once the instrument’s identifi cation number has been composed on the display,
press to store data in the memory and return to the -Pro- stage.
[3.1]
[3.2]
/