Page is loading ...

USER MANUAL

USER MANUAL
Whirlwind Wheelchair International, San Francisco State University, 1600 Holloway Avenue, SCI 251, San Francisco, CA 94132-4163 USA
Phone: 415.338.6277, Fax: 415.338.1290, E-mail: info@whirlwindwheelchair.org
Funding Provided by
The Jared Tamler Memorial Fund
The Fred Gellert Family Foundation
Written by
Alida Lindsley & Carol Maddox
Contributions
Chris Howard & Ralf Hotchkiss
Editors
Joan Ro
g
in & Marc Krizac
k
Whirlwind RoughRider™ User Manual
Copyright © 2007 by Whirlwind Wheelchair International
First Edition, June 2007
Whirlwind welcomes your ideas and suggestions for improving our wheelchairs and manuals.
The best information we get is from you, the rider.
Please feel free to contact us.

Basic Riding Skills Maintenance and Repair
Your RoughRider™
Whirlwind RoughRider™ User Manual
www.whirlwindwheelchair.org
Your RoughRider 1
Who is the RoughRider for? And RoughRider Specifications 2
RoughRider Components 3
RoughRider Features 4
Common Modifications 8
Basic Riding Skills 11
Know your Capabilities and Limits 11
Pressure Relief 14
Pressure Relief Techniques 16
Moving Around 19
Riding Techniques 20
Tranfers: Getting in and out of your RoughRider 24
Traveling with your RoughRider 28
Maintenance and Repair 31
Maintenance Schedule 32
Cushion 33
Bearings 35
Upholstery 40
Wheel Locks 42
Spokes 43
Lubricating your RoughRider 45
Tires 46
Cleaning your RoughRider 48
Routine Inspections 49
Nuts and Bolts 50
Footrests 52
Handgrips 53
Troubleshoot: If your RoughRider Does Not Roll Straight 54
Table of Contents

USER MANUAL
www.whirlwindwheelchair.org
page 1 of 57
Your RoughRider™
The RoughRider wheelchair’s innovative design helps
you ride more easily and safely:
• Over very rough ground without tipping forward.
• Over soft surfaces, without the front wheels getting
stuck.
• Down and across slopes, with minimal effort and
much less risk of tipping.
The RoughRider is compact, lightweight, and has a
comfortable seat.
The RoughRider’s folding frame makes travel easy on
buses and automobiles. The RoughRider was designed with
few removable components to minimize the loss of parts.
The RoughRider was also designed for easy repair and
maintenance using commonly available parts and tools.
The RoughRider’s design is the culmination of ideas and innovations of wheelchair builders,
users, and experts from around the world who promote the independence of wheelchair riders.

USER MANUAL
www.whirlwindwheelchair.org
page 2
Who is the RoughRider for?
To avoid potential injury, the RoughRider should only be used by someone who can meet the
following criterion:
Pressure Management - The single most important criterion. If you have limited or no
sensation (feeling) you must be able to manage the pressure on your body to use the
RoughRider safely (e.g., proper techniques for self care, pressure relief, skin care). A pressure
ulcer can form after only 20 minutes of sitting without pressure relief. You must always have an
appropriate, high quality pressure relief cushion (and know how to care for it) to use with the
RoughRider.
Head and Trunk Control - The RoughRider’s sling-type backrest may not be suitable for you
if you have weak or absent trunk muscles, as you may not have enough muscle support to
maintain a desirable riding position. Using the RoughRider with inadequate trunk control could
lead to the development of scoliosis (curvature of the spine). If you are not able to support your
head independently, you should not use the RoughRider, as it does not provide any head
support.
Size and Fit – The RoughRider is designed for riders with hip widths between 31.5–48.5 cm*
(12.5–19 in.), and an upper leg length longer than 40.7 cm (16 in.). The length measurement is
taken while seated and measures from back of pelvis to back of lower leg. With some standard
modifications however, the RoughRider may be suitable for riders outside of these ranges. See
end of section for more information. *Seat widths may vary depending on manufacturer.
RoughRider Specifications
Effective Seat Widths: *seat fabric will
be narrower than effective seat width
355mm (14 in.), 400mm (15.7 in.), 440mm (17.4 in.),
480mm (19 in.)
Seat Depth: 405mm (16 in.)
Seat Height: 485mm (19 in.) at front of seat
Seat Angle: 12 degrees
Seat to Back Angle: 90 degrees
Back Height:
435mm (17 in.) standard, 380mm (15 in.) and 485mm (19
in.) custom
Footrest Height from Front of Seat: 255mm–375mm (10–14.75 in.)
Rear Wheel Dimensions: 24 x 1.75 in. standard
Rear Wheel Camber: 3 degrees
Rear Wheel & Caster Barrel Bearings: 6201 (12mm ID x 32mm OD)
Axles: 12mm; Class 8.8 hardness (Grade 5)
Push Rim Diameter: 485mm (19 in.)
Front Wheel Dimensions: 110mm (4.3 in.) diameter x 80mm (3.1 in.) width
Front Wheel Bearings: Standard bicycle hub and bearing
Overall Width: 229mm (9 in.) + Seat width
Overall Length: Shortest 910mm (36 in.); longest 990mm (39 in.)
Wheelbase (Front to Rear Axle): Shortest 480mm (19 in.); longest 560mm (22 in.)
Rear Wheel Position Adjustment: 5 positions over 80mm (3 in.)
Weight: 16.75 kg (37 lbs)
RoughRider specifications: numbers are approximate and may vary depending on manufacturer.

Your RoughRider™
Basic Riding Skills Maintenance and Repair
RoughRider™ Components
Side Frame
Back and Seat
Upholstery
Cushion
Rear Wheel
Push Rim
X-Brace
Wheel Lock
Footrest
Caster Barrel
Caster Fork and
Caster Wheel
Upon receiving your RoughRider, please make a note of how the components are adjusted so that
you can easily adjust them in the future. It is recommend that you write down the following
critical measurements and refer to them when performing inspections or maintenance on your
RoughRider:
Seat Width
__________________cm (measured between inside edges of side frames)
Seat Height
__________________cm (measured from floor to front edge of seat)
Right __________cm
Footrest Height
Left __________cm
(measured from front edge of seat to back edge
of foot plate)
page 3 of 57
Whirlwind RoughRider™ User Manual

USER MANUAL
RoughRider™ Features
Small diameter caster wheels fit under the footrests, resulting in
a longer distance between the rear wheels and caster wheels
without making the chair longer overall. The small wheels also
allow you to maintain a low knee height, so that your knees can
fit under tables.
Long Wheelbase
What are the advantages of a longer wheelbase?
• Prevents tipping (better forward stability) when traveling over
uneven terrain, such as rocks or uneven dirt roads.
• Easier to push because more weight is on the rear drive wheels,
and less on your front caster wheels, which gives you better
traction on uneven ground and makes it easier to roll straight on a
side slope.
Why have a foldable X-brace?
• Chair folds flat for easy storage and
transport. If your chair does not fit
under or behind the rear seat of a van or
bus, you could be charged double or
triple for transport.
• Chair width can be easily changed by
substituting a different size X-brace and
upholstery.
Foldable X-Brace
www.whirlwindwheelchair.org
page 4

Your RoughRider™
Basic Riding Skills Maintenance and Repair
Why use pneumatic (air filled) rear tires?
Because wider, sturdier, pneumatic tires provide better:
• Shock absorption - air filled inner tubes absorb bumps
better than standard hospital wheelchair tires that are
made of solid rubber.
• Durability - thicker, knobbier tires last longer on rough
roads than standard wheelchair tires that are thin and have
little tread.
• Repair and replacement options - pneumatic tires are
available wherever bicycle parts are sold and eliminate
the need to search for special wheelchair tires. Solid
rubber tire inserts may be an option to avoid punctures.
Pneumatic Rear Tires
Most RoughRiders come with all terrain pneumatic tires (mid to
heavy-weight), that fit on standard wheel rims (24 x 1.75 in.)
However, you might prefer light-weight tires and rims if you will be
mostly riding indoors or in well-paved urban environments.
Wheel Locks
“Parking Brakes” Stabilize your chair when
it is stopped for easier and safer transfers,
reaching, weight shifting, etc.
Parking brakes should not be used to slow
the chair because it will quickly wear down
the tread of the tires.
Why use “Zimbabwe” caster wheels?
• The flexible rubber design provides a
smooth ride over rough ground including
cracks, stones, and other small obstacles.
• The wide wheel “floats” over soft ground
without getting stuck.
• The V-tire profile reduces the sticky
contact area of the tire so that it swivels
easily on hard surfaces.
“Zimbabwe” Caster Wheels
page 5 of 57
Whirlwind RoughRider™ User Manual

USER MANUAL
Adjustable Rear Wheel Position
The RoughRider’s rear wheels have five positions.
Why have an adjustable rear wheel position?
An adjustable rear wheel position optimizes stability and
performance for riders of differing abilities.
With your rear wheels further forward:
• Your chair will be easier to push because there is less weight on the
front wheels.
• Your chair will resist turning downhill on a side slope.
• It will be easier to go over obstacles.
• It will be easier to perform wheelies.
With your rear wheels further back the chair will be less likely to tip
backward.
Start with the rear wheel in a position that feels secure to you. As your
skill level increases with practice, the wheel position can be adjusted
forward.
Your Cushion
If you have limited feeling in your buttocks, you should use
a high quality foam cushion that is highly resilient. If you
do not use a suitable cushion you are likely to develop a
pressure sore. You should also perform regular pressure
relieving exercises (see the Basic Riding Skills section for
more instruction and information about limited feeling).
A cushion can also make you feel more comfortable and
can promote good posture. If you use a cushion, make sure
your footrests are well adjusted so that your weight is
evenly distributed on the cushion.
www.whirlwindwheelchair.org
page 6

Your RoughRider™
Basic Riding Skills Maintenance and Repair
Seat Angle
The RoughRider was designed with 12 degrees of seat tilt.
Why does the RoughRider have seat tilt?
• Seat tilt makes sitting feel more natural and comfortable; the
back-tilted position helps keep your trunk upright.
• Seat tilt helps you resist falling forward out of the chair (e.g. when
you are stopped suddenly by a bump).
Rider can reach
farther back to
push and can sit
upright with less
effort.
RoughRider with
12 degrees seat tilt
Rider slumps
forward and uses
effort to sit.
Standard chair
with little seat tilt
Cambered wheels tilt inward at the top of the wheel and
outward at the bottom. The RoughRider has approximately 3
degrees of camber.
Why have cambered wheels?
• More stability side to side because the chair is wider at the
bottom.
• Easier to push the push rims because they are in line with
your shoulders,closer to you, and angle outwards slightly.
Cambered Rear Wheels
The RoughRider’s footrests:
• Are adjustable to accommodate users of different
heights.
• Fold out of the way for easier transfer.
Footrests
page 7 of 57
Whirlwind RoughRider™ User Manual

USER MANUAL
www.whirlwindwheelchair.org
page 8
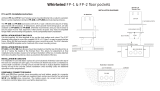
For Shorter Riders
Shorter Back Height – Some manufactures may be able to customize
the back height for you, if you prefer a shorter back height.
Shorter Seat Depth - If your upper legs are shorter than
40.7mm (16 in.), as measured from back of pelvis to back of
lower leg, you can shorten the effective seat length by:
• Asking the manufacturer (or a local metalworker) to
shorten the seat tubes at the front and to make custom seat
fabric to fit the new sized tubes;
• Adding foam behind your back so that you are sitting
further forward (you may also want to move your rear
wheels forward).
Common Modifications
If you are taller than 1.8m (6 ft.), you may need to make some
modifications to make the chair fit better. This is especially
important if you do not have full feeling in your body.
In order to bear more weight under your thighs and less on your
buttocks to prevent pressure sores, you can:
• Adjust footrests to their lowest position.
• Add dense foam under your normal cushion to lift you
up, if your thighs are still not bearing weight.
• Adjust your wheel position backward to stabilize your
higher center of gravity.
• Ask your manufacturer (or local metalworker) to make a
higher backrest for you. A higher backrest may be more
comfortable and support you better.
For Taller Riders

Your RoughRider™
Basic Riding Skills Maintenance and Repair
If you do not have legs, you may want to:
• Move your rear wheels back to prevent yourself
from tipping backward.
• Remove the footrest(s) to minimize the weight of the
chair, unless you use the footrests to carry loads or
get in and out of the chair.
Optimal Riding for Amputees
You may want to add a calf strap to your RoughRider to
keep your feet from slipping backward off the footrests.
You can add a calf strap by wrapping a piece of material,
such as webbing or heavy cloth, around the footrest tubes.
A lap belt may be useful to improve your control and
keep your buttocks seated in the wheelchair. A lap belt
can also help you feel more secure when riding your
wheelchair. You can add a lap belt by attaching two
strips of soft material, such as webbing, to the guide tubes
(the inner curved tube on side frame) or to the back tubes
and connecting the strips together with a buckle.
Heel Strap and Lap Belt
Prevent areas of high pressure: It is very important when using both the lap belt and the heel
strap to prevent the strap material from creating areas of high pressure. If you use a heel strap or
lap belt make sure to routinely check the skin of your lap and the back of your legs and feet for
signs of pressure sores. Refer to the Basic Riding Skills section for more instruction and
information about limited feeling and skin checks.
page 9 of 57
Whirlwind RoughRider™ User Manual

Maintenance and Repair
Routine maintenance can:
• Prevent breakdowns and excessive wear making your chair last longer, go farther, and cost
less to repair.
• Prevent injuries or long term damage to your muscles that result from sudden failures.
• Make your chair more comfortable and easier to use.
Some basic maintenance and repairs are explained in this section so that you will be able to keep
your RoughRider rolling as long as possible.
A bicycle mechanic may be able to help you with both maintenance and repair if needed. It is a
good idea to get to know a good mechanic who is close to where you live. Explain to the
mechanic how you use your wheelchair, and use the information in this manual to help your
mechanic understand how a wheelchair works.
After reading this section of the manual it is a good idea to discuss anything that is not clear with
the manufacturer, distributor, or an experienced Whirlwind RoughRider user. They should be
able to show you how to perform different maintenance and repair tasks.
In an emergency situation, you may be able to:
• Drive the wheelchair with a flat or
completely missing tire by leaning your
weight away from the missing/flat tire
(though this will quickly damage the
wheel rim).
• Drive the wheelchair without one of the
front casters by leaning your weight
away from the missing wheel.
It is always a good idea to carry an inner tube puncture repair kit and a bicycle pump with
you in case of emergencies. Whenever possible, you should also carry an adjustable wrench
and a screwdriver. You should also keep spare parts and tools available in your home for
easy access. Spare parts should include bearings, tubes, nuts, and cushions. Tools you should
have in your home include a second wrench, a small hammer, a spoke wrench, and a knife.

Maintenance Schedule
Routine maintenance can help prevent breakdowns and excessive wear. It will make your chair
last longer. Here is a calendar showing when to do basic maintenance tasks. For how to do the
specific maintenance go to the corresponding detailed descriptions.
Complete
RoughRider
What to do
description
part
on page
WEEKLY
Cushion
Check for cleanliness or breakdown of foam and
structure. Clean when needed. Check your skin
condition daily.
Page 33
Tire Pressure Check tire pressure. Add air when needed. Page 16
MONTHLY
Bearings
Basic Bearing Maintenance: Lubricate bearings in
caster wheels, caster barrels, and rear wheels with oil*
(see notes on recommended oil to use).
Page 36
Upholstery
Check for damage, wear and dirt. Clean or replace as
necessary.
Page 40
EVERY 2 MONTHS
Lubricate Wheel Locks with oil* (see notes on recommended oil to use). Page 45
Wheel locks
Adjust to correct position. Lubricate moving parts.
Tighten nuts. Every other month OR when wheel
locks are not holding chair in position OR when wheel
locks become difficult to lock.
Page 42
Spokes
Inspect and tighten spokes to true the wheels.
Every other month OR when spokes are broken or
loose OR if wheels wobble when spinning.
Page 43
Cleaning and
Routine
Inspection
Clean, lubricate, and inspect your RoughRider for
damage every 2 – 3 months if living in rough rural
environments where you are riding in dirt rather than
on paved roads; 2 - 3 times / year otherwise.
Page 48 - 49
Nuts and Bolts
Tighten nuts and bolts.
During Cleaning and Routine Inspections.
Page 50
2 – 3 TIMES / YEAR
Lubricate footrest pivot, folding stabilizer pivots, spoke threads, X-brace
pivot, and pivot tube with oil* (see notes on recommended oil to use).
Page 45
Bearings
Thorough Bearing Maintenance: Clean and repack
with grease* (see notes on recommended grease to
use). 2 – 3 times / year if living in rough rural
environments; 1 time / year otherwise.
Page 37

Cushion
The cushion protects your skin from pressure sores. It is important to keep it clean and dry so it
will last longer. Your cushion will not last as long as your chair. You should replace your
cushion every year or as needed. Dirt and moisture that is in contact with your skin can cause
pressure sores. If you notice skin problems developing, you should check the condition of
your cushion.
The foam will wear out with exposure to liquid and sunlight. Foam that is worn out may have
hard spots which can contribute to the development of pressure sores. Try to prevent your
cushion from getting wet or being exposed to direct sunlight.
Maintaining your Cushion
Regularly inspect your cushion for worn spots, dirt, holes in
the cover and foam.
How to inspect your cushion: Remove the cover and inspect
the top foam and base. They should be solid, without crumbling
or excessive discoloration, and the foam should spring back
when squeezed.
When necessary remove and wash the cover with mild soap
and water. Dry it thoroughly before replacing.
Wash top foam when needed with mild soap and water, making
sure to rinse all the soap out, and dry thoroughly before
replacing the cover.

Repair or Replace your Cushion
You should replace your cushion every year or as
needed.
If the top foam is worn out, is misshapen, or doesn’t
spring back when compressed, it should be replaced with
the same type of foam. If well cared for, the base of a
cushion will last longer than the top foam.
Compared to new cushion:
Used cushion on left shows significant
deformation. It is time to replace top
foam or entire cushion.
The cushion cover can be patched if doing so will not cause pressure or skin damage. Pay attention
to where the edges of the patch will be, and make sure these are not in places already under pressure
such as the buttocks.

Bearings
Maintaining your bearings will make them last longer and will help your chair roll more easily.
How to Make Your New Bearings Last Longer
• Pack bearings with as much bearing
grease as possible. See Thorough
Bearing Maintenance section for how
to pack bearings with grease.
• Install bearings with a washer made of
felt on outer sides of bearings under a
steel washer to prevent dust and dirt
from entering bearing.
*Recommended oil for basic maintenance: Heavier oil is better. The best oil
to use is 90 or 140 weight gear oil; the next best is 20 weight electric motor oil.
Do NOT use:
• Automotive engine oil. The detergent in automotive engine oil will mix with water.
• Common penetrating household lubricants and degreasers like WD40 should not be used.
Use of penetrating lubricants can damage the seals and remove grease. Bearing life will be
significantly shortened if you use your chair with ungreased bearings. Penetrating oils should
only be used for cleaning. After cleaning with a penetrating lubricant, repack the bearing with
grease (see Thorough Maintenance section).
• Light sewing machine or household oils. These oils are too light and will not stay in the
bearing for long.

*Recommended bearing grease for thorough maintenance: One of
the best types of bearing grease is water resistant boat trailer ball bearing
grease. Automobile ball bearing grease is very good, but is less water
resistant.
Maintaining your Bearings
Basic Maintenance (every month OR when you feel your chair slowing down and you don’t
have time to do more):
• Lubricate
our caster wheel caster barrel
,
and rear wheel bearin
y
,
g
s with oil*.

Thorough maintenance for rear hub and caster barrel bearings
(2-3 times / year if in rough environment; 1 time / year otherwise)
• To remove
bolt
• Reinsert the axle bolt at an angle so that the tip of the bolt contacts the inside face (inner race) of
the bottom bearing (see above left picture). Gently tap on the head of the axle bolt as you move
the bolt’s tip around the hole of the bearing until the bearing falls out. Hammer lightly; do NOT
hammer with force. Turn the wheel over and remove the other bearing. The same process can be
used to remove the bearings from the caster barrel. If the bearings will not come out, put some
light oil (not penetrating oil) around the bearings and try again later.
• Once the bearings are removed carefully pop the seals off with the tip of a knife.
• Clean all parts with kerosene making sure to get all of the dirt out. A brush such as a toothbrush
can also be helpful.
• Allow to dry; then repack/reassemble bearings with as much bearing grease as possible.
• Replace the seals.
the bearings from the hub, remove the wheel from the wheelchair and take the axle
out.
Formatted: Justified

• If caster fork has slots: Take the wheel out of the caster fork by loosening nuts until the wheel
drops out of the fork. If the caster fork does not have slots: Take the wheel out of the caster fork
by loosening nuts and screwing cones toward one side until axle is off center enough to pry out
of fork.
• To disassemble bearings, unscrew the cones outward/away from wheel until balls fall out.
• Clean all parts with kerosene.
• Allow to dry; then replace the balls and reassemble bearings with as much bearing grease as
possible. Dipping the balls in grease will hold them in place and make assembly easier.
Thorough maintenance for front wheel bearings
(2-3 times / year if in rough environment; 1 time / year
otherwise)
Cone
Axle
Cup and balls
Formatted: Justified
/