Page is loading ...

For Research Use Only. Not for use in diagnostic procedures.
CytoScan™ Assay Automated Workflow on
Applied Biosystems™ NIMBUS™
SITE PREPARATION GUIDE
for 25 or 49 Samples
Catalog Numbers 901808, 901833, and 901858
Publication Number 703142
Revision 3

The information in this guide is subject to change without notice.
DISCLAIMER: TO THE EXTENT ALLOWED BY LAW, Thermo Fisher Scientific AND/OR ITS AFFILIATE(S) will NOT BE LIABLE FOR SPECIAL, INCIDENTAL,
INDIRECT, PUNITIVE, MULTIPLE, OR CONSEQUENTIAL DAMAGES IN CONNECTION WITH OR ARISING FROM THIS DOCUMENT, INCLUDING YOUR
USE OF IT.
Important Licensing Information
This product may be covered by one or more Limited Use Label Licenses. By use of this product, you accept the terms and conditions of all applicable Limited
Use Label Licenses.
Corporate entity
Life Technologies | Carlsbad, CA 92008 USA | Toll Free in USA 1 800 955 6288
TRADEMARKS
All trademarks are the property of Thermo Fisher Scientific and its subsidiaries unless otherwise specified.
Kimwipes is a trademark and brand of Kimberly-Clark Worldwide, Inc. Costar is a registered trademark of Corning, Inc. Hard-Shell is a registered trademark of Bio-
Rad Laboratories, Inc. Microsoft and Excel are either registered trademarks or trademarks of Microsoft Corporation in the United States and/or other countries.
Tygon is a registered trademark of Saint-Gobain Performance Plastics. Clontech and Titanium are trademarks of Clontech Laboratories, Inc. Bioanalyzer is a
trademark of Agilent Technologies, Inc. Tough-Spots is a registered trademark of Diversified Biotech, Inc. Gentra and Puregene are registered trademarks of
QIAGEN. GeneMate is a trademark and brand of BioExpress, LLC.
©2018 Thermo Fisher Scientific Inc. All rights reserved.
Manufacturer:
Affymetrix Pte Ltd
7 Gul Circle #2M-01
Keppel Logistics Building
Singapore 629563
Products:
CytoScan™ Arrays
Manufacturer:
Thermo Fisher Scientific Baltics UAB
V.A. Graiciuno 8, LT-02241
Vilnius, Lithuania
Products:
CytoScan™ Reagent Kit
Revision history: Pub. No. 703142
Revision Date Description
306 September 2018 Updated to the current document template, with associated updates to
trademarks, logos, licensing, and warranty.
Updated to include improved fragmentation protocol and reagents.
2 04 April 2013 Baseline for revision history.

CytoScan™ Assay Automated Workflow Site Preparation Guide—Applied Biosystems™ NIMBUS™ Instrument 3
Contents
CHAPTER 1 Introduction. . . . . . . . . . . . . . . . . . . . . . . . . . . . . . . . . . . . 5
About CytoScan™ Automated Target Preparation Solution on the NIMBUS™ Instrument . . . 5
CHAPTER 2 Safety precautions and hazards . . . . . . . . . . . . . . . . . . . . 6
General precautions . . . . . . . . . . . . . . . . . . . . . . . . . . . . . . . . . . . . . . . . . . . . . . . . . . . . . . . . . 6
Operating the instrument . . . . . . . . . . . . . . . . . . . . . . . . . . . . . . . . . . . . . . . . . . . . . . . . . . . 6
Method programming . . . . . . . . . . . . . . . . . . . . . . . . . . . . . . . . . . . . . . . . . . . . . . . . . . . . . 6
Biohazard precautions . . . . . . . . . . . . . . . . . . . . . . . . . . . . . . . . . . . . . . . . . . . . . . . . . . . . . 7
Computer precautions . . . . . . . . . . . . . . . . . . . . . . . . . . . . . . . . . . . . . . . . . . . . . . . . . . . . . . . 7
Electrical Safety precautions . . . . . . . . . . . . . . . . . . . . . . . . . . . . . . . . . . . . . . . . . . . . . . . . . . 7
Safety . . . . . . . . . . . . . . . . . . . . . . . . . . . . . . . . . . . . . . . . . . . . . . . . . . . . . . . . . . . . . . . . . . . . 8
Pinch Points–Keep Hands Clear! . . . . . . . . . . . . . . . . . . . . . . . . . . . . . . . . . . . . . . . . . . . . . . 10
CHAPTER 3 Pre-installation and site preparation . . . . . . . . . . . . . . . . 11
Pre-installation information . . . . . . . . . . . . . . . . . . . . . . . . . . . . . . . . . . . . . . . . . . . . . . . . . . 11
Site selection . . . . . . . . . . . . . . . . . . . . . . . . . . . . . . . . . . . . . . . . . . . . . . . . . . . . . . . . . . . 11
O-ring care . . . . . . . . . . . . . . . . . . . . . . . . . . . . . . . . . . . . . . . . . . . . . . . . . . . . . . . . . . . . . 13
Inventory of components and warranty registration . . . . . . . . . . . . . . . . . . . . . . . . . . . . . 13
Preparing the computer . . . . . . . . . . . . . . . . . . . . . . . . . . . . . . . . . . . . . . . . . . . . . . . . . . . 13
Preparing the power requirements . . . . . . . . . . . . . . . . . . . . . . . . . . . . . . . . . . . . . . . . . . 13
Hamilton equipment, software, and labware . . . . . . . . . . . . . . . . . . . . . . . . . . . . . . . . . . . . . 14
Operation specifications for NIMBUS™ Instrument and devices . . . . . . . . . . . . . . . . . . . . 14
Equipment. . . . . . . . . . . . . . . . . . . . . . . . . . . . . . . . . . . . . . . . . . . . . . . . . . . . . . . . . . . . . . 15
Set up CytoScan™ Assay-specific deck . . . . . . . . . . . . . . . . . . . . . . . . . . . . . . . . . . . . . . . 16
Secure the pedestals, thermoshake, and CPAC to the deck . . . . . . . . . . . . . . . . . . . . . . 16
Assembling the trash chute . . . . . . . . . . . . . . . . . . . . . . . . . . . . . . . . . . . . . . . . . . . . . . . . 24
Setting up the Thermoshake. . . . . . . . . . . . . . . . . . . . . . . . . . . . . . . . . . . . . . . . . . . . . . . . 27
Assembling the CPAC tube adapter and cover . . . . . . . . . . . . . . . . . . . . . . . . . . . . . . . . . 29
Placing the reagent template onto the CPAC device . . . . . . . . . . . . . . . . . . . . . . . . . . . . 31
CytoScan™ Reagent Template . . . . . . . . . . . . . . . . . . . . . . . . . . . . . . . . . . . . . . . . . . . . . . 32
Related Hamilton documentation . . . . . . . . . . . . . . . . . . . . . . . . . . . . . . . . . . . . . . . . . . . 32
Laboratory setup and recommendations . . . . . . . . . . . . . . . . . . . . . . . . . . . . . . . . . . . . . . . . 33

Contents
4CytoScan™ Assay Automated Workflow Site Preparation Guide—Applied Biosystems™ NIMBUS™ Instrument
Configuration 1—two separate rooms . . . . . . . . . . . . . . . . . . . . . . . . . . . . . . . . . . . . . . . . 33
Configuration 2—one room . . . . . . . . . . . . . . . . . . . . . . . . . . . . . . . . . . . . . . . . . . . . . . . . 36
Contamination prevention . . . . . . . . . . . . . . . . . . . . . . . . . . . . . . . . . . . . . . . . . . . . . . . . . 39
Equipment and calibration . . . . . . . . . . . . . . . . . . . . . . . . . . . . . . . . . . . . . . . . . . . . . . . . . 39
Reagent handling and storage . . . . . . . . . . . . . . . . . . . . . . . . . . . . . . . . . . . . . . . . . . . . . . 40
Laboratory workflow . . . . . . . . . . . . . . . . . . . . . . . . . . . . . . . . . . . . . . . . . . . . . . . . . . . . . . 41
Thermal cyclers, 96-well plate, and adhesive seals . . . . . . . . . . . . . . . . . . . . . . . . . . . . . 41
Hybridization oven . . . . . . . . . . . . . . . . . . . . . . . . . . . . . . . . . . . . . . . . . . . . . . . . . . . . . . . 42
Reagents, equipment, and consumables . . . . . . . . . . . . . . . . . . . . . . . . . . . . . . . . . . . . . . . 43
Equipment, software, and arrays required . . . . . . . . . . . . . . . . . . . . . . . . . . . . . . . . . . . . 43
Reagents required . . . . . . . . . . . . . . . . . . . . . . . . . . . . . . . . . . . . . . . . . . . . . . . . . . . . . . . 45
Consumables required . . . . . . . . . . . . . . . . . . . . . . . . . . . . . . . . . . . . . . . . . . . . . . . . . . . . 46
Optional equipment from Thermo Fisher Scientific . . . . . . . . . . . . . . . . . . . . . . . . . . . . . . 47
Equipment required from other suppliers . . . . . . . . . . . . . . . . . . . . . . . . . . . . . . . . . . . . . . 48

CytoScan™ Assay Automated Workflow Site Preparation Guide—Applied Biosystems™ NIMBUS™ Instrument 5
1Introduction
About CytoScan™ Automated Target Preparation Solution on the
NIMBUS™ Instrument
Cytogenetics research studies are performed to identify structural changes in DNA,
such as copy number changes (CNV), loss of heterozygosity (LOH), and mosaicism.
Individuals typically have two copies of the genome in each of their cells: one inherited
from the mother and one inherited from the father. Chromosomal abnormalities, such
as the ones listed below, are common in several disease states:
•Deletions–When one or both copies of a particular chromosome region are lost.
•Gains–When a chromosome or chromosomal region is duplicated or multiplied.
•Uniparental Disomies (UPDs)–When two copies of a chromosome or chromosomal
region are present, but both have been inherited from a single parent.
Traditional cytogenetics techniques, such as karyotyping and fluorescent in situ
hybridization (FISH) have been used to study chromosomal abnormalities for decades.
However, karyotyping only detects abnormalities at low resolutions (larger than
~5 Mb), and FISH is a more focused and targeted approach without the benefit of
genome-wide analysis. Further, these techniques are limited to only providing copy
number information so that UPDs cannot be identified.
Together, CytoScan™ Arrays and CytoScan™ Assay Automated Workflow, along with
the Command Console and Chromosome Analysis Suite software, enable you to
perform high-resolution genome-wide DNA copy number analysis. The Thermo
Fisher Scientific solution for cytogenetics research also provides genotyping
information with over 750,000 SNPs, enabling detection of loss of heterozygosity
(LOH), which can be used to detect UPDs. The combined high resolution DNA copy
number data and the ability to detect gains, losses, mosaicism, and LOH on a single
array makes the CytoScan™ Solution a great tool for next generation cytogenetics
research studies.
IMPORTANT! The CytoScan™ Automated Target Preparation Assay protocol is
optimized for processing from 25 or 49 samples at a time using the Applied
Biosystems™ NIMBUS™ Target Preparation Instrument to obtain whole genome copy
number and SNP information from Applied Biosystems™ CytoScan™ Arrays. Only the
post-PCR steps from PCR purification to adding hybridization master mix are
automated. This protocol is not intended for genome-wide association studies.

6CytoScan™ Assay Automated Workflow Site Preparation Guide—Applied Biosystems™ NIMBUS™ Instrument
2Safety precautions and hazards
General precautions . . . . . . . . . . . . . . . . . . . . . . . . . . . . . . . . . . . . . . . . . . . . . . . . . . . 6
Computer precautions . . . . . . . . . . . . . . . . . . . . . . . . . . . . . . . . . . . . . . . . . . . . . . . . . 7
Electrical Safety precautions . . . . . . . . . . . . . . . . . . . . . . . . . . . . . . . . . . . . . . . . . . . . 7
Safety . . . . . . . . . . . . . . . . . . . . . . . . . . . . . . . . . . . . . . . . . . . . . . . . . . . . . . . . . . . . . . . . 8
Pinch Points–Keep Hands Clear! . . . . . . . . . . . . . . . . . . . . . . . . . . . . . . . . . . . . . . . 10
General precautions
Applied Biosystems™ CytoScan™ Assay Kit as well as Applied Biosystems™ CytoScan™
Arrays are for research use only.
All blood and other potentially infectious materials should be handled as if capable of
transmitting infection and disposed of with proper precautions in accordance with
federal, state, and local regulations.
Some components required for this assay may pose significant health risks. Follow
prudent laboratory practices when handling and disposing of carcinogens and toxins.
Refer to the manufacturer’s Safety Data Sheet for additional information.
Wear appropriate personal protective equipment when performing this assay. At a
minimum, safety glasses and chemical resistant gloves should be worn.
Operating the
instrument
Good Laboratory Practices (GLP) must be observed when using Applied Biosystems™
NIMBUS™ Target Preparation Instrument. Wear suitable protective clothing, safety
glasses, and protective gloves, particularly when dealing with an instrument
malfunction where the risk of contamination from spilled liquids exists.
During operation of the NIMBUS Instrument, stand clear of any moving parts or the
working deck of the instrument. In general, never lean over the NIMBUS Instrument
when working with it.
Method
programming
Perform test runs with tap water first and then with the final liquids prior to routine
use, first perform test runs with tap water and then with the final liquids. Test all the
liquid classes that will be used.
A newly programmed test method must first be run on the NIMBUS Instrument with
the final liquids prior to validation of the method and routine use. The method
programmer should supervise this run.
Before using any newly created or modified method for routine test purposes, a
comparison study of the old and new method must be performed by the laboratory
supervisor to ensure that the processing and data evaluation of both methods
produces equivalent results.

CytoScan™ Assay Automated Workflow Site Preparation Guide—Applied Biosystems™ NIMBUS™ Instrument 7
Chapter 2 Safety precautions and hazards
Computer precautions 2
Biohazard
precautions
If the NIMBUS Instrument becomes contaminated with biohazardous or chemical
material, it should be cleaned in accordance with the procedures in the Maintenance
section of the MICROLAB® NIMBUS® User Guide (Pub. No. 62965-01). Failure to
observe and carry out these maintenance procedures may impair the reliability and
correct functioning of the NIMBUS Instrument.
If working with biohazardous samples, pay particular attention to cleaning and
decontamination procedures when performing the maintenance procedures. Wear
gloves when handling the 96 pipetting arm, pedestals, containers, and tips.
The NIMBUS Instrument drops used tips into a waste container. When the waste
container becomes full, immediately empty it into a laboratory-supplied waste bin.
Avoid contact with the discarded tips.
Any surfaces on which liquid has been spilled must be decontaminated. Do not use
disinfecting materials which contain hypochlorite (Javel water, Chlorox) or bleaching
fluids.
Computer precautions
Take necessary precautions against software viruses and other malicious software.
Only use the manufacturer’s original installation CD-ROM sets for the operating
system and the original NIMBUS Instrument Software. Only CytoScan™ Post-PCR
Software Methods for NIMBUS™ may be used to control the NIMBUS Instrument.
Running other software concurrently with CytoScan™ Post-PCR Software Methods for
NIMBUS™ may negatively affect the performance of the NIMBUS Instrument.
Any manipulation of the NIMBUS Instrument data files or other information that
determines or affects the NIMBUS Instrument functions can result in erroneous test
results or instrument failure.
Using an uninterrupted power supply (UPS) is recommended as the loss of power may
cause data to be lost or corrupted.
Ensure that the hard disk has sufficient available space for your needs. Data within the
Log files directory (for example, traces and pipetting files) should be copied to the
laboratory host device and deleted from the workstation computer at weekly intervals.
Electrical Safety precautions
Turn off the NIMBUS Instrument, then disconnect it from the main electrical supply
and computer before removing a mechanical or electrical component.

Chapter 2 Safety precautions and hazards
Safety
8CytoScan™ Assay Automated Workflow Site Preparation Guide—Applied Biosystems™ NIMBUS™ Instrument
2
Safety
Note: Instruments shipped outside the U.S. do not have the accessories carton
strapped to the top of the crated instrument.
WARNING! Waste may contain biohazardous or chemical-contaminated
material.
IMPORTANT! Use ESD control measures when working with instrument electronic
assemblies.
IMPORTANT! Always make sure that the NIMBUS Instrument’s power is turned off
and disconnected from the main electrical supply before installing or removing any
electrical connections.
WARNING! Use good laboratory practice (GLP) and universal precautions, and
wear appropriate personal protective equipment when working with and around
the NIMBUS Instrument.
IMPORTANT! Examine the packaging for signs of damage. If the crate or instrument
has been damaged, contact Thermo Fisher Scientific.
IMPORTANT! Verify that the contents of the package match the shipping lists.
Contact Thermo Fisher Scientific if any items are missing.
IMPORTANT! Clean exterior surfaces with soap and water. If bleach is used to
disinfect, never allow bleach to remain on the deck or aluminum parts. Microcide SQ
is an alternative broad-spectrum cleaner and disinfectant.
IMPORTANT! Follow safe laboratory practices in selecting and using a cleaning fluid
to flush out contaminants. Do not use cleaning solutions that contain acetone or other
ketones which can dissolve paint. Do not use caustic or acidic cleaning solutions.
IMPORTANT! Do not use an isopropyl alcohol-based solution to clean the safety
shield. It can cause micro-fractures.
IMPORTANT! Do not wipe down areas near electrical connections with the 2 to 5%
chlorine bleach solution. Bleach damages electrical connections.
WARNING! You may be required to disconnect a component or connection to
completely remove the deck. Contact Thermo Fisher Scientific for additional
information.
IMPORTANT! Preventive maintenance must only be performed by an authorized
service technician. Before any preventive maintenance can be performed, you must
empty and decontaminate the deck panel.

CytoScan™ Assay Automated Workflow Site Preparation Guide—Applied Biosystems™ NIMBUS™ Instrument 9
Chapter 2 Safety precautions and hazards
Safety 2
WARNING! Never move a fully assembled NIMBUS Instrument by yourself.
Two or more people are required to move the instrument which weighs between
130 and 160 lbs, depending on its configuration. Always remove labware and
pedestals prior to moving.
IMPORTANT! Do not overfill reagent containers, tubes, or other liquid containers.
WARNING! Promptly clean any spills around the NIMBUS Instrument.
WARNING! A chemical hazard could be created if labware is dropped from the
labware gripper arm while it contains dangerous chemicals.
WARNING! Use caution during initialization and tip eject as the 96-head and its
covers will leave the instrument “footprint” and travel out to the trash chute.
WARNING! Use caution during tip eject as the labware gripper arm will leave
the instrument “footprint” and travel out to the trash chute.
WARNING! Use caution when removing package, installing, or moving
instrument. The instrument could be dropped on a person or body part during
transition to a new location. Always use the supplied lift straps.
WARNING! If the instrument experiences a crash and is user recoverable, re-
calibrate instrument. If the instrument crashes and is not user-recoverable,
contact Thermo Fisher Scientific.
WARNING! Liquid level detection must be explicitly tested when working with
foaming liquids. Foam may affect the accuracy of liquid level detection.
WARNING! Contact Thermo Fisher Scientific if you believe the instrument has
lost accuracy or precision in any motion axis.
WARNING! Do not remove the side shields under any circumstances.
IMPORTANT! The user is obligated to validate methods.
IMPORTANT! Place the NIMBUS Instrument on a stable bench or cart to prevent
ripple or wave action in reagent troughs, otherwise liquid handling may be
compromised.
IMPORTANT! Capacitance-based Liquid Level Detection (cLLD) does not function
with the use of clear, non-conductive tips. Lack of cLLD can adversely affect fluid
handling performance.

Chapter 2 Safety precautions and hazards
Pinch Points–Keep Hands Clear!
10 CytoScan™ Assay Automated Workflow Site Preparation Guide—Applied Biosystems™ NIMBUS™ Instrument
2
Pinch Points–Keep Hands Clear!
Potential pinch points of the NIMBUS Instrument include the:
• Area between the gantry and the wing
• Slots between the deck edge and the cosmetic cover
• Area between the head or tips and the deck or labware
• Area between the head and the shields during y-direction movement of the head
• Front of the gantry between the gantry y-drive mechanism and the cosmetic
covers
• Area between the labware gripper arm and the 96-channel CO-RE head
• Area between the labware gripper arm and the waste chute
CAUTION! Keep your hands and head away from the NIMBUS Instrument
while it is operating to avoid serious accidents related to CRASH INJURY. The
robotic head moves rapidly and the tips can act as piercing agents. If you forgot
to place a reagent or other item on the deck, pause the NIMBUS Instrument and
then perform necessary actions.
WARNING! Do not place your hands in the way of moving parts while the
instrument is operating.
IMPORTANT! While instrument is moving, keep hands, hair, and loose clothing
away. Keep all other foreign objects away from the pinch point areas of the NIMBUS
Instrument.
WARNING! It is not recommended to leave tips on the head or leave the head
in its squeeze position for extended periods of time. This can lead to premature
O-ring wear and poor system performance.
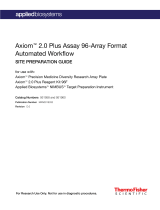
Figure 1 Pinch Point Hazard areas on the NIMBUS™ Instrument
NIMBUS™ Instrument arm
pinch point hazard area
NIMBUS™ Instrument head
pinch point hazard area

CytoScan™ Assay Automated Workflow Site Preparation Guide—Applied Biosystems™ NIMBUS™ Instrument 11
3Pre-installation and site
preparation
Pre-installation information . . . . . . . . . . . . . . . . . . . . . . . . . . . . . . . . . . . . . . . . . . . 11
Set up CytoScan™ Assay-specific deck . . . . . . . . . . . . . . . . . . . . . . . . . . . . . . . . . . 16
Laboratory setup and recommendations . . . . . . . . . . . . . . . . . . . . . . . . . . . . . . . . 33
Reagents, equipment, and consumables . . . . . . . . . . . . . . . . . . . . . . . . . . . . . . . . . 43
Pre-installation information
Site selection Note: Determine the NIMBUS Instrument location carefully. Moving the NIMBUS
Instrument after installation requires re-calibration. See ʺConfiguration 1—two
separate roomsʺ on page 33 and ʺConfiguration 2—one roomʺ on page 36 for
suggested NIMBUS Instrument placement.
Keep in mind the following considerations and requirements when preparing a
location for the NIMBUS Instrument:
• The NIMBUS Instrument comes with a laptop.
• Keep the NIMBUS Instrument away from direct sunlight, drafts, excessive
vibrations, and widely fluctuating temperatures or humidity. This is especially
critical for low volume (<
10 µL) applications that require highly accurate and
precise pipetting.
• The NIMBUS Instrument must be placed on a stable bench, table, or hood that can
support up to 200 lbs (89.6 kg) without bowing or swaying.
• The NIMBUS Instrument must be oriented so that when facing the instrument,
the waste disposal station is on the LEFT side of the instrument.
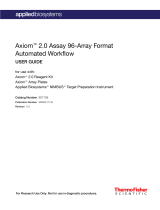
• Make sure the bench/table surface is level as possible and affords at a minimum
the following dimensions (Figure 2):
– Width (front to rear) 20 in (50.8 cm)
– Length (left to right) 52.5 in (133.4 cm)
– Height 30 in (76.2 cm)
IMPORTANT! Read the pre-installation information before unpacking or moving the
instrument.

Chapter 3 Pre-installation and site preparation
Pre-installation information
12 CytoScan™ Assay Automated Workflow Site Preparation Guide—Applied Biosystems™ NIMBUS™ Instrument
3
For optimum serviceability, it is best to position the NIMBUS Instrument on an island
location within the laboratory. Be sure to plan additional space for:
• Laptop/PC, mouse and other accessories such as a printer.
• Storage of manuals, tips, components, and labware.
• Integrated off-deck accessories and third party devices.
The NIMBUS Instrument has a solid waste chute for collection of used tips which is
mounted on the front left-hand side of the instrument. The chute is designed with a
slide such that the tips will be directed off the bench/table into a waste collection bag
or bin. Accordingly, the front of the instrument should be approximately 1 inch
(2.5 cm) from the front edge of the supporting table or bench.
Figure 2 The Applied Biosystems™ NIMBUS™ Target Preparation Instrument

CytoScan™ Assay Automated Workflow Site Preparation Guide—Applied Biosystems™ NIMBUS™ Instrument 13
Chapter 3 Pre-installation and site preparation
Pre-installation information 3
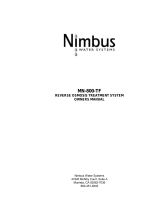
O-ring care The o-rings on the head of the NIMBUS Instrument allow the instrument to pick up
and manipulate the pipette tips loaded on the deck. When the head is left in a squeezed
position for an extended period of time, the o-rings wear out and the head is stressed.
Upon successfully completing a method, the head is normally parked with the o-rings
in a relaxed position. Should a method be interrupted or stopped, it is possible that the
head may stand still with the o-rings in the squeezed position (Figure 3). Should this
happen, try “initializing” the instrument.
To help preserve the longevity of the O-rings, remember the following:
• Never power down the instrument with any tips loaded on the head.
• Never leave the instrument with the head in the squeezed position.
• ‘Initializing” the instrument usually resolves the head remaining in the squeezed
position.
Inventory of
components and
warranty
registration
Locate the NIMBUS Instrument Inventory List shipped with the unit. Use this list to
check off each item as component are unpacked. Components that are kits will have
their own inventory list inside the kit box.
Preparing the
computer
The NIMBUS Instrument includes a laptop. The field application scientist (FAS)
installs the CytoScan™ Post-PCR Software Methods for NIMBUS™.
Preparing the power
requirements
The input power (Universal Supply) is 100-24 VAC, 50-60 Hz, 5/A. The power supply
is a UL/CSA/CE approved universal power supply with IEC connection. International
power adapters will need to be supplied prior to installation
A multi-port power strip is supplied with each instrument which can be plugged into
a single outlet. If the power strip is not used, three power outlets are required: one for
the NIMBUS Instrument, one for a laptop or PC, and one for the MTEC integration.
UPS power backup for both the computer and the NIMBUS Instrument is
recommended but not required.
WARNING! It is not recommended to leave tips on the head or leave the head in
its squeeze position for extended periods of time. This can lead to premature
O-ring wear and poor system performance.
Figure 3 O-rings in “squeezed” and “relaxed” state
WARNING! It is not recommended to leave tips on the head or leave the head in
its squeeze position for extended periods of time. This can lead to premature
O-ring wear and poor system performance.

Chapter 3 Pre-installation and site preparation
Hamilton equipment, software, and labware
14 CytoScan™ Assay Automated Workflow Site Preparation Guide—Applied Biosystems™ NIMBUS™ Instrument
3
Hamilton equipment, software, and labware
Operation
specifications for
NIMBUS™
Instrument and
devices
Table 1 provides operation specifications for the NIMBUS Target Preparation
Instrument, and the Inheco Thermoshake and CPAC devices.
IMPORTANT! The NIMBUS Target Instrument is for indoor operation and use only.
Table 1 Operation specifications for the NIMBUS Instrument and Inheco devices
Specification
NIMBUS™ Target Preparation Instrument
Operating
Temperature:
Relative Humidity:
Altitude:
15°C to 35°C (59°F to 95°F)
30% to 85% R.H. non-condensing
2,000 m (1.2 miles) above sea level
Inheco Thermoshake device
Limits for ambient operating temperature 15°C to 32°C (59°F to 90°F)
Tolerable relative humidity Max. 75%, non-condensing1
1 Condensing can prevent the Thermoshake device to achieve the specifications.
Inheco CPAC device
Temperature 15°C to 32°C (59°F to 90°F)
Tolerable relative humidity 30-80% relative (non-condensing)
WARNING! Condensate can prevent the devices from achieving the above
operating specifications. Upon completion of Stage 5: Prepare Hyb Tray, be sure to
click Finish in the final Cleanup window for that stage to prevent further
condensation which may damage the devices.

CytoScan™ Assay Automated Workflow Site Preparation Guide—Applied Biosystems™ NIMBUS™ Instrument 15
Chapter 3 Pre-installation and site preparation
Hamilton equipment, software, and labware 3
Equipment The Applied Biosystems NIMBUS Target Preparation Instrument (Cat. No. 00-0401) is
required to run the CytoScan Assay Automated Workflow. This workstation includes
the accessories, software and deck configuration listed in Figure 4.
Figure 4 CytoScan™ Assay NIMBUS™ Instrument deck configuration
CytoScan deck configuration for the NIMBUS™ Instrument
1. Variomag Thermoshake with adapter and plate collar
2. CPAC
3. Precision DWP Pedestal
4. DWP Pedestal
5. DWP Pedestal
6. Tip Adapter
7. Precision DWP Pedestal
8. DWP Pedestal
9. FTR Pedestal
10. FTR Pedestal
11. FTR Pedestal

Chapter 3 Pre-installation and site preparation
Hamilton equipment, software, and labware
16 CytoScan™ Assay Automated Workflow Site Preparation Guide—Applied Biosystems™ NIMBUS™ Instrument
3
Set up CytoScan™
Assay-specific deck
The Multi TEC Controller is used to operate Thermoshake and CPAC Cooling Block.
The Thermoshake is set up with the PCR adapter and plate positioning bracket. The
CPAC cooling block is set up with tube rack and reagent template.
There are two slot modules: one for CPAC and the other for Thermoshake.
Secure the
pedestals,
thermoshake, and
CPAC to the deck
The NIMBUS Target Preparation Instrument comes with a small accessory tool kit that
includes a 2 mm, 2.5 mm, and a 3 mm hex wrench (a.k.a., hex key, Allen key, or Allen
wrench) (Figure 6). Additionally, the INHECO base plate kit comes with a 1.5 mm hex
wrench. These tools are required for securing pedestals and devices to the NIMBUS
deck.
Figure 5 Multi TEC Control and Slot Module
Multi TEC Control (front view)
Controls both devices
Multi TEC Control (back view) Slot Module 12V
Figure 6 NIMBUS™ Target Preparation Instrument accessory tool kit

CytoScan™ Assay Automated Workflow Site Preparation Guide—Applied Biosystems™ NIMBUS™ Instrument 17
Chapter 3 Pre-installation and site preparation
Hamilton equipment, software, and labware 3
Secure the pedestals
The pedestals in deck positions 6, 9, 10, and 11 are secured to the NIIMBUS deck by
tightening the set screws, located on the left and right side of each pedestal, with a
2 mm hex wrench. When securing the pedestals to the deck it is best to start with the
pedestals in the back of the deck and work to those in the front to facilitate the ease of
access to set screws.
Thus, using a 2 mm hex wrench, follow the instructions below to place and lock down
the pedestals in the following order:
1. Tip Adapter at deck position 6
2. FTR pedestal at deck position 9
3. FTR pedestal at deck position 10
4. Tip Isolator at deck position 11
Refer to Figure 4 on page 15 for specific deck position locations. The remaining
pedestals are simply positioned by placing them on the locator pins found on the deck.
To Secure a pedestal to the NIMBUS Deck
1. Place pedestal on the deck, positioned using the two locator pins on the left and
right side of the pedestal (Figure 7).
Figure 7 Pedestal placed on deck, positioned using locator pins (front view)
Locator pins
Set screw

Chapter 3 Pre-installation and site preparation
Hamilton equipment, software, and labware
18 CytoScan™ Assay Automated Workflow Site Preparation Guide—Applied Biosystems™ NIMBUS™ Instrument
3
2. Tighten the set screws on the left and right side of the pedestal using a 2 mm hex
wrench (Figure 8).
3. Using the locator pins on the deck, place and secure the remaining pedestals on
deck in proper order, working from the back to the front of the deck (Figure 9).
4. Place the remaining pedestals onto the deck, positioning them using the locator
pins on the left and right side of each pedestal. These remaining pedestals are not
secured to the deck with set screws. Refer to Figure 4 on page 15 for deck
configuration information (Figure 10).
Figure 8 Tightening set screws on the left and right side of pedestal
Figure 9 Placing and securing the pedestals onto the deck in the proper order
Place and secure the pedestals onto the NIMBUS deck from
back to front:
1. Deck position 6
2. Deck position 9
3. Deck position 10
4. Deck position 11
Note: Place a pedestal on the deck and secure by tightening the
set screws. Be sure to secure each pedestal placed onto the
deck before moving on to placing and securing the next
pedestal.

CytoScan™ Assay Automated Workflow Site Preparation Guide—Applied Biosystems™ NIMBUS™ Instrument 19
Chapter 3 Pre-installation and site preparation
Hamilton equipment, software, and labware 3
Securing the Thermoshake and CPAC devices to the NIMBUS™ deck
The Thermoshake and CPAC devices sit on the NIMBUS deck in deck positions 1 and
2. When fully assembled, they are found behind the trash chute attachment plate and
trash chute mounting bracket. The Thermoshake and CPAC devices are secured to the
deck using a 1.5 mm hex wrench and set screws. The trash chute attachment plate and
trash chute mounting bracket are secured using a 2.5 mm hex wrench and M3 screws.
The instructions that follow assume an initial setup. If the set screws for the
Thermoshake and/or CPAC device(s) need to be tightened after the initial installation,
the trash chute attachment plate and the trash chute mounting bracket need to be
removed first to allow access to the device set screws.
Figure 10 Place the remaining pedestals onto the deck according to the deck
configuration.

Chapter 3 Pre-installation and site preparation
Hamilton equipment, software, and labware
20 CytoScan™ Assay Automated Workflow Site Preparation Guide—Applied Biosystems™ NIMBUS™ Instrument
3
To secure the Thermoshake and CPAC devices to the NIMBUS™ deck
1. The Thermoshake and CPAC devices are placed in their proper locations onto the
deck using the locator pins (Figure 11).
Figure 11 Place devices securely on the deck using the locator pins.
Thermoshake
Deck position #1
CPAC
Deck position #2
Locator pin
Figure 12 Set screws on Thermoshake and CPAC devices
Only one set screw for each device. Close up view of set screw.
/