Page is loading ...

Made to Work. Built to Last.
SM
P.O. Box 2000 State Road 15 North
Milford, IN. 46542-2000 U.S.A.
574-658-4101 Fax 877-730-8825
www.ctbinc.com
Made in the U.S.A.
Assembly Instructions
CN2148
Note: The original, authoritative version of this manual is the English version produced by CTB, Inc. or any of its subsidiaries or divisions, (hereafter
collectively referred to as "CTB"). Subsequent changes to any manual made by any third party have not been reviewed nor authenticated by CTB.
Such changes may include, but are not limited to, translation into languages other than English, and additions to or deletions from the original content.
CTB disclaims responsibility for any and all damages, injuries, warranty claims and/or any other claims associated with such changes, inasmuch as
such changes result in content that is different from the authoritative CTB-published English version of the manual. For current product installation
and operation information, please contact the customer service and/or technical service departments of the appropriate CTB subsidiary or division.
Should you observe any questionable content in any manual, please notify CTB immediately in writing to: CTB Legal Department, P.O. Box 2000,
Milford, IN 46542-2000 USA.
SIDE BELT NEST BODY

Page 2
Manufacturer warrants each new product manufactured by it to be free from defects in material or workmanship
for one (1) year from and after the date of initial installation by or for the original purchaser. If such a defect is
found by Manufacturer to exist within the one-year period, the Manufacturer will, at its option, (a) repair or
replace such product free of charge, F.O.B. the factory of manufacture, or (b) refund to the original purchaser the
original purchase price, in lieu of such repair or replacement. Labor costs associated with the replacement or
repair of the product are not covered by the Manufacturer.
Conditions and Limitations
1. The product must be installed by and operated in accordance with the instructions published
by the Manufacturer or Warranty will be void.
2. Warranty is void if all components of the system are not original equipment supplied by the
Manufacturer.
3. This product must be purchased from and installed by an authorized distributor or installer or a
certified representative thereof or the Warranty will be void.
4. Malfunctions or failure resulting from misuse, abuse, negligence, alteration, accident, or lack
of proper maintenance, or from lightning strikes, electrical power surges or interruption of
electricity, shall not be considered defects under the Warranty.
5. This Warranty applies only to systems for the care of poultry and livestock. Other applications
in industry, commerce, or residential applications are not covered by this Warranty and are
strictly prohibited. Any such use will void the Warranty.
Manufacturer shall not be liable for any Consequential or Special Damage which any purchaser may suffer or
claim to suffer as a result of any defect in the product. "Consequential" or "Special Damages" as used herein
include, but are not limited to, lost or damaged products or goods, costs of transportation, lost sales, lost orders,
lost income, increased overhead, labor and incidental costs and operational inefficiencies.
THIS WARRANTY CONSTITUTES THE MANUFACTURER'S ENTIRE AND SOLE WARRANTY AND
THIS MANUFACTURER EXPRESSLY DISCLAIMS ANY AND ALL OTHER WARRANTIES, INCLUDING,
BUT NOT LIMITED TO, EXPRESS AND IMPLIED WARRANTIES AS TO MERCHANTABILITY, FITNESS
FOR PARTICULAR PURPOSES SOLD AND DESCRIPTION OR QUALITY OF THE PRODUCT FUR-
NISHED HEREUNDER.
Distributors are not authorized to modify or extend the terms and conditions of this Warranty in any manner or to
offer or grant any other warranties for the products in addition to those terms expressly stated above. An officer
of the Manufacturer must authorize any exceptions to this Warranty in writing. Manufacturer reserves the right to
change models and specifications at any time without notice or obligation to improve previous models.
Effective 01/07
WARRANTY

SIDE BELT NEST BODY
ASSEMBLY AND INSTALLATION INSTRUCTIONS
Page 3
WARNING: Improper installation, adjustment, alteration, service or maintenance can cause property damage, injury or death.
Read the installation, operating and maintenance instructions thoroughly before installing or servicing this equipment.
L'installation déplacée, l'ajustement, le changement, le service ou l'entretien peuvent causer les dommages de propriété, la blessure
ou la mort. Lire l'installation, fonctionnant et les instructions d'entretien à fond avant d'installer ou entretenir cet équipement.
La instalación impropia, ajuste, modificación, servicio o mantenimiento puede causar dañado propiedad, herida o muerte.
Lea la instalación, trabajar y mantenimiento instrucciones completamente antes de instalar o poner en funcionamiento equipo.
DANGER
Take necessary precautions when working with sheet metal, edges may be SHARP!
Faites attention quand travaillant avec feuillet, les bords peuvent être AIGUISÉ !
¡Tome las precauciones necesarias al trabajar con metal laminado, las orillas
pueden ser AGUDAS!
Read assembly guide completely before beginning setup. For most efficient assembly, two people should work
together on nests.
Lire assemblée guide avant que commencer. Deux gens devoir travailler ensemble sur les nids.
Lea la asamblea guía completamente antes de empezar montaje. Para la más asambleas eficientes, dos per-
sonas deben trabajar juntos en nidos.
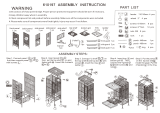
ASSEMBLY INSTRUCTIONS FOR 8’ SIDE BELT NEST
(16 & 20 Hole)
This guide will address the assembly of and parts identification for the revised side belt nest of common
partition design. This guide will also include attachment of and parts identification for the passageways.
Installation of the collection table, variable speed control and egg belt as well as system operation will
be covered in a separate document.

Page 4
20 HOLE NEST (narrow) 9.6”
61911201 CHORE-TIME

Page 5
20HOLE NEST (narrow)
1 16-34533 PERCH: 95" - DRILLED 2
2 16500017 COVER, EGG TRAY SIDEBELT NEST 2
3 16560012 TRAY ASM: 20 HOLE SIDE BELT 2
4 16560008 STRINGER: 20 HOLE NEST UNIV. 2
5 16500166 PARTITION:NEST UNIV-RTNR HOLES 22
6 16060026 WIRE:BTM SUPPRT GLV #5 95.125" 4
7 16500010 TOP: 9.6" HOLE UNIV. NEST 2
8 16560040 BACK: 20 HOLE CHORE-TIME 1
9 16-30190 FLIPPER, 8FT NEST UNIV. 1
10 16-8904 CLAMP: HINGE SS 3/8 WIDE 6
11 16-34790 BRACKET, S.BELT CENTER FLIPPER 1
12 16560017 BRACKET:EGG TRAY CHANNEL CONN. 2
13 16560004 BRACE, EGG TRAY SIDE BELT 6
14 16560016 BRACKET,NEST SUSP. & JOINT 2
15 16-34096 RIVET: POP 3/16" AL AD62ABS SH 150
16 16-90078 SCREW:10-24 x 2-1/4 HX HD WHSR 8
17 16500006 BRKT: PERCH / ROD SUPPORT UNIV 16
OPTIONAL EQUIPMENT
18 16500016 LID: SIDEBELT CLOSEOUT UNIV. 2
ADDITIONAL 6 HINGE CLAMPS REQUIRED FOR CLOSEOUT LIDS
PARTS NOT SHOWN IN ILLUSTRATION
16-12500 PIN: COTTER STEEL 1/8" X 3/4" 3
16560036 RIVET PACK,NEST FRONT & HINGE 1
16-90076 NUT, HEX 10-24 W/NYLON INSERT 20
16-90077 SCREW,HX HD MACH 10-24 x 1/2 12

Page 6
16 HOLE NEST (wide) 12”
61921201 CHORE-TIME

Page 7
1 16-34533 PERCH: 95" - DRILLED 2
2 16500017 COVER, EGG TRAY SIDEBELT NEST 2
3 16560013 TRAY ASM: 16 HOLE SIDE BELT 2
4 16560007 STRINGER: 16 HOLE NEST UNIV. 2
5 16500166 PARTITION:NEST UNIV-RTNR HOLES 18
6 16060026 WIRE:BTM SUPPRT GLV #5 95.125" 4
7 16500009 TOP: 12" HOLE UNIV. NEST 2
8 16560039 BACK: 16 HOLE CHORE-TIME 1
9 16-30190 FLIPPER, 8FT NEST UNIV. 1
10 16-34790 BRACKET, S.BELT CENTER FLIPPER 1
11 16560017 BRACKET:EGG TRAY CHANNEL CONN. 2
12 16560004 BRACE, EGG TRAY SIDE BELT 6
13 16560016 BRACKET,NEST SUSP. & JOINT 2
14 16-34096 RIVET: POP 3/16" AL AD62ABS SH 125
15 16-90077 SCREW,HX HD MACH 10-24 x 1/2 8
16 16500006 BRKT: PERCH / ROD SUPPORT UNIV 16
17 16-8904 CLAMP: HINGE SS 3/8 WIDE 6
OPTIONAL EQUIPMENT
18 16500016 LID: SIDEBELT CLOSEOUT UNIV. 2
ADDITIONAL 6 HINGE CLAMPS REQUIRED FOR CLOSEOUT LIDS
PARTS NOT SHOWN IN ILLUSTRATION
16-12500 PIN: COTTER STEEL 1/8" X 3/4" 3
16560036 RIVET PACK,NEST FRONT & HINGE 1
16-90076 NUT, HEX 10-24 W/NYLON INSERT 20
16-90077 SCREW,HX HD MACH 10-24 x 1/2 12
16 HOLE

Attach connection brackets to one end
(2 places) or both ends (4 places) of
nest body depending on single, double
or triple nest grouping in house.
Egg tray connector attached using FOUR rivets on each end of egg trays.
STEP 2. Attach egg trays to partitions.
1
2
3
4
Note Rivet Direction
Allow for Egg Tray Connection Brackets
Page 8
STEP 1. Attach Partitions to the Back as shown. The rivet should capture both partition flanges and the back.
Orientation of the “N” or “W” I.D. stamping on the Back is not critical.
I.D. LETTER
Do not rivet top at
both ends at this step.
Fasten two partitions to
back using THREE rivets.
INSTALLED RIVETS

STEP 3. For nests using plastic fronts, attach
fronts to stringer as shown. Insert Rivet through
plastic front into Stringer.
Triangle shaped
tabs on Fronts
should lock into
stringers as shown.
Rivet through plastic into stringer.
Page 9
NOTE. For nests not using plastic fronts, skip
to Step 4. See picture for example.
Nest NOT
using
plastic fronts.
NOTE: For Nests Using Plastic Fronts:

Page 10
STEP 4. Attach Front/Stringer Assembly as shown. Attach Egg Tray Braces (narrow end)
between the Stringer and the Partitions at the following positions:
a. 20-Hole nests : Partitions #2, #6 and #10.
b. 16-Hole Nests : Partitions #2, #5 and #8.
Step 5 shows how to attach the wide end of the bracket to the Egg Tray Assembly.
NOTE:
Egg Tray Assemblies and
Fronts are not shown in
the illustrations for clarity
of instruction.
Attaching Front/Stringer Assembly

Page 11
STEP 5. Attach the Egg Tray Covers as follows:
a. Compress Hinge Clamp with pliers or guide nail and align with middle Egg
Tray Brace. Fasten with long
rivet from RIVET PACK through Hinge, Egg Tray and
Tray Brace.
b. Insert Hinge Clamp into middle slot on Tray Cover flange.
c. Repeat for Cover/Hinge/Egg Tray/ Bracket connection on each end of cover.
Covers should ‘latch’ closed beneath Stringer when hinges are installed properly. Open covers
again for Step 6.
View of rivet through Hinge, Egg Tray and
Bracket.
Close-up view of Hinge
Close-up view of Rivet installed

STEP 7-A. Slide Support Rods through the appropriate positioning slots in the end partition.
See Diagrams below.
Page 12
STEP 6. Install Perch Brackets and wooden Perch to Egg Tray Covers as shown. The shallow ‘V’ in
the ends of the bracket legs should install toward the wooden Perch.
16500006
View of Bracket installed beneath perch

Page 13
STEP 7-B. Install Support Rod/Perch Brackets with rivets on End Partitions only.
Support Rod installation and Rod Support Bracket
locations.
INNER PARTITIONS NOT SHOWN FOR CLARITY
BACK
END PARTITION
SUPPORT ROD/PERCH BRACKET
BOTTOM SUPPORT WIRE

Page 14
STEP 8. Attach Tops as shown. DO NOT apply rivets in the following positions at this time.
a. First and last holes (both ends of Top) on flange to Back.
b. 20-Hole Nests: Partition #2, #6 and #10 (Both Sides)
c. 16-Hole Nests: Partitions #2, #5 and #8 (Both Sides)
The nest lid Hinge Clamps will attach here and are installed later.
IF CLOSE OUT LIDS ARE USED:
IF CLOSE OUT LIDS ARE NOT USED, ATTACH ALL HOLES WITH RIVETS,
Go on to step #10.
DO NOT RIVET.
DO NOT RIVET.
Leave open for Flipper / Winch
Brackets and Bolts.
Leave open for Flipper / Winch
Brackets and Bolts.
DO NOT RIVET
Leave open for
Hinge Clamps
DO NOT RIVET
Leave open for
Hinge Clamps
Stringers and Egg
Trays not shown
for clarity of
instruction.
Stringers and Egg
Trays not shown
for clarity of
instruction.

Page 15
IF CLOSE OUT LIDS ARE INCLUDED:
STEP 9. Attach the Nest Lid as follows:
a. Compress Hinge Clamp with pliers or guide nail and align with middle hole on Top
and Partition. Fasten with Long
rivet from RIVET PACK through Hinge and Top into
Partition.
b. Insert Hinge Clamp into middle slot on Nest Lid.
c. Repeat for Lid/Hinge/Partition connection on each end of Lid.
FIXED
TOP
RIVET
HINGE
PARTITION
FLANGE
HINGED
LID

Page 16
Install Flipper over stems on Winch and Universal
Center Brackets and insert Cotter Pins through
bracket stem holes. Secure by curling pin ends.
STEP 10. Install Suspension Brackets
Install Winch Brackets on top corners of back with the #10-24 hardware supplied.
DO NOT USE RIVETS.
Install Universal Flipper Bracket using #10-24 hard-
ware as shown. Align holes on Flipper with Universal
Bracket to determine correct Bracket mounting.

Page 17
STEP 11. CONNECTING NESTS TOGETHER AND TO WINCHING SYSTEM.
Select winches that will safely support the system. An 8’ section weighs approximately 128-130
pounds.
WE, THE MANUFACTURER, CANNOT BE RESPONSIBLE FOR THE CAPABILITIES
OF THE STRUCTURE TO SUPPORT THIS SYSTEM. FOR WEIGHT LOAD
CAPABILITIES, CONTACT YOUR BUILDING CONTRACTOR.
A cable drop is required at the end of each 8’ nest section. Cable saddles, cable clamps or ‘S’ hooks
may be used to attach to the nest brackets.
NOTE:
Suspension Brackets
should overlap
Egg Tray Connection Brackets Require EIGHT
rivets in total: FOUR outside of egg tray as shown
and FOUR inside of egg tray (see step 2).
DO NOT USE RIVETS TO
SECURE SUSPENSION
BRACKETS TO NEST.
Level the system from side to side as well as along the length of the line.

Page 18
When placing the nest system on slats, whether wooden or plastic, Agile Mfg. requires that the nest line
be level along the entire
length of the line. This can be accomplished by placing 1” x 4” strips over the
slats and underneath the nests as a base to shim the nests.
Minimum
Strip Length

Page 19
STEP 12. PASSAGEWAY INSTALLATION INSTRUCTIONS
It is essential the sections be properly aligned and leveled to allow free movement of the conveyor belt.
The double nest sections are to be connected together, or to the conveyor passage, by the connector
brackets on the conveyor trays and suspension bracket at the top.
Attach passageway to nest brackets using rivets. Rivet in all holes (4x)
are OPTIONAL for added strength and line rigidity. Rivets in holes
nearest nest body only (2x) allow for flex between uneven suspension
points or winching systems along line length. See picture below.
Hole for optional
rivet for RIGID
passageway
connection.
View from front of nest. View from back of nest.
Hole for optional
rivet for RIGID
passageway.
Illustration of a 2 Rivet connection per end of passageway to permit line flex.

Page 20
ATTENTION:
Nest Line Alignment Notice
Nest Lines MUST be aligned and straightened after installation and
before egg collection begins at the start of each flock. Once the
nests are resting on the slats, the nest egg trays must be straight-
ened with each other horizontally from side to side, and vertically.
Shims may be required to lift the nests from underneath off the
slats for vertical leveling the egg trays.
Failure to complete this alignment of the nest line WILL
result in
premature egg belt wear, belt edge fraying, eggs under belts, and
possible belt breakage. In addition, badly frayed and worn belts can
cause damage to the egg belt drive system and control.
Also, the nests must be adjusted to be level from side to side to
insure the correct bottom and pad angle for proper egg roll-out from
the nest pads to the egg belt and trays. Nests that are not level
from side to side may have eggs remaining in the nest hole on one
side of the line, while the other side will be too steep and may
cause egg shell checks and cracks. Again, shims may be required to
lift the nests from underneath off the slats for vertical leveling the
nest bodies.
A - Dimensions from nest to outer wall or slat system wall. Dimension “A” assumes wall on stem wall
is straight. Buildings may vary. Adjust nest line side to side to make “A” dimension equal on all nests
in the line.
B- Vertical adjustment. Shim nest lines on slats in “B” direction (up or down)as required to make egg
tray surfaces between nest bodies and nest bodies and passageways flush at connection joints.
C - Line leveling. Egg trays should be level from side to side to insure correct floor angle in nest
bodies.
Note: A laser level can be used for A,B, and C.
/