Page is loading ...

Pedestal Parts
Read all instructions BEFORE assembly and USE of product. KEEP INSTRUCTIONS FOR
FUTURE USE. Record the following information for quick reference.
Note: Illustrations are only representative
and not actual. Attach copy of sales receipt.
Date Purchased:______________________ Model Number: _______-_______
Bassinet
Mattress
Main Body
Changing Table
Travel
Bag
Bassinet Frame
Play Yard
Mattress
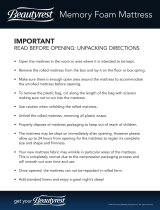
Parts List
Make sure you have all the parts listed below before using your Play Yard. If any parts are
missing, call Consumer Affairs at 1-800-99-Combi.
Canopy
with Soft Toys
Combi USA, Inc. • 1962 HWY 160 W, Suite 100 • Fort Mill, SC 29708 • www.combi-intl.com
Consumer Affairs 1-800-99-Combi
A (x1)
F (x2)
G (x1)
C (x2)
E (x1)
D (x2)
B (x2)
Screws (x4)
H (x2)
Travel Solutions
Play Yard
Instruction Manual
Storage
Attachment
®

WARNINGS For your child’s safety:
Failure to follow these warnings and the instructions could result in serious injury or death.
All products specifications are subject to change without notice. Sizes and weights are intended
as guides and are approximations. Combi® reserves the right to modify the products in its line during the
course of the year. Non contractual media. Colors are as accurate as the media in which they appear allows.
©Combi USA, Inc. 2006
Note: Illustrations are for reference only
and may not represent the actual product.
Completely remove all plastic
bags and packing materials before
using this product to prevent a
possible choking hazard.
DO NOT leave child in product
with sides lowered. Be sure sides are
raised and locked in position whenever
child is in product. Infant may roll into
space between pad and loose mesh
side causing suffocation.
Before each usage or assembly,
inspect product for damaged
hardware, loose joints, missing
parts or sharp edges. DO NOT use
product if any parts are missing or
broken. Ask your dealer or contact
Combi for replacement parts and
instructional literature if needed. DO
NOT substitute parts.
If refinishing, use a nontoxic finish
specified for children’s products.
Never use plastic shipping bags
or other plastic film as mattress
covers not sold and intended for
that purpose. They can cause
suffocation.
Play Yard, including side rails
must be fully erected prior to use.
Make sure all latches are secure.
To reduce the risk of SIDS,
pediatricians recommend healthy
infants be placed on their back to
sleep, unless otherwise advised by
your physician.
Do not lift or carry play yard,
bassinet or changing table while
occupied.
SUFFOCATION HAZARD
Infants can suffocate
• In gaps between a mattress too
small or too thick and product sides.
• On soft bedding
NEVER add a mattress, pillow,
comforter or padding. Use ONLY
mattress/pad provided by Combi.
Strings can cause strangulation!
DO NOT place items with a string
around a child’s neck such as hood
strings or pacifier cords. DO NOT
suspend strings over product or
attach strings to toys.
Discontinue use of the Play Yard
when child is able to climb out or
reaches the height of 35 in.
When child is able to pull to
standing position, remove bumper
pads, large toys, and other objects
that could serve as steps for climbing
out.
DO NOT place Play Yard near a
window where cords from blinds or
drapes can strangle a child.
Always provide the supervision
necessary for the continued safety
of your child. When used for playing,
never leave child unattended.
Use ONLY mattress provided by
manufacturer which must be at least
37 inches long by 25 inches wide and
not more than 1 inch thick.
DO NOT use a water mattress
with this product.
FALL HAZARD – To help prevent
falls, do not use this product when
the infant begins to push up on
hands and knees or has reached
manufacturer’s recommended
maximum weight, whichever comes
first.
Never leave bassinet or changing
table in place when child is in the
Play Yard.
FALL HAZARD
To prevent death or serious injury,
always keep child within arm’s reach.
Use waist belt provided with changing
table.
IMPORTANT:
• Play Yard maximum weight: 30
lbs.
• Play Yard maximum height: 35
inches.
• Bassinet maximum weight: 15
lbs. or less than 3 months old.
• Changing Table maximum
weight: less than 25 lbs.
Play Yard Attachments
SUFFOCATION HAZARD
Infants can suffocate:
- In gaps between an extra pad and
side of the bassinet
- On soft bedding
NEVER add a mattress, pillow, com-
forter, or padding. Use ONLY the pad
provided by manufacturer.
If a sheet is used with the pad, use
only the one provided by the bassi-
net manufacturer or one specifically
designed to fit the dimensions of the
bassinet mattress.

(figure 1) (figure 2) (figure 3)
(figure 4)
(figure 5) (figure 6) (figure 7)
Unpacking the Play Yard
1. Remove the Changing Table from the side pocket of
the Travel Bag. (figure 1)
2. Remove the Play Yard from the Travel Bag. (figure 2)
3. Remove the Mattress Pad from around the Play Yard
by unfastening the hook & loop straps and unfolding
from around the Play Yard. (figure 3)
Setting Up Your Play Yard
- 3 -
IMPORTANT
DO NOT push center
of Play Yard floor
down until all top rails
are locked. If rails do
not lock, lift center of
Play Yard floor higher.
Locking the Play Yard Rails
1. Hold the handle on the Play Yard floor
upright while lifting up the short rails,
one at a time, until they are locked into
position. (figure 4)
2. While keeping the handle upright, slightly
spread the legs of the Play Yard and lift up
the long rails, one at a time, until they are
locked into position. (figure 5)
3. Once all the rails are locked into position,
spread out the Play Yard and press handle
down on the center of the floor. (figure 6)
4. Add mattress to Play Yard with soft side up.
DO NOT use Play yard without mattress.
(figure 7)

Assembling and Using the Changing Table
(figure 8)
(figure 11)(figure 10)(figure 9)
(figure 8a)
Assembling the Changing Table
1. Pull back fabric cover on each side to locate metal bars.
2. Insert both sides of changing table frame into opposite side
of frame while pressing silver pins. (figure 8)
3. Be sure silver pin locks into small hole
within opening.
Disassembling the Changing Table
1. Pull back fabric cover on each side and press the silver pin
while pulling the changing table frame apart.
2. Fold the changing table in half and store in the side
compartment of the Travel Bag. (figure 8a)
Attaching the Changing Table to the Play Yard
1. Attach both plastic hooks to Play Yard (end with wheels)
with changing table facing up. (figure 9)
2. Attach snaps on fabric panel to snaps located at the end of
Play yard. (figure 10)
3. Thread the hook & loop straps on the changing table
through the plastic loops, located on the front and back
sides of the Play Yard, and attach. (figure 11)
Removing the Changing Table from the Play Yard
1. Reverse the instructions above for attaching the changing
table.
- 4 -
WARNING
Never leave bassinet or changing table in place
when child is in the Play Yard.

Assembling and Using the Changing Table (cont.)
(figure 12)
(figure 13)
Attaching Canopy to Bassinet
(figure 14)
(figure 15)
Removing the Canopy
Using the Changing Table
1. Once the changing table is securely fastened to the Play
Yard, place the baby on the changing table.
2. Place the straps around the baby’s body and fasten the
strap clips. (figure 12)
3. Tighten the changing table straps around baby’s body.
(figure 13)
- 5 -
1. Confirm the canopy is facing the proper direction. The
hook attachment strips on the canopy should line up with
the hook attachment strips on the bassinet.
2. Align both sides of the canopy to the bassinet. Slide each
side of the canopy on to the canopy locking mechanisms
located on each side of the bassinet frame. Push until they
lock into place. (figure 14)
3. Attach snaps and hook attachment strips on canopy to the
bassinet cover. (figure 15)
1. Press and hold the lever on the canopy
locking mechanism while sliding the
canopy off the frame.
CAUTION
Be careful when removing the canopy.
Fingers may get pinched.

- 6 -
Assembling and Using the Bassinet
Assembling the Bassinet
1. Insert both sides of bassinet frame into opposite side of
frame while pressing silver pins. (figure 16) Be sure the
silver pins lock into the small hole within opening.
2. Place the bassinet frame on the ground with the canopy
locking mechanisms facing up.
3. Insert the vertical supports into the bassinet frame by laying
them parallel with the bassinet frame with the angled
middle facing up. (figure 17)
4. Unfold the bassinet support board and lay it on the ground
with the button snaps facing upwards.
5. Lift the bassinet frame over the bassinet support board and
allow the vertical supports to hang down. (figure 18)
6. Slide the vertical supports into the clips on the bassinet
support board. (figure 19)
7. Place the assembled bassinet frame into the bassinet fabric
and pull the openings in the fabric over the canopy locking
mechanisms. Be sure that the hook and loop fasteners on
the bassinet fabric are on the opposite side of the canopy
release lever. (figure 20)
(figure 16)
(figure 17)
(figure 18) (figure 19) (figure 20)
Canopy Release
Lever
Hook and Loop
Fasteners
8. Pull the bassinet fabric tight around the bassinet
frame and fasten all the snaps to the bassinet support
board. (figure 21)
9. Lay the bassinet pad in the bottom of the assembled
bassinet.
Disassembling the Bassinet
1. Reverse the instructions above for assembling the
bassinet.
(figure 21)

- 7 -
(figure 23)
(figure 24) (figure 25)
(figure 22)
Locate unit in Play Yard corner.
1. Press appropriate button to select desired
feature(s).
BATTERY REPLACEMENT
Battery not included.
1. Use a Phillips head screwdriver to remove screw
from battery compartment door.
2. Lift the battery compartment door open.
3. Insert three size “AA” alkaline batteries, as
indicated inside the battery compartment.
4. Replace the battery compartment door.
Light, Sound and Vibration
Note:
– Remove the battery during long periods of non-
use. Never leave a discharged battery in the Play
Yard. Battery leakage and corrosion can damage
this product.
– Do not attempt to recharge a non-rechargeable
battery.
– Remove a rechargeable battery from the Play
Yard before recharging.
– Avoid Short-circuiting the terminals of the
battery.
Assembling and Using the Bassinet (continued)
3. Zip the bassinet to the side of the Play Yard. (figure 23)
4. Zip the other side of the bassinet to the changing table. (figure
24)
5. Pull the hook & loop straps on the side of the bassinet through
the slots in the side of the Play Yard. Pull snugly and attach hook
& loop fastener. (figure 25)
Removing the Bassinet from the Play Yard
1. Reverse the instructions above for attaching the bassinet.
Attaching the Bassinet to the Play Yard
1. Attach both plastic hooks to both long top rails of Play Yard. Be
sure the zipper on the side of the bassinet (with hook & loop
straps) aligns with the zipper on the side of the Play Yard to
ensure you have it facing the proper direction. (figure 22)
2. Press down on center of bassinet to ensure both ends are
secure.
WARNING
Never leave bassinet or changing table in place
when child is in the Play Yard.

- 8 -
(figure 26)
(figure 27)
(figure 28)
(figure 29) (figure 30)
(figure 31)
Folding the Play Yard
1. Remove the mattress pad from the bottom of the Play Yard.
2. Pull back the flap covering the center handle. Flip the
handle 90 degrees then pull up. Be sure to lift the handle
high to allow the side rails to unlock. (figure 26)
3. Press the unlocking button while lifting up on the side rails.
(figure 27)
4. With the unlocking button still depressed, push the side
rails downward to fold. (figure 28) If the side rails will not
unlock, lift the handle in the center of the Play Yard higher
and try again.
5. Once all the rails are collapsed, bring the four corners of
the Play Yard to the center to fold. (figure 29)
6. Take the mattress pad, with the cushion side facing
inwards, and wrap it around the folded Play Yard.
7. Pull the hook & loop straps through the plastic loops on
the mattress pad and attach. (figure 30)
Storing the Play Yard in the Travel Bag
1. Hold the Play Yard by the floor handle which should be at
the top and slide into the travel bag.
2. The changing table storage compartment on the travel bag
should be on the opposite side of the wheels. The fabric
on the bottom of the travel bag should be between the
wheels. (figure 31)
- 8 -
Folding and Storing the Play Yard

- 9 -
3. Secure part (G) by placing one screw on each of the four
sides as shown in (figure 36a).
4. Attach part (E) to both finished sides of the pedestal as
shown in (figure 37). Be sure that all the silver pins lock
into place.
5. Attach parts (F) to each side of the pedestal as shown in
(figure 38). Be sure that all the silver pins lock into place.
(figure 37) (figure 38)
(figure 36a)
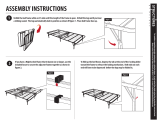
Assembling the Pedestal
1. Assemble part (D) and (H) into part (B) as show in (figure
33). Be sure that all the silver pins lock into place. Repeat
the same procedure for the other side.
2. Make sure the hole on the end of part (C) is aligned with
the smaller opening on part (D), and press part (G) through
both parts (D) and (C) as shown in (figure 35 & 36).
Repeat the same procedure for the other side.
NOTE: Be sure the pin holes on part (D) and (H) face in the
same direction on each side as the opening on part (B), and
part (G) angles away from the pin holes. The finished side
can be seen in (figure 36). The pin holes and opening all
face in the same direction and the angle of part (G) angles
away from the pin holes and opening.
(figure 35)
(figure 33)
Pin Holes
Angle
Opening
(figure 34)
Pin Holes
(figure 36)
(figure 32)
H
C
G
B
D
H
D
E
F

- 10-
(figure 39)
6. Attach the basket by snapping it around part (F) on each
side as shown in (figure 39).
7. Wrap the elastic connectors around part (G) of the pedestal
as shown in (figure 40).
8. Attach the elastic bands around the bottom hooks of the
pedestal as shown in (figure 41).
9. Place the bassinet on the finished pedestal (figure 42),
and wrap the straps underneath the bassinet around the
horizontal supports of the pedestal and connect the straps
as shown in (figure 43).
(figure 40)
(figure 41) (figure 42) (figure 43)
Assembling the Pedestal (cont.)
Extending the Wheels
Pull the wheels out from within
part (B) until they lock into place.
Retract Wheels
Pull up slightly while pushing the
wheel back into part (B)
Using the Pedestal Wheels

- 11-
Routine Maintenance
STORE IN A COOL AND DRY AREA, especially in the summer. Do not store the Play Yard in the trunk
of a vehicle.
MAIN BODY AND BASSINET
Briskly wipe off any mud and dirt. To clean the body, wipe with a damp cloth then wipe out any traces
of moisture on the body with a dry cloth. The main body might become moldy and musty if not wiped
dry.
Excessive exposure to the sun could cause premature color fading of fabric.
MATTRESS AND BAG
DO NOT machine wash. Clean with mild soap and a damp cloth.

Combi USA, Inc. • 1962 HWY 160 W, Suite 100 • Fort Mill, SC 29708 • www.combi-intl.com
Consumer Affairs 1-800-99-Combi
For technical questions, please call 1-800-992-6624.
If you would like to place an order for the following parts, please fill out the form below and return
to the following address:
Combi USA, Inc. or Fax this completed form to
Attn: Consumer Affairs
1962 Highway 160 W, Suite 100
Fort Mill, SC 29708-8027
IMPORTANT: We must have this information to process your order:
Model Number: ______ - ______
Parts List for the Play Yard only.
Price Quantity Total
1. Changing Table Mat $ 15.00
2. Storage Attachment 25.00
3. Play Yard Carrying Bag 20.00
4. Bassinet Mattress 15.00
5. Bassinet Mattress Cover 10.00
6. Canopy 25.00
7. Soft Toys (Ball, Bear, Star) 10.00
8. Accessory Bag 15.00
9.
10.
11.
Amount of Order
ADD
Shipping & Handling
Sales Tax (6%)
(SC residents only)
Total
If you need to order other parts for your Play Yard, please call us toll-free
at 1-800-992-6624.
Shipping and Handling Fees: Add $8.00 for orders $34.99 and under. Add
$13.00 for orders $35.00 and over. Note: Additional shipping charges will apply
outside of the Continental U.S.
Combi USA reserves the right to change pricing at any time.
Ship To:
Consumer Name
Street Address
Street Address
City, State, Zip
Telephone Number
032907 rev2
803-548-3663
Located on the Play Yard Floor.
Travel Solutions
Play Yard
Instruction Manual
Charge to my credit card:
VISA MASTERCARD
AMERICAN EXPRESS DISCOVER
Card Number
Expiration Date __________ - ___________ - ____________
Cardholder’s Signature
Check enclosed
®
/