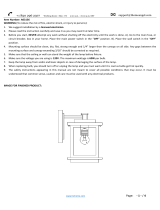
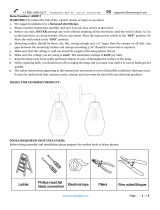
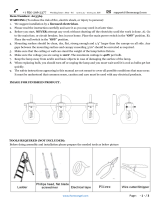
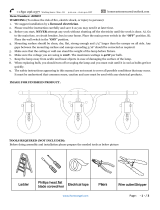
LNC A03410 is a stylish and functional 3-light flush mount ceiling lamp that adds a touch of elegance to any room. With its sturdy construction and easy installation process, it's a great choice for DIY enthusiasts. The adjustable studs allow for a customized fit, ensuring a secure and stable mount. The lamp can accommodate three 60W bulbs, providing ample illumination for your space.
LNC A03410 is a stylish and functional 3-light flush mount ceiling lamp that adds a touch of elegance to any room. With its sturdy construction and easy installation process, it's a great choice for DIY enthusiasts. The adjustable studs allow for a customized fit, ensuring a secure and stable mount. The lamp can accommodate three 60W bulbs, providing ample illumination for your space.


-
 1
1
-
 2
2
-
 3
3
-
 4
4


LNC A03410 Operating instructions
- Type
- Operating instructions
- This manual is also suitable for
LNC A03410 is a stylish and functional 3-light flush mount ceiling lamp that adds a touch of elegance to any room. With its sturdy construction and easy installation process, it's a great choice for DIY enthusiasts. The adjustable studs allow for a customized fit, ensuring a secure and stable mount. The lamp can accommodate three 60W bulbs, providing ample illumination for your space.
Ask a question and I''ll find the answer in the document
Finding information in a document is now easier with AI
Related papers
-
LNC A03392 Operating instructions
-
-
-
-
-
-
-
-
-
Other documents
-
ROOMS TO GO 90622020 Assembly Instructions
-
Uolfin 976RQYHD24318BB Operating instructions
-
Zevni Z-R7NEVAZ2-4696 Operating instructions
-
 T'nB NEDI3D60 Datasheet
-
 LALUZ A03156 Installation guide
-
 NEW WORLD DECOR YRBVYYLWS3611S6 Installation guide
-
 NEW WORLD DECOR 3YUMUFLWS356986 Installation guide
-
 NEW WORLD DECOR MIR26BHZVC3631C6 Installation guide
-
 JONATHAN Y JYL6301B Operating instructions
-
 JONATHAN Y JYL6300A Operating instructions


