Page is loading ...

1) TURN OFF POWER.
IMPORTANT: Before you start, NEVER attempt any work without
shutting off the electricity until the work is done.
a) Go to the main fuse, or circuit breaker, box in your home. Place
the main power switch in the “OFF” position.
b) Unscrew the fuse(s), or switch “OFF” the circuit breaker switch(s),
thatcontrolthepowertothextureorroomthatyouareworking
on.
c) Placethewallswitchinthe“OFF”position.Ifthexturetobe
replaced has a switch or pull chain, place those in the “OFF” position.
2) Attach mounting strap to outlet box. (Screws not provided.)
3) Assemble mounting screws into threaded holes in mounting strap.
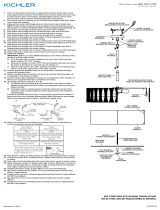
4) Grounding instructions: (See Illus. A or B).
A) Onxtureswheremountingstrapisprovidedwithaholeandtwo
raise dimples. Wrap ground wire from outlet box around green
ground screw, and thread into hole.
B) Onxtureswhereacuppedwasherisprovided.Putgroundwire
from outlet box under cupped washer and green ground screw and
thread screw into hole in mounting strap.
Ifxtureisprovidedwithgroundwire.Connectxturegroundwiretooutlet
box ground wire with wire connector, (not provided) after following the
above steps.
Never connect ground wire to black or white power supply wires.
5) Make wire connections (connectors not provided.) Reference chart below
for correct connections and wire accordingly.
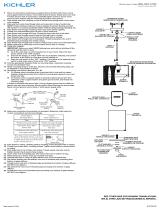
6) Pushxturetoceilingsomountingscrewscanpassthroughkeyhole
slots.Turnxtureuntilscrewheadsappearasindetail.Tightenscrews.
7) Insert recommended bulbs.
8) Screwendofthreadedpipewithhexnutintocouplingonbottomofxture.
9) With wire tabs located along top edge of trim ring, place trim ring down
over diffuser. Fit wire tabs in notches on diffuser.
10)Raisediffuser/trimringassemblyuptoxture.Passholeindiffuserover
end of threaded pipe.
11) Threadnialontoendofthreadedpipe.(DONOTovertighten.)
1) APAGUELAALIMENTACIÓNELÉCTRICA.
IMPORTANTE: Antesdecomenzar,NUNCAtratedetrabajarsinantes
desconectarlacorrientehastaqueeltrabajosetermine.
a) Vayaalacajaprincipaldefusibles,ointerruptorocajadecircuitos
desucasa.Coloqueelinterruptordelacorrienteprincipalen
posición de apagado “OFF”.
b) Desatornilleel(los)fusible(s),ocoloqueelinterruptoro
interruptores del breaker en posición de apagado “OFF”, que
controla (n) la corriente hacia el artefacto o habitación donde está
trabajando.
c) Coloqueelinterruptordeparedenposicióndeapagado“OFF”.Si
el artefacto que se va a reemplazar tiene un interruptor o cadena
quesejala,colóquelosenlaposicióndeapagado“OFF”.
2) Instalelaplacademontajealacajadesalida.(Noseproporcionan
tornillos.)
3) Instalelostornillosdemontajeenlosagujerosroscadosdelaplacade
montaje.
4) Instrucciones de puesta a tierra: (Vea la ilustración A o B)
A) Enlosartefactosdondeseproporcionalaabrazaderademontaje
conunagujeroydosdepresioneselevadas.Envuelvaelalambre
atierradelacajadesalidaalrededordeltornilloatierraverdey
rosqueeltornilloenelagujero.
B) En los artefactor donde se proporciona una arandela cóncava.
Pongaelalambreatierradelacajadesalidaentrelaarandela
cóncavayeltornilloatierraverdeyrosqueeltornilloenelagujero,
enlaabrazaderademontaje.
Si se proporciona el artefacto con alambre a tierra, conecte el alambre a
tierradelartefactoalalambreaatierradelacajadesalida,conelconector
de alambre (no proporcionado), después de seguir los pasos de arriba.
Nunca conecte el alambre a tierra a los alambres blanco o negro de la
alimentación eléctrica.
5) Hacer las conexiones de los alambres (conectores no incluidos.) Ver el
cuadromásabajoparalasconexionescorrectasyalambrardeacuerdoaesto.
6) Coloqueelartefactodealumbradoenelcielorraso,demodoquelos
tornillosdemontajepuedanpasaratravésdelasranurastipobocallave.
Gire el artefacto hasta que las cabessas de los tornillos aparescan como
en el detalle. Apriete los tornillos.
7) Inserte la lámpara recomendada.
8) Atornille el extremo corto del tubo roscado con tuerca hexagonal de
cuenta en el acoplamiento en la parte inferior del artefacto.
9) Conlaslengüetasdealambreubicadasalolargodelbordesuperiordel
anillodelaguarnición,coloqueelanillodelaguarniciónhaciaabajopor
encimadeldifusor.Ajustelaslengüetasdealambreenlasmuescasdel
difusor.
10)Eleveelmontajedeldifusor/anillodelaguarniciónhastaelartefacto.Pase
eloricioubicadoeneldifusorporencimadelextremodeltuboroscado.
11) Atornille el capuchón en el tubo roscado. (NO apriete excesivamente.)
GREEN GROUND
SCREW
CUPPED
WASHER
A
B
OUTLET BOX
GROUND
FIXTURE
GROUND
DIMPLES
WIRE CONNECTOR
(NOT PROVIDED)
OUTLET BOX
GROUND
GREEN GROUND
SCREW
FIXTURE
GROUND
Connect Black or
Red Supply Wire to:
Connect
White Supply Wire to:
Black White
*Parallel cord (round & smooth) *Parallel cord (square & ridged)
Clear, Brown, Gold or Black
without tracer
Clear, Brown, Gold or Black
with tracer
Insulated wire (other than green)
with copper conductor
Insulated wire (other than green)
with silver conductor
*Note: When parallel wires (SPT I & SPT II)
are used. The neutral wire is square shaped
or ridged and the other wire will be round in
shape or smooth (see illus.)
Neutral Wire
ARANDELA
CONCAVA
A
B
TIERRA DE LA
CAJA DE SALIDA
TORNILLO DE TIERRA,
VERDE
DEPRESIONES
TIERRA
ARTEFACTO
CONECTOR DE ALAMBRE
(NO SE PROVEE)
TIERRA DE LA
CAJA DE SALIDA
TORNILLO DE TIERRA,
VERDE
TIERRA
ARTEFACTO
Conectar el alambre de
suministro negro o rojo al
Conectar el alambre de
suministro blanco al
Negro Blanco
*Cordon paralelo (redondo y liso)
*Cordon paralelo (cuadrado y estriado)
Claro, marrón, amarillio o negro
sin hebra identificadora
Claro, marrón, amarillio o negro
con hebra identificadora
Alambre aislado (diferente del verde)
con conductor de cobre
Alambre aislado (diferente del
verde) con conductor de plata
*Nota: Cuando se utiliza alambre paralelo
(SPT I y SPT II). El alambre neutro es de forma
cuadrada o estriada y el otro alambre será de
forma redonda o lisa. (Vea la ilustracíón).
Hilo Neutral
DateIssued:1/27/12 IS-10885-US
DIFFUSOR
DIFUSOR
FIXTURE
ARTEFACTO
SCREW/KEYHOLEDETAIL
DETALLEDETORNILLO/
BOCALLAVE
MOUNTING STRAP
PLACADEMONTAJE
FINIAL
CAPUCHON
MOUNTINGSCREW
TORNILLODEMONTAJE
NOTCH
MUESCA
TRIM RING
ANILLODELAGUARNICIÓN
WIRE TAB
LENGÜETA
DEALAMBRE
THREADEDPIPE
TUBOROSCADO
/