Page is loading ...

INSTALLATION INSTRUCTIONS
Model 10885LED
Model 10886LED
WARNING:
• This fixture is intended for installation in accordance with the
National Electric Code (NEC) and all local code specifications.
• Supply wires are not intended for use through or concealed
behind walls, floors, or ceilings.
• The LED light output is strong enough to injure human eyes.
Precautions must be taken to prevent looking directly at LED’s
with unaided eyes for more than a few seconds.
DIMMING: This LED fixture is compatible with electronic low
voltage dimmers only.
CAUTION – RISK OF SHOCK – Disconnect Power at the main
circuit breaker panel or main fuse box before starting and during
the installation.
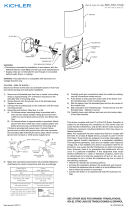
Determine size of outlet box. Measure distance between
threaded holes of outlet box. If measurement is 3-1/2” or 2-3/4”
follow instructions below. If measurement is 3-1/4”, please see
instructions for mounting to 3-1/4” hole distance outlet box.
Instructions for mounting to 3-1/2” hole distance and 2-3/4”
hole distance outlet box.
1) Read and understand all instructions and illustrations com-
pletely before proceeding with assembly and installation of
fixture.
2) If you have any doubts about how to install this fixture, or if
the fixture fails to operate completely, please contact a
qualified electrician.
3) All parts must be used as indicated in the instructions. Do
not substitute any parts, leave parts out, or use any parts
that are worn or broken. Failure to obey this instruction
could invalidate the UL listing, C.S.A. certification, and/or
ETL listing of this fixture.
4) Fixture is to be connected to a single branch circuit.
5) Mounting surface should be clean, dry, flat and 1/4” larger
than the fixture housing surface.
6) Install (2) strap mounting screws into outlet box leaving
small amount of threads exposed. Position fixture over the
outlet box. Align the larger hole side of keyhole slot with
screws in outlet box. Push fixture to ceiling and turn fixture
in direction of smaller side of keyhole slots until it stops.
Mark the location of the three outer keyhole slots of the
backplate to the ceiling. Be sure to mark only the narrow
part of the keyhole slot. Remove the fixture pan from the
ceiling. Drill the three holes using an appropriately sized drill
bit. Insert the provided ceiling anchors into the holes.
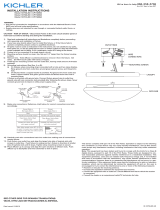
7) Grounding instructions: (See Illus. A or B)
A) On fixtures where mounting strap is provided with a hole and
two raise dimples. Wrap ground wire from outlet box around
green ground screw, and thread into hole.
B) On fixtures where a cupped washer is provided. Put ground
wire from outlet box under cupped washer and green ground
screw and thread screw into hole in mounting strap.
If fixture is provided with ground wire. connect fixture ground
wire to outlet box ground wire with wire connector, after fol-
lowing the above steps. Never connect ground wire to black or
white power supply wires.
Date Issued: 12/06/2016 IS-10885LED-US
We’re here to help 866-558-5706
Hrs: M-F 9am to 5pm EST
SEE OTHER SIDE FOR SPANISH TRANSLATIONS.
VEA EL OTRO LADO DE TRADUCCIONES AL ESPAÑOL.
WIRE
CONNECTOR(S)
STRAP MOUNTING SCREW(S)
MOUNTING SCREW(S)
MOUNTING STRAP
OUTLET BOX
LOCKWASHER(S)
HEXNUT(S)
BACKPLATE
SHADE
DIFFUSER
FINIAL
THREADED PIPE
MOUNTING TO 3-1/4"
(HOLE DISTANCE)
OUTLET BOX
FINIAL
DIFFUSER
SHADE
STRAP MOUNTING SCREW(S)
THREADED PIPE
WIRE
CONNECTOR(S)
OUTLET BOX
MOUNTING TO 2-3/4"
(HOLE DISTANCE)
OUTLET BOX
8) Make wire connections. Reference chart below for correct
connections and wire accordingly.
9) Carefully push wire connections into outlet box making sure
all connections remain secure.
10) Push fixture to ceiling, align the larger hole side of keyhole
slot with screws in outlet box. Push fixture to ceiling and
turn fixture in direction of smaller side of keyhole slots until
it stops. Tighten strap mounting screws to secure.
11) Slip the shade over top the diffuser. Rest the angled tabs of
the shade onto the slots on the diffuser.
12. Raise the diffuser up to the fixture. Carefully pass the hole in
the center of diffuser over the end of the threaded pipe.
13) Raise the diffuser until the top of the shade and the diffuser
meet the fixture canopy.
14) Screw finial onto threaded pipe. Tighten finial to secure
diffuser in place. (DO NOT over tighten.)
Instructions for mounting onto a 3-1/4” (hole distance) outlet
box using provided mounting strap:
1. Follow steps 1-5 from 3-1/2” and 2-3/4” instructions.
2. Starting from outlet box side of mounting strap, thread (2)
longer mounting screws into threaded holes spaced 2-3/4”
apart. Tighten to secure.
3. Raise mounting strap to outlet box. Longer screws should be
pointing downward.
4. Align slots in mounting strap to threaded holes in outlet box.
Thread (2) strap mounting screws into outlet box. Center
strap in outlet box. Tighten screws to secure.
5. Continue with steps 7-9 from 3-1/2” and 2-3/4” instructions.
6. Push fixture to ceiling, align the larger hole side of keyhole
slots with screws in mounting strap. Push fixture to ceiling
and turn fixture in direction of smaller side of keyhole slots
until it stops. Pass (2) lockwashers and thread (2) nuts on
mounting screws. Tighten to secure.
7. Continue with steps 11-14 from 3-1/2” and 2-3/4” instructions.
GREEN GROUND
SCREW
CUPPED
WASHER
OUTLET BOX
GROUND
FIXTURE
GROUND
DIMPLES
WIRE CONNECTOR
OUTLET BOX
GROUND
GREEN GROUND
SCREW
FIXTURE
GROUND
AB
Connect Black or
Red Supply Wire to:
Connect
White Supply Wire to:
Black White
*Parallel cord (round & smooth) *Parallel cord (square & ridged)
Clear, Brown, Gold or Black
without tracer
Clear, Brown, Gold or Black
with tracer
Insulated wire (other than green)
with copper conductor
Insulated wire (other than green)
with silver conductor
*Note: When parallel wires (SPT I & SPT II)
are used. The neutral wire is square shaped
or ridged and the other wire will be round in
shape or smooth (see illus.) Neutral Wire

Date Issued: 12/06/16 IS-10885LED-US
SEE OTHER SIDE FOR ENGLISH TRANSLATIONS.
VEA EL OTRO LADO DE TRADUCCIONES AL INGLÉS.
INSTRUCCIONES DE INSTALACIÓN
Modelo 10885LED / Modelo 10886LED
ADVERTENCIA:
• Este artefacto está diseñado para instalarse de acuerdo con
el Código Nacional de Electricidad (NEC, por sus siglas en
inglés) y todas las especificaciones de códigos locales.
• Los cables de suministro no deben usarse a través de o
escondidos detrás de paredes, pisos o techos.
• La luz LED que se obtiene es lo suficientemente fuerte para
dañar los ojos. Deben tomarse precauciones para evitar
mirar directamente la luz LED sin protección por más de
unos pocos segundos.
REGULACIÓN DE INTENSIDAD DE LUZ: Este artefacto LED es
compatible solo con los reguladores de intensidad de bajo
voltaje electrónicos.
PRECAUCIÓN – RIESGO DE DESCARGA ELÉCTRICA –
Desconecte la electricidad en el panel principal del
interruptor automático o caja principal de fusibles antes de
comenzar y durante la instalación.
Determine el tamaño de la caja de salida. Mida la distancia entre
los agujeros roscados de la caja de salida. Si la medida es 3-1/2
o 2-3/4 pulgadas siga la instrucción más abajo. Si la medida es
3-1/4 pulgadas, vea las instrucciones para montar a una caja de
salida con 3-1/4 pulgadas de distancia entre agujeros. Instruc-
ciones para montar a caja de salida con 3-1/2 pulgadas y 2-3/4
pulgadas de distancia entre agujeros.
1) Lea y entienda completamente todas las instrucciones e
ilustraciones antes de proceder con el ensamblaje e insta
lación del artefacto.
2) Si tiene alguna duda sobre cómo instalar este artefacto, o si
el artefacto no opera completamente, contacte a un electri
cista calificado.
3) Todas las partes deben ser usadas como se indica en las
instrucciones. No sustituya partes, deje partes afuera o use
partes que estén gastadas o rotas. El no obedecer estas
instrucciones podría invalidar la clasificación UL, la certifi
cación de C.S.A. y/o la clasificación ETL de este artefacto.
4) El artefacto tiene que conectarse a un circuito de un solo
ramal.
5) La superficie de montaje debe estar limpia, seca y plana, y
ser ¼ de pulgada más grande que la superficie de la
cubierta del artefacto.
6) Instale (2) tornillos de montaje de la abrazadera en la caja
de salida dejando una pequeña cantidad de roscas expues
tas. Posicione el artefacto sobre la caja de salida. Alinee el
lado del agujero grande de la muesca de bocallave con los
tornillos en la caja de salida. Empuje el artefacto al techo y
gire el artefacto en dirección del lado más pequeño de las
muescas de bocallave hasta que pare. Marque el lugar de
las tres muescas de bocallave externas de la placa trasera
en el techo. Asegúrese de marcar solo la parte angosta de la
muesca de bocallave. Saque la bandeja (charola) del
artefacto del techo. Taladre los tres agujeros usando una
fresa de tamaño apropiado. Inserte las anclas para el techo
provistas en los agujeros.
7) Instrucciones de conexión a tierra solamente para los
Estados Unidos. (Vea la ilustracion A o B).
A) En las lámparas que tienen el fleje, de montaje con un
agujero y dos hoyuelos realzados. Enrollar el alambre a
tierra de la caja tomacorriente alrededor del tornillo
verde y pasarlo por el aquiero.
B) En las lámparas con una arandela acopada. Fijar el
alambre a tierra de la caja tomacorriente del ajo de la
arandela acoada y tornillo verde, y paser por el fleje de
montaje.
Si la lámpara viene con alambre a tierra. Conecter el alambre
a tierra de la lámpara al alambre a tierra de la caja tomacorr
ente con un conector de alambres (no incluido) espués de seguir
We’re here to help 866-558-5706
Hrs: M-F 9am to 5pm EST
los pasos anteriores. Nunca conectar el alambra a tierra a los
alambres eléctros negro o blanco.
8) Haga les conexiones de los alambres (no se proveen los
connectores.) La tabla de referencia de abajo indica las
conexiones correctas y los alambres correspondientes.
9) Empuje cuidadosamente las conexiones de cables dentro
de la caja de salida, asegurándose de que todas las conexio
nes queden firmes.
10) Empuje el artefacto al techo, alinee el lado del agujero
grande de la muesca de bocallave con los tornillos en la
caja de salida. Empuje el artefacto al techo y gire el arte
facto en dirección del lado más pequeño de las muescas de
bocallave hasta que pare. Apriete los tornillos de montaje de
la abraza dera para asegurar.
11) Deslice la pantalla sobre la parte superior del difusor.
Coloque las lengüetas inclinadas de la pantalla en las
muescas en el difusor.
12) Suba el difusor hasta el artefacto. Pase cuidadosamente el
agujero en el centro del difusor sobre el extremo del tubo
roscado.
13) Suba el difusor hasta que la parte superior de la pantalla y el
difusor encuentren el escudete del artefacto.
14) Enrosque el capuchón en el tubo roscado. Apriete el capu
chón para asegurar el difusor en su lugar. (NO apriete
demasiado).
Instrucciones para montar a caja de salida con 3-1/4 pulgadas
de distancia entre agujeros usando la abrazadera de montaje
provista:
1. Siga los pasos 1-5 de las instrucciones para 3-1/2 y 2-3/4 pulgadas.
2. Empezando del lado de la caja de salida de la abrazadera de montaje,
enrosque (2) tornillos de montaje más largos en los agujeros roscados
espaciados a 2-3/4” pulgadas. Apriete para asegurar.
3. Suba la abrazadera de montaje a la caja de salida. Los tornillos más
largos deben estar apuntando hacia abajo.
4. Alinee las muescas en la abrazadera de montaje con los agujeros
roscados en la caja de salida. Enrosque (2) tornillos de montaje de la
abrazadera en la caja de salida. Centre la abrazadera en la caja de
salida. Apriete los tornillos para asegurar.
5. Continúe con los pasos 7-9 de las instrucciones para 3-1/2 y 2-3/4
pulgadas.
6. Empuje el artefacto al techo, alinee el lado del agujero grande de la
muesca de bocallave con los tornillos en la abrazadera de montaje.
Empuje el artefacto al techo y gire el artefacto en dirección del lado más
pequeño de las muescas de bocallave hasta que pare. Pase (2) arande-
las de seguridad y enrosque (2) tuercas en los tornillos de montaje.
Apriete para asegurar.
TORNILLO DE MONTAJE
ABRAZADERA DE MONTAJE
CAJA DE SALIDA
ARANDELA DE SEGURIDAD
TUERCA HEXAGONAL
PLACA TRASERA
PANTALLA
DIFUSOR
CAPUCHÓN
MONTAJE A CAJA
DE SALIDA DE 3-1/4
PULGADAS (DISTANCIA
ENTRE LOS AGUJEROS)
CAPUCHÓN
PANTALLA
TORNILLOS DE MONTAJE DE LA ABRAZADERA
TUBO ROSCADO
CONECTORES DE ALAMBRE
CAJA DE SALIDA
MONTAJE A CAJA
DE SALIDA DE 2-3/4
PULGADAS (DISTANCIA
ENTRE LOS AGUJEROS) CONECTORES DE ALAMBRE
DIFUSOR
ARANDELA
CONCAVA
TIERRA DE LA
CAJA DE SALIDA
TORNILLO DE TIERRA,
VERDE
DEPRESIONES
TIERRA
ARTEFACTO
CONECTOR DE ALAMBRE
TIERRA DE LA
CAJA DE SALIDA
TORNILLO DE TIERRA,
VERDE
TIERRA
ARTEFACTO
AB
Conectar el alambre de
suministro negro o rojo al
Conectar el alambre de
suministro blanco al
Negro Blanco
*Cordon paralelo (redondo y liso) *Cordon paralelo (cuadrado y estriado)
Claro, marrón, amarillio o negro
sin hebra identificadora
Claro, marrón, amarillio o negro
con hebra identificadora
Alambre aislado (diferente del verde)
con conductor de cobre
Alambre aislado (diferente del
verde) con conductor de plata
*Nota: Cuando se utiliza alambre paralelo
(SPT I y SPT II). El alambre neutro es de forma
cuadrada o estriada y el otro alambre será de
forma redonda o lisa. (Vea la ilustracíón). Hilo Neutral
/