Page is loading ...

IMPORTANT SAFETY INSTRUCTIONS
LIGHTED BULB IS HOT!
WARNING: To reduce the risk of FIRE or INJURY TO PERSON:
• Turnoffandallowtocoolbeforereplacingbulb.
• BulbgetsHOTQUICKLY!Contactswitchonlywhenturningoff.
• DONOTremaininlightifskinfeelswarm.(Lightisintense,
maycause“sunburn”)
• DONOTlookdirectlyatlightedbulb.
• Keepmaterialsawayfrombulbthatmayburn.
• UseONLYwithwattagespeciedorlower.
• DONOTtouchbulbatanytime,useasoftcloth.Oilfromskin
maydamagebulb.
• DONOToperatexturewithmissingordamagedglass.
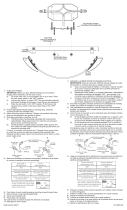
1) Assemblemountingscrewstobackpanusinghexnut.
2) Atthecenterofthebackpanareknockoutslots.Remove
thesetthatmatchesyouroutletbox.
3) Securethebackpantotheoutletbox.
4) Anchorthebackpantothewallusingthesetofholesat
eachendofxtureusingwoodscrews,togglebolts,plastic
anchors,etc.
5) TURN OFF POWER.
IMPORTANT:Beforeyoustart,NEVERattemptanywork
withoutshuttingofftheelectricityuntiltheworkisdone.
a) Gotothemainfuse,orcircuitbreaker,boxinyour
home.Placethemainpowerswitchinthe“OFF”
position.
b) Unscrewthefuse(s),orswitch“OFF”thecircuitbreaker
switch(s),thatcontrolthepowertothextureorroom
thatyouareworkingon.
c) Placethewallswitchinthe“OFF”position.Ifthexture
tobereplacedhasaswitchorpullchain,placethosein
the“OFF”position.
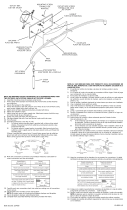
6) Groundinginstructions:(SeeIllus.AorB).
A) Onxtureswheremountingstrapisprovidedwitha
holeandtworaiseddimples.Wrapgroundwirefrom
outletboxaroundgreengroundscrew,andthreadinto
hole.
B) Onxtureswhereacuppedwasherisprovided.Attach
groundwirefromoutletboxundercuppedwasherand
greengroundscrew,andthreadintomountingstrap.
Ifxtureisprovidedwithgroundwire.Connectxture
groundwiretooutletboxgroundwirewithwireconnector
(notprovided.)afterfollowingtheabovesteps.Neverconnect
groundwiretoblackorwhitepowersupplywires.
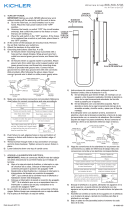
7) Makewireconnections(connectorsnotprovided).Reference
chartbelowforcorrectconnectionsandwireaccordingly.
8) Carefullypushwireconnectionsbackintooutletboxmaking
sureallconnectionsremainsecure.
9) Slipfaceplateovermountingscrewsandbackpan.NOTE:
Becertainwiresdonotgetpinchedbetweenbackpanand
faceplate.
10) Securefaceplatetobackpanusingthreadedballs.
11) Insertrecommendedbulb.CAUTION: DONOTtouchbulb
withbarehands.Ifthishappens,cleanbulbwithdenatured
alcoholandalintfreecloth.
12) Slipglasssleeveoverbulb.
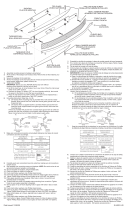
13) Placefrontglassinbetweenfaceplateandcurvedbar,aligning
holesinglasswithholesoninsideofbar.
14) Pushsmallrubberwashersontoballstuds.
15) Frombackofglass,threadballstudsintoholesinglassand
andcurvedbar.
16) Tightenballstudstosecureglasstobar.(DONOTover
tighten.)
17) Settopglassontopofxturealigningholesinglasswith
holesintabsonbackplate.
18) PushsmallrubberwashersontoPhillipheadscrews.
19) Fromtopofglass,threadPhillipheadscrewsintoholesin
glassandtabs.Tightenscrewstosecureglasstoxture.
(DONOTovertighten.)
20) Raisebottomglassuptoxture,aligningholesinglasswith
holesintabsonbackplate.
21) PushsmallrubberwashersontoPhillipheadscrews.
22) Frombottomofglass,threadPhillipheadscrewsintoholes
inglassandtabs.Tightenscrewstosecureglasstoxture.
(DONOTovertighten.)
Connect Black or
Red Supply Wire to:
Connect
White Supply Wire to:
Black White
*Parallel cord (round & smooth) *Parallel cord (square & ridged)
Clear, Brown, Gold or Black
without tracer
Clear, Brown, Gold or Black
with tracer
Insulated wire (other than green)
with copper conductor
Insulated wire (other than green)
with silver conductor
*Note: When parallel wires (SPT I & SPT II)
are used. The neutral wire is square shaped
or ridged and the other wire will be round in
shape or smooth (see illus.)
Neutral Wire
BACKPAN
PLACADEMONTAJE
DateIssued:1/04/13 IS-45087-US
GREEN GROUND
SCREW
CUPPED
WASHER
A
B
OUTLET BOX
GROUND
FIXTURE
GROUND
DIMPLES
WIRE CONNECTOR
(NOT PROVIDED)
OUTLET BOX
GROUND
GREEN GROUND
SCREW
FIXTURE
GROUND
FRONTGLASS
VIDRIOFRONTAL
THREADEDBALL
BOLAROSCADO
FACEPLATE
PLACADESUJECIÓN
CURVEDBAR
BARRACURVAD
TOPGLASS
VIDRIOSUPERIOR
BOTTOMGLASS
VIDRIOINFERIOR
PHILLIPSHEADSCREW
TORNILLODECABEZA
PHILLIPS
SMALLRUBBERWASHER
ARANDELADECAUCHO
PEQUEÑA
/


