Page is loading ...

©2007 AEI Security & Communications Ltd. All rights reserved.
AEI Security and the respective logo are trademarks of AEI Security & Communications Ltd.
Weslake Industrial Park
Rye Harbour Road
Rye
East Sussex
TN31 7TE
United Kingdom
http://www.aei.eu
AEI Security & Communications Ltd is
dedicated to providing its customers
with first class support.
We have provided you with 3 methods
of obtaining technical advice on this
product.
During busy periods we would suggest
using the web and e-mail options to
obtain support.
1. On the web...
Free technical advice is available online 24/7 at our dedicated support web site:
http://www.aei.eu
2. By e-mail...
You can contact our engineers by e-mail. Please be sure to clearly explain your problem and the
model you have purchased.
3. By Telephone...
We have a dedicated helpline, Monday to Friday, 9AM-1PM and 1:30PM - 5PM. The telephone
helpline is available to UK customers only. Please note that calls are charged at the local rate, and
your call may be recorded for training purposes.
0845 166 7940
Support
MODEL: DE40BWB
Door Entry System
INSTALLATION GUIDE

DE40BWB Instruction Manual
Page 2
Pack contents
Monitor
Camera
Mounting Plate A
Monitor-Camera Cable
Bracket
PSU
Mounting Plate B
Handset and
Cable
IMPORTANT NOTICES
The monitor is NOT SUITABLE FOR EXTERNAL USE
Exposure to moisture may damage this device, render it unsafe
for use and invalidate the 1 year warranty.
DE40BWB Instruction Manual
Page 7
Day to day operation
1. Talking to a visitor
When a visitor presses the door bell button it will trigger a bell sound at the handset. The handset will also
display an image showing the visitor.
To speak to the visitor, lift the handset. The monitor will continue showing an image for around 1 minute. To
reactivate the image you can press button 1 on the monitor.
After the conversation has finished, replace the handset. The monitor will stop displaying an image after a
few seconds.
2.Monitoring the camera output
You can view the output from the camera at any time by pressing button 1 on the monitor
3.Activating the panic alarm
Press button 2 to activate the panic alarm on the camera
4.Opening the electronic door lock
If connected, the electronic lock can be opened by pressing button 3 on the monitor at any time.
BUTTON 1
Activate monitor
BUTTON 2
Panic Alarm
BUTTON 3
Open Door Lock
CONTRAST
Adjust to improve
picture quality
VOLUME

DE40BWB Instruction Manual
Page 6
Connecting an electronic lock mechanism
+
-
This system can be used to control a standard electronic lock mechanism.
1. Connect the KEY SW1 and SW2 terminals to your electronic lock ensuring the
polarity of the connections (+/-) is correct.
DE40BWB Instruction Manual
Page 3
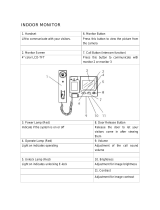
Panel descriptions
Camera
Lens
Nightvision IR LED
Illumination
Speaker
Door Bell Button
(Press to chime)
Microphone
Volume and
picture contrast
controls
4” CRT Monitor
Screen
Power ON
Indication
Monitor Button
(Press to view)
Alarm Button
(Press to activate)
Unlock Button
(Press to release
door mechanism)
Speaker

DE40BWB Instruction Manual
Page 4
Camera & monitor installation
CAMERA INSTALLATION GUIDELINES
The camera should be installed in a dry
location.
Choose a flat surface approximately 1.45 -
1.50m from the ground.
INSTALLATION
1. Attach mounting plate A to the wall using 2
of the supplied screws.
2. Attach the bracket to the wall & mounting
plate A using a supplied screw.
3. Fix the camera in place by attaching the
camera to the bracket using the supplied
machine screw.
MONITOR INSTALLATION GUIDELINES
Ensure the mounting surface is flat.
The monitor should be installed in a dry
location approximately 1.45 - 1.50m from the
ground.
INSTALLATION
1. Attach mounting plate B to a wall or door
frame using 2 of the supplied screws.
2. The monitor can now be slot onto the
mounting plate.
1
2
1
2
3
1. Do not mount the monitor in an area of high temperature or humidity e.g. above a radiator or cooking
appliance
2. Do not mount the monitor near devices which generate strong magnetic fields e.g. televisions.
3. Do not drop the monitor or use excessive force during usage or installation.
4. Do not operate the monitor with wet hands or if the monitor itself as become wet.
5. Do not use volatile or corrosive cleaning fluids on any part of this system.
DE40BWB Instruction Manual
Page 5
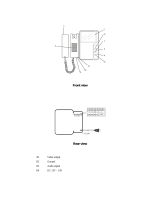
Finishing the installation
1. Connect the supplied cable to connectors A (camera) and B (monitor).
2. Connect the power supply to the rear connection on the monitor.
USING AN EXISTING OR CUSTOM CABLE RUN
The provided ‘telephone’ style cable is provided to make installation more convenient in the majority of
cases. However, if you are required to use an existing cable run or built a longer than standard cable then
the connection can be achieved using 5 core cable.
Please follow the connections shown below.
B
A
/