Page is loading ...

Aventura Technologies, Inc. 48 Mall Drive, Commack, NY 11725 U.S.A. P:631.300.4000 / F:631.434.7000 / aventuracctv.com Rev.100815
Guardian II User Manual

Aventura Technologies, Inc. 48 Mall Drive, Commack, NY 11725 U.S.A. P:631.300.4000 / F:631.434.7000 / aventuracctv.com Rev.100815
User Manual
Content
Device operation user manual ........................................................................ 3
1. Structure ....................................................................................................... 3
2. LCD Display.................................................................................................. 3
3. Charging ....................................................................................................... 4
1. Turn on .......................................................................................................... 5
2. Turn o ......................................................................................................... 5
3. Standby ........................................................................................................ 5
4. System settings .......................................................................................... 5
5. Video recording .......................................................................................... 6
5.1 Video recording ................................................................................... 6
5.2 Snapshot ............................................................................................... 6
6. Taking pictures ........................................................................................... 6
7. Separate sound recording ...................................................................... 6
8. Infra-Red mode .......................................................................................... 7
9. File deletion and le protection mode ............................................... 7
10. Playback Video/camera/audio ............................................................... 7
11. Restart ........................................................................................................... 7
12. Indicator instruction ................................................................................. 8
13. Laser light and white light operation .................................................. 8
14. AV output/HDMI output .......................................................................... 8
14.1 AV output ............................................................................................ 8
14.2 HDMI output ...................................................................................... 8
15. Connected to computer .......................................................................... 8
III Specication ...................................................................................................... 9
IV Accessories.......................................................................................................10
V Troubleshooting and handling ...................................................................10

Aventura Technologies, Inc. 48 Mall Drive, Commack, NY 11725 U.S.A. P:631.300.4000 / F:631.434.7000 / aventuracctv.com Rev.100815
Device operation
I Overview
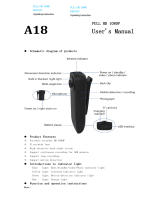
1. Structure
GPS interface
USB interface
HDMI interface
AV IN
External lens interface
Laser light White light
HD lens
Infra-red lights
Speaker
Indicator light
Walkie-Talkie
Video key
Photo key
360°rotatable clip
Audio key
HD 2’ LCD
Power key
Up/Infrared
Down/Laser light key
Restart
Back key
Menu
Playback key
White light/screen over key

Aventura Technologies, Inc. 48 Mall Drive, Commack, NY 11725 U.S.A. P:631.300.4000 / F:631.434.7000 / aventuracctv.com Rev.100815
2. LCD Display
Record time remaining on the memory card.
Body camera mode indicator: While in video preview mode - film icon; in video recording mode - red dot;
in photo preview - camera icon.
The ID number of the body camera.
Note: This can be configured as the unique ID for each officer or user.
Displays the memory card identication.
Battery level icon.
Displays the system date and time.
Displays the remaining storage of the memory card.
3. Charging
Low battery indication: when the battery voltage is low, the battery icon in the top right corner of the LCD will turn red and
ash. A warning tone will be heard from the body camera, and the device will automatically shut down in ve minutes. There
are two kinds of charging methods:
Connecting the device with a computer through the USB port. The state of charge can be reflected by the icon on
the LCD (charging while it is power on) or by the LED (charging while it is power off). Red light indicator is on while
charging. Red light indicator will turn off when fully charged.
Connecting the device to the charge station matched when it is produced through the USB port. The state of charge
can be reflected by the icon on the LCD (charging while it is power on) or by the LED (charging while it is power off).
Red light indicator is on while charging. Red light indicator will turn off when fully charged.

Aventura Technologies, Inc. 48 Mall Drive, Commack, NY 11725 U.S.A. P:631.300.4000 / F:631.434.7000 / aventuracctv.com Rev.100815
II Basic operation
1. Turn on
In shutdown state, short press the power key to power on. LED will display in red and the preview screen will appear.
If there is no operation in three minutes, the device enters the self-protection/power save mode automatically.
2. Turn o
In boot state, long press power key for two seconds to power o, the LCD shuts down, all light indicators will power o.
3. Standby
In boot state, if there is no operation in three minutes, the device will enter self-protection mode/power save mode
automatically. The LCD shuts down automatically, the LED light indicator turns red. Press the screen key to light the
screen or turn o the LCD screen.
4. System settings
Press the “Menu” key to enter “System Setting” option, the LCD will display as following:
Note: Press the “OK” key to enter each menu setting, which will enable the “Up/Down” keys. Press the “OK” key again to
confirm your changes.
Resolution
Date/Time
Video Segmentation
Photo Resolution
ID
Prerecord
Delay record
SYSTEM
1920 X1080 16:9
2014-12-18
11:30
SPLIT SMIN
3.0m(2048 X 1536 4:3)
PHOTO NUMBER 1

Aventura Technologies, Inc. 48 Mall Drive, Commack, NY 11725 U.S.A. P:631.300.4000 / F:631.434.7000 / aventuracctv.com Rev.100815
5. Video recording
5.1 Video recording
In the preview scene, press the “Video” key to start recording. In recording mode, the top left corner will display a red dot. LED
light indicator will light up in red and begin to ash slowly. Press the “Video” key again to stop recording. LED light indicator
will return to green. The video les are saved automatically to the memory card. The screen will return to the preview scene of
video automatically. The name of the video is consist of the date and time with a “MP4” as sux saved in memory card. Refer
to the “Play back” section to review the recorded video. If the recordings are extensive, the device will divide the recordings
automatically, 5/ 10/15/30 minutes as a cycle.
5.2 Snapshot
While shooting video, press “Photo” key .This will take photos and save automatically to memory. The device will
return to video scene mode after a snapshot is taken. Snapshots will not interrupt video recording.
6. Taking pictures
While in the preview scene mode, press “Photo” key .
A sound will be heard when a photo is taken. Pressing the “Photo” key again once will take another photo. The name
of the photos consists of the date and time with a “JPG” as sux saved in memory. Refer to the “Play back” section to check
the photo.
7. Separate sound recording
In preview scene mode, press “Audio” to start separate sound recording. The screen will display “recording” in the middle as
a notication. The LED light indicator will be yellow. Press “Audio” again to stop separate sound recording. The LED light
indicator will turn back to green, the audio le is stored into memory, while the screen will return back to preview scene mode.
8. Infra-Red mode
The infrared night vision light is o by default when turning on the device. The video is displayed and recorded in color while
recording during the day. When using the body camera and recording at night, hold the “Up” key and release it to turn the
Infra-Red switch to the ON position. You can toggle the IR ON/OFF, by holding the“Up” key and release it after 2-3 secs. Photo
resistor light sensors will automatically power ON or OFF the IR when needed.
9. File deletion and le protection mode
Any audio and video files saved on the memory card cannot be deleted without connecting the device to the docking
station. You should log into the management software to delete the files.
FFile protection mode - protects les from any tampering attempts, le attributes are set to“read only.”
A. There are two ways to set file protection mode (depending if the device is locked by system administrators).
While the device is in video/audio mode, press “BACK” key to enter/exit “SOS” mode, a yellow lock icon will show up or
disappear on the right of the device.
In playback preview scene, choose videos or pictures which you want to protect, press “MENU” key to enter/exit “SOS” mode,
the files get/lose protection.

Aventura Technologies, Inc. 48 Mall Drive, Commack, NY 11725 U.S.A. P:631.300.4000 / F:631.434.7000 / aventuracctv.com Rev.100815
10. Playback Video/camera/audio
With the power on, the preview screen, short press “playback” key to enter the playback menu.
In this display, press the “Up” or the “Down” key to select the desired option (Video/Photo/Audio)(Highlight the selected
item with green frame).
Press “OK” key once to display all les (Video / Photo/Audio). Under display press “up” or the “down” key to select the
required query or playback les (Highlight the selected item with green frame).
Press “OK” key once to display all files (Video / Photo/Audio). During play, press “OK” key once to stop playing, and then
press the key again to continue playing. Play after pressing “OK” key repeat.
In the above process, short press “BACK” key to return a stage, until the normal display.
11. Restart
A forced restart of the device can be made by using a pen of sharp pinned object. Just hold the restart button with this tool.
This will reboot the entire device, while all previous settings are unchanged.
12. Indicator instruction
With the power on, the preview screen LED is red.
With the power on, the video mode LED is red, blinking slowly.
With the power on, the audio mode is yellow, blinking slowly.
In the data connection state, LED indicator is blue.
In state of charge, the LED indicator is blue, after charging the LED indicator light goes out.
With the power on, each pressing of “Photo” key can take one photo, LED indicator ashes red.
13. Laser light and white light operation
With the device power on, press “Down/Laser light” button to turn on/o the laser light, the device will transmitter a red
laser beam which can locate shooting direction.
With the device power on, press “White light” button to turn on/o the white light, the device will transmitter white light
which can provide light in the dark.
14. AV output/HDMI output
14.1 AV output
The device is equipped with AV output function, a dedicated AV output cable connector can connect the monitor to the TV,
audio and video will play audio and video playback when access / playback video on the display when, in this play mode the
device’s display is blank state.
14.2 HDMI output
The device is equipped with HDMI output function, a dedicated HDMI output cable connector can connect the monitor to the
TV, audio and video will play audio and video playback when access / playback video on the display when, in this play
mode the device’s display is blank state.

Aventura Technologies, Inc. 48 Mall Drive, Commack, NY 11725 U.S.A. P:631.300.4000 / F:631.434.7000 / aventuracctv.com Rev.100815
15. Connected to computer
The software is divided into the following two versions:
(For Unlocked device) Install the U disk version software equipment: Connect the device to the computer with the
USB cable, do not have to install any drivers.
(For locked device) Install the docking station software equipment: It needs to install the driver, and driver
installation method and software refer to CD software instructions.
16. GPS Location Function (optional)
This device can locate via an optional GPS module. After you connect the device with GPS via the GPS antenna, it will
generate GPS location les while shooting video. Using a dedicated player to play the le, you can preview the device
location information and trajectory on the map. (For more information about the operation instruction, please refer to the
CD.) User Instruction: Turn on the device after connecting it to GPS via GPS antenna, in the lower right corner of the screen
shows a red radar symbol indicates a normal antenna connection. When you begin shooting video, the device
automatically starts searching for location; radar symbol turns green and indicating a successful location.
Specication III
Resolution 2 MP (1920×1080)
Frame Rate Up to 60 FPS
Display 2.0 inch 16:9 TFT LCD 960×240
Aspect Ratio 16:9 or 4:3
Lens angle Built-in Len: 120 degree wide angle
Focus range 0.3~∞
Sensor 1/2" Color CMOS
Body Size 95mm×60mm×30mm (length × width × height)
Photo JPG le format up to 16MP camera
Video Camera Video Format: H.264 compressed format :1920×1080@30fps, 1440×1080@30fps, 1280×720@30fps, 848×480@60fps, 640×480@30fps
Video Format MP4, MPEG-4, H.264
Recording Mode Motion Detection, pre recording, record delay
Recording le size 5 min, 10 min, 15 min, 30 min.
Status Indicator Vibration alert for record start/stop, visual and audible alert
Exposure Mode Auto Exposure
Night Vision Mode 6 high powered built in Infrared LED’s, Built in ashlight with night photography and Video mode, Built in laser light mode
IR Range Identication of faces at 8 Meters (26ft)
Connections Micro HDMI, USB 2.0, AV In, AV Out
Audio Built-in microphone / speaker
Pickup 64KHZ
Memory 16GB (up to 32Gb)
Shutter / Shutter Speed Electronic Shutter/1/2-1/2000s
Filter Switch Switchable lens lter, suitable for both daytime and night use
White Balance Automatic
USB Interface Mini USB Interface/USB 2.0
Operating Temperature/Humidity -30°C~65°C/<90%
Ingress Rating IP65
Public Awareness Yes
GPS Location Tagging (Optional)
Power Input 5V DC 1 Amp USB charger
Battery Life ~12 Hours
Recharge Time 2.5 Hours
Assessories Included USB Charger, Swivel pocket clip, low prole clip
Certication CE
Warranty 2 Years

Aventura Technologies, Inc. 48 Mall Drive, Commack, NY 11725 U.S.A. P:631.300.4000 / F:631.434.7000 / aventuracctv.com Rev.100815
IV Accessories
GPC-PS-USB 100-240 VAC Charger/USB Cable
GPC-CL1 Low Prole Clip
GPC-CL2
CD /Manual
GPS(optional)
V Troubleshooting and handling
Device cannot boot or is non-responsive
1. Connect the charger to the device.
2. Check the charger and the connection line.
3. Press the reset key to restart the device.
4. If none of the above resolve the issue, please contact Aventura Technical Support.
Device failed to connect to the docking station/computer or failure to enter upload mode.
Please contact Aventura Technical Support.
Forgot Password
Please contact Aventura Technical Support.
Time cannot be synchronized
If you have already tried to use the docking station software or the U disk mode application and none of these are able to
sycnhronize the time, please contact Aventura Technical Support.
Red equipment image
The device uses relay control infrared lter lens. When it has been hit in the course of transportation or damaged while in
use, the infrared lter lens can get stuck. The magnetic force cannot reset after the relay is energized. At this time, please
repeatedly press the infrared switch. This will attempt to recover the relay controller for the infrared lter lens. If this does
not resolve the issue, contact Aventura Technical Support.
Cannot connect to external camera
Please contact Aventura Technical Support.
/