Page is loading ...

DRAWING No. SE300 01-1408 2040 6006
[1] SAFETY PRE
CAU
TIONS
Before use, read the following safety precautions.
Thank you for purchasing Digital Tachometer Model SE300.
Before use, please read this manual thoroughly. After reading it,
keep it together with the product for reference to it when necessary.
The instructions given under symbols “
WARNING” and
“ CAUTION” must be followed to prevent incidents such as an injury.
1-1 Explanation of Warning Symbols
The meaning of the symbols used in this manual is as follows.
: Very important instructions for safe use.
• The warning messages are intended to prevent accidents to
operating personnel such as an injury.
• The caution messages are intended to prevent damage or
malfunction to the instrument.
1-2 Warning Instructions for Safe Use
To prevent human incidents such as an injury, be sure to
observe the following instructions when using the instrument.
1. Before proceeding to measurement, wear optimum working
cap and wear so that your hair and clothes are not entangled
by the rotating object. Be also sure to wear protective eyeglasses.
2. Never touch the rotating object during measurement.
3. Do not use the instrument if the rotating object to be
measured presents any irregularity.
4. If there is any risk of endangerment of the measurement
personnel by a part of the rotating object, secure the safety
of that part by installing an enclosure, etc.
5. Do not service or modify the instrument unless when
replacing the batteries.
6. The instrument should be inspected in the start-up inspection
of every day as well as more than once a year.
WARNING
1. Take care not to drop the instrument from a high altitude
when handling it.
2. Take care not to apply a strong impact to the lens section of
the instrument.
3. Do not open the case of the instrument, touch the internal
circuit boards or parts or modify it in any manner.
CAUTION
[2] APPLICATIONS AND FEATURES
2-1 Applications
This instrument is a noncontact, handheld type digital tachometer
designed for measuring the rotation speeds of rotating objects such
as motors. The instrument can also be used as a contact type tachometer
by connecting the optional ENC-3 Contact Measurement Attachment.
2-2 Features
• Designed in pursuit of the ease of holding to enable stable
measurement.
• Abundant measurement modes.
• Long detection distance in noncontact measurement (max. approx.
50 cm) enabling measurement from a distance from the rotating object.
• Contact measurement capability using the optional ENC-3
Contact Measurement Attachment.
• MAX/MIN display function.
• Auto power OFF function (approx. 2 min., cancellation possible).
• Bright backlight.
•
Fixed installation possible using a commercially available camera tripod.
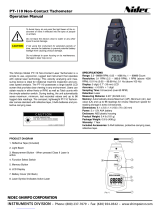
[3] NAME OF COMPONENT UNITS
3-1 Main Instrument and Accessories
Irradiation/detection lens
Power button
Rotation detection
indicator LED
Front Back
Contact adapter fixing hole
Tripod hole
Battery cover
Function buttons
See section [4]
3-2 Display
Numeric value display Units
: Maximum value
: Auto power OFF
: Minimum value : Contact measurement mode
: Data Hold : Low battery alarm
For the units and their combinations, see “5-3 Noncontact
Measurement” and “5-4 Contact Measurement”.
[4] DESCRIPTION OF FUNCTIONS
4-1 Power button:
Press and hold the button for more than one second to turn the
instrument ON.
All of the display and indicators light up and then the instrument
gets ready for measurement.
* If there is a reflective object in front of the lens when the instrument
is turned ON, a numeric value may be displayed. In such a case,
wait for about 2 seconds until the numeric value becomes [0].
(Ready for measurement)
Press the same button for more than one second to turn the
instrument OFF.
The measurement mode setting is saved in memory even after the
instrument has been turned OFF.
4-2 Auto power OFF
When the instrument has not detected reflected light for about 2
minutes after the last operation performed, the instrument turns
OFF automatically. To recover from the auto power OFF status,
turn the instrument ON with the usual procedure.
To cancel the auto power OFF function, press and hold the
button and then hold the Power button for more than one second
to turn the instrument ON. The
indicator will not be displayed in
the measurement display.
4-3 Measurement mode selection: button
Each press of the button switches the measurement mode.
Press and hold the
button for more than one second. The
indicator appears indicating that the instrument is in the noncontact
measurement mode. To return to the contact measurement mode,
press and hold the
button for more than one second again.
* For details on the measurement mode switching of the noncontact
and contact measurement modes, see “5-3 Noncontact
Measurement” and “5-4 Contact Measurement”.
4-4 Backlight switching: button
Press the button to switch ON the backlight of the display
panel. Press the button again to switch the backlight OFF.
4-5 Data hold: button
When the button is pressed, the indicator appears on
the display and the numeric value being displayed is held. The
displayed value will not change even when the measurement input
varies. When the button is pressed again, the
indicator
disappears and the data hold function is canceled.
* The data hold function is also canceled when the
button is
pressed.
4-6 Maximum and minimum value display:
button
Press the button to enter the mode in which the
instrument saves and stores the maximum and minimum measurement
values from the moment the button is pressed. Each press of the
button switches the displayed values in the following cycle:
• Maximum value display: The instrument displays the maximum
value since the press of the
button.
• Minimum value display: The instrument displays the minimum
value since the press of the
button.
• Current value display: The instrument displays the current
measurement value while saving the maximum and minimum
values since the press of the
button. To view the
maximum or minimum value, it is required to press the
button to the maximum or minimum value display.
To cancel the maximum and minimum value display, press and
hold the
button for more than one second.
* The maximum/minimum value display function is also canceled
when the
button is pressed.
* The
button is disabled during data hold ( ). The
maximum and minimum values are not updated during it.
* Maximum and minimum value display function is disabled in the
count measurement mode.
4-7 Count clear: button
Press the button during count measurement (unit: count)
clears the counted value.
4-8 Low battery alarm
When the battery power is consumed and the voltage drops below
about 2.3 V, the
indicator appears on the display panel to
solicit early replacement of the batteries.
4-9 Tripod hole
The instrument can be installed on a
commercially available tripod for fixed
use. Screw in the tripod into the
threaded tripod hole on the rear of the
instrument.
• Thread size: 1/4-20 UNC (ISO 1222)
* Use a commercially available tripod.
[5] MEASURING PROCEDURE
5-1 Start-up inspection
Inspect the following points before starting the work of every day.
• Appearance: Check that the appearance of the instrument is not
damaged by falling, etc.
If any irregularity is found, do not use the instrument.
• Scratches and dirt on the lens: Check that the lens is not
clouded.
Accurate measurement is impossible if the lens is dirty or clouded.
Dirt or cloud should be removed by gently wiping with a soft, dry cloth.
• Check that the low battery alarm indicator is not displayed
when the instrument is turned ON. If it is displayed, replace the
batteries with new ones.
* If nothing is displayed on the display panel, the batteries could be
exhausted completely.
5-2 Warning for measurement
1. Do not measure a rotating object from a close distance at
which the instrument could contact the rotating object.
2. Do not attempt to measure an object rotating at a speed
exceeding the measuring range of the instrument.
WARNING
5-3 Noncontact measurement
Be sure to stop the rotating object to be measured before
attaching the reflective sticker on it.
WARNING
1. Before attaching the reflective sticker on the rotating object,
remove the moisture, oil and dust on the sticker attaching
surface completely.
2. If the sticker is to be attached on a shiny plated surface,
accurate measurement would be impossible due to diffuse
reflections. In this case, paint the sticker attaching surface
black or attach a piece of black tape on the surface.
3. Protect the reflective sticker on the rotating object against
penetration of intermittent light such as the light from a
fluorescent lamp. If an effect of extraneous light is expected,
adjust the positioning of the instrument so that it displays [0]
when the rotating object is not rotating before measurement.
4. Accurate measurement may sometimes be impossible under
direct sunlight.
5. Measurement of high-speed rotation may be impossible of
the time the irradiated light passes on the reflective sticker is
short (less than about 0.2 second). In this case, increase the
area of the reflective sticker.
CAUTION
To perform noncontact measurement, attach the reflective sticker
(provided with the instrument) on the rotating object to be
measured as shown below.
Rotating object
Reflective sticker
Irradiation light
1) Turn the instrument ON and set the desired measurement mode.
Each press of the
button switches the measurement
mode in the following cycle:
Rotation speed measurement Rotation speed measurement
(revolutions per minute) (revolutions per second)
Rotation count measurement Interval measurement
(counts) (milliseconds)
2) Apply the irradiation light perpendicularly on the reflection
marking on the rotating object so that the rotation detection
indicator LED lights steadily. The distance between the tip of the
detection section of the instrument and the reflective surface on
the rotating object should be between 50 and 500 mm.
3) The instrument displays the measurement result.
SE300
DIGITAL TACHOMETER
01-1408 2040 6006
INSTRUCTION MANUAL
Dempa Bldg, 4-4 Sotokanda 2-Chome
Chiyoda-ku, Tokyo, Japan
− 1 − − 2 − − 3 − − 4 −

DRAWING No. SE300 01-1408 2040 6006
5-4 Contact measurement (Using the optional ENC-3)
1.
Do not perform measurement if the contact adapter, contact
maker or rim speed ring of the contact measurement attachment
is damaged, worn or deformed.
2. Be sure to tighten the contact adapter fixing screw tightly.
3. Fit the contact maker or rim speed ring all the way into the
root of the rotary shaft of the contact adapter.
4.
When measuring a high-speed rotating object (8000 rpm or
higher), do not measure it continuously for more than one minute.
5. Do not use a tripod in the contact measurement.
6. Do not use the contact maker or rim speed ring with a high-
temperature rotating object.
WARNING
The contact measurement required the optional ENC-3 Contact
Measurement Attachment.
1) Attach the contact adapter as shown below and secure the fixing
screw tightly.
Contact adapter
Fixing screw
2) Select the contact maker or rim speed ring according to the
purpose of measurement and fit it on the tip of the contact
adapter.
Contact maker
Rim speed ring
* Select the rim speed ring when measuring the velocity of a belt
conveyer or similar object (Travel distance per minute in m/min or
travel distance per second in m/s).
3) Turn the instrument ON and select the contact measurement
mode (see “4-3 Measurement mode selection”). Ensure that
the
indicator appears on the display panel and set the desired
measurement mode.
Each press of the
button switches the measurement
mode in the following cycle:
Rotation speed measurement
Rotation speed measurement Interval measurement
(revolutions per minute) (revolutions per second) (milliseconds)
Rim speed measurement Rim speed measurement Rotation count measurement
(meters per second) (meters per minute) (counts)
When the rim speed ring is attached, select either the [m/min] or
[m/s] mode.
4) Apply the contact maker or rim speed ring on the rotating object.
Special care is required for the method of application.
The contact maker should be applied perpendicularly to the
contact surface toward the axis of the rotating object.
The rim speed ring should be applied in parallel with the
measurement target.
Rotating object
5) The instrument displays the measurement result.
6) Detach the contact adapter by loosening the fixing screw,
position the instrument so that the side with the fixing screw
faces down and pull the adapter obliquely considering the
presence of a lock mechanism.
5-5 Measurement modes
• [rpm] : Revolutions per minute
• [rps] : Revolutions per second
• [ms] : Reflected light detection interval (milliseconds)
• [count] : Rotation count measurement
• [m/min] : Travel distance per minute (meters)
Rotation speed(rpm)xCircumference of rim speed ring 100(mm)
1000
• [m/s] Travel distance per second (meters)
Rotation speed(rps)xCircumference of rim speed ring 100(mm)
1000
[6] MAINTENANCE
1. The information in this section is critical for safety. Manage
the instrument based on full understanding of the information
given in this manual.
2. For safety and accuracy of the instrument, calibrate and
inspect it at least once a year.
WARNING
6-1 Maintenance and Inspection
Be sure to perform the maintenance inspection of the instrument to
use it safely for an extended period and keep the high quality. The
inspection items are as described in “5-1 Start-up inspection”.
6-2 Calibration and Inspection
For more information, please contact Sanwa’s authorized agent /
distribute service provider, listed in our website.
See section 7-3.
6-3 Battery replacement
• Batteries shipped with the instrument
The batteries provided with the instrument are monitoring batteries.
Their service life may be shorter than brand-new batteries.
* Monitoring batteries refer to the batteries for use in checking the
functionality and performance of the product.
1
Using a Phillips screwdriver, loosen the retaining screw of the
battery cover.
2
When the battery cover comes up, remove it.
3
Replace both of the two batteries in the battery holder with new
ones by taking care of the polarity.
4
Attach the battery cover and secure the retaining screw.
6-4 Cleaning and Storage
1.
The instrument is not resistant to volatile solvents and should not
be wiped with lacquer thinner or alcohol. When it gets dirty, wi pe
dirt away with a soft cloth moistened with a small amount of water.
2. The instrument is not resistant to heat and should not be
placed near a source of high heat.
3.
Do not store the instrument in a position subjected to excessive
vibrations or a position presenting the risk of dropping.
4.
Avoid storing the instrument under direct sunlight, high or low
temperature, high humidity or a position with a risk of condensation.
5. Be sure to remove the batteries when the instrument is
expected to be left unused for a long period of time.
CAUTION
6-5 Storage in the carrying case
The instrument can be stored in the carrying case as shown below.
Main instrument
Contact maker (*)
Contact adapter (*)
Test certificate
Reflective stickers
Rim speed ring (*)Batteries
Instruction manual
(*) Optional ENC-3 Contact Measurement Attachment
[7] AFTER-SALE SERVICE
7-1 Warranty and Provision
Sanwa offers comprehensive warranty services to its end-users
and to its product resellers. Under Sanwa's general warranty
policy, each instrument is warranted to be free from defects in
workmanship or material under normal use for the period of one (1)
year from the date of purchase.
This warranty policy is valid within the country of purchase only,
and applied only to the product purchased from Sanwa authorized
agent or distributor.
Sanwa reserves the right to inspect all warranty claims to
determine the extent to which the warranty policy shall apply. This
warranty shall not apply to disposables batteries, or any product or
parts, which have been subject to one of the following causes:
1. A failure due to improper handling or use that deviates from the
instruction manual.
2. A failure due to inadequate repair or modification by people
other than Sanwa service personnel.
3. A failure due to causes not attributable to this product such as
fire, flood and other natural disaster.
4. Non-operation due to a discharged battery.
5. A failure or damage due to transportation, relocation or dropping
after the purchase.
7-2 Repair
Customers are asked to provide the following information when
requesting services:
1. Customer name, address, and contact information
2. Description of problem
3. Description of product configuration
4. Model Number
5. Product Serial Number
6. Proof of Date-of-Purchase
7. Where you purchased the product
Please contact Sanwa authorized agent / distributor / service
provider, listed in our website, in your country with above
information. An instrument sent to Sanwa / agent / distributor
without above information will be returned to the customer.
Note:
1) Prior to requesting repair, please check the following:
Capacity of the built-in battery, polarity of installation and
discontinuity of the test leads.
2) Repair during the warranty period:
The failed meter will be repaired in accordance with the
conditions stipulated in 7-1 Warranty and Provision.
3) Repair after the warranty period has expired:
•
If it is expected that servicing can restore the original functioning of
the instrument, we will service it for a price upon request of the user.
•
The service charge or transport freight could sometimes become higher
than the product price. Please consult us before asking for servicing.
•
The minimum retention period of the servicing performance parts of
this instrument is six (6) years after the discontinuation of production.
This period is equal to the servicing available period. However, the
retention period of a part may be reduced if it becomes unavailable
due to discontinuation of production of the part manufacturer, etc.
4) Precautions when sending the product to be repaired:
To ensure the safety of the product during transportation, place the
product in a box that is larger than the product 5 times or more in
volume and fill cushion materials fully and then clearly mark
“Repair Product Enclosed” on the box surface. The cost of
sending and returning the product shall be borne by the customer.
7-3 SANWA web site
http://www.sanwa-meter.co.jp
E-mail: [email protected]
[8] SPECIFICATIONS
8-1 General Specifications
Measurement methods Red visible light photoelectric reflection method,
contact method (*)99999
Measurement modes rpm, rps (Revolution speed)
ms (Interval)
count (Rotation count)
m/min, m/s (Rim speed) (*)
Reflection detection
distance
Approx. 50 to 500 mm
Display panel LCD, 5 digits, backlit
Display updating intervals
Approx. 1
sec.
(rpm, rps, cycle, m/min, m/s modes)
Approx. 0.1 sec. (count mode)
Operating environmental
conditions
Altitude ≤ 2000 m, indoor, pollution degree II
Operating temperature/
humidity range
5 °C to 40 °C, ≤80 %RH (without condensation)
Storage temperature/
humidity range
-10 °C to +40 °C, ≤80 %RH (without condensation)
(The batteries should be removed before long-
term storage.)
Auto power OFF The instrument turns OFF in about 2 minutes
after the last operation or last reflected light
detection.
Over-scale display “OL” is displayed on the display panel.
Low battery alarm When the battery power is consumed and the
voltage drops below about 2.3 V, the
indicator appears on the display panel
Power supply “AA”-size dry cell battery (R6P/LR6) x 2
Battery life Approx. 28 hours (alkaline batteries, backlight
not used)
Dimensions
210(H) x 60(W) x 50(D) mm (Main instrument only)
298(H) x 60(W) x 50(D) mm (Contact adapter +
Contact maker)
Weight (incl. batteries) Approx. 218 g (Main instrument only),
Approx. 278 g(Contact adapter + Contact maker)
Accessories Instruction Manual, “AA”-size dry cell battery
(R6P/LR6) x 2, carrying case, reflective stickers
(x 50)
8-2 Optional accessories
ENC-3 Contact Measurement Attachment (Contact adapter, contact
maker and rim speed ring)
SE-A30 Contact maker
SE-A31 Rim speed ring, circumference 100 mm
SE-T3 Reflective stickers (x 100 = 50-sticker sheet x 2)
C-SE300 Carrying case
8-3 Measuring ranges and accuracies
Accuracy guaranteed temperature/humidity ranges:23±5 °C, no more
than 80 %RH, (without condensation.)
rdg: Reading. dgt: Lowest digits.
Measurement ranges
Measurement mode
Noncontact
measurement
Contact
measurement
rpm 30.0 – 99999 30.0 – 19999
rps 0.50 – 1600.0 0.50 – 333.00
ms 0.600 – 1999.0 3.000 – 1999.0
count 0 – 99999 0 – 99999
m/min – 3.0 – 1999.0
m/s – 0.05 – 33.00
(*) When the optional ENC-3 is used
Accuracy ±(0.03 % rdg + 1dgt)
* Accuracy in noncontact measurement. It does not include errors
that may be caused by extraneous light or shake of the instrument.
*
In the contact measurement, the accuracies and slipping movements of
the contact maker and rim speed ring are added to this figure above.
*
In the rim speed measurement, ±0.5 % rdg is added to the figure above.
Accuracy calculation method
Example) Noncontact revolution speed measurement (rpm)
Displayed value: 10000 rpm
Accuracy: Error: ±(10000 rpm x 0.03 % + 1 dgt) = ±4 rpm
True value: Within the range of 10000 rpm ±4 rpm (9996 – 10004 rpm)
* AT 10000 rpm, 1 dgt corresponds to 1 rpm.
For the purpose of improvement, the design and specifications of the
products described above may be subject to change without notice.
(*) When the optional ENC-3 is used
− 5 − − 6 − − 7 − − 8 −
/