Page is loading ...

www.rivatech.de
Specification subject to change without notice
RC8102HD-6111T/W
Installation Guide

Precaution
Please read this manual carefully before installing the units.
Never disassemble the main unit and the camera unit. Unauthorized disassembly may
cause equipment failure or damage to the unit.
Do not install the product on unstable brackets, unstable or vibrating surfaces since
this could cause damage to the product.
Use only the accessories provided or recommended by the manufacturer.
Do not operate the camera in environments beyond the specified temperature. Refer
to Environment Condition on APPENDIX(A): SPECIFICATIONS in this manual.
Before applying power to the camera, check the power source to ensure that it is
within the specifications. Refer to Electrical Characteristics on APPENDIX(A):
SPECIFICATIONS.
CAUTION: RISK OF EXPLOSION IF BATTERY IS REPLACED BY AN INCORRECT TYPE.
DISPOSE OF USED BATTERIES ACCORDING TO THE MANUFACTURER’S INSTRUCTIONS.

HD Series RC8102HD Installation Guide
11-2014-A www.rivatch.de 3
Table of Contents
Precaution ................................................................................................................ 2
1. FEATURES ............................................................................................................. 4
2. PACKAGE CONTENTS............................................................................................. 5
3. PART NAMES ........................................................................................................ 6
4. INSTALLATION ...................................................................................................... 8
4.1. Camera Unit Installation .................................................................................................... 8
4.2. Main Unit Installation ....................................................................................................... 12
4.3. Cable Connection ............................................................................................................. 13
5. CONFIGURATION ................................................................................................ 16
5.1. Set up network environment ........................................................................................... 16
5.1.1. Generic IP Environment ............................................................................................ 16
5.1.2. Custom IP Environment............................................................................................. 17
5.2. View video on web page .................................................................................................. 18
5.2.1. ActiveX Installation .................................................................................................... 18
5.2.2. View Video using IPAdmin Tool ................................................................................ 19
5.3. Reboot .............................................................................................................................. 20
5.4. Factory Default ................................................................................................................. 20
5.5. Safe Mode ........................................................................................................................ 20
APPENDIX (A): SPECIFICATIONS .............................................................................. 22
Summary ................................................................................................................................. 22
Electrical Characteristics ......................................................................................................... 23
Environment Condition ........................................................................................................... 23
Mechanical Condition ............................................................................................................. 23
APPENDIX (B): POWER OVER ETHERNET ................................................................. 24
Power Comparison .................................................................................................................. 24
APPENDIX (C): DIMENSIONS ................................................................................... 25
APPENDIX (D): HEXADECIMAL-DECIMAL CONVERSION TABLE ................................. 28
REVISION HISTORY ................................................................................................. 29

HD Series RC8102HD Installation Guide
11-2014-A www.rivatch.de 4
1. FEATURES
Camera
1/3” 1080p CMOS Image Sensor
Digital Day/Night
WDR
Video
H.264 Baseline, Main, High profile(MPEG-4 Part 10/AVC), MJPEG(Motion JPEG)
Max 30fps in 1080p*
Text Overlay
Network
10 / 100 Base-T Ethernet
Integration
Software Development Kit (SDK) available
ONVIF Compliant (Profile S & Profile G)
* ONVIF Profile G is supported from FW V1.8.0 or higher.
General
Micro SD/SDHC card slot
Power Over Ethernet (PoE)
Video Contents Analysis (VCA)
VCA Presence (Standard)
VCA Surveillance (Optional)
VCA Pro (Optional)
* VCA Pro is supported from FW V1.8.0 or higher.
* If VCA is activated, frame rate is limit to max15fps@1080p. Limitation based on V.1.9.0
firmware release and could be changed without notice.

HD Series RC8102HD Installation Guide
11-2014-A www.rivatch.de 5
2. PACKAGE CONTENTS
Please unpack the package carefully and handle the equipment with care.
The package contains:
Camera Unit
Main Unit
Universal Plugs
Power Adaptor (DC12V)
Double-sided tape
for Covert Cover
Covert Cover
Rotate Ring
Surface Mount Bracket
PAN/TILT Bracket
Tapping Screw
(TP1 M3x20) x 2EA
Screw
(TP2 M3x6(Ni)) x 2EA
Anchor Block
(M4x25) x 5EA
Tapping Screw
(TS1 M4x25) x 5EA
Cable Clamp x 3 EA
Ferrite Core
Tapping Screw
(TP1 M4 x20) x 3EA
4 Pin Terminal Block
Note
i
The contents above are subject to change without prior notice.

HD Series RC8102HD Installation Guide
11-2014-A www.rivatch.de 6
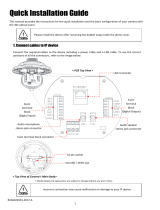
3. PART NAMES
Main Unit
① Terminal connector
Connector for cable connection for digital input / output. Refer to 4.3. Cable Connection
for more details.
② Camera Connector
Connector for camera unit
③ microSD/SDHC card slot
The camera supports up to 32GB. Class 4 and higher SD card is recommended for HD
recordings.
④ Reset button
This button will restart or reset to factory default settings. Refer to To learn more about
using other features of your devices, refer to the manuals as “RIVA Web Interface Manual
Full HD Series” or “VCAsys User Manual (Online Help)”, which is available on
www.rivatech.de homepage.
* Model herein and its appearance are subject to change without any prior notice.
④
⑤
⑥
⑦

HD Series RC8102HD Installation Guide
11-2014-A www.rivatch.de 7
5.3. Reboot and 5.4. Factory Default for more details.
⑤ LAN Connector
RJ45 LAN connector for 10/100 Base-T Ethernet (PoE supported)
⑥ Power Adaptor Connector
DC 12V power supply connection
⑦ Slide Plate
Built-in mounting bracket for main unit

HD Series RC8102HD Installation Guide
11-2014-A www.rivatch.de 8
Camera Unit with conjoined accessories
① Camera
Pinhole camera
② Camera DIN connector
Connector to be inserted to the camera connector in the main unit
③ Covert Cover
Bracket to be installed behind the wall or ceiling to hold the camera inside
④ Surface Mount Bracket
Bracket to be installed on the wall or ceiling to hold the camera inside
⑤ Pan/Tilt Bracket
Bracket to be installed on the wall or ceiling for camera’s angle adjustment
It shall be combined with the rotate ring and the surface mount bracket for the complete
installation.
①
③
④
⑤
②
* Model herein and its appearance are subject to change without any prior notice.

HD Series RC8102HD Installation Guide
11-2014-A www.rivatch.de 9
4. INSTALLATION
4.1. Camera Unit Installation
There are three different ways to install the camera unit:
- Covertly behind the wall or ceiling by using the covert cover
- Mounted and fixed on the wall or ceiling by using the surface mount bracket
- Mounted and fixed on the wall or ceiling by using the pan/tilt bracket to enable the
camera’s angle adjustment
Covert Installation
1) Drill a hole with 3mm diameters on a desired
spot where the camera lens will be located.
2) Peel off one side of the double-sided tape,
and attach it to the flat surface of the covert
cover by aligning the grooves on the tape
with the screw holes on the covert cover.
tape
groove
Screw hole
(Behind the wall or
above the ceiling)

HD Series RC8102HD Installation Guide
11-2014-A www.rivatch.de 10
3) Peel off the other side of the tape, and stick
the taped surface to the installation surface
by placing it with the screw head upward and
the cable holder downward and aligning it
with the drilled hole on the installation
surface.
5) Place the camera inside the covert cover by
routing the camera’s cable through the cable
holder on the covert cover, and tighten the
top screw head to fix the camera.
4) Fasten the covert cover by using the tapping
screws (M3x20) appropriate for the material of
the installation surface.
6) Use the cable clamp optionally if you want to
fix the camera’s cable to a desired spot with a
tapping screw (M4x20).
Screw head
cable holder
cable clamp
(Behind the wall or
above the ceiling)
(Behind the wall or
above the ceiling)
cable holder

HD Series RC8102HD Installation Guide
11-2014-A www.rivatch.de 11
Surface Installation for fixed angle
2) Cover the camera with the surface mount
bracket by routing the camera’s cable into
the cable holder on the bracket. Then, fasten
the bracket using the tapping screws (M3x20)
and anchor blocks appropriate for the
material of the installation surface.
3) Use the cable clamp optionally if you want to
fix the camera’s cable to a desired spot with a
tapping screw (M4x20).
cable clamp
1) Place the camera on a desired installation
surface.

HD Series RC8102HD Installation Guide
11-2014-A www.rivatch.de 12
Surface Installation for pan/tilt adjustment
3) Insert the rotate ring into the bracket by
pressing it into the bracket’s mount ring.
4) Place the camera unit on the pan/tilt bracket.
6) Use the cable clamp optionally if you want
to fix the camera’s cable to a desired spot
with a tapping screw (M4x20).
mount ring
rotate ring
cable clamp
1) Drill a hole on a desired installation surface,
and insert an anchor block into the hole.
2) Fix the pan/tilt bracket by inserting the
tapping screw (M4x25) to be passed
through the screw hole on the bracket and
tightening it into the anchor block.
5) Place the surface mount bracket on top of the
camera, fix the bracket by inserting the tapping
screws (M3x6) into the screw holes on the
bracket by aligning the screw holes with the
holes on the rotate ring on the pan/tilt bracket,
and tighten the screws.

HD Series RC8102HD Installation Guide
11-2014-A www.rivatch.de 13
4.2. Main Unit Installation
The main unit can be mounted on the installation surface by the built-in slide
plates.
1) Pull out both slide plates at the bottom of the main
unit.
2) Place the main unit on the installation surface by
facing the bottom of the main unit toward the
installation surface, and mark the drilling spots
based on the alignment holes on the slide plates.
3) Drill the marked spots with a screw driver.
4) Insert the anchor blocks to the drilled holes, and
tighten them into the installation surface.
5) Place the main unit in the same way as in 2), and
insert the tapping screws to be passed through the
alignment holes on the main unit.
6) Tighten the screws into the anchor blocks to
fix the main unit to the installation surface.

HD Series RC8102HD Installation Guide
11-2014-A www.rivatch.de 14
4.3. Cable Connection
DI/DO terminal connector
1) Connect external input/output devices (e.g. alarm device) optionally if they are necessary.
Refer to the reference below for the appropriate connections.
DO (Alarm) – For connecting an external device such as relays and LEDs.
Do the electrical wiring correctly referring to the following information.
DO
Function
Specifications
C
Ground
1
Output
0 to 24 VDC
Max load: 50mA
Then, the connected device can be activated via its webpage.
Go to 5. CONFIGURATION for more details for its setting.
DO
COM
Relay Type
Device
Internal
C
1
C
1
DO
DI
DO
DO
1)
2)
3)
4)

HD Series RC8102HD Installation Guide
11-2014-A www.rivatch.de 15
DI (Sensor) – For connecting a device such as a PIR and a door/window sensor.
Do the electrical wiring correctly referring to the following information.
DI
Function
Specifications
C
Ground
1
Input
0 to 5 VDC
Max load: 50mA
Then, the connected device can be activated via its webpage.
Go to 5. CONFIGURATION for more details for its setting.
Camera connector
2) Connect the camera unit to the main unit by inserting the camera’s DIN connector to the
camera’s connector on the main unit by placing the arrow mark on the camera’s DIN
connector upward like the image below.
Note
i
Please make sure that the camera unit needs to be connected to the main unit
prior to the power connection. Otherwise, the camera may fail to show image.
+3.3V
DI
COM
DI
COM
+
-
Relay Type
Voltage Type
+
-
Output of
Sensor
Output of
Sensor
Internal
Internal
+
-

HD Series RC8102HD Installation Guide
11-2014-A www.rivatch.de 16
LAN connector
3) Connect the main unit to the network using an Ethernet cable (RJ45). Then, install the ferrite
core on the Ethernet cable. Refer to the explanations below for the ferrite core installation.
In case you intend to power the device using the LAN cable, a PoE switch should be available
in your network. Refer to Appendix (B): Power over Ethernet for more details.
Use of the ferrite core
Installation of the provided ferrite core is highly recommended to reduce high frequency
electrical noise level. Here below are the instructions to install the ferrite core on the Ethernet
cable.
Power connector
4) Connect a DC12V power adaptor to the power connector on the main unit.
If the camera is powered via PoE, a power adaptor is not necessary to be connected to the
main unit.
Note
i
Please make sure that the camera unit needs to be connected to the main unit
prior to the power connection. Otherwise, the camera may fail to show image.
1) Open the ferrite core by lifting the clip.
2) Make one loop with the cable through the ferrite core. (See the enlarged image above.)
3) Close the ferrite core to hold the cable loop in the ferrite core’s chamber.

HD Series RC8102HD Installation Guide
11-2014-A www.rivatch.de 17
5. CONFIGURATION
5.1. Set up network environment
The default IP address of the device is 192.168.XXX.XXX. Users can identify the IP address of the
device from converting the MAC address’s hexadecimal numbers, which is attached to the
device. Be sure that the device and PC are on a same area network before running the
installation.
IP address : 192.168.xxx.xxx
Subnet mask: 255.255.0.0
5.1.1. Generic IP Environment
In case of generic private network environment where IP address 192.168.XXX.XXX are used,
users may view the live streaming images on a web page using the device’s default IP address:
1. Convert the device’s MAC address to the IP address. Refer to the Hexadecimal-Decimal
Conversion Chart at the end of the manual.
(The MAC address of the device is attached on the side or bottom of the device.)
2. Start the Microsoft® Internet Explorer web browser and enter the address of the device.
3. Web streaming and device configurations are supported through ActiveX program. When the
ActiveX installation window appears, authorize and install the ActiveX.
MAC address = 00-13-23-01-14-B1 → IP address = 192.168.20.177
Convert the last two sets of hexadecimal numbers to decimal numbers.

HD Series RC8102HD Installation Guide
11-2014-A www.rivatch.de 18
5.1.2. Custom IP Environment
IPAdminTool and the manual can download from www.rivatech.de homepage.
IPAdminTool is a management tool, which automatically scans all of the network products for
users to perform administrative tasks, which includes network configurations, firmware update,
device reboot, and device organizations.
To modify the device’s default IP address for customized network area;
1. Find the device from the IPAdminTool’s list and highlight the device’s name.
2. Right-click the mouse and select IP Address; IP Setup window appears.
3. In the IP Setup’s window, information under Local Network information displays the
user/PC’s network area information. Those information need to be incorporated to the IP
Address, Subnet Mask, Gateway, and DNS boxes, except the last 2 sets of IP Address, which
are to be the unique numbers for the device. Refer to the image above for the setting
4. Click Setup to complete the modification.
PC environment Info
Give new unique IP
address in last two sets

HD Series RC8102HD Installation Guide
11-2014-A www.rivatch.de 19
5.2. View video on web page
Type the proper IP address to view the live streaming images through a web browser.
The default username and password is root / pass.
5.2.1. ActiveX Installation
1. When the browser asks to install the AxUMF software, click Install to proceed.
2. When Setup installation pop-up window appears, click Install to proceed with rest of
installations.
Note
i
Depending on system OS and Internet Explorer version, installation experience
may differ from one another. Figures described above are from Windows 7,
Internet Explorer 9 environment.

HD Series RC8102HD Installation Guide
11-2014-A www.rivatch.de 20
Caution
!
5.2.2. View Video using IPAdmin Tool
IPAdminTool automatically searches all activated network encoders and IP cameras and shows
the product name, IP address, MAC address and etc.
1. From the IPAdminTool’s product list, select the device by highlighting it.
2. Right-click the mouse and select Web view.
3. The system’s default web browser opens the device’s address.
Whether directly accessing the streaming video through typing IP address on a
web page or taking steps through IPAdminTool, the ActiveX is needed to be
installed for the Microsoft® Internet Explorer to have the complete
configuration privileges.
More Information
To learn more about using other features of your devices, refer to the manuals as “RIVA Web
Interface Manual Full HD Series” or “VCAsys User Manual (Online Help)”, which is available on
www.rivatech.de homepage.
/