Page is loading ...

219736 Page 1 of 32 10/27/08
FOODWARMERS
INSTALLATION
&
OPERATIONS
MANUAL
Duke Manufacturing Co.
2305 N. Broadway St. Louis, MO 63201
800.735.3853 314.231.1130 314.231.5074 fax
www.dukemfg.com

219736 Page 2 of 32 10/27/08

219736 Page 3 of 32 10/27/08
TABLE OF CONTENTS
Page
Receiving and Inspection of Equipment
Concealed Damage 4
Filing a Claim 4
Warning 4
General Troubleshooting . 4
Safety Precautions
Gas Foodwarmers 5
Electric Foodwarmers 5
General Information
Operation Instructions 5
Cleaning Instructions 5
Assembly Instructions for Aerohot Foodwarmers 6
Foodwarmer “Quick Base” Pictorial 7
Foodwarmer “Carving Board” Pictorial 8
Installation Instructions
Aerohot Foodwarmers and Heritage Buffet Hot Food Units 9
Operating
Aerohot Foodservice and Thurmaduke Foodwarmer 10
Installation of the Aerohot Sealed Wells Hot Food Units 11
Maintenance of the Aerohot Foodservice and Thurmaduke Foodwarmers
Cleaning 12
Trouble Shooting Guide 12
Wiring Diagram for Aerohot Sealed Well Units 13
Parts Diagram and List for Wells 14
Gas Water Bath Hot Food Units
Clearances 15
Gas Connections 15
Preheat Instructions 16
Lighting Instructions 16
Pilot Light Adjustment 16
Main Burner Adjustment 16
"ADI, "ASI" Installation Instructions 17
BM80 - Bottom Mount Hot Food Wells. 18
Gas Food Warmers (G, S-SR, T & TD, ASI, B-SR, CC-SR & 300 Series) – General Information 19
Operating Instructions – Gas Food Warmers 20 20
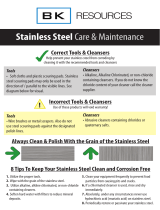
Stainless Steel Equipment Care and Cleaning 21
Cleaning Procedures for Polyethylene or ABS Rubber Composition Table Tops or Cutting Boards 24
Electric Parts List 25
Aerohot Foodservice Electric Parts Diagram 27
Heritage Buffet Unit Electric Parts Diagram 28
Thurmaduke Foodwarmer Electric Parts Diagram 29
Gas Parts List 30
Aerohot Foodservice Gas Parts Diagram 31
Thurmaduke Foodwarmer Gas Parts Diagram 32

219736 Page 4 of 32 10/27/08
RECEIVING AND INSPECTION OF THE EQUIPMENT
Even though most equipment is shipped boxed or crated, care should be taken during unloading so the
equipment is not damaged while being moved into the building.
Carefully check for any visible signs of damage to the cartons or containers. If evidence of damage exists, the
package should be opened immediately and a joint inventory and examination of the contents should be made
by you and the driver.
C
ONCEALED
D
AMAGE
If a concealed loss or damage is discovered after you have given the carrier a clear delivery receipt, notify the
carrier in writing immediately or within ten (10) days from the delivery date. If you phone the carrier, you must
follow up the call in writing to protect your rights. You can only improve your position as a claimant by
promptly reporting such loss or damage. You should also retain all cartons or containers, including packing
material, until an inspection has been made or waived.
F
ILING A
C
LAIM
Notation of loss or damage does not constitute the filing of a claim. You should file your claim in writing with
the carrier immediately!
Carriers will furnish the necessary form upon request. You should also request an inspection. If a claim is filed
by phone, always follow up immediately in writing.
WARNING
Installation of this equipment should be done only by persons qualified or licensed to install electrical
equipment.
Adjustments and service work should be performed only by a qualified service technician. Service is available
through Duke Authorized Parts & Service Distributors throughout the United States. For a complete listing of
these, consult your distributor listing or write to Duke for the name of the nearest distributor.
This equipment is intended for commercial use only. Not for household use.
Fluorescent Lamps contain Mercury. Dispose of in Accordance to Local Regulations.
GENERAL TROUBLESHOOTING
Always ask and check:
1. Is the unit connected to a live power source?
2. Check circuit breaker.
3. Is power switch on and pilot light glowing?
4. Check rating label. Are you operating the unit on the proper voltage?

219736 Page 5 of 32 10/27/08
GAS FOODWARMERS
FOR YOUR SAFETY
Do not store or use gasoline or other flammable vapors and liquids in the
vicinity of this or any other appliance.
WARNING
Improper installation, adjustment, alteration, service or maintenance can
cause property damage, injury or death. Read the installation, operating
and maintenance instructions thoroughly before installing this equipment.
NOTICE
Due to the availability of parts, this foodwarmer may not have the ability
to adjust the gas valve as described in the operations manual. All valves
are factory pre-set to provide proper flame height with the type of gas
listed on the nameplate.
ELECTRIC FOODWARMERS
CAUTION
To protect from possible severe electrical shock, this appliance is designed
to be connected to a properly grounded electrical circuit.
For a cord connected appliance: In order to provide proper grounding, it is
essential that the grounding prong of the plug be inserted into a properly
grounded receptacle. If you do not know whether a receptacle is properly
grounded, consult a licensed electrician.
N
EVER
insert the plug into a receptacle if the cord is frayed or damaged
or if the plug has been altered or damaged.
GENERAL INFORMATION
1. Always clean equipment thoroughly before first use. (See general cleaning instructions.)
2. Check rating label for your model designation & electrical rating.
3. For best results, use stainless steel countertops.
GENERAL OPERATION INSTRUCTIONS
1. All foodservice equipment should be operated by trained personnel.
2. Do not allow your customers to come in contact with any surface labeled "CAUTION HOT".
3. Where applicable: Never pour cold water into dry heated units.
4. Where applicable: Do not cook, warm or hold food directly in liner pans (well pans). Always use
steam table pans/insets, etc.
5. Never hold food below 150°F.
GENERAL CLEANING INSTRUCTIONS
1. NEVER clean any electrical unit by immersing it in water. Turn unit off before surface cleaning.
2. Always clean equipment thoroughly before first use. Clean unit daily, except where noted on
charts: Use warm, soapy water. Mild cleansers and PLASTIC scouring pads may be used to
remove baked-on food and water scale.
3. Turn off electrical units before cleaning or servicin
g.

219736 Page 6 of 32 10/27/08
ASSEMBLY INSTRUCTIONS FOR AEROHOT FOODWARMER UNITS
1. Place telescoping carton with printed side up and remove top. Remove foodwarmer from carton, and
miscellaneous parts, etc., from heating compartments.
2. Flatten carton top and place it on floor. Place foodwarmer on the carton with top down.
3a. Attach four (4) leg angles to the body by sliding the ends of the leg angles inside the body corners between
body and leg plate bracket. Each leg angle is fastened with four bolts already installed, but loose.
b. Attach the undershelf to the other end of the leg angles. Use one bolt to line up and support the undershelf to
the leg angles.
c. Starting at one leg angle, remove the bolt and line up with leg or caster bracket to the holes on the undershelf
and leg angle. Fasten each with two bolts.
d. Repeat step "C" until all legs or casters are fastened in place.
e. At this point, the unit may be set upright. If the unit has leg brackets it should be leveled by turning the
adjustable feet as needed.
f. The cutting board brackets should be attached with the screws already in place.
g. If a pusher bar has been provided, it should be attached with the screws already in place.
h. Push all knobs onto control stems.
AEROHOT & THURMADUKE
BE SURE ALL FASTENERS ARE TIGHTENED AS SECURELY AS POSSIBLE.
Your foodwarmer is now ready to be installed. Please read following Installation Instructions.
IMPORTANT
UNIT IS SHIPPED UNASSEMBLED. TO MEET NATIONAL SANITATION
FOUNDATION STANDARDS, THE INSTALLER MUST USE A NSF-
APPROVED SILICONE SEALANT TO SEAL THE SEAMS BETWEEN THE
UNIT AND ASSEMBLED PARTS
[
S
EE
F
OODWARMER
Q
UICK
B
ASE
P
ICTORIAL
ON
P
AGE
7
]
[
S
EE
C
ARVING
B
OARD
P
ICTORIAL
ON PAGE
8
]
S
CREWS SHIPPED
INSTALLED

219736 Page 7 of 32 10/27/08
F
OOD
W
ARMER
Q
UICK
B
ASE
1. Mount leg gussets to bottom shelf leaving
screws loose.
2. Leg angle screws will be shipped in-
stalled in the body unit but left loose
for easy leg angle insertion. Insert
leg between unit and bracket.
3. Slide bottom shelf over leg angle so
that loose screws seat into leg angle
slots. Tighten all screws.
4. Unit is ready to be turned right side
up.
S
CREWS FOR MOUNTING LEG
GUSSETS
L
EG
A
NGLE
SLOTS
L
EG
A
NGLE
S
CREWS
L
EG
A
NGLE
SLOTS

219736 Page 8 of 32 10/27/08
INSTALLATION OF CARVING BOARD
1. Remove bottom carving board bolts & top
center screw.
2. Slide carving board bracket over top bolt
( flat side of bracket to outside edge of
warmer.)
3. Replace bottom carving board bolt and
tighten. Repeat step 2 & 3 on opposite
end of warmer.
4. Remove top bolts from Foodwarmer
brackets. Place carving board into
bracket slots.
5. Replace top bolts through brackets and
carving board and into foodwarmer.
Tighten.
6. Insert position pen into corners of carving
board and hole of bracket. Secure with nut
7. Place polyboard over position pens.
8. Replace center screw through carving
board into warmer. Tighten.

219736 Page 9 of 32 10/27/08
INSTALLATION INSTRUCTIONS FOR
ELECTRIC AEROHOT FOODWARMERS &
HERITAGE BUFFET HOT FOOD UNITS
GENERAL
This foodwarmer is designed for installation as an independent heavy-duty appliance.
For Heritage Buffet Units: Do not use alcohol or mineral spirits, or products with a high concentration
of these solvents, to clean the body panels.
INSTALLATION
Operating temperatures permit safe installation of this foodwarmer within 1" of a combustible wall or
partition.
Unit should be set adjusted to desired height, or to align with other equipment before it is per-
manently connected to electrical supply. For leveling the foodwarmer on an uneven floor or to
eliminate rocking, turn the feet of the legs in the proper direction until the desired results are obtained.
ELECTRICAL CONNECTIONS
The voltage and wattage ratings of this foodwarmer are given on the device nameplate. Connect the
foodwarmer to a circuit having a voltage and type of current (AC or DC) similar to that stamped on
the device nameplate. For movable equipment a proper cord and cap are included for connection to
the matching power supply outlet.
For permanent installations, connections to supply line may be made through conduit or armored
cable. For supply connections use No. 12 AWG or larger wires suitable for at least 90°C (194°F). Use
copper wire for power supply or suitable copper to aluminum wire connector.
Supply connections are made through a knockout in the junction box. The device leads extend into
the junction box for making easy connections. After making and taping connections, push excess wire
back into junction box and replace cover.
The body of the appliance should be grounded by connecting the ground wire provided in the junction
box to a good electrical ground, such as a water pipe, a steam pipe, or a grounded supply conduit.
The foodwarmer is not fused and consequently must be connected to a fused circuit equipped with
suitable disconnect means, as required by local code authorities.

219736 Page 10 of 32 10/27/08
OPERATING THE AEROHOT OR THURMADUKE
PREHEAT - To preheat individual sections, turn the switch dial to high for 10 - 20 minutes before the
foods are placed in the compartments. Insure that pan openings are covered to prevent loss of heat.
ECONOMY OF OPERATION
WATER IS NOT NECESSARY IN THE AEROHOT FOODWARMER.
IF WATER IS USED, SPILLAGE PANS ARE REQUIRED.
Air. being easier and quicker to heat than water, makes the waterless foodwarmer faster and more
economical to operate than a table using water.
Foods can be kept moist by keeping them at the correct temperature. Foods dry out only when excessive
temperatures are reached, so when foods tend to dry out, REDUCE HEAT.
If only part of the foodwarmer is needed, the compartment not in use need not be heated. Insulation between
the compartments divide the unit into a series of smaller independent foodwarmers.
CARE AND CLEANING
Care should be used to prevent spilling when placing full food containers into the pan openings. Spilled
foods that are not removed will dry out and eventually burn, causing odors. The inside of the heating
compartments should be wiped out daily and thoroughly cleaned at least once each week.
SWITCH SETTINGS
The most satisfactory switch settings must be determined by experience based on the nature of the
foodservice and the type of operation as well as individual preference of the restaurant operator. The proper
switch setting necessary to keep foods at the desired temperature will vary dependent upon the frequency of
turnover, size of food containers, amount of food in each container, room temperature, location of
foodwarmer with respect to range or other heated equipment, air outlets, fans, doors and passageways
.
SWITCH DIAL
SETTINGS
Covers
ON
Covers
OFF
RECOMMENDED
TEMPERATURES
(in degrees)
FOODS OR TYPES OF FOODS
Lo
2
140° - 150°F
Rolls - Thick Soups
Creamed Foods - Mashed Potatoes
2-3
4-5
150° - 170°F
Roasts* - Short Ribs - Sliced Meats
Baked Ham* - Fish - Vegetables - Cutlets
Stews - Baked Beans - Croquettes
Fried Liver – Fried Potatoes
Fried Chicken Medium Gravies
3-4
4-6
170° - 200°F
Baked Potatoes - Barbecued Ribs
Dressing - Thin Gravies and Soups
* A low perforated rack is recommended to keep roasts and hams off the bottom of the pan. When a rack is used, keep
1" - 2" of thin gravy in the bottom of the pan.

219736 Page 11 of 32
10/27/08
INSTALLATION OF AEROHOT SEALED WELL UNITS
Check unit’s electrical rating tag to insure that electrical service is of the proper voltage and
adequately sized for this equipment.
LOCATION
Do not install the hot food unit near any combustible objects or surfaces affected by heat or moisture.
LEVELING
This unit must be level, both front and back and left to right, in order to maintain an equal water depth
throughout the wells.
UNITS WITH DRAINS
A 1/2" female pipe thread drain is supplied on all models. The installer must provide a suitable drain connection
and shut-off valve. CAUTION: Over tightening or failure to use proper tools may result in damage to the weld
where the drainpipe is connected to the well. This equipment is to be installed to comply with
applicable Federal, State or Local Plumbing Code.
ELECTRICAL CONNECTION
Connections must be made in accordance with all applicable local codes and/or the National Elec-
trical Code. Refer to the wiring diagrams on the following pages.
OPERATION
Before the unit is used for the first time, turn the temperature knob to "10" and heat the well for 20-30
minutes. Do not be alarmed if smoke appears; this preheat should burn off any residue or dust on the
heating element.
WARNING: Steam can cause serious burns. Always wear some type of protective covering
on your hands and arms when removing lids or pans from the unit. Lift the lid or pan in a
way that will direct escaping steam away from your face and body.
Never place food directly into the well. Always use pans.
Wet operation is recommended.
Always place covers on pans when not serving to prevent food from drying out and to reduce your
operating costs.
For most efficient operation, keep empty, covered insets in each well during preheating and when the well
is not in use.
W
ET
O
PERATION
1. Fill food well with two (2) quarts of water. For quicker pre-heating, use hot water to till the well.
2. Turn the control to "HIGH" and pre-heat the warmer for 30 minutes.
3. After pre-heating, set the control to your desired serving temperature.
4. Never pour water into a well that has been heated dry. This may cause well to crack and leak.
Always fill well before preheating or before water level is below 1/2".
D
RY
O
PERATION
1. Pre-heat the well on "HIGH" for approximately 15 minutes.
2. After pre-heating, set the control to your desired serving temperature.

219736 Page 12 of 32
10/27/08
MAINTENANCE OF AEROHOT AND THURMADUKE
HOT FOOD UNITS
DAILY CLEANING
1. Turn the control knob to the OFF position and allow unit to cool before cleaning.
2. Drain or remove water from the well.
CAUTION:
Do not allow water to splash or run on to the controls or wiring.
3. Use a soft cloth or sponge with a mild detergent to clean the entire warmer assembly. Rinse comp-
letely with warm water and then dry.
4. A plastic scouring pad and a mild detergent may be used to remove hardened food.
NOTICE: Do not use steel wool.
WEEKLY CLEANING
1. Scale deposits due to the mineral content of the water may be removed using a plastic scouring pad
and a de-scaling agent approved for use on stainless steel. It is important to keep these deposits
from building up as they may cause corrosion of the stainless steel well.
2. After de-scaling, the well assembly should be rinsed thoroughly with a solution of vinegar and
water to neutralize all cleaner residue.
3. Wipe the well assembly dry and leave uncovered.
WARNING
Do not use any highly caustic cleaners, acids or ammonia. These may cause corrosion and/or damage to
the stainless steel well. Do not allow water to stand in the well for long periods of time. Water must be
removed from the well and the well cleaned after each use.
TROUBLE SHOOTING GUIDE
1. Problem: Pilot light off and unit does not heat:
a. Has unit been connected to a proper electrical source of the proper voltage?
b. Is electric turned on at the main? Check the circuit breaker or fuse.
c. Are the master switch and/or control knobs set to the "ON" position?
2. Problem: Unit does not maintain proper food temperature.
a. Are the controls set to the proper setting?
b. If used with water, was hot water used to fill well? If not, allow extra pre-heat time.
c. Has unit been pre-heated for 30-45 minutes?
d. Were pans of food placed into unit at or above desired temperature?
e. Has the food been kept covered?
f. Are there air conditioning ducts, take-up air ducts or fans located near or over unit, causing
cool drafts?
g. Has unit been connected to a proper electrical source of the proper voltage? If so, is there a
"low" voltage condition?

219736 Page 13 of 32 10/27/08
WIRING DIAGRAM FOR SEALED WELL AEROHOT FOOD SERVICE
HOT FOOD UNIT

219736 Page 14 of 32 10/27/08
PARTS
# Part# Part Name
1 154047 Food well, with drain
2 215550 Pilot, 120V
3 215555 Pilot, 240V
4 212081 Thermostat
5 212190 T-Stat Knob
INFINITE SWITCHES
6A
155580* 120v
6B 155578 208V
6C 155579 240V
7 212164 Infinite Switch knob
8 153471 Hi-Limit thermostat
9 154458 Nut w/star washer
10 230162 Element pan
ELEMENTS
12 154352 120, 750 WATT
13 154046 120V, 1200 WATT
14 154353 208V, 750 WATT
15 154355 240V, 750 WATT
16 154354 240V, 1200 WATT
17 154048 Strainer
*
-
A
LTERNATE
P
ART
#’
S
212074 - 5580 -2
212076 – 5578-2
212075 – 5579-2
212081 – 2081-2

219736 Page 15 of 32
10/27/08
GAS WATER BATH HOT FOOD TABLE
FOR YOUR SAFETY
Do not store or use gasoline or other flammable vapors and liquids in the vicinity
of this or any other appliances.
WARNING
Improper installation, adjustment, alternation, service or maintenance can cause
property damage, injury or death. Read these instructions thoroughly before in-
stalling or servicing this equipment.
IMPORTANT
BEFORE PLACING THIS APPLIANCE INTO OPERATION CONTACT YOUR
LOCAL GAS SUPPLIER AS TO WHAT INSTRUCTIONS ARE TO BE FOLLOW-
ED IF YOU SMELL GAS. THE INSTRUCTIONS OBTAINED SHOULD THEN
BE POSTED IN A PROMINENT LOCATION.
CLEARANCE INSTRUCTIONS:
A
PPLIANCES TO BE INSTALLED ON COMBUSTIBLE FLOORS AND
/
OR ADJACENT TO COMBUSTIBLE
WALLS OR PARTITIONS
:
ALLOW MINIMUM 2" CLEARANCE FROM COMBUSTIBLE AND NON-COMBUSTIBLE
WALLS OR PARTITIONS FROM REAR AND BOTH ENDS OF UNIT.
The appliance area must be free and clear of all combustible items.
The unit must he leveled before placing into operation. To level the unit on an uneven floor, adjustable
feet have been provided.
The appliance and its individual shut off valve must be disconnected from the gas supply piping system
during any pressure testing of that system at test pressures in excess of 1/2 pound per square inch gauge.
The appliance must be isolated from the gas supply system by closing its individual manual shut-off valve
during any pressure testing of the gas supply system at test pressures equal to or less than 1/2 pound per
square inch gauge.
GAS CONNECTION:
INSTALLATION PERSONNEL: Check all connections and fittings on valves and tubing supplied as a
pan of this unit to make sure they did not come loose during shipment. A manual shut-off valve should be
provided between the gas supply system and the gas inlet on the appliance. A pressure regulator has been
provided with this unit and must be installed to ensure proper operation. All piping should be clean and
free of burrs and metal chips. All pipe connections should be made using a joint compound resistant to the
action of LP gasses. A drip tee must be used to collect any moisture or particles. After completing the
installation of the unit all connections must be checked for leaks. Use a commercial brand leak detector or
a solution of liquid detergent and water to check for leaks. DO NOT USE AN OPEN FLAME TO
CHECK FOR LEAKS.
When installing this unit, all local codes must be followed. In the absence of local codes, the installation
must conform to the latest edition of ANSI Z223.1 - booklet titled, "THE NATIONAL FUEL GAS
CODE". This publication is available from the American Gas Association, 1515 Wilson Blvd., Arlington,
VA 22209.

219736 Page 16 of 32 10/27/08
Provisions for adequate air supply must be taken into account when installing the unit. Care should be
taken so as not to obstruct the area around the burner or pilot. DO NOT close off the space between the
undershelf and lower edge of the body. A minimum of 4" air space must be maintained between items
stored on the undershelf and the burner. Combustible items should NOT be stored on the undershelf. Do
not block off the louvered air vents on the rear and ends of the unit as this will affect the operation of the
burner and could cause it to go out due to lack of oxygen.
See schematic drawing of the burner and manifold assembly for the location of the various components.
PREHEAT INSTRUCTIONS
Fill water compartment with minimum 2" of HOT water.
NOTE: Water is necessary to operate this unit. Failure to use water or allowing the compartment to dry
will damage the unit and void the warranty.
Turn the burner control knob to the "HIGH" position for 15-30 minutes with the pan openings covered
before pans containing hot food are placed in the unit. This will retain heat in the unit and be more effi-
cient. Adjust burner control knob to maintain foods at desired temperatures.
LIGHTING INSTRUCTIONS
To light pilot, push in red reset button on bottom of safety pilot valve body and light pilot. Hold reset but-
ton in for approximately 30 seconds, then release. If the pilot flame goes out, repeat the above procedure
until the pilot stays on. When the pilot flame stays burning, a valve disc will open, permitting gas to flow
to the burner. To activate the main burner, turn the burner control valve to HIGH position, then MEDIUM
or LOW as desired. Be certain to check for proper burning.
NOTE: If pilot or burner goes out, turn off all gas and wait five (5) full minutes before attempting
to relight.
The pilot light and main burners were preset and tested at the factory. However, due to vibrations, etc., in
shipping and handling, they should be rechecked upon installation of the unit and readjusted as required.
PILOT LIGHT ADJUSTMENT
To adjust the pilot, first remove the cap screw from the safety pilot valve body located on the underside
near the pilot inlet. The adjustment screw is inside. Insert a small screwdriver into the slot and turn to
adjust the height of the pilot flame. The pilot flame should be high enough to prevent it from blowing out
due to drafts or ventilating fan air movement. Excessive height of the pilot flame is simply wasting
energy.
NOTE: Due to the pilot light burning at all times, it is important to be certain to put a small
amount of water (approximately 1/4" deep) into the pan after cleaning. Under no
circumstances should the water pan be dry. This will cause discoloration of the stainless
steel and possible damage to the unit as well as voiding the warranty.
MAIN BURNER ADJUSTMENT
With burner on, turn control knob to LOW position, then remove knob from stem. Insert small
screwdriver into hollow stem or burner control valve and engage screw slot. Turn screw clockwise to
increase height. Ensure that valve stem does not turn while adjusting. At this time also adjust the air
shutter at the end of the burner for proper air-gas mixture. Observe the flame and open or close the air
shutter until only tiny yellow tips appear on the flame.
CAUTION: Do not operate main burner without water in the pan. This will cause damage to the
unit and void the warranty.

219736 Page 17 of 32
10/27/08
"ADI "ASI UNITS
INSTALLATION INSTRUCTIONS
WHEN MOUNTING FROM BELOW THE COUNTER TOP:
The top surface of the unit should have applied to it a generous bead of a silicone rubber sealant such
as Dow Corning "RTV" or G.E. Silicone sealant. After clamping the unit up against the counter top,
wipe from the joint any excess sealant, which squeezes out. The unit mounted in this manner should
be supported from below by an appropriate metal structure or hung from the underside of the top by
mounting angles of at least 18-gauge steel.
WHEN MOUNTING BY THE OVERHANGING TOP RIM (in a cut-out in the counter top):
The underside of the overhanging top rim should have applied to it a generous bead of silicone before
the unit is set into the cutout in the counter top. In order to relieve part of the load from the top rim,
the unit should be supported from below with metal components in a manner compatible with the
construction of the counter. Any excess sealant, which squeezes out between the unit top rim and
counter top, should be wiped off before the sealant cures or stripped away with a sharp knife after
curing.
If the above instructions are followed, application 1 does not require any additional support. However,
caution must be used to insure that the top cutout is the proper size as listed below:
1 -section 17"L x 23"W (front to back)
2 -section 31"L x 23"W (front to back)
3 -section 45"L x 23"W (front to back)
4 -section 59"L x 23"W (front to back)
5 -section 73"L x 23"W (front to back)
6 -section 87"L x 23"W (front to back)
Be sure the unit is centered in the opening in the counter top. If support from below is used for application
2, or because the cutout is cut too large, caution must be used to avoid supporting the unit against any of
the gas or electric components.
The gas units MUST have 35 square inches of air space per burner for proper ventilation. The gas unit is
manufactured with permanently attached spacer legs, which provide the required area. It is mandatory that
the area directly below the operator’s controls, between these legs, remains open at all times. The
remaining three (3) sides of the unit may be enclosed by the cabinet housing the unit.

219736 Page 18 of 32 10/27/08
MODELS BM80 BOTTOM MOUNT HOT FOOD WELLS
THERMOSTAT AND LAMP CUT-OUT
Units are available with square corners or with 1” radiused corners for die-stamped cutouts.
GENERAL SPECIFICATIONS (ALL 80 Series)
O
UTSIDE
D
IMENSIONS
I
NSIDE
D
IMENSIONS
C
UTOUT
F
LANGE
R
ECOM
F
LANGE
T
URNDOWN
S
TANDARD
C
ONTROL
L
OCATION
C
ONTROL
C
UTOUT
13-13/16” X 21-3/4” X 8-3/16” 12-3/16” X 20-1/8” X 6-1/4”
11-7/8” X 19-
7/8”
13/16”
¾”
36” Capillary
26” Effective Length
Use
Increase/Decrease
Plate for Hole Pattern
OPTION SPECIFICATIONS
R
OUND
C
ORNERS
S
QUARE
C
ORNERS
D
RAIN
L
OCATION
D
RAIN
C
OUPLING
T
HERMOSTAT
R
ECESSED
B
EZEL
*
E
LECTRICAL
C
ODE
K
IT
S
HIP
W
T
1” Radiused. Standard on stock
#’s 55486, 55485, 55354,
55360, 56299
¾” DOWN. Standard on stock #’s
55352, 55355m, 55358,
55361, 56288.
Standard stock #’s with drains:
55353, 55356, 55359,
55362,56297
1-
11/16
” x 1-
11/16
”
From back right
corner
1/2NP
NPT
Stainless
1-1/2” long
W/72” Capillary
effective length
62”. Add “S” to
Stock #
See
Above,
Stock
#56370
Ship Wt. 2
lbs.
Add “E” to
applicable
Stock No.
19 lbs.
WIRING SPECIFICATIONS
ELECTRICAL SPECS PER UNIT
H
EATING
W
ELLS
B
OTTOM
H
OUSING
S
TOCK
V
OLTS
W
ATTS
1PH/A
MPS
1 piece, die stamped. 304
stainless, 20 gauge
BOTTOM HOUSING:
Fully insulated, galvanized steel, insulated on
bottom of inspection housing.
55486 55351
55352 55353
120V
750W
6.25
THERMOSTATS:
Equipped with an all-position, using point
system and permanently dual, 250V, 25AMP,
double pole.
55485 55354
55355 55356
120V
1200W
10
55481 55357
55358 55359
208V
240V
1200W
1600W
5.77
6.67
55480 55360
55361 55362
208V
240V
277V
900W
1200W
1600W
4.33
5.0
5.9
HEATING ELEMENTS:
1600W tubular heating element
1200W tubular heating element
900W tubular heating element
750W tubular heating element
Tubular heating elements.
Silicone fluid (or equivalent)
sealed heating elements.
Screw terminal connectors.
Manufactured in accordance
with UL standards.
THERMOSTAT:
Thermostat is 2 pole and breaks both lines at
“OFF” position. Units are pre-wired to
Thermostat. Make line connections, as
shown. All wiring should be done in
accordance with local codes. Use minimum
14SWC copper wire rated at least 908
Optional recessed bezel equipped with 1”
conduit knockouts.
56300 56299
56298 56297
120V 1600W 13.3
A
NY UNIT SHIPPED PRIOR TO
M
ARCH
1,
2003
WILL NEED THE OLD STYLE PAN
.
(PN
154043)
INSTALLATION
1. Follow general installation instructions.
2. Install in an all stainless steel counter top.
3. Turn down edges of counter top into well pan. Use 1” radius-
ed corners or square corners depending on the bottom mount
well you selected.
4. Apply ¼” bead of silicone sealant to top flange of unit and
position unit underneath counter.
5. Secure unit to counter with stainless steel fasteners.
6. Mount control as indicated and connect power. Again, check
rating label for correct voltage.
½” DIA
5/32” DIA
3/8” DIA
1 ½”
7/8”
7/8”

219736 Page 19 of 32 10/27/08
THURMADUKE (G, S-SR- T & TD Series) &
AEROHOT (ASI, B-SR, CC-SR & 300 Series)
G
AS
F
OOD
W
ARMERS
INSTALLATION
The Thurmaduke (G, S-SR, T & TD Series) and Aerohot (ASI, B-SR, CC-SR & 300 Series) must be installed
with a minimum horizontal clearance of 1" from combustible and non-combustible construction, but may be
installed against a wall or partition in fireproof locations. For Canada only, the Aerohot (ASI, B and CC
Series) units are to be installed in non-combustible locations only.
Units should be adjusted to desired height, or to align with other equipment. Insure that unit is level. For
leveling on an uneven floor or to eliminate rocking, turn the feet of the legs in the proper direction until the
unit is the desired height and is level and all feet are in contact with the floor.
A pressure regulator is provided and must be installed in the gas line, adjacent to the Thurmaduke or Aerohot
series. The regulator for use with natural gas is set with a manifold pressure of 3.7 in W.C.P. The regulator for
use with propane gas is set with a manifold pressure of 10 in. W.C.P. A regulator is not required for CGA LP
gas units.
GAS CONNECTIONS
PLUMBER OR INSTALLER: Insure that all connections and fittings on valves, burners, and tubes are tight
and have not become loose in shipment. Connect gas pressure regulator, gas shut-off valve and ground joint
union in supply line for convenience in servicing unit. Pipe components and compounds used should be
resistant to the action of liquefied petroleum gases. Install a drip tee to collect dirt and moisture in the gas.
Regulator must be installed so as to be readily removable. A soap solution should be used for checking for gas
leaks in pipe connections. See "Operating Instructions" for proper flame height, etc.
GAS PARTS
This Thurmaduke and Aerohot Series is equipped with correct burners and gas pressure regulator for the type
gas shown on the AGA nameplate. Consult the AGA plate to insure that unit is equipped with the correct parts.
Each burner is rated at 3500 BTU per hour maximum input and needs no adjustment. The set orifice, fixed
secondary air entrainment, cap slots and pressure regulator will automatically provide for correct BTU input.
The gas pressure regulator supplied with this unit is to be connected in the supply line of the foodwarmer to
insure satisfactory operation (The warranty covering this unit does not apply if the pressure regulator is not
installed in the line or the pressure settings are changed.)

219736 Page 20 of 32 10/27/08
OPERATING INSTRUCTIONS
SECTIONAL – VALVE – BURNER - PILOT ASSEMBLY
VALVE ADJUSTMENT FOR APPROXIMATE FLAME HEIGHT
1. Turn valve knob to low or medium
position.
2. Remove valve knob.
3. Insert small screwdriver into hollow
stem of valve and engage screw slot.
4. Turn to right to decrease and left to
increase flame height. Insure that valve
stem does not turn also. Observe flame
while making adjustment.
* For replacement of these parts refer to the
coinciding number.
The most satisfactory flame heights must be determined by experience based on the nature of the food
service and the type of operation as well as the individual preference of the restaurant operator. The flame
size necessary to keep foods at the desired temperature will vary dependent upon the frequency of turn over,
size of food containers, amount of food in each container, room temperature, location of food warmer with
respect to range or other heated equipment, air outlets, fans doors and passageways.
SWITCH DIAL SETTINGS
Covers ON Covers OFF
RECOMMENDED
TEMPERATURES
(in degrees)
FOODS OR TYPES OF FOODS
Lo
2
140°- 150°F
Rolls - Thick Soups
Creamed Foods - Mashed Potatoes
2-3
4-5
150°- 170°F
Roasts* - Short Ribs - Sliced Meats
Baked Ham* - Fish - Vegetables – Cutlets
Stews - Baked Beans - Croquettes
Fried Liver - Fried Potatoes
Fried Chicken Medium Gravies
3-4
4-6
170° - 200°F
Baked Potatoes - Barbecued Ribs Dressing - Thin
Gravies and Soups
* A low perforated rack is recommended to keep roasts or hams off the bottom of the pan. When a rack is
used, keep 1" - 2" of thin gravy in the bottom of the pan.
3525-04-13*
3505
*
35
2
5
-
03
-
56
*
3503
*
3
5
32
-
33
*
35
27
-
02
*
3541- Natural*
3542 – Propane*
/