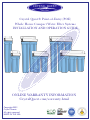
Crystal Quest Point-of-Entry Installation guide
- Category
- Sanitary ware
- Type
- Installation guide
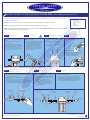
Crystal Quest Point-of-Entry, a whole house water filter system, delivers clean, fresh water to every tap in your home. Installed on your main water pipe, it removes impurities, giving you better-tasting, healthier water for drinking, cooking, and bathing. Its compact design fits neatly under sinks or in tight spaces. Enjoy cleaner, better-quality water throughout your home with Crystal Quest Point-of-Entry.
Crystal Quest Point-of-Entry, a whole house water filter system, delivers clean, fresh water to every tap in your home. Installed on your main water pipe, it removes impurities, giving you better-tasting, healthier water for drinking, cooking, and bathing. Its compact design fits neatly under sinks or in tight spaces. Enjoy cleaner, better-quality water throughout your home with Crystal Quest Point-of-Entry.


-
 1
1
-
 2
2
-
 3
3
-
 4
4
-
 5
5
-
 6
6
-
 7
7
-
 8
8


Crystal Quest Point-of-Entry Installation guide
- Category
- Sanitary ware
- Type
- Installation guide
Crystal Quest Point-of-Entry, a whole house water filter system, delivers clean, fresh water to every tap in your home. Installed on your main water pipe, it removes impurities, giving you better-tasting, healthier water for drinking, cooking, and bathing. Its compact design fits neatly under sinks or in tight spaces. Enjoy cleaner, better-quality water throughout your home with Crystal Quest Point-of-Entry.
Ask a question and I''ll find the answer in the document
Finding information in a document is now easier with AI
Related papers


Other documents
-
PREMIER 1 530024 User manual
-
 Cafe CQE28DM5NS5 Installation guide
-
Yes CVE28DM5NS5 Owner's manual
-
-
Tiger Corporation CQE-B User manual
-
Lifetime 90135 Assembly Instructions Manual
-
Lifetime 151110 Owner's manual
-
-
-
KIA AV230IXAN Owner's manual
