Page is loading ...

CQE-RC-04000 2-7/8” x 9-3/4” 5-Micron Carbon Block Filter Cartridge 12-18 months lifetime expectancy
CQE-RC-04001 2-7/8” x 9-3/4” 5-Micron Sediment Reusable Pleated Filter Cartridge 12-18 months lifetime expectancy
CQE-RC-04002 2-7/8" x 9-3/4" Multistage PLUS Filter Cartridge 18-36 months lifetime expectancy
CQE-RC-04005 2-7/8” x 9-3/4” Ceramic Filter Cartridge 2-3 years with proper cleaning
CQE-RC-04006 2-7/8" x 9-3/4" Fluoride Filter Cartridge 12-18 months lifetime expectancy
CQE-RC-04049 2-7/8" x 9-3/4" Fluoride/Multistage Filter Cartridge 6-12 months lifetime expectancy
CQE-RC-04007 2-7/8" x 9-3/4" Nitrate Filter Cartridge 12-18 months lifetime expectancy
CQE-RC-04050 2-7/8" x 9-3/4" Nitrate/Multistage Filter Cartridge 6-12 months lifetime expectancy
CQE-RC-04008 2-7/8" x 9-3/4" Arsenic Filter Cartridge 12-18 months lifetime epxectancy
CQE-RC-04051 2-7/8" x 9-3/4" Arsenic/Multistage Filter Cartridge 6-12 months lifetime expectancy
Installation and Maintenance Instructions
KEEP THIS MANUAL FOR FUTURE
REFERENCE AND UNIT MAINTENANCE
Online warranty registration
http://crystalquest.com/warranty.htm
Product design is subject to change without notice.
For further assistance contact your
Crystal Quest® dealer or visit us at www.crystalquest.com
To order replacement cartridges
CRYSTAL QUEST® warrants your CRYSTAL QUEST® Countertop Replaceable Water Filter System for one year
from the date of purchase against all defects in materials and workmanship when used in compliance with the
manual. This warranty does not include replacement cartridges unless defective upon receipt. CRYSTAL QUEST®
disclaims all implied warranties including, without limitation, warranties of merchantability and tness for a
particular purpose. If for any reason the product proves to be defective within one year from the date of purchase,
please call for assistance. This warranty gives you specic legal rights and you may have other legal rights which
vary from state to state. CRYSTAL QUEST® assumes no responsibility for incidental or consequential damages,
for damages arising out of misuse of the product, or the use of any unauthorized attachment. Some states do
not allow the exclusion or limitation of implied warranties or incidental or consequential damages, so the above
limitations or exclusions may not apply to you. Should service be required during or after the warranty period or
should you have any questions regarding how to use your CRYSTAL QUEST® Countertop Water Filter System,
contact our Technical Support Department at [email protected], Monday through Friday, 9 A.M. to 4:30
P.M. Eastern Time.
One-Year Limited Warranty
4
Please note all drawings, pictures, colors and sizes are approximate for illustrative
purposes only and may not exactly resemble the end product. All models are subject to
change without notice.
Installation and Operation Guide
Important!
• Crystal Quest® accepts no liability for property damage.
• Use this system on a potable (safe-to-drink) COLD water
supply only.
• Installation must comply with local, state, and federal
plumbing codes and health department rules and
regulations. These guidelines must be followed while
installing the system.
Copyright
©
2009 Crystal Quest
®
All Rights Reserved. Reprint 2014
Easy to use!
Easy to install!
Operating Specications
Pressure Range: 30–60 psi (2.1–4.2 bar)
Temperature Range: 40–90°F (4.4–32.2°C)
Rated Service Flow: 0.3–0.5 gpm
CRYSTAL QUEST®
Countertop Replaceable Water Filter Systems

A. Turn o faucet. Unscrew the top of the housing using sump wrench.
(Fig 1). Water may spill when housing is removed. Empty excess water
into sink. Set top of lter housing aside.
B. Pull out lter cartridge to remove from the base. Clean top and base of
lter housing with warm water, mild dish soap and a soft cloth. Do not
use harsh detergents, abrasive cleaners or wire brushes, as they may
damage the system.
C. Set base of lter on counter. Insert new lter cartridge according to the
directional arrow on the cartridge which indicates “This End Towards
Cap”. Seat securely into lter base (Fig 2) .
NOTE: Make sure both black O-rings are present on the lter housing. Also,
make sure to lubricate O-rings with cooking oil. (Do not use coconut oil.)
D. Screw top of lter housing onto base and tighten with sump wrench
until very snug.
E. Turn on water and the diverter handle. Flush the cartridge 3-4 times for 5
to 10 minutes to remove any media nes before using water.
NOTE:
Cartridges may be recycled. Visit www.crystalquest.com/crystal quest
policies.htm under Preventive Routine Mintenance instructions.)
Large clamp
Filter Cartridge Replacement
A. Leaks between base and housing
• Turn o faucet and unscrew base of housing.
• Check to make sure both O-rings are clean, lubricated (with cooking
oil) and undamaged. Replace if necessary.
• Use Teon tape around sump threading.
• Reinsert cartridge into base according to the directional arrow on the
cartridge which indicates “This End Towards Cap”
and screw on sump
using sump wrench. Be careful not to overtighten. If leak persists,
contact Technical Support at [email protected].
B. Diverter valve will not release
• Unscrew diverter valve from faucet.
• Soak in vinegar up to one hour to remove scale build-up and rinse.
C. Decreased ow or return of bad taste/odor
• Replace lter cartridge.
TroubleshootingTroubleshooting
Fig 2
Fig 1
POLYPROPYLENE
POLYPROPYLENE
TURN CLOCKWISE TO
TIGHTEN
TURN COUNTER-
CLOCKWISE TO REMOVE
TURN CLOCKWISE TO
TIGHTEN
TURN COUNTER-
CLOCKWISE TO REMOVE
PUSH DOWN WHILE
TIGHTENING
STAINLESS
STEEL
3
STAINLESS
STEEL
NOTE:
• A drinking water cartridge may contain carbon nes (very ne black powder). After installation, ush the cartridge 3-4 times per ush for 5 to 10
minutes to remove the nes before using the water.
• It is recommended that you run the tap at least 20 seconds prior to each use for drinking or cooking purposes.
• During initial use, your water may appear cloudy. This cloudiness is caused by air that has been trapped in the cartridge. If the water sits for 5
minutes in a glass, you will notice the cloudiness disappear from the bottom up. This phenomenon is not harmful and will clear up in time as the
remaining air is ushed from the cartridge.
• Please read all instructions and precautions before installing and using your Crystal Quest® Countertop Water Filter.
• Numbered diagrams correspond with numbered steps.
WARNING: Do not use with water that is microbiologically unsafe or of unknown quality without adequate disinfection before or after the system.
Systems certied for cyst reduction may be used on disinfected water that may contain lterable cysts.
CAUTION: Filter must be protected against freezing which can cause cracking of the lter and water leakage.
NOTE:
• Filter cartridge life varies depending on lter type, usage, and water conditions.
• For cold water use only.
• Make certain that installation complies with all state and local laws and regulations.
• The replacement lter cartridge used with this system has a limited service life. Changes in taste, odor, or reduced ow of the water being ltered can
indicate that the cartridge should be replaced.
• The contaminants or other substances removed or reduced by these systems are not necessarily in your water. Ask your local water municipality for a
copy of their water analysis or have your private well tested by a reputable water testing lab.
• After prolonged periods of non-use (such as during a vacation), it is recommended that the system be ushed thoroughly. Let water run for 5–6
minutes before using. Repeat if necessary.
Fig 1
Fig 2
Connecting diverter valve to faucet
Operation
2
*Stainless steel ltration systems may need periodic maintenance
to prevent corrosion from hard water, as well as, water with high
levels of nitrates and high levels of iron. To prevent and rid your
system of corrosiveness, quarterly cleaning should be done. This
can be done using 9% white vinegar and warm water. Sumps and
caps (as applicable), should be cleaned and rinsed well.
Replacement Parts
Filter Housing — 1
Wrench — 2
Spout — 3
O-ring — 4
Filter Cartridge — 5
Diverter Valve — 6
Tubing — 7
Clamp — 8
Optional Prelter — 9
Base — 10
1
8
7
6
9
3
5
4
2
1
8
7
6
9
3
5
2
10
10
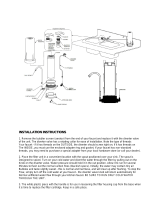
1. Remove aerator from faucet (Fig 1).
NOTE: Adapters are included which will t
most faucets. To create a tight seal, you may
need to use the gasket from your faucet's
aerator in addition to the washers included
with the adapters. If the adapters do not t,
consult your local plumbing or hardware sup-
plier for assistance in obtaining the correctly
threaded adapter.
3. Screw the diverter valve onto the faucet and
turn until tight. Make certain that gasket (already
installed in diverter valve) is positioned securely
between the diverter valve and the faucet (or
adapter). Rotate diverter valve stem to desired
position. Swivel collar may need to be retightened.
2. Determine the type of threads on your faucet
and screw adapter (Fig 2) into faucet. Tighten
manually.
Outside threads:
No adapter should
be needed (proceed
to Step 3).
Inside threads:
Select the correct
adapter and
washer (Fig 2).
Gasket Adapters
(use size as needed)
Diverter
Aerator
Gasket
Large clamp
Optional Prelter available for all countertop models
CQE-CT-00143
Triple Replaceable Cartridge Countertop Water Filter System
8 stages of ltration
Diverter
Diverter
valve stem
Outside threads
on faucet
4. Use the large clamp to tighten unit hose to the faucet. Place the water
lter in desired location on countertop conveniently next to sink. Insert
spout into spout housing and push it down rmly.
Turn on water at faucet handle then turn
on diverter handle. Water will then ow
through the lter. To stop water ow to
lter, turn o water at faucet handle,
then turn o diverter handle.
/