DCS-8525LH
10
DEUTSCH
MONTAGE DER KAMERA
Nutzen Sie die unten beschriebenen Schritte als Hilfe bei der Montage der Kamera mithilfe der
Armhalterung. Es ist ratsam, zuerst die Kamera zu kongurieren, bevor Sie die Montage der Kamera
vornehmen.
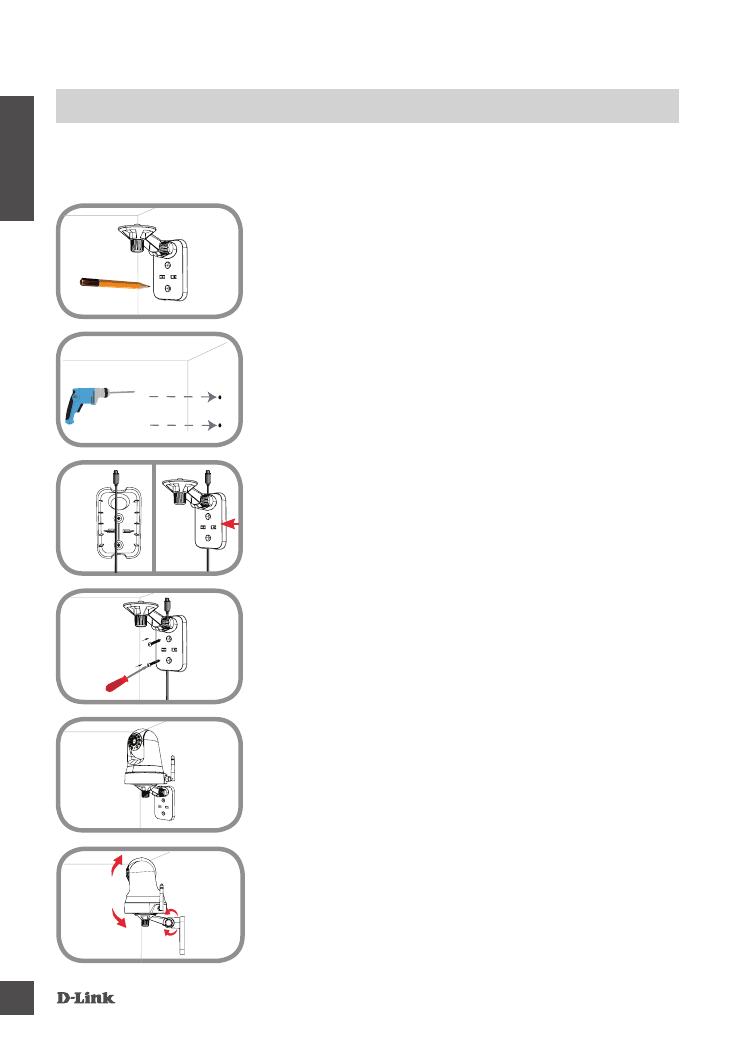
Schritt 1:
Halten Sie die Armhalterung an der Stelle gegen die Wand bzw.
Decke, wo Sie sie anbringen möchten. Markieren Sie mit einem
Bleistift, wo die Montagelöcher gebohrt werden sollen. Achten Sie
darauf, dass die Armhalterung korrekt und mit ausreichend Platz
ausgerichtet ist, so dass die Kamera montiert und die nötigen Kabel
geführt werden können.
Schritt 2:
Verwenden Sie die für die Beschaffenheit der Wand oder Decke
entsprechend geeigneten Werkzeuge, um dort zwei Löcher 2,5 cm
tief mit einem 6 mm Bohreinsatz zu bohren, wo Sie die Markierungen
vorgenommen haben. Setzen Sie anschließend die Dübel in die
Bohrlöcher ein, um die Schrauben darin festzuziehen.
Schritt 4:
Bringen Sie die Kamerahalterung mithilfe der mitgelieferten
Schrauben an.
Schritt 5:
Verwenden Sie die im Lieferumfang des Produkts enthaltene
Flügelschraube, um die Kamera an der Halterung zu befestigen.
Schließen Sie das Stromkabel an die Kamera an.
Schritt 3:
Nach Bedarf können Sie das Kabel hinter der Kamerahalterung
verbergen. Führen Sie das Kabel durch die Montagehalterung
auf der Rückseite und befestigen Sie es mithilfe der eingebauten
Kabelführungselemente. Vergessen Sie nicht, für eine ausreichende
Kabellänge zu sorgen, damit der Anschluss der Kamera
gewährleistet ist.
Schritt 6:
Richten Sie den Winkel des Arms auf der Halterung Ihren Wünschen
entsprechend ein. Ziehen Sie die Flügelschraube an, um den Arm in
dieser Position zu xieren.


