Page is loading ...

www.ferm.com
Art.nr.WTM1001
FTM-Tracker,3 in 1
www.ferm.com 0708-24
GB Subject to change
D Änderungen vorbehalten
NL Wijzigingen voorbehouden
F Sous réserve de modifications
E Reservado el derecho de
modificaciones technicas
P Reservado o direito a modificações
I Con reserva di modifiche
S Ändringar förbehålles
FIN Pidätämme oikeuden muutoksiin
N Rett till endringer forbeholdes
DK Ret til ændringer forbeholdes
H Változtatás jogát fenntartjuk
CZ Změny vyhrazeny
SLO Predmet sprememb
PL Temat do zmiany
RUS äÓÏ·ÌËfl Ferm ÔÓÒÚÓflÌÌÓ
Òӂ¯ÂÌÒÚ‚Û ÂÚ ‚˚ÔÛÒ͇ÂÏÛ ˛ ²
ÔÓ‰ÛÍˆË˛. èÓÁÚÓÏÛ ‚ ÚÂıÌ˘ÂÒËÂ
ı‡‡ÍÚÂËÒÚËÍË ÏÓ„ÛÚ ‚ÌÓÒËÚ¸Òfl ·ÂÁ
Ô‰‚‡ËÚÂθÌÓ„Ó Û‚Â‰ÓÏÎÂÌËfl.
GR HÚԇ̠ÙÔ ‰Èη›ˆÌ· ·ÏÏ·ÁÒÓ
GB
D
NL
F
E
P
I
S
FIN
N
DK
H
CZ
SLO
PL
RUS
GR
USERS MANUAL 04
GEBRAUCHSANWEISUNG 06
GEBRUIKSAANWIJZING 09
MODE D’EMPLOI 12
MANUAL DE INSTRUCCIONES 14
ISTRUÇÕN A USAR 17
MANUALE UTILIZZATI 20
BRUKSANVISNING 23
KÄYTTÖOHJE 26
BRUKSANVISNING 28
BRUGERVEJLEDNING 31
HASZNÁLATI UTASÍTÁS 33
NÁVOD K POUŽITÍ 36
NOVODILA ZA UPORABO 38
INSTRUKSJĘ OBSŁUGI 41
êìäéÇéÑëíÇé èé ùäëèãìÄíÄñàà 44
O¢∏°π∂™ Ã∏™∂ø™ 47

4. ∂¿Óˆ ·fi ı‡Ú˜ ‹ ·Ú¿ı˘Ú· ÂÓ‰¤¯ÂÙ·È
Ó· ˘¿Ú¯Ô˘Ó Û˘Ì·Á›˜ ͇ÏÈÓ˜ Ì·ÙÈΤ˜
‰ÔÎÔ› (Ú¤ÎÈ·). ∏ ı¤ÛË ÙÔ˘ ÔÚıÔÛÙ¿ÙË ‰ÂÓ
ı· ÂÓÙÔÈÛÙ› Â¿Ó Ë ‚·ıÌÔÓfiÌËÛË Ù˘
Û˘Û΢‹˜ ¤¯ÂÈ Á›ÓÂÈ ·Ú¯Èο Û ηÓÔÓÈÎfi
ÙÔ›¯Ô ηÈ, ÛÙË Û˘Ó¤¯ÂÈ·, ÌÂÙ·ÎÈÓËı› ÛÙËÓ
ÂÚÈÔ¯‹ ¿ӈ ·fi ÙËÓ Î¿Û·. ∞˘Ùfi
·ÔÙÂÏ› ¤Ó‰ÂÈÍË fiÙÈ ˘¿Ú¯ÂÈ Ì·ÙÈ΋
‰ÔÎfi˜/Ú¤ÎÈ.
5. ™·˜ Û˘ÓÈÛÙԇ̠ӷ οÓÂÙ ·ÚÎÂÙ¤˜
ÌÂÙÚ‹ÛÂȘ ηٿ Ì‹ÎÔ˜ ÙÔ˘ ηٷÎfiÚ˘ÊÔ˘
ÔÚıÔÛÙ¿ÙË ‹ Ù˘ ÂÓÈÛ¯˘ÙÈ΋˜ ‰ÔÎÔ‡,
ηıÒ˜ Ë ‡·ÚÍË Î¿ÔÈÔ˘ ηÚÊÈÔ‡
ÂÓ‰¤¯ÂÙ·È Ó· ·ÏÏÔÈÒÛÂÈ ÙËÓ ¤Ó‰ÂÈÍË ÁÈ· ÙË
ı¤ÛË ÙÔ˘ ΤÓÙÚÔ˘ Ù˘ ‰ÔÎÔ‡ ÛÙ‹ÚÈ͢.
6. ∏ Û˘¯Ó‹ ·ӷ‚·ıÌÔÓfiÌËÛË Ù˘
Û˘Û΢‹˜ ı· ·ÔÙÚ¤„ÂÈ ÙË Ï‹„Ë
ÂÛÊ·ÏÌ¤ÓˆÓ ÂӉ›ÍˆÓ.
7. ∂›Û˘, Û·˜ Û˘ÓÈÛÙԇ̠ӷ ÂÎÙÂÏ›ÙÂ
·Ú¿ÏÏËÏ· Î·È ·Ó›¯Ó¢ÛË
Ù¿Û˘/ÌÂÙ¿ÏÏÔ˘, ÚÔÎÂÈ̤ÓÔ˘ Ó·
‚‚·Èˆı›Ù fiÙÈ Ë ÂÓÈÛ¯˘ÙÈ΋ ‰ÔÎfi˜ ‹ Ô
ÔÚıÔÛÙ¿Ù˘ Ô˘ ÂÓÙÔ›Û·Ù ‰ÂÓ Â›Ó·È
οÔÈÔ˜ ۈϋӷ˜ ‹ ηÏÒ‰ÈÔ. ¡· ¤¯ÂÙÂ
˘fi„Ë fiÙÈ ÂÓ‰¤¯ÂÙ·È Ó· ÂÓÙÔÈÛÙÔ‡Ó Î·È
ÌÈÎÚ¤˜ ‚›‰Â˜ ‹ ηÚÊÈ¿ ÛÙÂÚ¤ˆÛ˘.
ª∂°π™Δ√¶√π∏™∏ Δ∏™ ∞∫ƒπμ∂π∞™
∏ ¢·ÈÛıËÛ›· Ù˘ Û˘Û΢‹˜ ÌÔÚ› Ó·
Ú˘ıÌÈÛÙ›, ÚÔÎÂÈ̤ÓÔ˘ Ó· ˘Ô‰ÂÈÎÓ‡ÂÈ ÌÂ
·ÎÚ›‚ÂÈ· ÙË ı¤ÛË ÛˆÏ‹ÓˆÓ ‹ ηψ‰›ˆÓ ‹
ÂÓÈÛ¯˘ÙÈÎÒÓ ‰ÈÎÒÓ Î·È ‰ÔÎÒÓ ÛÙ‹ÚÈ͢
(ÔÚıÔÛÙ·ÙÒÓ). °È· Ó· ÙÔ ÂÈÙ‡¯ÂÙ ·˘Ùfi, ı·
Ú¤ÂÈ Ó· Û·ÚÒÛÂÙ ÙËÓ ÂÚÈÔ¯‹ Ô˘
ÂÚÂ˘Ó¿ÙÂ, ¤ˆ˜ fiÙÔ˘ ÂÓÂÚÁÔÔÈËı› Ë Ï˘¯Ó›·
Î·È Ô ‚ÔÌ‚ËÙ‹˜. ªÂÙ¿ ·fi οı ۿڈÛË,
ÛÙÚ¤„Ù ÙÔ ÌÏ ÎÔ˘Ì› ÂÏ·ÊÚ¿, ¤ˆ˜ fiÙÔ˘
·ÂÓÂÚÁÔÔÈËı› Ë Ï˘¯Ó›· Î·È Ô ‚ÔÌ‚ËÙ‹˜.
¶ÚÈÓ ·fi οı ÂfiÌÂÓË Û¿ÚˆÛË ÛÙÚ¤„ÙÂ
ÂÏ·ÊÚ¿ ÙÔ ÎÔ˘Ì› ÚÔ˜ ÙËÓ ·ÓÙ›ıÂÙË
ηÙ‡ı˘ÓÛË, ¤ÙÛÈ ÒÛÙÂ Ë Ï˘¯Ó›· Î·È Ô
‚ÔÌ‚ËÙ‹˜ Ù˘ Û˘Û΢‹˜ Ó· ÂÓÂÚÁÔÔÈÔ‡ÓÙ·È
·ÎÚÈ‚Ò˜ ÛÙÔ ÛËÌÂ›Ô fiÔ˘ ‚Ú›ÛÎÔÓÙ·È ÔÈ
ۈϋÓ˜, Ù· ηÏ҉ȷ, ÔÈ ÂÓÈÛ¯‡ÛÂȘ ‹ ÔÈ
ÔÚıÔÛٿ٘.
ƒÀ£ªπ™∏ Δ∏™ ™À™∫∂À∏™
ΔË Û˘Û΢‹ Û˘Óԉ‡ÂÈ ¤Ó· ÌÈÎÚfi ηÙÛ·‚›‰È, ÙÔ
ÔÔ›Ô ‚Ú›ÛÎÂÙ·È Î¿Ùˆ ·fi ÙÔ Î¿Ï˘ÌÌ· ÙÔ˘
¯ÒÚÔ˘ Ù˘ Ì·Ù·Ú›·˜ (‚Ϥ ∂ÈÎ. 10).
ƒ˘ıÌÈÛË ·ÓȯÓ¢Û˘ ÌÂÙ·ÏÏÔ˘/Ù·Û˘:
1. ™ÙÚ¤„Ù ÙÔ ÌÏ ÎÔ˘Ì› Ú‡ıÌÈÛ˘
¢·ÈÛıËÛ›·˜ ÌÂÙ¿ÏÏÔ˘/Ù¿Û˘ ηٿ ÌÈÛ‹
ÛÙÚÔÊ‹.
2. ªÂÙ·ÎÈÓ‹ÛÙ ÙÔ ‰È·ÎfiÙË ÂÈÏÔÁ‹˜ ÛÙË
ı¤ÛË ·Ó›¯Ó¢Û˘ Ù¿Û˘/ÌÂÙ¿ÏÏÔ˘.
3. ™ÙÚ¤„Ù ÙË ‚›‰· Ú‡ıÌÈÛ˘ ·ÎÚȂ›·˜
(‚Ϥ ∂ÈÎ.1), ¯ÚËÛÈÌÔÔÈÒÓÙ·˜ ÙÔ ÌÈÎÚfi
ηÙÛ·‚›‰È.
4. ∂¿Ó Ë Ú¿ÛÈÓË Ï˘¯Ó›· LED Â›Ó·È ·Ó·Ì̤ÓË,
ÛÙÚ¤„Ù ·ÚÁ¿ ÙË ‚›‰· Ú‡ıÌÈÛ˘ ·ÎÚȂ›·˜
¢∂•π√™Δƒ√º∞ ¤ˆ˜ fiÙÔ˘ ÂÓÂÚÁÔÔÈËı› Ë
ÎfiÎÎÈÓË Ï˘¯Ó›· LED, ηıÒ˜ Î·È Ô ‚ÔÌ‚ËÙ‹˜.
™ÙÚ¤„Ù ·ÓÙ›ÛÙÚÔÊ· ÙË ‚›‰· Ú‡ıÌÈÛ˘
·ÎÚȂ›·˜, ¤ˆ˜ fiÙÔ˘ ·Ó¿„ÂÈ Ë Ú¿ÛÈÓË
Ï˘¯Ó›· LED Î·È ·ÂÓÂÚÁÔÔÈËı› Ô
‚ÔÌ‚ËÙ‹˜. ªÂ ·˘ÙfiÓ ÙÔÓ ÙÚfiÔ, Ë
Û˘Û΢‹ ¤¯ÂÈ Ú˘ıÌÈÛÙ› ÛˆÛÙ¿.
5. ∂¿Ó ÂÓÂÚÁÔÔÈËı› Ë ÎfiÎÎÈÓË Ï˘¯Ó›· LED
Î·È Ô ‚ÔÌ‚ËÙ‹˜, ÛÙÚ¤„Ù ·ÚÁ¿ ÙË ‚›‰·
Ú‡ıÌÈÛ˘ ·ÎÚȂ›·˜ ∞ƒπ™Δ∂ƒ√™Δƒ√º∞,
¤ˆ˜ fiÙÔ˘ ·Ó¿„ÂÈ Ë Ú¿ÛÈÓË Ï˘¯Ó›· LED ηÈ
·ÂÓÂÚÁÔÔÈËı› Ô ‚ÔÌ‚ËÙ‹˜. ªÂ ·˘ÙfiÓ
ÙÔÓ ÙÚfiÔ, Ë Û˘Û΢‹ ¤¯ÂÈ Ú˘ıÌÈÛÙ›
ÛˆÛÙ¿.
ƒ˘ıÌÈÛË ·ÓȯÓ¢Û˘ ‰ÔÎˆÓ ÛÙËÚÈ͢
1. ™ÙÚ¤„Ù ÙÔ ÌÏ ÎÔ˘Ì› Ú‡ıÌÈÛ˘
¢·ÈÛıËÛ›·˜ STUD (¢√∫ø¡ ™Δ∏ƒπ•∏™)
ηٿ ÌÈÛ‹ ÛÙÚÔÊ‹.
2. ªÂÙ·ÎÈÓ‹ÛÙ ÙÔ ‰È·ÎfiÙË ÂÈÏÔÁ‹˜ ÛÙË
ı¤ÛË STUD DETECTOR (∞¡πá∂ÀΔ∏™
¢√∫ø¡ ™Δ∏ƒπ•∏™).
3. ∫Ú·Ù‹ÛÙ ÙË Û˘Û΢‹ Ì ÙËÓ ÏÂ˘Ú¿ Ô˘
·Ó·ÁÚ¿ÊÂÈ “STUD” (¢√∫√π ™Δ∏ƒπ•∏™)
ÛÙÚ·Ì̤ÓË ÚÔ˜ ÙÔÓ ÙÔ›¯Ô.
4. ƒ˘ıÌ›ÛÙ ÙË ‚›‰· Ú‡ıÌÈÛ˘ ·ÎÚȂ›·˜ ÁÈ· ÙË
ÏÂÈÙÔ˘ÚÁ›· WOOD DETECTION
(∞¡πá∂À™∏ •À§√À).
5. ∂¿Ó ·Ó¿„ÂÈ Ë Ú¿ÛÈÓË Ï˘¯Ó›· LED ηÈ
ÏÂÈÙÔ˘ÚÁ› Ô ‚ÔÌ‚ËÙ‹˜, ÛÙÚ¤„Ù ·ÚÁ¿ ÙË
‚›‰· Ú‡ıÌÈÛ˘ ·ÎÚȂ›·˜ ¢∂•π√™Δƒ√º∞,
¤ˆ˜ fiÙÔ˘ ·Ó¿„ÂÈ Ë ÎfiÎÎÈÓË Ï˘¯Ó›· ηÈ
·Ú·Ì›ÓÂÈ Û ÏÂÈÙÔ˘ÚÁ›· Ô ‚ÔÌ‚ËÙ‹˜.
™ÙÚ¤„Ù ·ÚÁ¿ ÙË ‚›‰· Ú‡ıÌÈÛ˘ ·ÎÚȂ›·˜
ÚÔ˜ ÙËÓ ·ÓÙ›ıÂÙË Î·Ù‡ı˘ÓÛË, ¤ˆ˜ fiÙÔ˘
·Ó¿„ÂÈ Ë Ú¿ÛÈÓË Ï˘¯Ó›· LED ηÈ
¯·ÌËÏÒÛÂÈ Ô ÙfiÓÔ˜ ÙÔ˘ ˯ËÙÈÎÔ‡ Û‹Ì·ÙÔ˜
ÙÔ˘ ‚ÔÌ‚ËÙ‹. ªÂ ·˘ÙfiÓ ÙÔÓ ÙÚfiÔ Ë
Û˘Û΢‹ ¤¯ÂÈ Ú˘ıÌÈÛÙ› ÛˆÛÙ¿.
ª∏¡ •∂á∞Δ∂ ¡∞ ∞¶∂¡∂ƒ°√¶√π∂πΔ∂
Δ∏ ™À™∫∂À∏ √Δ∞¡ ¢∂¡ Δ∏¡
Ã∏™πª√¶√π∂πΔ∂ (ª∂Δ∞∫π¡∏™Δ∂ Δ√
¢π∞∫√¶Δ∏ ∂¶π§√°∏™ ™Δ∏ ª∂™∞π∞
£∂™∏)
Ferm 49
TRACKER
OPERATING INSTRUCTIONS
TECHNICAL SPECIFICATIONS
EXPLANATION OF SYMBOLS
In accordance with essential applicable safety
standards of European directives
Please read all instructions before using the
detector
Risk of an electric shock
Caution! Risk of damaging material and/or
physical injuries
Faulty and/or discarded electrical or electronic
apparatus have to be collected at the
appropriate recycling locations.
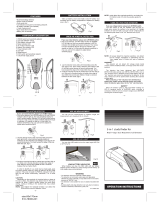
FEATURES
Fig.1.
1. Red LED indicator
2. Green LED indicator
3. Sensitivity knob (Stud detector)
4. Selector switch
5. Sensitivity knob (Voltage/Metal detector)
6. Green 'ON' LED
7. Stud detection face
8. Voltage/Metal detection face
9. Battery compartment cover
10. Trimmer for Stud detector
11. Trimmer for Voltage/Metal detector
12. Buzzer
PREPARATION FOR USE
Slide out the battery compartment cover (on the
back of the unit) and connect a fresh 9V-006P
battery (See Fig.2).Replace cover and securely snap
in place.Now the unit is ready for use.
OPERATION
METAL/VOLTAGE DETECTION
PROCEDURE
1. Hold the unit as shown in Fig.3 and turn the blue
knob fully downwards.
2. Move the Selector Switch to VOLTAGE/METAL
DETECTOR position.The green ‘On’ LED will
switch on immediately.Make sure that the unit is
not near any metal or current-carrying
conductor.
3. Turn the blue knob upwards until the indicators
just go out.The unit is now ready for use.
4. Hold the unit as shown in Fig.4 and move it
sideways (in horizontal position),across the wall.
The red LED and a continuous buzzer tone will
go on when a metal object is in the vicinity.
Current-carrying conductor will be shown with
a red blinking LED and beeping sound of buzzer
(See Fig.5).
5. If the indicators do not go on,or won't go on,
after the set has been switched on,the unit needs
to be adjusted.For details,please refer to ‘UNIT
ADJUSTMENT’.
Safety
When the unit gives a ‘NO VOLTAGE’ reading
(no blinking motion of red LED and beeping
sound of buzzer when touching the conductor),check the
unit on a known voltage source before touching any
conductor.
Caution
It will not detect shielded conductors,i.e.those
in metal conduct,it only shows presence of
metal.
Notes
1. Some walls may contain metallised fibre for
fireproofing,this will spread the area of voltage
pick-up.Placing your free hand on the wall may
cancel the effect.
2. Rubbing or banging the unit on the wall may
generate static electricity and cause a false
reading.
Leakkage currents
Because of the extremely small current
required to cause a reading on the unit,an
apparent false reading may be seen in some situations.
I.e.a conductor with poor insulation touching a damp
wall,will show a voltage on the wall.In this situation,the
unit is indicating a potential hazard which should be
checked with a voltmeter.
Battery | 9V (6LR61)
Measuring depth:
wood | 2 cm
metal,electric | 3-5 cm
04 Ferm

WOOD FRAME DETECTION
PROCEDURE
Locating vertical battens or wall studs,refer
to the following procedures:
1. Hold the unit vertically as shown in Fig.6 and turn
the blue knob fully downwards.
2. Move the Selector Switch to STUD DETECTOR
position.
3. Turn the blue knob upwards until the red LED
and buzzer go on.
4. Reverse the blue knob gently until the green LED
goes on and buzzer sound changes to a lower pitch.
5. If the unit can not be set accordingly,it need to be
adjusted.For details,please refer to ‘UNIT
ADJUSTMENT’.
6. Move the unit horizontally across the wall (See
Fig.7).Make sure that the detection face marked
with 'STUD' is placed against the wall.
7. When an edge of a batten or wall stud is under
the groove of the unit,the red LED will go on and
the buzzer sound will change to a higher pitch.
Mark this position on the wall (See Fig.8).
8. Resume the movement of the unit.When the
green LED goes on and buzzer sound changes to
a lower pitch,mark this position also.These
marks indicate the edges of the batten or wall
stud.The middle point between two marks will
be the centre of the batten or wall stud.
Locating horizontal battens or stud braces,
refer to the following procedure:
1. Place the unit horizontally against the wall (See
Fig.9).
2. Uses the same method of locating vertical
battens or wall studs to detect horizontal
battens or stud braces.
Notes
1. The stud detection can be used normaly on wall-
papered walls.However,it may not function on
some types of foil backed or metallic fabric
surfaces.
2. If by change the unit is placed over the wall batten
or stud to process calibration,the green LED will
go off and buzzer will cease when the edge of
batten or wall stud is under the groove of the
unit.
3. A double width may be found around door and
window frames due to double batten or stud
encountered.
4. A solid wood header may exist in some doors or
windows.The stud location will not be found if
the unit is calibrated on a normal wall first and
then moved to the header area,it will indicate the
presence of a header.
5. It is advisable to take several readings along the
vertical batten or stud as a nail may change the
apparent centre position.
6. Frequent re-calibrations can help to avoid any
false readings.
7. We recommend to carry metal/voltage
detection to make sure the detected batten or
wood stud is not a pipe or cable.Please note that
some small securing screws or nails may be
detected.
MAXIMIZING ACCURACY
The sensitivity of the unit can be pin-pointed at the
exact place of pipes and cables or battens and studs.
To do this,sweep until across the area in question,
with light and buzzer sounding.After each sweep,
gradually adjust blue knob,until light and buzzer are
no longer activated.Gently reverse knob before each
subsequent sweep,unit light and buzzer go on at the
location of hidden pipes/cable or batten or stud.
UNIT ADJUSTMENT
A small screwdriver is provided which is located
under the cover of the battery compartment (See
Fig.10).
Metal/voltage detection adjustment
1. Turn the blue Metal/Voltage sensitivity knob by
1/2 turn.
2. Place Selector Switch to Voltage/Metal detector
position.
3. Turn the trimmer (see fig.1) using the small
screwdriver.
4. If the green LED is on,slowly turn the trimmer
CLOCKWISE until the red LED and buzzer just
come on.Slowly turn back the trimmer until the
green LED just come on and buzzer cease.Now
the unit is correctly adjusted.
5. If the red LED and buzzer go on,slowly turn the
trimmer ANTI-CLOCKWISE until the green
LED just go on and buzzer cease.The unit is now
correctly adjusted.
Stud detection adjustment
1. Turn the blue STUD sensitivity knob by 1/2 turn.
2. Move Selector Swtich to STUD DETECTOR
position.
3. Hold the unit with STUD face against the wall.
4. Adjust the trimmer for WOOD DETECTION.
5. If the green light and buzzer are on,slowly turn
the trimmer CLOCKWISE until the red light and
buzzer just go on.Slowly turn back the trimmer
until the green LED is just on,and the buzzer
changes to a slower pitch.The unit is now
adjusted correctly.
REMEMBER TO SWITCH OFF THE UNIT
WHEN NOT IN USE (MOVE SELECTOR
SWITCH TO THE MIDDLE)
Ferm 05
¶ÚÔÛÔ¯Ë!
∏ Û˘Û΢‹ ‰ÂÓ ·ÓȯÓ‡ÂÈ
ÌÔӈ̤ÓÔ˘˜ ·ÁˆÁÔ‡˜, .¯. ·˘ÙÔ‡˜
Ô˘ ‚Ú›ÛÎÔÓÙ·È Ì¤Û· Û ÌÂÙ·ÏÏÈÎfi ÂÚ›‚ÏËÌ·.
£· ·ÓȯÓ‡ÂÈ ÌfiÓÔÓ ÙËÓ ‡·ÚÍË ÙÔ˘
ÌÂÙ·ÏÏÈÎÔ‡ ·ÓÙÈÎÂÈ̤ÓÔ˘.
™ËÌÂȈÛË
1. √ÚÈṲ̂ÓÔÈ ÙÔ›¯ÔÈ ÂÚȤ¯Ô˘Ó ÔÚ˘ÎÙ¤˜ ›Ó˜
ÁÈ· ÏfiÁÔ˘˜ ˘ÚÔÚÔÛÙ·Û›·˜. ™Â ·˘Ù‹Ó ÙËÓ
ÂÚ›ÙˆÛË Ë ÂÚÈÔ¯‹˜ ·Ó›¯Ó¢Û˘ Ù¿Û˘
‰È¢ڇÓÂÙ·È È‰È·›ÙÂÚ·. À¿Ú¯ÂÈ Ë
Èı·ÓfiÙËÙ· Ó· ÌÂȈı› ÙÔ Ê·ÈÓfiÌÂÓÔ, ¿Ó
ÙÔÔıÂÙ‹ÛÂÙ ÛÙËÓ ÂÈÊ¿ÓÂÈ· ÙÔ˘ ÙÔ›¯Ô˘
ÙÔ ÂχıÂÚfi Û·˜ ¯¤ÚÈ.
2. ∏ ÙÚÈ‚‹ ‹ ÙÔ ¯Ù‡ËÌ· Ù˘ Û˘Û΢‹˜ ¿ӈ
ÛÙÔÓ ÙÔ›¯Ô ÂÓ‰¤¯ÂÙ·È Ó· ·Ú¿ÁÂÈ ÛÙ·ÙÈÎfi
ËÏÂÎÙÚÈÛÌfi, ÁÂÁÔÓfi˜ Ô˘ ı· ÚÔηϤÛÂÈ
Ï·Óı·Ṳ̂Ó˜ ÂӉ›ÍÂȘ ÙÔ˘ ·ÓȯÓÂ˘Ù‹.
¢È·ÚÚÔÂÛ ÚÂ˘Ì·ÙÔÛ
∂Í·ÈÙ›·˜ Ù˘ Ôχ ¯·ÌËÏ‹˜ ¤ÓÙ·Û˘
Ú‡̷ÙÔ˜ Ô˘ ··ÈÙÂ›Ù·È ÁÈ· ÙËÓ
ÂÓÂÚÁÔÔ›ËÛË ÙÔ˘ ·ÓȯÓÂ˘Ù‹, Ë Û˘Û΢‹
ÂÓ‰¤¯ÂÙ·È Û ÔÚÈṲ̂Ó˜ ÂÚÈÙÒÛÂȘ Ó· ‰›ÓÂÈ
Ï·Óı·Ṳ̂Ó˜ ÂӉ›ÍÂȘ ÁÈ· ÙËÓ ‡·ÚÍË Ù¿Û˘
Û ¤Ó·Ó ÙÔ›¯Ô, fiˆ˜ ÁÈ· ·Ú¿‰ÂÈÁÌ· fiÙ·Ó
¤Ó·˜ ·ÁˆÁfi˜ Ì ÂÏÏÈ‹ ÌfiÓˆÛË ¤ÏıÂÈ ÛÂ
·ʋ Ì ¤Ó·Ó ˘ÁÚfi ÙÔ›¯Ô. ™Â ·˘Ù¤˜ ÙȘ
ÂÚÈÙÒÛÂȘ, Ë Û˘Û΢‹ ˘Ô‰ÂÈÎÓ‡ÂÈ Èı·Ófi
ΛӉ˘ÓÔ, ÙÔÓ ÔÔ›Ô ı· Ú¤ÂÈ Ó· ÂϤÁÍÂÙ ÌÂ
¤Ó· ‚ÔÏÙfiÌÂÙÚÔ.
¢π∞¢π∫∞™π∞ ∞¡πá∂À™∏™ •À§π¡√À
™∫∂§∂Δ√À Δ√πÃ√À
°È· ÙÔÓ ÂÓÙÔÈÛÌfi ÙˆÓ Î·Ù·ÎfiÚ˘ÊˆÓ
ÂÓÈÛ¯˘ÙÈÎÒÓ ‰ÔÎÒÓ ‹ ÙˆÓ ‰ÔÎÒÓ ÛÙ‹ÚÈ͢
(ÔÚıÔÛÙ·ÙÒÓ) ̤۷ ÛÙÔ˘˜ ÙÔ›¯Ô˘˜,
ÂÊ·ÚÌfiÛÙ ÙȘ ·Ú·Î¿Ùˆ ‰È·‰Èηۛ˜:
1. ∫Ú·Ù‹ÛÙ ÙË Û˘Û΢‹ ηٷÎfiÚ˘Ê· fiˆ˜
Ê·›ÓÂÙ·È ÛÙËÓ ∂ÈÎ. 6 Î·È ÛÙÚ¤„Ù ÙÔ ÌÏÂ
ÎÔ˘Ì› ÚÔ˜ Ù· οو, ˆ˜ ÙÔ Ù¤ÚÌ· Ù˘
‰È·‰ÚÔÌ‹˜ ÙÔ˘.
2. ªÂÙ·ÎÈÓ‹ÛÙ ÙÔ ‰È·ÎfiÙË ÂÈÏÔÁ‹˜ ÛÙË
ı¤ÛË STUD DETECTOR (∞¡πá∂ÀΔ∏™
¢√∫ø¡ ™Δ∏ƒπ•∏™).
3. ™ÙÚ¤„Ù ÙÔ ÌÏ ÎÔ˘Ì› ÚÔ˜ Ù· ¿ӈ
¤ˆ˜ fiÙÔ˘ ÂÓÂÚÁÔÔÈËı› Ë ÎfiÎÎÈÓË Ï˘¯Ó›·
LED Î·È Ô ‚ÔÌ‚ËÙ‹˜.
4. ™ÙÚ¤„Ù ÂÏ·ÊÚ¿ ÙÔ ÌÏ ÎÔ˘Ì› ÚÔ˜ ÙËÓ
·ÓÙ›ıÂÙË Î·Ù‡ı˘ÓÛË ¤ˆ˜ fiÙÔ˘ ·Ó¿„ÂÈ Ë
Ú¿ÛÈÓË Ï˘¯Ó›· LED Î·È ¯·ÌËÏÒÛÂÈ Ô
ÙfiÓÔ˜ ÙÔ˘ ˯ËÙÈÎÔ‡ Û‹Ì·ÙÔ˜ Ô˘ ÂΤÌÂÈ
Ô ‚ÔÌ‚ËÙ‹˜.
5. ∂¿Ó Â›Ó·È ·‰‡Ó·ÙË Ë Ú‡ıÌÈÛË Ù˘ Û˘Û΢‹˜
Û‡Ìʈӷ Ì ٷ ·Ú·¿Óˆ, Ë Û˘Û΢‹ ı·
Ú¤ÂÈ Ó· Ú˘ıÌÈÛÙ› ·fi ÙËÓ ·Ú¯‹. °È·
ÏÂÙÔ̤ÚÂȘ, ·Ó·ÙÚ¤ÍÙ ÛÙËÓ
·Ú¿ÁÚ·ÊÔ ƒÀ£ªπ™∏ Δ∏™ ™À™∫∂À∏™.
6. ªÂÙ·ÎÈÓ‹ÛÙ ÙË Û˘Û΢‹ ÔÚÈ˙fiÓÙÈ·,
·Ú¿ÏÏËÏ· Ì ÙÔÓ ÙÔ›¯Ô (‚Ϥ ∂ÈÎ. 7).
ºÚÔÓÙ›ÛÙ ÒÛÙ ӷ ¤¯ÂÙ ÛÙÚ·Ì̤ÓË ÚÔ˜
ÙÔÓ ÙÔ›¯Ô ÙËÓ ÏÂ˘Ú¿ Ù˘ Û˘Û΢‹˜ Ô˘
ʤÚÂÈ ÙËÓ ¤Ó‰ÂÈÍË “STUD” (¢√∫√π
™Δ∏ƒπ•∏™).
7. ŸÙ·Ó Ë ·˘Ï¿ÎˆÛË Ù˘ Û˘Û΢‹˜ ‚ÚÂı›
¿ӈ ·fi οÔÈ· ÂÓÈÛ¯˘ÙÈ΋ ‰ÔÎfi ‹ ‰ÔÎfi
ÛÙ‹ÚÈ͢ ÙÔ˘ ÙÔ›¯Ô˘, ı· ·Ó¿„ÂÈ Ë ÎfiÎÎÈÓË
Ï˘¯Ó›· LED Î·È ı· ·˘ÍËı› Ô ÙfiÓÔ˜ ÙÔ˘
˯ËÙÈÎÔ‡ Û‹Ì·ÙÔ˜ Ô˘ ÂΤÌÂÈ Ô
‚ÔÌ‚ËÙ‹˜. ™ËÌÂÈÒÛÙ ·˘Ùfi ÙÔ ÛËÌ›Ô
¿ӈ ÛÙÔÓ ÙÔ›¯Ô (‚Ϥ ∂ÈÎ. 8).
8. ™˘Ó¯›ÛÙ ӷ ÌÂÙ·ÎÈÓ›Ù ÙË Û˘Û΢‹.
ŸÙ·Ó ·Ó¿„ÂÈ Ë Ú¿ÛÈÓË Ï˘¯Ó›· LED ηÈ
ÌÂȈı› Ô ÙfiÓÔ˜ ÙÔ˘ ˯ËÙÈÎÔ‡ Û‹Ì·ÙÔ˜ ÙÔ˘
‚ÔÌ‚ËÙ‹, ÛËÌÂÈÒÛÙ ÙÔ ÛËÌÂ›Ô ·˘Ùfi, fiˆ˜
οӷÙÂ Î·È ÚÔËÁÔ˘Ì¤Óˆ˜. ∞˘Ù¿ Ù·
ÛËÌ¿‰È· ˘Ô‰ÂÈÎÓ‡Ô˘Ó Ù· ¿ÎÚ· ÙˆÓ
ÂÓÈÛ¯˘ÙÈÎÒÓ ‰ÔÎÒÓ Î·È ÙˆÓ ‰ÔÎÒÓ
ÛÙ‹ÚÈ͢ ÙÔ˘ ÙÔ›¯Ô˘. ΔÔ ÛËÌÂ›Ô Ô˘
‚Ú›ÛÎÂÙ·È ·Ó¿ÌÂÛ· ÛÙ· ÛËÌ¿‰È·, Û ›ÛË
·fiÛÙ·ÛË ·fi ·˘Ù¿, Â›Ó·È ÙÔ Ì¤ÛÔ Ù˘
ÂÓÈÛ¯˘ÙÈ΋˜ ‰ÔÎÔ‡ ‹ Ù˘ ‰ÔÎÔ‡ ÛÙ‹ÚÈ͢
ÙÔ˘ ÙÔ›¯Ô˘.
°È· ÙÔÓ ÂÓÙÔÈÛÌfi ÙˆÓ ÔÚÈ˙fiÓÙȈÓ
ÂÓÈÛ¯˘ÙÈÎÒÓ ‰ÔÎÒÓ (ÛÙÚˆÙ‹ÚˆÓ) ‹ ÙˆÓ
‚¿ÛÂˆÓ ÙˆÓ ‰ÔÎÒÓ ÛÙ‹ÚÈ͢ ÙÔ˘ ÙÔ›¯Ô˘,
ÂÊ·ÚÌfiÛÙ ÙȘ ·Ú·Î¿Ùˆ ‰È·‰Èηۛ˜:
1. ΔÔÔıÂÙ‹ÛÙ ÙË Û˘Û΢‹ Û ÔÚÈ˙fiÓÙÈ·
‰È‡ı˘ÓÛË, ·Ú¿ÏÏËÏ· Ì ÙÔÓ ÙÔ›¯Ô (‚ϤÂ
∂ÈÎ. 9).
2. °È· ÙÔÓ ÂÓÙÔÈÛÌfi ÙˆÓ ÔÚÈ˙fiÓÙȈÓ
ÂÓÈÛ¯˘ÙÈÎÒÓ ‰ÔÎÒÓ ‹ ÙˆÓ ‰ÔÎÒÓ ÛÙ‹ÚÈ͢
(ÔÚıÔÛÙ·ÙÒÓ), ·ÎÔÏÔ˘ı‹ÛÙ ÙËÓ Ì¤ıÔ‰Ô
ÁÈ· ÙÔÓ ÂÓÙÔÈÛÌfi ÙˆÓ Î·Ù·ÎfiÚ˘ÊˆÓ
ÂÓÈÛ¯˘ÙÈÎÒÓ ‰ÔÎÒÓ.
™ËÌÂȈÛÂȘ
1. √ ÂÓÙÔÈÛÌfi˜ ÙˆÓ ‰ÔÎÒÓ ÛÙ‹ÚÈ͢
(ÔÚıÔÛÙ·ÙÒÓ) ÌÔÚ› Ó· Á›ÓÂÈ Î·È ÛÂ
ÙÔ›¯Ô˘˜ ÂÂӉ‰˘Ì¤ÓÔ˘˜ Ì ٷÂÙÛ·Ú›·.
øÛÙfiÛÔ, Ë Û˘Û΢‹ ÂÓ‰¤¯ÂÙ·È Ó· ÌËÓ
ÏÂÈÙÔ˘ÚÁ‹ÛÂÈ Û ÙÔ›¯Ô˘˜ Ì ÌÂÙ·ÏÏÈ΋
¤Ӊ˘ÛË ‹ Û ÂÈÊ¿ÓÂȘ Ô˘ ÂÚȤ¯Ô˘Ó
ÔÚ˘ÎÙ¤˜ ›Ó˜.
2. ∂¿Ó, ηٿ ÙË ‰È¿ÚÎÂÈ· Ù˘ ‚·ıÌÔÓfiÌËÛ˘,
Ë Û˘Û΢‹ ÙÔÔıÂÙËı› ηٿ Ï¿ıÔ˜ ¿ӈ
·fi οÔÈ· ÂÓÈÛ¯˘ÙÈ΋ ‰ÔÎfi ‹ ‰ÔÎfi
ÛÙ‹ÚÈ͢, ÌfiÏȘ ÙÔ ¿ÎÚÔ Ù˘ ‰ÔÎÔ‡ ‚ÚÂı›
οو ·fi ÙËÓ ·˘Ï¿ÎˆÛË Ù˘ Û˘Û΢‹˜, ı·
·ÂÓÂÚÁÔÔÈËı› Ë Ú¿ÛÈÓË Ï˘¯Ó›· LED,
ηıÒ˜ Î·È Ô ‚ÔÌ‚ËÙ‹˜.
3. °‡Úˆ ·fi ÎÔ˘ÊÒÌ·Ù· ı˘ÚÒÓ Î·È
·Ú·ı‡ÚˆÓ ÂÓ‰¤¯ÂÙ·È Ó· ÂÓÙÔ›ÛÂÙÂ
ÂÓÈÛ¯‡ÛÂȘ ‰ÈÏ¿ÛÈÔ˘ Ï¿ÙÔ˘˜, ÏfiÁˆ Ù˘
¯Ú‹Û˘ ‰ÈÏÒÓ ÔÚıÔÛÙ·ÙÒÓ Î·È
ÂÓÈÛ¯‡ÛÂˆÓ ÛÙ· ÛËÌ›· ·˘Ù¿.
48 Ferm
/