Page is loading ...

Customer Service Hotline 1-877-693-PURE
Page 4
HydroGardener® Reverse Osmosis System Filter Change Instructions
system damage. Water should now be flowing
through the system to the point of use. Allow the
water to run until the stream falls to a thin gentle
flow. Initial discharge may be accompanied by a
harmless discoloration due to loose carbon. Discard
the first few gallons of product water until the water
runs clear and both the TDS and pH stabilize.
For more information please visit
www.ThePerfectWater.com or contact customer service
at 1-877-693-PURE. We will be happy to assist you with
your filter change.
Perfect Water Technologies, Inc.
Copryright © 2010
Customer Service Hotline 1-877-693-PURE
HydroGardener
®
Series
Reverse Osmosis System
Filter Change Instructions
Perfect Water Technologies
Fig. 1

Customer Service Hotline 1-877-693-PURE
Page 2
HydroGardener
®
Reverse Osmosis System Filter Change
HydroGardener® Series Reverse
Osmosis System Filter Change
Instructions
Tools Required
Scissors
Towel
1. Clear away a workspace near the location of the
HydroGardener
®
Reverse Osmosis System.
2. Turn off the water feeding the HydroGardener,
by closing the inline ball valve located on the
feed water line. See Figure 1.
3. Depressurize the system. Locate the 3/8” blue
tubing at the output of the system. Depending
on how you have terminated this line and
connected it to your point of use (float valve,
ball valve, open to reservoir) make sure this is
open and water no longer flows. The system is
now depressurized; continue to leave it in the
open position.
4. Slowly and gently pull the HydroGardener
®
off of
its mounting clips from the bottom up. Lay it on
a towel. Pull off the first filter to be changed.
IMPORTANT: Make note of flow direction arrows
on the filter body and line then up with the
replacement filter which you should position
nearby.
Customer Service Hotline 1-877-693-PURE
Page 3
HydroGardener
®
Reverse Osmosis System Filter Change
a. To determine which replacement filter you
should use, compare the labels on the filters and
make sure the flow direction arrows face the
same direction. Make note of your system
configuration.
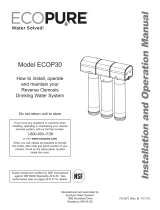
b. To remove the tubing from the filter – push
down the seal ring to the filter body with the
thumb and forefinger while simultaneously
pulling on the tubing as shown in Figure 6.
Some mild resistance to pulling out the tubing
is normal. Removing the tubing will be
impossible without first fully depressurized the
HydroGardener as described in step 4. See
diagram on page 4. Immediately trim off a ¼”
from the end of the tubing with the scissors.
Make sure tubing end is smooth and round
before inserting it into the replacement filter.
NOTE: A rough or oblong tube end will leak.
c. Insert the tube end about a ¼” into the
replacement filter fitting then pull back gently
to ensure a sung fit. Repeat step 4 for the other
end of the filter. Immediately discard used
filter. Repeat step 4 for each of the next
replacement filters.
5. Remount the HydroGardener
®
, and SLOWLY
open the feed water line to the HydroGardener
®
.
Failure to repressurize slowly may result in
/