Page is loading ...


3
boannstyle.com
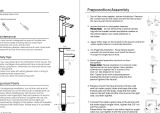
Installation Instructions Prelude
The Boann Reverse Osmosis 5-Stage Water Filtration System has been designed as a Do-It-
Yourself ltration system. However, it is recommended to acquire the services of a licensed
professional to facilitate and expedite the installation process. To ensure a successful
installation, as well a fully-operating ltration system, carefully read this manual and follow all
operational guidelines.
The installation instructions set forth in this manual are very detailed and thorough. Should you
experience a leak during installation or usage, please see the Leak Prevention section on
page 18.
ATTENTION: It is very important to change the lter of your system in order to ensure pure water
is being produced and to avoid any premature system degradation. After installation is complete
and deemed successful, please read the Recommended Filter Replacement Schedule section on
page 19 and keep record on your calender when your system lters require replacement.
PLEASE NOTE: Water contaminants and/or foreign substances mentioned within this manual
are not necessarily present in all water. The Reverse Osmosis 5-Stage Water Filtration System
performs a succession of ltration steps to purify and optimize water for consumption.
Reverse Osmosis 5-Stage Water Filtration System Specications
Dimensions:
R.O. System: 10.13” W x 14.63” H x 8” D
Tank: 11” W x 15” H x 11” D
Unit Weight: 11.5 lbs (R.O. System); 8 lbs (Tank)
Tank: 5 Gallons (Tank Capacity 3.2 Gallons)
Water Source Conditions:
Maximum Total Dissolved Solids (TDS): <2000 ppm
Water Pressure Range: 40-100 psi (2.8 bar)
Minimum Inlet Water Pressure: 40 psi (2.8 bar)
Water Temperature Range: 40 - 85˚F (4.5˚ - 30˚C)
Water pH Range: 4 -11
Pre-Installation Instructions

4
boannstyle.com
Table of Contents
Installation Instructions for Reverse Osmosis 5-Stage Water Filtration System
Pre-Installation Instructions ........................................................................................................ 3
Installation Instructions Prelude ............................................................................................................ 3
Reverse Osmosis 5-Stage Water Filtration System Specications ................................................. 3
Package Contents .......................................................................................................................... 5
Take Everything Outside of the Box ....................................................................................................... 5
Product Overview .......................................................................................................................... 6
Boann Reverse Osmosis 5-Stage Water Filtration System ............................................................... 6
System Operation Filtration Chart ............................................................................................... 7
Tools to Complete Installation ................................................................................................................ 7
Installation Preparation ................................................................................................................ 8
Prepare Space for the Filtration System ............................................................................................... 8
Using the EZ Angle Stop Adapter ........................................................................................................... 9
The Auto Leak Detector Advantage ..........................................................................................11
Re-Activating the Auto Leak Detector ....................................................................................... 11
R.O. Filtration System Installation ..............................................................................................12
Preparing the Discharge Water Drain Clamp ............................................................................ 12
Prepare the R.O. Pressure Storage Water Tank ........................................................................14
Installation of Push-In Standard Faucet ....................................................................................15
Installation of Standard Faucet .................................................................................................16
Initiating the Water Filtration System ........................................................................................17
R.O. Filtration System Evaluation/Leak Prevention .................................................................18
Testing the Water Filtration System ..........................................................................................18
Threaded Fittings ....................................................................................................................... 18
Water Filtration Filter Schedule .................................................................................................19
Recommended Filter Replacement Schedule ...........................................................................19
Filter Replacement Guide ............................................................................................................20
Quick Twist Visual Guide - Filter Replacement .......................................................................... 20
Filter Replacement Instructions .................................................................................................21
Pre-Filters - How to Perform a Filter Replacement....................................................................21
Boann Manufacturer Warranty ..................................................................................................22
Table of Contents

5
boannstyle.com
Take Everything Outside of the Box
Examine the contents inside the box and make sure you have all required parts and accessories
to complete the installation process.
Parts Diagram 1
Parts Diagram 2
Parts Diagram 3
Package Contents
Drain Clamp ACW-2
and Gasket
Water Feed Connector
AB-3-4
Auto Leak
Detector & Screws
5 Gal. Pressure
Storage Water Tank
Faucet Adapter
LS-FA04-716
Needle Valve
NSV-1 (Optional
1.5m PE Tubes
(4 Tubes)
D103 NSF Faucet
& Parts
EZ Angle Stop
Adapter & Gasket
Tank Ball Valve
LS-CV1144
Elbow
Connector - 4 x

6
boannstyle.com
Boann Reverse Osmosis 5-Stage Water Filtration System
FOR VISUAL REFERENCE PURPOSE ONLY: Provided below are images showing the front and
rear of the ltration system, with lters intact. We recommend to thoroughly read the installation
instructions step by step in order to expeditiously and correctly complete the installation process.
System Front View:
System Back View:
Product Overview

7
boannstyle.com
Tools to Complete Installation
System Operation Filtration Chart
Stage 1:
Sediment
Pre-Filter
Particle Filtering:
for sand, silt,
dirt and rust
particles
Water
Source
Purified
Water
How Does RO System work?
Stage 2:
Granulated
Activated
Carbon Pre-Filter
Microfiltration:
Chlorine, Odor,
Organic Chemicals
Stage 3:
Carbon
Pre-Filter
Ultrafiltration:
Chlorine,
Bad taste, Odor
Stage 4:
RO Membrane
Filter
Filters dissolved
minerals, salts
and most harmful
chemicals
Stage 5:
Post Carbon
Filter
Filters Chlorine
and Odors for
water purity
Bacteria
Viruses
Pesticides
Estrogen
Synthetic Dye
Asbestos
Reverse Osmosis Element
0.0001 Micron pore size:
Water
Tank
Industrial-Grade Scissors Plumbing Gloves
Teon Tape Power DrillWrench

8
boannstyle.com
Installation Preparation
Prepare Space for the Filtration System
Before installation is initiated, it is advisable to clean out space underneath the sink in which the
ltration system will be installed. Evaluate the area underneath the sink and determine the proper
location for the unit and tank. Please consider easy accessibility, as it is required to periodically
service the ltration system and its parts.
Tip!
Understanding installation will likely cause water to splash or drip from the ltration
system during installation and/or servicing, it is advisable to stand the unit inside a
drip pan. Disposable aluminum baking sheets sufce for this application.
Picture of completed system assembly

9
boannstyle.com
Using the EZ Angle Stop Adapter
The Boann R.O. 5-Stage Water Filtration System comes with the EZ Angle Stop Adapter (NSF
Certied). The adapter is a convenient and user-friendly part that faciliates installation. PLEASE
NOTE YOU DO NOT NEED TO TURN OFF THE MAIN WATER SUPPLY LINE when using the EZ
Angle Stop Adapter. DO NOT use Teon tape on this product.
1. To start, turn both Hot and Cold water valves clockwise, turning Off water to both water lines.
Turn the sink faucet On to make sure no cold water is owing. Next, use a wrench to unscrew
the cold water hose from the Cold Water Valve.
2. If the white gasket is not attached to the EZ Angle Stop Adapter, place and push the gasket into
the female threads. After, screw the EZ Angle Stop Adapter onto the 3/8” male threads on the
Cold Water Valve. When resistance is felt, tighten the EZ Angle Stop Adapter one full rotation,
securing the adapter.
Installation Preparation
Turn Valve
Clockwise to
Turn Off
Note!
The Mur-lock® Union-Tee Fitting (V0420426) can be purchased and used
as a supplement tting to connect a 1/4” refrigeration water line to the
water ltration system.

10
boannstyle.com
Using the EZ Angle Stop Adapter
3. Using a wrench, thoroughly tighten the cold water hose onto the male threading of the EZ
Angle Stop Adapter. Note: Adapter should always remain upright, withstanding no stress from
the hose. Cut the red PE tubing in half and push one end of the red PE tubing rmly into the
Collet on the EZ Angle Stop Adapter.
4. Attach the other end of the red PE Tubing to the R.O. System Out port on the Auto Leak
Detector. Next, use the other cut red PE tubing and attach it to the Main Line-In port on the
Auto Leak Detector.
Installation Preparation
To R.O.
System - Out
From Main
Line - In
(Feed Water)
Note!
Although the Leak Detector is an invaluable safeguard against leakage, it is
considered an optional part and therefore is not required for full system operation.
Therefore, connecting the red PE tubing from the Manual Shut Off Valve to the Inlet
input port on the system will complete water main line system connection.

11
boannstyle.com
The Auto Leak Detector Advantage
The Boann Reverse Osmosis 5-Stage Water Filtration System comes exclusively with an Auto
Leak Detector module, which is an invaluable part of the system and serves to detect the
presence of water (leakage) around the system. Should the Auto Leak Detector sense the
presence of a leakage, a water-absorbent cell will absorb neighboring water and initiate a
system shut-down, thus stopping excess water from damaging the unit and the
surrounding environment.
Leak Detector Parts:
Re-Activating the Auto Leak Detector
1. Every Auto Leak Detector module comes with 2 internal water-absorbent cells. Should the
system initiate a shut-down due to a leak, the replacement of the used cell will be required.
2. To open the housing module, simply pry the upper - spring trigger with your hand or use a at
screwdriver to detach (pry) the upper from the housing.
3. Next, detach the blue cell holder and discard the used cell. Place a new cell inside the cell
holder and reinsert the upper - spring trigger onto the lower housing, making sure the spring
inserts into the cavity of the cell holder.
4. Apply rm pressure to connect the upper to the lower housing. You will hear a click when the
module is correctly assembled.
5. Reinstall or house the Auto Leak Detector back in its original location.
NOTE: Replacement water-absorbent cells can be purchased separately.
Installation Preparation
Manual Shut Off Valve
Cotton Water-Absorbent Cell
Leak Detector Housing
Used - Cotton
Water-Absorbent Cell
Upper - Spring
Trigger

12
boannstyle.com
Preparing the Discharge Water Drain Clamp
Find the location on the drain pipe under your sink where you wish to secure the Discharge
Water Drain Clamp. CAUTION: Make sure the location chosen is above the Trap, and is at least
3-4” above the return line. (The Trap is the “U” shape part of the drain pipe) You may secure the
saddle clamp on the horizontal pipe, as long as the clamp is above the Trap. It is also advisable to
secure the drain clamp in a location that it is not blocking anything.
1. Drill out the chosen spot with a 1/4” drill bit. The 1/4” hole that is created into the chosen
location on the drain pipe is where the black discharge line will be inserted and secured
into place with the Discharge Water Drain Clamp.
2. If not already attached to the Discharge Water Drain Clamp, take the rubber gasket that’s
provided and remove its paper backing.
R.O. Filtration System Installation
Drain Trap
Tip!
A redesigned Discharge Water Drain Clamp has been added to the RO Water
Filtration System. System assembly of the new drain clamp is the same process, as
noted in this section; however attachment of the PE tubing is facilitated by way of a
quick-connect collet opening on the redesigned drain clamp.
Rubber Gasket

13
boannstyle.com
3. Adhere the gasket to the interior of the Discharge Water Drain Clamp. Now stick the black PE
tubing into the drain clamp, making sure the tubing is protruding through at least 1/2 inch.
4. Now rmly secure the Discharge Water Drain Clamp in its chosen location, making sure the
tubing is inserted into the drain pipe by 1/4 inch (as shown).
5. Assemble the two pieces of the Discharge Water Drain Clamp with use of the two screws and
bolts. Now attach the black PE tubing discharge line into the Drain input port on the rear of the
R.O. ltration system.
Assembled Discharge Drain Clamp Drain Input Port
R.O. Filtration System Installation

14
boannstyle.com
Prepare the R.O. Pressure Storage Water Tank
The R.O. Pressure Storage Water Tank has both an air and water bladder built inside it. The air
bladder comes pre-set from the factory at 7 PSI. NOTE: Changes to the PSI of the air bladder
inside the water tank may cause harmful back pressure which can result in damage to
the R.O. ltration system.
Connecting the R.O. Pressure Storage Water Tank
1. Screw the Tank Ball Valve onto the threads located on top of the water tank. For security, apply
5-8 wraps of Teon tape to the thread of the tank.
2. The yellow PE tubing will now be used to connect the system to the R.O. Pressure Storage
Water Tank. Connect the yellow PE tubing into the Tank Ball Valve atop of the water tank and
connect the other end to the Tank input port on the R.O. Filtration System.
Tank Input Port Ports with Elbow Connectors
R.O. Filtration System Installation
Tank Ball Valve
Tip!
For geographic locations or within homes where inadequate water pressure may
be experienced, we recommend using a Diaphragm Pump (water pressure pump),
which can be added to the Boann RO Water Filtration System. For product use
information, please visit: www.boannstyle.com.

15
boannstyle.com
Installation of Push-In Standard Faucet
At this point the blue PE tubing will be used to connect the R.O. ltration system to the faucet.
The length of tubing used to hook up the kitchen faucet should be long enough to connect to the
Faucet input port. Take a moment to assess and measure the amount of tubing required for the
application. Once an accurate measurement is taken, cut the blue PE tubing with scissors or a
sharp knife. Make certain the cut is straight and not at an angle.
Now insert one end of the customized blue PE tubing into the Faucet input port on the rear of the
ltration system. The other end will connect to the faucet adapter.
Installation Steps
1. Drill a 1/2” hole in the sink or
counter top, or utilize an existing
hole (should it be the
appropriate size).
2. Slide chrome cover plate and
rubber gasket onto stem of
faucet and place the faucet
onto the sink, with the stem
going through the hole.
3. Attach plastic locating washer
(used where a 1/2” hole is
available, reverse when
mounting on stainless steel or
when using a drilled hole.
Attach metal tooth washer.
4. Tighten the faucet nut from
under the counter surface to
lock the faucet into place.
5. Thread the faucet adapter
onto the faucet’s threaded stem.
Do not use Teon tape.
6. Firmly push the blue 1/4” tubing into the faucet adapter.
Check over all of the steps. Make sure all of your tubing is inserted rmly into the
respective inputs!
R.O. Filtration System Installation
Counter Top
Chrome Cover Plate
Rubber Gasket
Locating Washer
Metal Tooth Washer
Faucet Nut
Faucet Adapter 1/4” x 7/16”
Blue 1/4” Tubing

16
boannstyle.com
Installation of Standard Faucet
At this point the blue PE tubing will be used to connect the R.O. System to the faucet. The length
of tubing used to hook up the kitchen faucet should be long enough to connect to the Faucet input
port. Take a moment to assess and measure the amount of tubing required for the application.
Once an accurate measurement is taken, cut the blue PE tubing with scissors or a sharp knife.
Make certain the cut is straight and not at an angle.
Now insert one end of the customized blue PE tubing into the Faucet input port on the rear of the
ltration system. The other end will connect to the faucet assembly.
Installation Steps
1. Drill a 1/2” hole in the sink or
counter top, or utilize an
existing hole (should it be the
appropriate size).
2. Slide chrome cover plate and
rubber gasket onto stem of
faucet and place the faucet
onto the sink, with the stem
going through the hole.
3. Attach plastic locating washer
(used where a 1/2” hole is
available, reverse when
mounting on stainless steel or
when using a drilled hole.
Attach metal tooth washer.
4. Tighten the faucet nut from
under the counter surface to
lock the faucet into place.
5. Slide the compression nut and
ferrule onto the blue tubing.
6. Insert the tube inset into the
opening end of the blue tubing.
7. Thread the compression nut
onto the faucet’s threaded stem, securing the blue tubing.
Check over all of the steps. Make sure all of your tubing is inserted rmly into the
respective inputs!
R.O. Filtration System Installation
Counter Top
Chrome Cover Plate
Rubber Gasket
Locating Washer
Metal Tooth Washer
Faucet Nut
1/4” Compression Nut
Blue 1/4” Tubing
1/4” Tube Inset
1/4” Ferrule

17
boannstyle.com
Initiating the Water Filtration System
Opening All Water & System Valves
At this point, turn On all water and system valves to initiate the water ltration system. Proceed to
turn On the Hot and Cold water valves and the ltration system’s Tank Ball Valve, located atop of
the R.O. Pressure Storage Water Tank.
Flushing the Reverse Osmosis 5-Stage Water Filtration System
PLEASE NOTE: By turning the cold water shut off valve ON, water is effectively owing through
the system, thereby ushing the system of any and all loose particulates and carbon dust.
IMPORTANT: It is advisable to turn on the cold water tap on the kitchen faucet to make sure there
are no leaks anywhere within the plumbing system.
It is important to allow the water to run through the system for one (1) hour to initiate the Reverse
Osmosis process and ensure proper system ushing. In that the R.O. Membrane is lled with food
preservative for quality assurance, it is advisable to ush it out with water, along with the Post
Carbon Filter and the Water Storage Tank’s bladder before water consumption.
R.O. Filtration System Installation
Tank Ball Valve - Open
Hot Water Valve Cold Water Valve
Tank Ball Valve - Close
Turn Water Valve
Counter-Clockwise
to Turn On
Turn Water Valve
Counter-Clockwise
to Turn On

18
boannstyle.com
Testing the Water Filtration System
After letting the system operate for one (1) hour, turn On the ltration system faucet and let water
run from the faucet until the storage water tank is empty. Invariably at rst you will evaluate dark,
murky water coming from the faucet. This is normal and reects loose particulates and carbon
dust being ushed out from the system. Upon conclusion of emptying out the tank, water will
commence to trickle from the faucet, indicating the tank is empty. After this process, turn Off the
faucet and let the system ll with water. The system is now operational and thus will produce
clean, drinkable water.
This concludes the installation process and you may now start drinking puried water from the
Boann Reverse Osmosis 5-Stage Water Filtration System. Enjoy!
If you require further information and/or clarication regarding the installation process, please
feel free to contact Boann at: [email protected].
Threaded Fittings
To prevent a leak on any threaded tting that screws into the
Reverse Osmosis 5-Stage Water Filtration System, please
employ Teon tape by way of wrapping the threads of the
various threaded ttings 5-7 times.
This preventative measure will assist in preventing potential
leaks from the threaded ttings throughout the R.O. ltration
system.
If there are signs of leakage from a 1/4” tube
inserted into a threaded tting, simply push and insert the threaded tting further. To facilitate
this process, use pliers and grab the tubing 1/2” from where the tube inserts into the threaded
tting. This will help avoid damaging the tubing which will be inserted into the threaded tting and
invariably prevent leakage from this location.
R.O. Filtration System Evaluation/Leak Prevention
Tip!
Maintaining the pre-lters of your system is key to ensure the ltration system
sustains integrity in both water quality production and longevity of its parts and
components. The pre-lters are the ltration systems rst line of defense and thus
paramount in promoting the maximum lifespan of the R.O. Membrane.
Note!
Alternatively, the Reverse Osmosis 5-Stage Water Filtration System can be ushed
by simultaneously allowing water to run through the system and letting the faucet
run for 1 hour. Upon conclusion, clean, drinkable water can be enjoyed.

19
boannstyle.com
Recommended Filter Replacement Schedule
Pre and Post Filters: Dened as the lter stages Pre (before the R.O. Membrane) and Post (after
the R.O. Membrane).
Stage 1, 2 & 3 Pre-Filters - When to Conduct a Filter Change.
Stages 1, 2 & 3 are the ltration system’s pre-lters which need to be changed approximately
every 1,000 gallons or every 6-months. On average households consume about 5 gallons of
drinking and cooking water daily and, as such, a lter change is required every 6 months or
sooner. For your convenience, a monthly maintenance schedule checklist is provided on the
label of each lter to keep record of routine lter maintenance. As an added measure, mark your
calender for a routine lter change every 6 months.
WARNING! If the pre-lters are not changed before 1,000 gallons of puried water is produced,
chlorine will bypass the pre-lters, thus entering and damaging the R.O. Membrane, rendering it
useless and in need of premature replacement.
Stage 4 - Reverse Osmosis Membrane Replacement
The R.O. Membrane is the most important component of the Boann Reverse Osmosis 5-Stage
Water Filtration System. The R.O. Membrane is rated for 4,000-5,000 Gallons of puried water
production. A new R.O. Membrane will last approximately 3-4 years. However, it is suggested
replacing the R.O. Membrane every 2 years for system and performance optimization.
• A standard household will consume between 3-5 gallons of puried water each day for
drinking and cooking. A 3-gallon per day consumption rate over a year’s time is equal to
roughly 1095 gallons, which therefore requires the Reverse Osmosis Membrane to be
changed about every 3.5 years.
• A 5-gallons per day consumption rate over a year is equal to approximately 1825
gallons which in turn requires the Reverse Osmosis Membrane to be changed
about every 2-2.8 years.
When in Doubt, Replace the R.O. Membrane
Boann recommends to replace the R.O. Membrane if it has never been replaced and if the
R.O. ltration system is more than 3 years old. If the age of the R.O. Membrane is unknown, it is
recommended to replace the lter as soon as possible.
Stage 5 - Post Carbon Filter Replacement
The Post Carbon Filter is the last ltration stage in the Boann Reverse Osmosis 5-Stage Water
Filtration System. The Post Carbon Filter is rated for 1800-2000 gallons of puried water
production and should be changed once a year or every second time you change the three
pre-lters.
Water Filtration Filter Schedule

20
boannstyle.com
Quick Twist Visual Guide - Filter Replacement
Filter Replacement Guide
Step 1
Lift up lter approximately
30-degrees from
R.O. ltration system.
Step 2
Twist lter counter-clock-
wise and gently remove
the lter from the
lter housing.
Step 3
Twist on replacement lter
and position back
into place.
/