Page is loading ...

Table of Contents
Tools and Materials .................................... 3
Before You Begin ...................................... 3
Roughing-in .......................................... 4
Install the Remote Control Dock ........................... 5
Install the Batteries .................................... 6
Feature Setup ........................................ 7
Language Setup .................................... 8
Syncing the Remote Control with the Toilet ................. 8
Automatic Seat Open and Close Setup .................... 9
Automatic Flush Setup ................................ 9
Heated Feet Setup .................................. 10
Heated Seat Setup .................................. 10
Deodorizer Setup ................................... 10
Bowl Light Setup ................................... 11
Enable or Disable Lights .............................. 11
Ambient Light Setup ................................. 12
Music Source Setup ................................. 13
Radio Station Setup ................................. 13
Key Sounds Setup .................................. 14
Bass, Treble and Balance Adjustment .................... 14
Internal or External Speaker Setup ...................... 15
Time Setup ....................................... 15
Automatic Bidet Wand Cleaning Setup ................... 16
Power Save Setup .................................. 16
Default Start Setup .................................. 17
Reconnecting the Remote Control ...................... 17
Reset Data ....................................... 18
Language Setup - Blind .............................. 18
Secure the Remote Control (Optional) ..................... 19
Check Operation ..................................... 19
Remote Control Troubleshooting .......................... 20
Warranty ........................................... 21
1197250-2-B 2 Kohler Co.

Tools and Materials
Before You Begin
NOTICE: Follow all local plumbing and electrical codes.
NOTE: Install this remote control before installing the toilet.
NOTE: There is a Homeowners Guide for the remote control
available at www.kohler.com.
Carefully inspect the remote control and docking station for
damage.
Kohler Co. 3 1197250-2-B

Roughing-in
NOTICE: The locations for the docking station is a suggested
location. Make sure all installations adhere to applicable codes and
standards.
Docking Station
36" (914 mm)
38" (965 mm) - 66" (1676 mm)
1197250-2-B 4 Kohler Co.

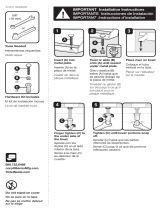
1. Install the Remote Control Dock
IMPORTANT! Carefully set the small screws in the screw pack
aside. They will be used in a later step.
Position the back plate at the installation location, tab on the
upper right corner.
Confirm the back plate is level. Mark the location of the screw
holes on the wall using the mounting plate as a template.
Drill a 3/16″ hole at each mark. Install the provided anchors.
Attach the back plate to the wall with the provided screws.
Position the docking station on the back plate.
Mark the location of the bottom holes.
Remove the docking station and drill a 3/16″ hole at each mark.
Install the provided anchors.
Position the docking station on the back plate.
Secure the docking station with the provided screws.
Attach the adhesive side of the pad to the docking station over
the screws.
Pad
Docking
Station
Back
Plate
Tab
Screw
Kohler Co. 5 1197250-2-B

2. Install the Batteries
Open the back compartment of the remote control by gently
lifting and pulling on the tab.
Install four AA batteries (provided).
Reinstall the cover.
Battery Cover
Tab
Batteries
1197250-2-B 6 Kohler Co.

3. Feature Setup
IMPORTANT! If you cannot understand the language displayed on
the screen, change the language following the instructions in the
Homeowners Guide for the remote control. Call the customer
service number on the back of this document if further assistance is
needed.
NOTE: The back panel features cannot be adjusted without
removing the remote control from the docking station. If the remote
control is secured to the docking station, these features cannot be
changed or adjusted by the user.
Press the menu button to open the menu options.
Press the back button to go to the previous screen.
Press the scroll up button to move up one menu item.
Press the scroll down button to move down one menu item.
Press the [ok] button to select the item highlighted on the menu
screen.
NOTE: To set the features, follow the instructions below.
Scroll Up
Back
Scroll Down
OK
Menu
Cleaning
Settings
Kohler Co. 7 1197250-2-B

Feature Setup (cont.)
Language Setup
IMPORTANT! If you cannot understand the language displayed on
the screen, change the language following the instructions in the
″Language Setup - Blind″ section.
NOTE: The remote control will display English upon arrival.
On the back of the remote control, press the [menu] button.
Scroll down to [Settings].
Press the [ok] button.
Scroll down to [yes].
Press the [ok] button.
Scroll down to [languages].
Press the [ok] button.
Scroll down to your desired language.
Press the [ok] button.
Syncing the Remote Control with the Toilet
On the back of the remote control, press the menu button.
Scroll down to [Settings].
Press the [ok] button.
Scroll down to [Yes].
Press the [ok] button.
Scroll down to [Learn remote].
Press the [ok] button.
Select [Yes].
Press the [ok] button.
Within five seconds, on the toilet, using the manual controls,
press and hold the [Power] and [Flush] buttons until the LED on
the back of the toilet blinks, then press the [Flush] button on the
toilet.
Immediately press the [ok] button after pressing [Flush].
1197250-2-B 8 Kohler Co.

Feature Setup (cont.)
Automatic Seat Open and Close Setup
NOTE: Automatic open and close arrives enabled, set to [Near]
setting. When automatic open and close is enabled, the cover will
open when movement is sensed in front of the toilet. The cover
automatically closes after use.
On the back of the remote control, press the menu button.
Scroll down to [Settings].
Press the [ok] button.
Scroll down to [Yes].
Press the [ok] button.
Scroll down to [Auto Open and Close].
Press the [ok] button.
To enable the auto open and close feature and set it for a small
room, scroll to [Near].
To enable the auto open and close feature and set it for a medium
large room, scroll to [Medium].
To enable the auto open and close feature and set it for a large
room, scroll to [Far].
To turn off the auto open and close feature, scroll to [Off].
Press the [ok] button.
Automatic Flush Setup
NOTE: Automatic flush arrives enabled. When automatic flush is
enabled, the toilet will automatically flush after it is used.
On the back of the remote control, press the menu button.
Scroll down to [Settings].
Press the [ok] button.
Scroll down to [Yes].
Press the [ok] button.
Scroll down to [Auto Flush].
Press the [ok] button.
To turn on the auto flush option, scroll to [enable].
Kohler Co. 9 1197250-2-B

Feature Setup (cont.)
To turn off the auto flush option, scroll to [disable].
Press the [ok] button.
Heated Feet Setup
NOTE: This feature arrives disabled. When enabled, warm air will
blow onto the user’s feet while sitting on the toilet.
On the back of the remote control, press the menu button.
Scroll down to [Heated Feet].
Press the [ok] button.
To turn on the heated feet option, select the desired heated feet
temperature setting, [Feet Temperature 1, 2, 3, 4, or 5].
To turn off the heated feet option, select [Heated Feet Off].
Press the [ok] button.
Heated Seat Setup
NOTE: The Heated Seat feature arrives disabled. When enabled, the
seat will be kept warm.
On the back of the remote control, press the menu button.
Scroll down to [Heated Seat].
Press the [ok] button.
To turn on the heated seat option, select the desired heated seat
temperature setting, [Seat Temperature 1, 2, 3, 4, or 5].
To turn off the heated seat option, select [Heated Seat Off].
Press the [ok] button.
Deodorizer Setup
NOTE: The Deodorizer feature arrives enabled. When this feature is
enabled and a user is seated, a fan pulls air from the bowl area and
pushes it through a deodorizer cartridge and out the back of the
toilet to decrease or eliminate odors.
On the back of the remote control, press the menu button.
Scroll down to [Settings].
1197250-2-B 10 Kohler Co.

Feature Setup (cont.)
Press the [ok] button.
Scroll down to [Yes].
Press the [ok] button.
Scroll down to [Deodorize].
Press the [ok] button.
To turn on the deodorizer option, scroll to [enable].
To turn off the deodorizer option, scroll to [disable].
Press the [ok] button.
Bowl Light Setup
NOTE: The Bowl Light arrives disabled. The bowl light illuminates
the inside of the bowl at night or in low-light conditions. When
enabled, the bowl will automatically turn on in low-light conditions.
The light automatically turns off in normal light conditions.
On the back of the remote control, press the menu button.
Scroll down to [Settings].
Press the [ok] button.
Scroll down to [Yes]
Press the [ok] button.
Scroll down to [Lighting].
Press the [ok] button.
Scroll down to [bowl light].
To enable the bowl light option, scroll to [bowl light].
Press the [ok] button.
Scroll to the desired level, [level 1-9].
To disable the bowl light option, scroll to [light off].
Press the [ok] button.
Enable or Disable Lights
NOTE: The Bowl Light feature arrives disabled. The Night Light
and Welcome Light features arrive enabled.
On the back of the remote control, press the menu button.
Kohler Co. 11 1197250-2-B

Feature Setup (cont.)
Scroll down to [Settings].
Press the [ok] button.
Scroll down to [Yes].
Press the [ok] button.
Scroll down to [Lighting mode].
Press the [ok] button.
Select the desired option, [bowl light], [welcome light], or [night
light] to revert to the mid point settings for each feature after
each use.
NOTE: When this feature is enabled, a check mark will appear to
the right of it. An [X] will appear to the right of the feature if it is
disabled.
Select [enable].
Press the [ok] button.
Ambient Light Setup
NOTE: The Ambient Light feature arrives disabled. When this
feature is enabled, the side panel lights will illuminate in low light
conditions.
On the back of the remote control, press the menu button.
Scroll down to [Settings].
Press the [ok] button.
Scroll down to [Yes].
Press the [ok] button.
Scroll down to [Lighting].
Press the [ok] button.
Scroll down to [ambient light].
Press the [ok] button.
Scroll to the desired level, [level 1-9].
To disable the ambient light option, scroll to [light off].
Press the [ok] button.
1197250-2-B 12 Kohler Co.

Feature Setup (cont.)
Music Source Setup
NOTE: When the remote control is attached to the docking station,
the radio station cannot be changed. If power to the toilet is turned
off, the remote control will revert to its factory setting and will need
to be removed from the wall and reprogrammed.
NOTE: The Music Source feature determines what the music source
will be when the user activates music. It is preset to [numi],
preloaded music. This features arrives with [radio] selected. Options
include [radio], [numi], [SD] card, or [aux].
NOTE: When [numi] is selected, preloaded music plays. When
[aux] is selected, an MP3 player can be connected to the port on the
back of the toilet. When [SD] is selected and an SD card is installed
in the toilet, music will play from the SD card.
On the back of the remote control, press the menu button.
Scroll down to [Settings].
Press the [ok] button.
Scroll down to [Yes].
Press the [ok] button.
Scroll down to [Music Source].
Press the [ok] button.
Select [radio] [numi], [aux] or [SD] as the music source.
Radio Station Setup
NOTE: To listen to a radio station, choose the radio station with the
demographics of the intended users in mind.
On the back of the remote control, press the menu button.
Scroll down to [Radio].
Press the [ok] button.
Scroll up or down to the desired radio station. Each time the
arrow is selected the next radio station with an acceptable signal
will be found.
Press the [ok] button when a desired radio station has been
found.
Kohler Co. 13 1197250-2-B

Feature Setup (cont.)
Key Sounds Setup
NOTE: The Key Sounds feature arrives enabled. When Key Sounds
is enabled, preset sounds will indicate certain functions, such as
auto open, have been activated. This feature arrives enabled.
On the back of the remote control, press the menu button.
Scroll down to [Settings].
Press the [ok] button.
Scroll down to [Yes].
Press the [ok] button.
Scroll down to [key sounds].
Press the [ok] button.
To turn on the key sounds feature, select [enable].
To turn off the key sounds feature, select [disable].
NOTE: A check mark will appear next to [enable] or [disable] to
indicate the status of the feature.
Press the [ok] button.
Bass, Treble and Balance Adjustment
NOTE: These features arrive set at midpoint, level 5.
On the back of the remote control, press the menu button.
Scroll down to [Settings].
Press the [ok] button.
Scroll down to [Yes].
Press the [ok] button.
Scroll down to [Sound attributes].
Press the [ok] button.
Select [bass], [treble] or [balance].
Press the [ok] button.
Select [level 0-10].
Press the [ok] button.
1197250-2-B 14 Kohler Co.

Feature Setup (cont.)
Internal or External Speaker Setup
NOTE: External speakers can be attached to the toilet. The internal
speakers arrive enabled.
On the back of the remote control, press the menu button.
Scroll down to [Settings].
Press the [ok] button.
Scroll down to [Yes].
Press the [ok] button.
Scroll down to [Speaker location].
Press the [ok] button.
Select [toilet] to play music through the speakers included with
the toilet.
Select [external] to play music through other speakers after they
are connected.
Press the [ok] button.
Time Setup
NOTE: The time is not displayed on the remote control. The time
setting is required for automatic cleaning and other features.
On the back of the remote control, press the [menu] button.
Scroll down to [Settings].
Press the [ok] button.
Scroll down to [yes].
Press the [ok] button.
Scroll down to [set time].
Press the [ok] button.
Select [12 hour] or [24 hour].
Press the [ok] button.
Select [AM] or [PM]
Press the [ok] button.
Change the hour using the up and down arrow.
Kohler Co. 15 1197250-2-B

Feature Setup (cont.)
Press the [ok] button.
Change the minutes using the up and down arrow.
Press the [ok] button.
Automatic Bidet Wand Cleaning Setup
NOTE: Automatic Wand Cleaning arrives enabled. When enabled,
the bidet wand will automatically be cleaned at the programmed
time.
On the back of the remote control, press the menu button.
Scroll down to [Cleaning].
Press the [ok] button.
Scroll down to [Yes].
Press the [ok] button.
Scroll down to [UV Wand clean].
Press the [ok] button.
To enable the automatic bidet wand cleaning option, select [Run
at 00:00] to run the cleaning cycle daily at midnight, [Run at
12:00] to run the cleaning cycle at noon.
Power Save Setup
NOTE: The Power Save feature arrives disabled. When enabled the
toilet will enter power save mode after the selected amount of time
has passed. Power save mode deactivates the heated seat and light
options until the toilet is used.
On the back of the remote control, press the menu button.
Scroll down to [Settings].
Press the [ok] button.
Scroll down to [Yes].
Press the [ok] button.
Scroll down to [Power Save].
Press the [ok] button.
To enable the power save option, scroll to [4, 8, 12 hours].
To disable the power save option, scroll to [never].
1197250-2-B 16 Kohler Co.

Feature Setup (cont.)
Press the [ok] button.
Default Start Setup
NOTE: The Default Start feature determines the start point for the
bidet settings at each use. The settings will revert to mid point or
retain the settings of the last user.
NOTE: This feature arrives set to mid point.
On the back of the remote control, press the menu button.
Scroll down to [Settings].
Press the [ok] button.
Scroll down to [Yes].
Press the [ok] button.
Scroll down to [Default Start].
Press the [ok] button.
Select [mid points] to revert to the mid point settings for each
feature after each use.
Select [last user] to restart with the settings of the last user.
Press the [ok] button.
Reconnecting the Remote Control
NOTE: Perform these steps when the remote control and toilet
connection is lost.
On the back of the remote control, press the menu button.
Scroll down to [Settings].
Press the [ok] button.
Scroll down to [Yes].
Press the [ok] button.
Scroll down to [Reconnect].
Press the [ok] button.
Select [Yes].
Press the [ok] button.
Kohler Co. 17 1197250-2-B

Feature Setup (cont.)
Reset Data
NOTE: This feature resets all features to their factory settings.
On the back of the remote control, press the menu button.
Scroll down to [Settings].
Press the [ok] button.
Scroll down to [Yes].
Press the [ok] button.
Scroll down to [Reset Data].
Press the [ok] button.
Scroll down to [Yes].
Press the [ok] button.
Language Setup - Blind
IMPORTANT! If you cannot understand the language displayed on
the screen, change the language following these instructions. Call
the customer service number on the back of this document if further
assistance is needed.
Open the back and remove the batteries. Wait 5 seconds.
Reinstall the batteries and close the cover.
The menu will now appear in English. If you desire a language
other than English and do not understand the words on the
screen, continue with the following steps:
On the back of the remote control, press the [menu] button.
Push the scroll-up button once.
Press the [ok] button.
Push the scroll down button once.
Press the [ok] button.
Push the scroll-up button twice.
Press the [ok] button.
Scroll to your desired language.
Press the [ok] button.
1197250-2-B 18 Kohler Co.

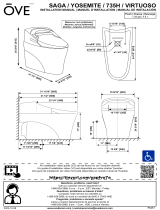
4. Secure the Remote Control (Optional)
Preventing Remote Control Removal
NOTE: When the remote control is secured to the docking station, it
cannot be removed without a screwdriver. This makes the back
menu inaccessible to the user.
Position the remote control on the docking station.
Gently push inward on the remote control and insert one of the
screws into the locking tab.
Partially tighten the screw with a Phillips screwdriver.
Repeat with the second screw.
Fully tighten both screws.
5. Check Operation
If the toilet is not fully installed, complete the toilet installation.
Press the flush button and confirm the toilet flushes.
Phillips Screwdriver
Docking Station
Screw
Locking Tab
Locking
Tab
Kohler Co. 19 1197250-2-B

Remote Control Troubleshooting
Consult the toilet Homeowners Guide, 1212876-5, or go to
www.kohler.com for detailed troubleshooting instructions if the
issues involve more than the remote control.
For service parts information visit www.kohler.com/serviceparts.
Small Children
The auto flush and bidet features require a sensor located under
the seat to be enabled. Small children may not be tall enough
(approximately 48″ (1.2 m)) to activate the sensor. The bidet and
autoflush features will not function correctly when this sensor has
not been activated.
Remote Control Troubleshooting
Symptoms Probable Causes Recommended Action
1. The remote
control does
not have
power. Screen
is black and
does not
respond to
touch.
A. The remote control
batteries are dead.
A. Replace the batteries.
B. Remote control is
not connected to
the toilet.
B. Reconnect the remote
control following the
instructions in this
manual.
C. The remote control
has locked while a
function is in
process.
C1. Remove the batteries
and reinstall them.
C2. Call the Customer
Care Center using
the information
provided on the back
page of this manual.
2. The remote
control is on,
but the toilet
fails to
respond.
A. The remote control
and toilet are not
communicating.
A1. Remote control is out
of range of the toilet.
Move the remote
control closer to the
toilet.
A2. Turn the power to
the toilet off using
the power button on
the back of the toilet,
wait 10 seconds, turn
the power back on.
1197250-2-B 20 Kohler Co.

Remote Control Troubleshooting (cont.)
Symptoms Probable Causes Recommended Action
A3. Reconnect the remote
control. On the toilet
press and hold the
″Power″ and ″Flush″
buttons until the
LED blinks. Then
select flush on the
remote control.
A4. Call the Customer
Care Center using
the information
provided on the back
page of this manual.
3. The remote
control is
locked and will
not work.
A. Power surge from
batteries.
A1. Remove and reinstall
the batteries.
A2. Call the Customer
Care Center using
the information
provided on the back
page of this manual.
Warranty
THREE YEAR LIMITED WARRANTY FOR VITREOUS CHINA
COMPONENT
THREE YEAR LIMITED WARRANTY FOR MECHANICAL PARTS
Kohler Co. warrants the vitreous china component on the KOHLER
Numi toilet to be free of defects in material and workmanship during
normal residential use for three (3) years from the date of installation.
Kohler Co. will further warrant all mechanical parts in the KOHLER
Numi toilet to be free of defects in material and workmanship during
normal residential use for three (3) years from the date of installation.
This warranty only applies to the KOHLER Numi toilet when installed
in the United States of America and Canada.
If a defect is found in normal use, Kohler Co. will, at its election,
repair, replace or make appropriate adjustment where Kohler Co.
inspection discloses any such defects. Damage caused by accident,
misuse or abuse is not covered by this warranty. This warranty
expressly excludes labor charges, removal charges, installation, or other
Kohler Co. 21 1197250-2-B
/