Page is loading ...

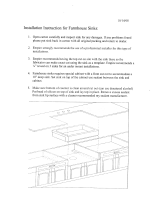
1Stainless Steel Farmhouse Sink Installation Instructions
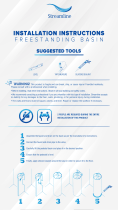
INSTRUCTIONS
Unpack and inspect the sink for any shipping
damages and ensure that none of the
required pieces are missing. If you find any
damages, do not install. Contact Customer
Service at 1-866-855-2284. If you need
assistance while installing your new farm-
house sink, call our Customer Service
number.
Due to the manufacturing process, each sink
will vary slightly dimensionally. Farmhouse
sinks may require custom cabinetry. We
recommend consulting an experienced
cabinet maker for assistance. Providing the
cabinet maker with the actual sink to be
installed will ensure a custom fit.
Please use assistance when lifting the sink in
order to avoid personal injury.
We recommend consulting a professional if
you are unfamiliar with installing kitchen
fixtures and plumbing. Signature Hardware
accepts no liability for any damages to the
floor, walls, plumbing or personal injury
during installation.
TOOLS AND MATERIALS:
Pencil
Read the following installation below. Observe
all local plumbing and building codes.
BEFORE INSTALLING
MATERIAL DESCRIPTION AND CARE
Thread Sealant
Tape Measure
STAINLESS STEEL FARMHOUSE SINK
Safety Glasses
Framing Square
Level
Hacksaw
Wood Shims
Drill
Basin Wrench
**Sealant - We recommend the use of
neutral cure silicone caulk or a general
purpose silicone sealant.
Stainless steel sinks are handcrafted from heavy gauge
stainless steel, which is extremely durable, but can be
scratched or scuffed when not cared for properly.
To maintain the condition of your stainless steel sink, simply
clean daily with mild soap and warm water and wipe the entire
surface dry with a dry, clean, soft cloth after each use. Keep
sink free of any standing water to prevent the buildup of
mineral deposits that can affect the appearance of your sink.
Because iron particles often develop rust spots in stainles
steel surfaces, do not leave steel cookware or utensils on the
surface of the sink for long periods of time.
Do not use cleaners containing acids, harsh chemicals, or
abrasives. Use the Stainless Steel Scratch-B-Gone Kit to
remove minor scratches and maintain the beauty of your
stainless steel fixture.

2Stainless Steel Farmhouse Sink Installation Instructions
We recommend undermount sink installation. Flush-mount
and built-up installation are not recommended.
Ensure there is adequate room for the faucet and
backsplash installations.
INSTALLATION OPTIONS
Apply a bead of silicone sealant to the base of the
strainer flange and place the flange in the drain
opening in the sink.
If your drain has a disposer flange, use the
directions supplied with the garbage disposer to
attach the disposer and complete your installation.
For drains with strainer baskets, slide the rubber
gasket and friction washer up the strainer flange to
the bottom of the sink.
Thread the lock nut onto the drain assembly.
Hand-tighten and make sure that the drain is
properly aligned. When ready, finish tightening with
a basin wrench to secure the drain. Secure the
P-trap to the strainer flange with the provided
compression nut and ferrule.
DRAIN INSTALLATION

3Stainless Steel Farmhouse Sink Installation Instructions
TEMPLATE AND CUTOUT
Farmhouse sinks may require custom cabinetry.
We recommend consulting an experienced
cabinet maker for assistance. Providing the cabinet
maker with the actual sink that is to be installed will
ensure a custom fit.
Allow clearance for the water supply lines, drains
and a garbage disposal, if applicable. Build a
support frame or install support bars from front
to back along the inner sides of the cabinet. The
frame must support the weight of the sink and
all attachments.
The support frame should be positioned so that
when installed, the sink is in line and level with the
top of the cabinet.
No template is provided since each sink will vary
dimensionally. After centering the sink, trace the
outline of the sink on the counter-top with a pencil to
use as a guide for the cutout. Remember to allow
clearance for any faucets and/or backsplashes. Cut
the counter-top accordingly.
FINAL PLACEMENT
Test fit the sink in the opening that was created in the
previous steps. The entire weight of the sink should
be supported by the support frame. Verify that the
sink is in line and level with the top of the cabinet. Use
shims, if needed, to level the sink.
Set the sink and apply your sealant to fill in any gaps
below the sink front, and between the sink and
counter-top. Hold the sink in place to secure. Place
the counter-top onto the sink and remove any excess
sealant from all surfaces.
PREPARE THE CABINET
/